1、概述
Guacamole大致流程如下图所示,本文目的是快速完成安装部署,如需深入了解参阅官方文档或其他博客。
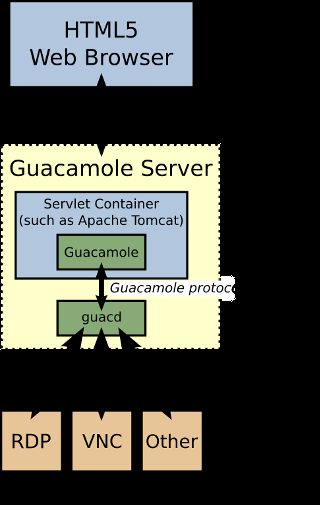
准备两台机器,一个是代理机一个是目标机器。
2、安装依赖
基础依赖:
- jdk1.8+
- tomcat8+
系统依赖:
yum install -y cairo-devel libjpeg-turbo-devel libpng-devel uuid-devel
yum install -y freerdp-devel pango-devel libssh2-devel libvncserver-devel pulseaudio-libs-devel openssl-devel libvorbis-devel libwebp-devel
3、部署
3.1、guacamole
访问http://guacamole.apache.org/releases/1.0.0/下载server包,然后上传到代理机目录下,如/opt/guacamole。接着解压,cd到目录执行
./configure --with-init-dir=/etc/init.d
make && make install
ldconfig
执行完成后,编译或下载war包,这里是war包下载地址http://mirror.bit.edu.cn/apache/guacamole/1.0.0/binary/,放入到tomcat的webapp下,然后在/opt/guacamole目录下创建三个文件:
guacamole.properties
guacd-hostname: 192.168.1.96
guacd-port:     4822
user-mapping.xml
            rdp
            192.168.4.181
            3389

            shy
            1

            display-update

            100


            ssh
            192.168.4.181
            22

            shy
            cmgplex!@#


            rdp
            192.168.4.181
            1

            shy
            1
logback.xml
  /opt/guacamole/guacamole.log

     %msg%n
需要注意的是,如果guacamole.properties配置不起作用,代理会始终绑定在127.0.0.1上,导致其他服务器无法连接,这时可以手动启动加参数绑定IP即可
guacd -l 192.168.43.1准备完成后配置环境变量
export CATALINA_HOME=/opt/guacamole/apache-tomcat-8.5.43
export CATALINA_BASE=/opt/guacamole/apache-tomcat-8.5.43
export GUACAMOLE_HOME=/opt/guacamole
最后启动服务
service guacd start  #启动guacamole
./startup.sh  #启动tomcat
3.2目标机器
如果目标是windows,或者命令行linux直接配置用户名密码等即可,如果目标是linux桌面,那么需要在目标机器上安装vnc或者rdp服务,以rdp为例,部署过程如下:
vi /etc/yum.repos.d/xrdp.repo

[xrdp]
name=xrdp
baseurl=http://li.nux.ro/download/nux/dextop/el7/x86_64/
enabled=1
gpgcheck=0

yum -y install xrdp tigervnc-server

#启动服务:
systemctl start xrdp.service
systemctl enable xrdp.service
最后打开http://localhost:8080/guacamole,即可看到页面
三、自定义客户端
有时候需要集成到自己的系统,而不是使用自带的client,Guacamole支持多种客户端API,以java为例,基于springboot流程如下:
添加依赖
			org.apache.guacamole
			guacamole-common
			1.0.0
Application增加注解@ServletComponentScan,复制官方demo的servlet并稍作修改如下:
DummyGuacamoleTunnelServlet.java
/*
 * Licensed to the Apache Software Foundation (ASF) under one
 * or more contributor license agreements.  See the NOTICE file
 * distributed with this work for additional information
 * regarding copyright ownership.  The ASF licenses this file
 * to you under the Apache License, Version 2.0 (the
 * "License"); you may not use this file except in compliance
 * with the License.  You may obtain a copy of the License at
 *
 *   http://www.apache.org/licenses/LICENSE-2.0
 *
 * Unless required by applicable law or agreed to in writing,
 * software distributed under the License is distributed on an
 * "AS IS" BASIS, WITHOUT WARRANTIES OR CONDITIONS OF ANY
 * KIND, either express or implied.  See the License for the
 * specific language governing permissions and limitations
 * under the License.
 */

import javax.servlet.annotation.WebServlet;
import javax.servlet.http.HttpServletRequest;

import org.apache.guacamole.GuacamoleException;
import org.apache.guacamole.net.GuacamoleTunnel;
import org.apache.guacamole.net.InetGuacamoleSocket;
import org.apache.guacamole.net.SimpleGuacamoleTunnel;
import org.apache.guacamole.protocol.ConfiguredGuacamoleSocket;
import org.apache.guacamole.protocol.GuacamoleConfiguration;
import org.apache.guacamole.servlet.GuacamoleHTTPTunnelServlet;
import org.springframework.beans.factory.annotation.Value;

/**
 * Simple tunnel example with hard-coded configuration parameters.
 */
@WebServlet(urlPatterns = "/tunnel")
public class DummyGuacamoleTunnelServlet extends GuacamoleHTTPTunnelServlet {
	@Value("${guacamole.guacd.host}")
	private String guacdHost;
	@Value("${guacamole.guacd.port}")
	private Integer guacdPort;
	@Value("${guacamole.target.protocol}")
	private String targetProtocol;
	@Value("${guacamole.target.host}")
	private String targetHost;
	@Value("${guacamole.target.port}")
	private String targetPort;
	@Value("${guacamole.target.username}")
	private String targetUsername;
	@Value("${guacamole.target.password}")
	private String targetPassword;

	private static final long serialVersionUID = 1126569778799758654L;

	@Override
	protected GuacamoleTunnel doConnect(HttpServletRequest request) throws GuacamoleException {
		GuacamoleConfiguration config = new GuacamoleConfiguration();
		config.setProtocol(this.targetProtocol);
		config.setParameter("hostname", this.targetHost);
		config.setParameter("port", this.targetPort);
		config.setParameter("username", this.targetUsername);
		config.setParameter("password", this.targetPassword);
		return new SimpleGuacamoleTunnel(
				new ConfiguredGuacamoleSocket(new InetGuacamoleSocket(this.guacdHost, this.guacdPort), config));

	}

}
application.properties增加如下配置
guacamole.guacd.host=xxxx
guacamole.guacd.port=4822
guacamole.target.protocol=rdp
guacamole.target.host=192.168.1.1
guacamole.target.port=3389
guacamole.target.username=ad
guacamole.target.password=1
最后增加页面,页面很简单注意引用js即可
<%@ page language="java" contentType="text/html; charset=UTF-8" pageEncoding="UTF-8"%>
js可以在官方demo里找到。
这里展示的是比较简单的自定义客户端,根据自身业务可以做到更强大的功能。