主要是为了进一步熟悉ugui,结合lua和C#做一些ugui的实践案例。(个人学习总结)
ugui基础案例工程为UGUIBasic文件夹
案例1、点击游戏物体改变一次颜色,被UI遮挡的情况下点击无效
案例2、圆形图片的制作
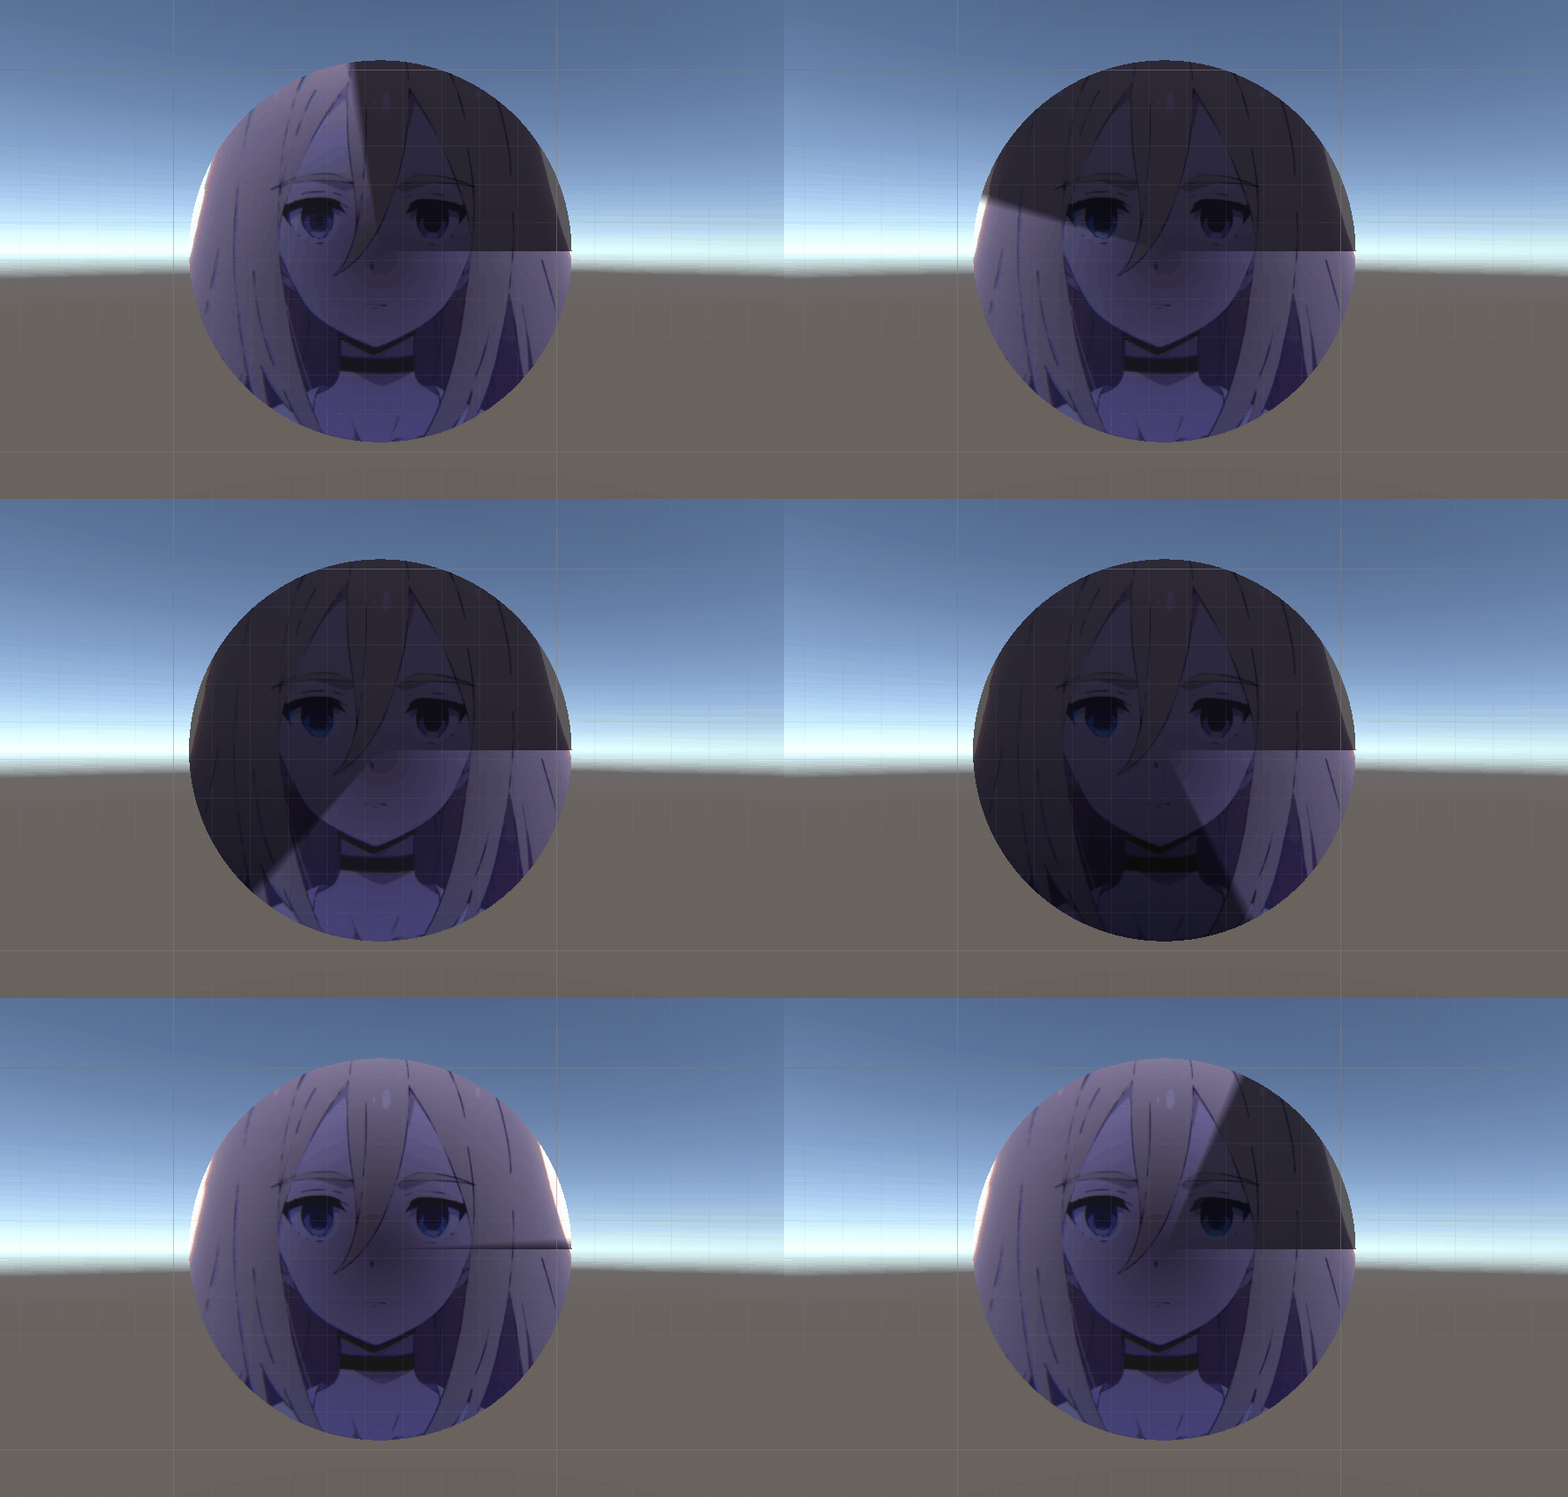
案例3、基于圆形图片制作的类似技能CD的UI效果
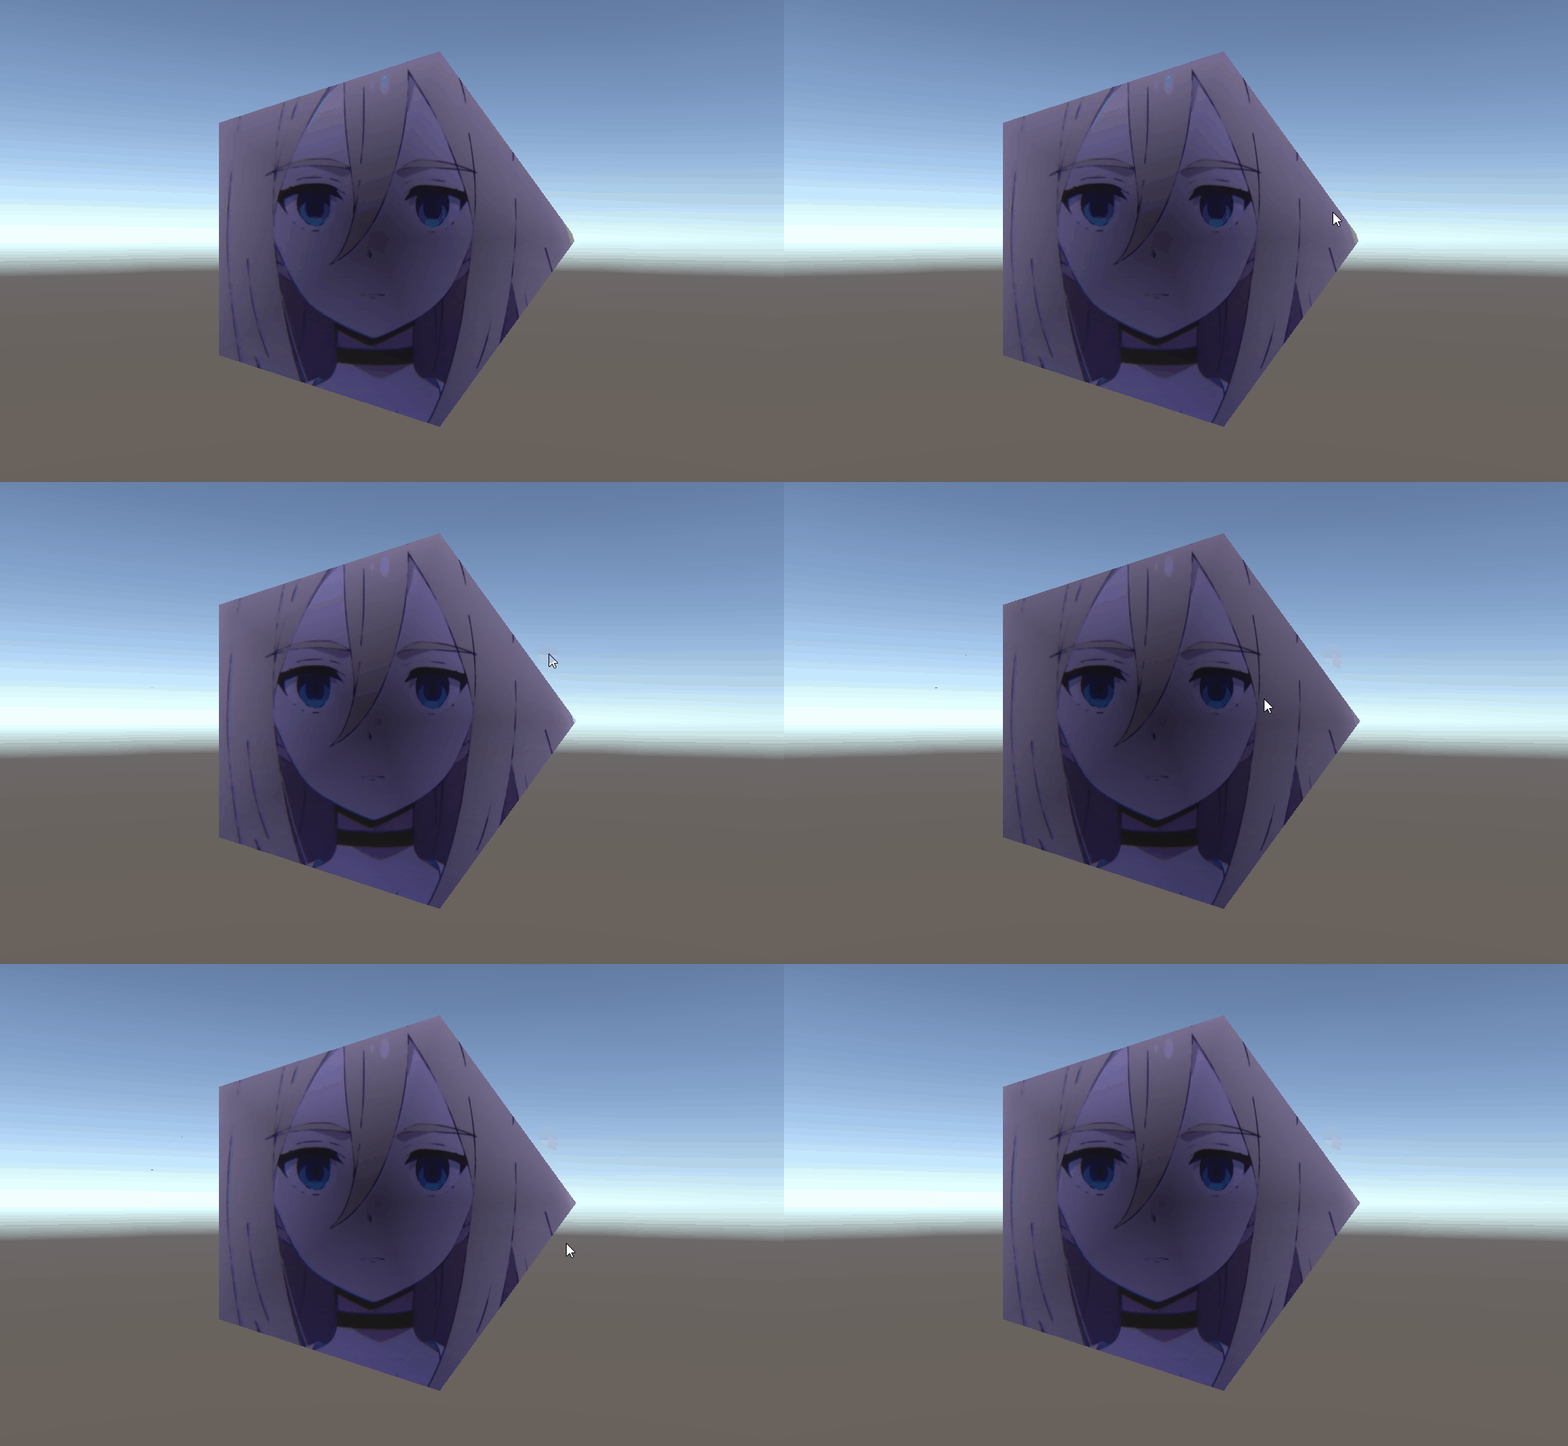
案例4、点击多边形UI时,判断点击的区域是否有效
案例5、实现3D图片循环滚动效果UI.
案例6、实现自定义多边形可拖拽实时修改形状的UI组件(可以实现属性面板之类的功能)
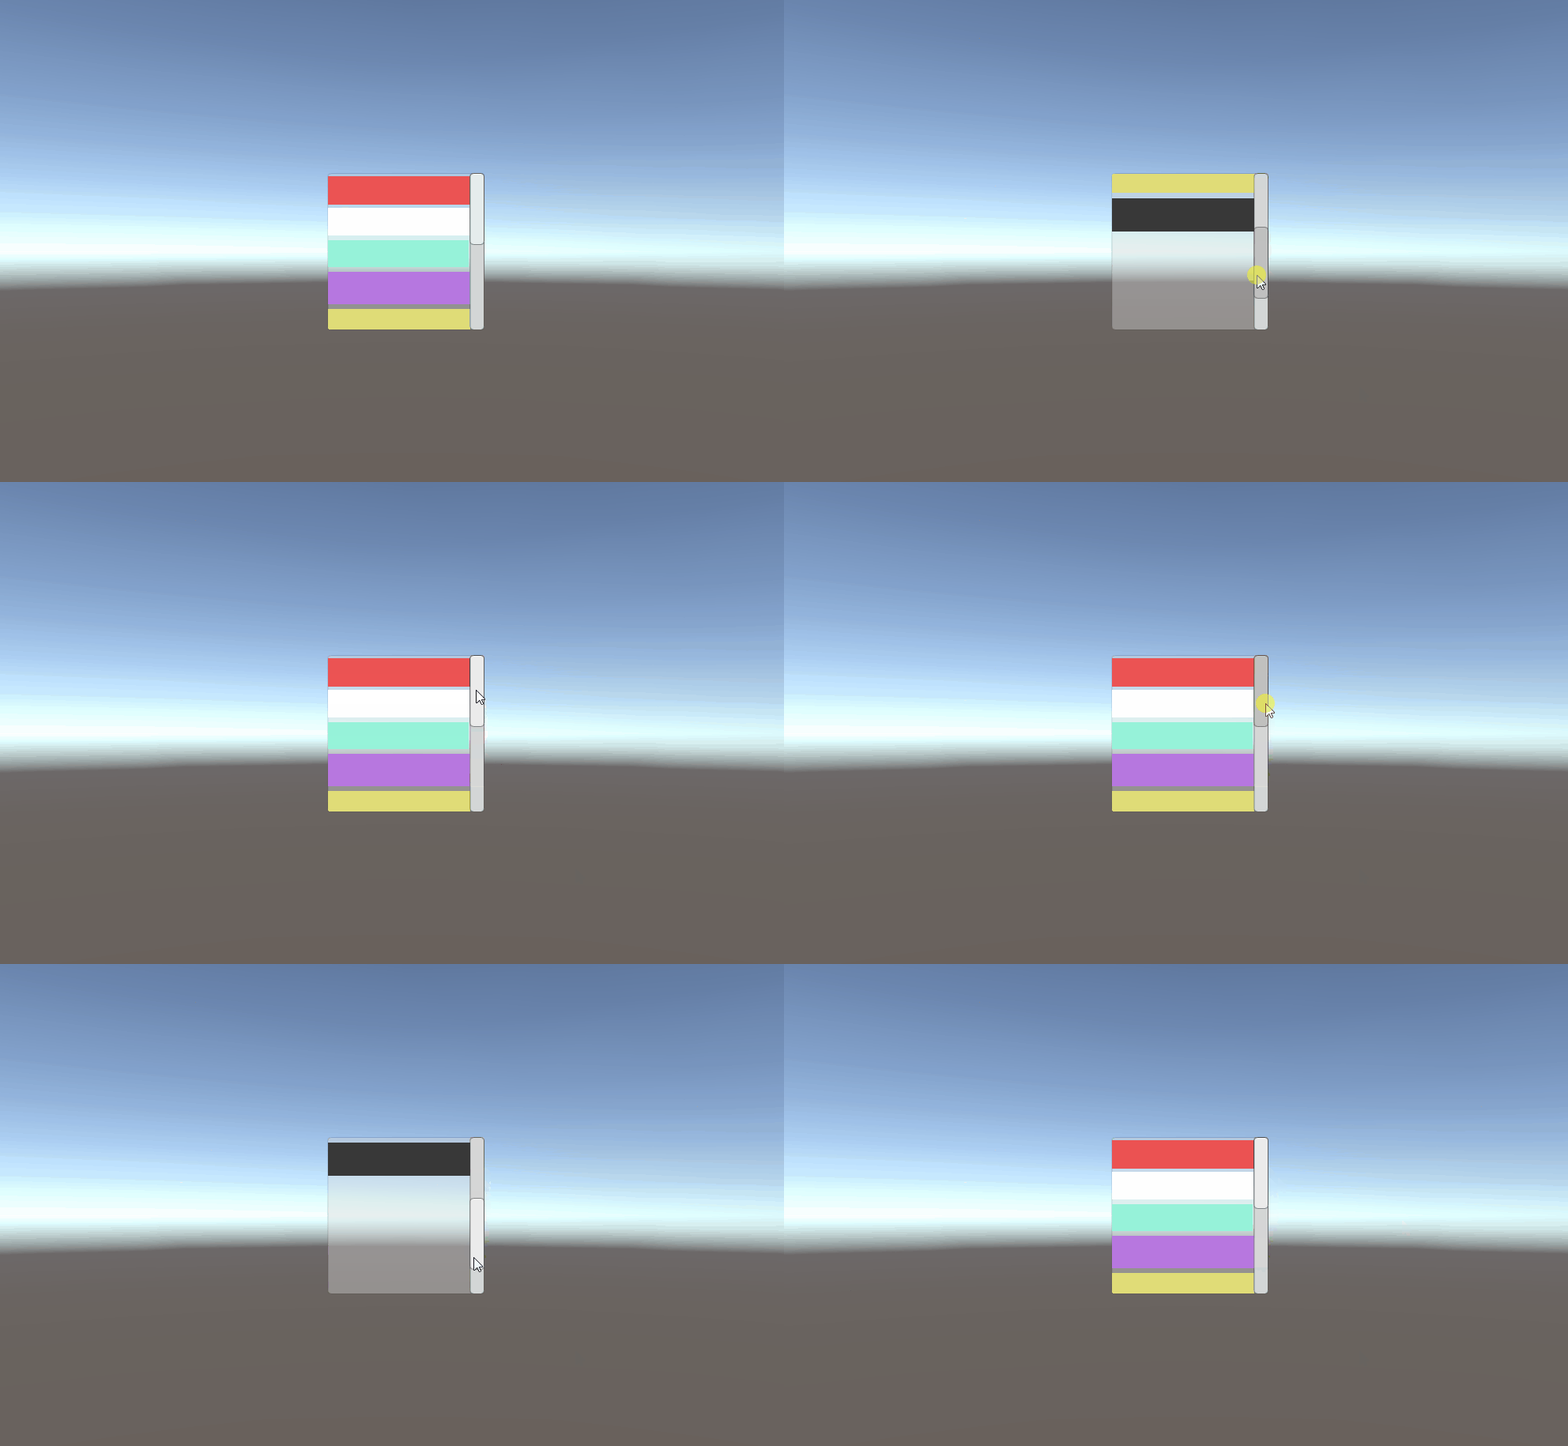
案例7、滚动视图的制作(案例无需代码)
案例8、简单血条制作
进行两边检查。
检查一,点击鼠标的时候,通过GraphicRaycaster发射射线,检查是否击中UI层,如果有直接结束。
检查二,点击鼠标的时候,通过摄像机的PhysicsCaster发射射线,检查是否击中物体,通过击中修改颜色。
--案例1、点击游戏物体改变一次颜色,被UI遮挡的情况下点击无效
local case1 = {}
--相当于引用命名空间
local UnityEngine = CS.UnityEngine
local Vector3 = CS.UnityEngine.Vector3;
local PrimitiveType = CS.UnityEngine.PrimitiveType;
local UI = CS.UnityEngine.UI;
local Color = CS.UnityEngine.Color;
local Input = CS.UnityEngine.Input;
local EventSystems = CS.UnityEngine.EventSystems;
-- 被脚本的全局变量
local cubeObject = nil; --成本创建的盒子物体
local clickNum = 0; --鼠标点击次数
case1.init = function ()
-- 创建一个盒子 并且初始化角度
cubeObject = UnityEngine.GameObject.CreatePrimitive(PrimitiveType.Cube);
local initPosOffset = Vector3(0,0,10);
cubeObject.transform.position = Vector3.zero + initPosOffset;
cubeObject.transform.localScale = Vector3(2,2,2);
cubeObject.transform.eulerAngles = Vector3(16,21,0);
-- 创建UI 一个image
local imageObject = UnityEngine.GameObject("Image");
local rectTransform = imageObject:AddComponent(typeof(UnityEngine.RectTransform));
local canvas = UnityEngine.GameObject.Find("Canvas");
local canvasRectTransform = canvas:GetComponent(typeof(UnityEngine.RectTransform));
imageObject.transform:SetParent(canvasRectTransform);
rectTransform.anchoredPosition = Vector3(0,0,0);
imageObject:AddComponent(typeof(UnityEngine.CanvasRenderer));
local image = imageObject:AddComponent(typeof(UnityEngine.UI.Image));
image.color = Color.red;
end
-- 检查有没有点击到UI
local function checkClickUI()
checkUtil = CS.CheckIsClickUI.Instance;
res = checkUtil:isClickUI();
return res;
end
--检查是否点击到物体
local function checkClickObject()
checkUtil = CS.CheckIsClickUI.Instance;
res = checkUtil:isClickObject();
return res;
end
-- update生命周期
case1.update = function()
if Input:GetMouseButtonDown(0) and cubeObject then
if checkClickUI() then
return;
end
if checkClickObject()==false then
return;
end
material = cubeObject:GetComponent(typeof(UnityEngine.MeshRenderer)).material;
if clickNum % 2 == 0 then
material:SetColor("_Color",UnityEngine.Color.blue);
else
material:SetColor("_Color",UnityEngine.Color.green);
end
clickNum = clickNum + 1;
end
end
return case1;
public class CheckIsClickUI : UnitySingleton<CheckIsClickUI> {
///
/// 判断是否点击到UI
///
public bool isClickUI() {
GraphicRaycaster graphicRaycaster = FindObjectOfType<GraphicRaycaster>();
PointerEventData eventData = new PointerEventData(EventSystem.current);
eventData.pressPosition = Input.mousePosition;
eventData.position = Input.mousePosition;
List<RaycastResult> results = new List<RaycastResult>();
graphicRaycaster.Raycast(eventData, results);
return results.Count > 0;
}
///
/// 判断是否点击到物品
///
public bool isClickObject()
{
PhysicsRaycaster physicsRaycaster = FindObjectOfType<PhysicsRaycaster>();
PointerEventData eventData = new PointerEventData(EventSystem.current);
eventData.pressPosition = Input.mousePosition;
eventData.position = Input.mousePosition;
List<RaycastResult> results = new List<RaycastResult>();
physicsRaycaster.Raycast(eventData, results);
return results.Count > 0;
}
}
其实可以直接使用Unity自带的Mask组件来实现,创建两个Image,然后再把一个Image变成另外一个Image的子物体,在父物体的Source texture上挂上带有alpha通道的png图片,alpha为0的地方对其进行遮罩就可以实现效果了,如下截图所示
虽然方案1可以实现,并且方案简单,但是性能上会很差,所有推荐使用方案2。
解读1:其实实现方式很简单,我们知道UI中的Image也是通过顶点数据显示出来的。
解读2:顶点是通过VertexHepler然后被CanvasRenderer渲染出来的。由因为所有可视化组件都会继承MaskabeGraphic类,而这个类右继承Graphic类,这个类会在自己的OnPopulateMesh()方法里面对VertexHepler进行顶点数据填充,
解读3:那么我们只需要自定义生成圆形Image的顶点数据。首先重新继承Image类,然后重写OnPopulateMesh()方法,修改里面的VertexHepler字段的数据就可以实现了。
-- 案例2 圆形图片的制作
local case2 = {}
--命名控件
local UnityEngine = CS.UnityEngine;
local Vector3 = CS.UnityEngine.Vector3;
local Color = CS.UnityEngine.Color
case2.init = function ()
-- 创建UI 一个image
local imageObject = UnityEngine.GameObject("Image");
local rectTransform = imageObject:AddComponent(typeof(UnityEngine.RectTransform));
local canvas = UnityEngine.GameObject.Find("Canvas");
local canvasRectTransform = canvas:GetComponent(typeof(UnityEngine.RectTransform));
imageObject.transform:SetParent(canvasRectTransform);
rectTransform.anchoredPosition = Vector3(0,0,0);
imageObject:AddComponent(typeof(UnityEngine.CanvasRenderer));
local image = imageObject:AddComponent(typeof(CS.CircleImage));
image.color = Color.white;
end
return case2;
using System.Collections;
using System.Collections.Generic;
using UnityEngine;
using UnityEngine.UI;
using UnityEngine.Sprites;
///
/// 实现圆形头像,基于Image所以直接继承Image类
///
public class CircleImage : Image
{
///
/// 创建使用,先对顶点加工运行
///
///
protected override void OnPopulateMesh(VertexHelper toFill)
{
//清掉原来的顶点数据
toFill.Clear();
//获取UV数据。xy分量为min坐标,zw为max坐标
Vector4 uv = Vector4.zero;
if (overrideSprite != null) {
uv = DataUtility.GetOuterUV(overrideSprite);
}
//获得uv的长度和宽度
float uvWid = uv.z - uv.x;
float uvHei = uv.w - uv.y;
//获取当前UI的长度和宽度
float wid = rectTransform.rect.width;
float hei = rectTransform.rect.height;
//转换向量比例计算
Vector2 convertVect = new Vector2(uvWid/wid, uvHei/hei);
//uv的中心点,必须要从uv的min坐标开始算
Vector2 uvCenter = new Vector2((uvWid + uv.x) / 2, (uvHei + uv.y) /2);
//圆心
UIVertex cirleCenter = new UIVertex();
cirleCenter.color = color;
cirleCenter.position = Vector3.zero; //顶点坐标。因为是一模型坐标来生成的顶点信息,所以直接认为中心点为0
cirleCenter.uv0 = new Vector2(cirleCenter.position.x * convertVect.x + uvCenter.x
, cirleCenter.position.y * convertVect.y + uvCenter.y);
toFill.AddVert(cirleCenter);
//把圆分成的份数
int bran = 50;
float radian = (2 * Mathf.PI) / bran;//弧度
float radius = wid / 2; //半径
float curRadian = 0;
//填充顶点
for (int i = 0;i<bran + 1;i++) {
float x = Mathf.Cos(curRadian) * radius;
float y = Mathf.Sin(curRadian) * radius;
curRadian += radian;
UIVertex vertex = new UIVertex();
vertex.position = new Vector2(x, y);
vertex.color = color;
//因为顶点带有负数,所以要变成正数
vertex.uv0 = new Vector2(x * convertVect.x, y * convertVect.y) + uvCenter;
toFill.AddVert(vertex);
}
//输入顶点顺序
int index = 1;
for (int i = 0;i < bran;i++) {
toFill.AddTriangle(index, 0, index + 1);
index++;
}
}
}
其实就是在案例2的基础上添加一个百分比字段,这个字段为浮点类型,取值从0到1,把这个百分比乘上形成这个圆的三角形个数就可以得到一部分的扇形,把这部分扇形的颜色加深且在时间的推移下修改这个字段的值即可实现。
-- 案例3 技能CD
local case2 = {}
--命名控件
local UnityEngine = CS.UnityEngine;
local Vector3 = CS.UnityEngine.Vector3;
local Color = CS.UnityEngine.Color;
local Time = CS.UnityEngine.Time;
local UI = CS.UnityEngine.UI;
--引用的变量
local image;
local updateNum = 0;
case2.init = function ()
-- 创建UI 一个image
local imageObject = UnityEngine.GameObject("Image");
local rectTransform = imageObject:AddComponent(typeof(UnityEngine.RectTransform));
local canvas = UnityEngine.GameObject.Find("Canvas");
local canvasRectTransform = canvas:GetComponent(typeof(UnityEngine.RectTransform));
imageObject.transform:SetParent(canvasRectTransform);
rectTransform.anchoredPosition = Vector3(0,0,0);
imageObject:AddComponent(typeof(UnityEngine.CanvasRenderer));
image = imageObject:AddComponent(typeof(CS.CircleImage));
image.color = Color.white;
image.sprite=CS.TexManger.Instance:getSpriteByAssetName("minmap");
end
--声明update函数
case2.update = function()
if image.percent >=1 then
image.percent = 0;
end
image.percent = image.percent + Time.deltaTime / 5;
--修改渲染相关,需要调用ICavasElement的ReBuild()方法才会重新生效
--需要让其重新刷新以下顶点数据
image:SetVerticesDirty();
end
return case2;
using UnityEditor;
using UnityEngine;
using UnityEngine.Sprites;
using UnityEngine.UI;
///
/// 实现圆形头像,基于Image所以直接继承Image类
///
public class CircleImage : Image
{
///
/// 百分比
///
[SerializeField]
public float percent = 1;
///
/// 创建使用,先对顶点加工运行
///
///
protected override void OnPopulateMesh(VertexHelper toFill){
//清掉原来的顶点数据
toFill.Clear();
//uv的中心点,必须要从uv的min坐标开始算
Vector2 uvCenter = getUvCenter();
//转换向量比例计算
Vector2 convertVect = getConvertVect();
//计算并且添加顶点
addVertex(toFill, uvCenter,convertVect);
}
private void addVertex(VertexHelper toFill,Vector2 uvCenter,Vector2 convertVect) {
//圆心
UIVertex cirleCenter = new UIVertex();
cirleCenter.color = color;
if (percent < 1)
{
cirleCenter.color = new Color(90 / 255f, 90 / 255f, 90 / 255f);
}
//顶点坐标。因为是一模型坐标来生成的顶点信息,所以直接认为中心点为0
cirleCenter.position = new Vector2(0.5f, 0.5f) - rectTransform.pivot;
cirleCenter.uv0 = uvCenter;
toFill.AddVert(cirleCenter);
rectTransform.localScale = new Vector3(1, 1, 1);
//把圆分成的份数
int bran = 100;
int inParceBran = (int)(bran * Mathf.Min(percent, 1));
float radian = (2 * Mathf.PI) / bran;//弧度
float radius = rectTransform.rect.width / 2; //半径
float curRadian = 0;
//填充顶点
for (int i = 0; i < bran + 1; i++)
{
float x = Mathf.Cos(curRadian) * radius;
float realX = x + cirleCenter.position.x;
float y = Mathf.Sin(curRadian) * radius + cirleCenter.position.y;
float realY = y + cirleCenter.position.y;
Vector2 readPos = new Vector2(realX + cirleCenter.position.x, realY + cirleCenter.position.y);
curRadian += radian;
UIVertex vertex = new UIVertex();
vertex.position = new Vector2(realX, realY);
if (i >= inParceBran)
{
vertex.color = color;
}
else
{
//不在访问的都设定为灰色
vertex.color = new Color(90 / 255f, 90 / 255f, 90 / 255f);
}
//因为顶点带有负数,所以要变成正数
vertex.uv0 = new Vector2(x, y) * convertVect + uvCenter;
toFill.AddVert(vertex);
}
//输入顶点顺序
int index = 1;
for (int i = 0; i < bran; i++)
{
toFill.AddTriangle(index, 0, index + 1);
index++;
}
}
///
/// 获取Uv的宽度和高度
///
///
private Vector2 getUvWidAndHei() {
//获取UV数据。xy分量为min坐标,zw为max坐标
Vector4 uv = Vector4.zero;
if (overrideSprite != null)
{
uv = DataUtility.GetOuterUV(overrideSprite);
}
//获得uv的长度和宽度
float uvWid = uv.z - uv.x;
float uvHei = uv.w - uv.y;
return new Vector2 (uvWid, uvHei);
}
///
/// 得到UV坐标中心
///
///
private Vector2 getUvCenter(){
Vector2 uvWH = getUvWidAndHei();
//获取当前UI的长度和宽度
float wid = rectTransform.rect.width;
float hei = rectTransform.rect.height;
return new Vector2(uvWH.x / 2, uvWH.y / 2);
}
///
/// 获取转换用的坐标向量
///
///
private Vector2 getConvertVect() {
Vector2 uvWH = getUvWidAndHei();
//获取当前UI的长度和宽度
float wid = rectTransform.rect.width;
float hei = rectTransform.rect.height;
return new Vector2(uvWH.x / wid, uvWH.y / hei);
}
}
修改前,点击UI空白部分仍然会判断为有效区域。
修改后,点击UI空白部分判断为无效区域。
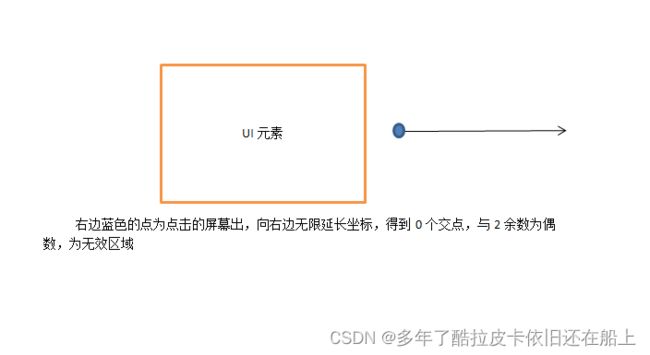
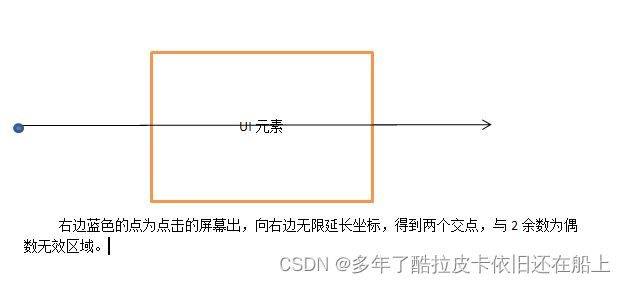
获取到点击屏幕的坐标,然后让这个点往右边发射一条射线,与多边形的UI进行形状进行相交,如果焦点数与2的余数为基数,那么直接认定点击的区域为有效区域。如下图所示:
给UI添加PolygonCllider2D组件,如下图所示:
然后通过PolygonCllider2D组件自己提供的overlayPointer(Vertor2 point)来进行判断
///
/// 判断操作是否有效
///
///
///
private bool IsValid(Vector2 localPoint) {
int num = GetCrossPointNum(localPoint, vertexCache);
return num % 2 == 1;
}
///
/// 用点击的点沿着屏幕x轴发射一条线与UI轮廓获取次数
///
///
///
private int GetCrossPointNum(Vector2 localPoint,List<Vector2> vertexList) {
int crossPointNum = 0;
int vertextNum = vertexList.Count;
for (int i = 0;i< vertextNum; i++) {
Vector2 vect1 = vertexList[i];
Vector2 vect2 = vertexList[(i+1)% vertextNum];
//做一些过滤,以屏幕的y坐标为参考,y坐标不在线段范围内直接过滤掉
if (vect1.y > vect2.y){
if (localPoint.y > vect1.y){
continue;
}
if (localPoint.y < vect2.y){
continue;
}
}
else if (vect2.y > vect1.y) {
if (localPoint.y > vect2.y){
continue;
}
if (localPoint.y < vect1.y) {
continue;
}
}
//用方程 y = localPosition.y 与 y = kx + b(满足vect2.x,vect2.y与vect1.x,vect1.y的方程相交再判断交点x的范围)
float k = (vect1.y - vect2.y)/(vect1.x-vect2.x);
float b = vect2.y - vect2.x * k;
float localPosX = localPoint.y/k - b/k;
//不往右边延长
if (localPosX < localPoint.x) continue;
if (vect1.x > vect2.x){
if (localPosX > vect1.x){
continue;
}
if (localPosX < vect2.x){
continue;
}
}
else if (vect1.x < vect2.x ){
if (localPosX > vect2.x) {
continue;
}
if (localPosX < vect1.x) {
continue;
}
}
//运行到这里符合焦点
crossPointNum ++;
}
return crossPointNum;
}
using System.Collections;
using System.Collections.Generic;
using UnityEngine;
using UnityEngine.UI;
public class CustomImage : Image{
private PolygonCollider2D polygonCollider2D;
protected override void Awake(){
polygonCollider2D = GetComponent<PolygonCollider2D>();
}
public override bool IsRaycastLocationValid(Vector2 screenPoint, Camera eventCamera)
{
Vector2 localPos;
RectTransformUtility.ScreenPointToLocalPointInRectangle(rectTransform,screenPoint, eventCamera,out localPos);
if (localPos == null) {
return false;
}
return polygonCollider2D.OverlapPoint(localPos);
}
}
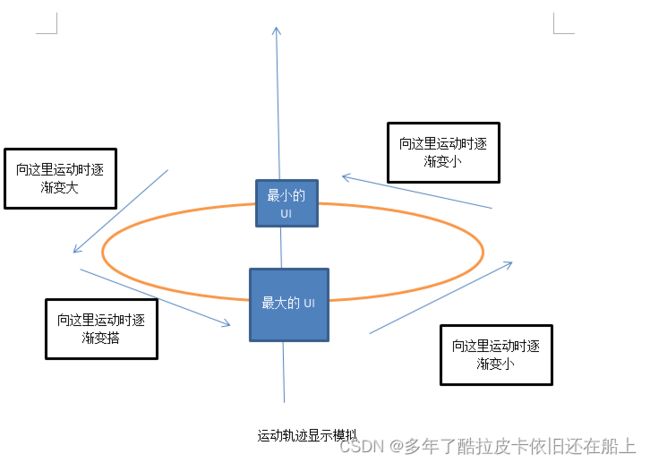
解读1:使用了伪3D的方式来实现这一效果,按照UI物体的Scaler的X轴大小来进行排序,然后按照排序后的结构使用setsiblingIndex来改变物体的父物体下的顺序,进而改变显示的顺序。
解读2:在z轴方向,套用了圆。每张图片按照圆的运动轨迹上的各个点来修改图片的缩放和坐标,来达到视觉效果
-- 3d滚动图实现
local case5 = {}
local UnityEngine = CS.UnityEngine;
local Color = CS.UnityEngine.Color;
case5.init = function ()
--找到画布
local canvas = UnityEngine.GameObject.Find("Canvas");
scroll3DImage = UnityEngine.GameObject("scroll3DImage");
rect = scroll3DImage:AddComponent(typeof(UnityEngine.RectTransform));
rect:SetParent(canvas.transform);
scroll3DImage:AddComponent(typeof(CS.Scroll3DImage));
end
return case5
using System.Collections;
using System.Collections.Generic;
using UnityEngine;
using UnityEngine.EventSystems;
using UnityEngine.UI;
using DG.Tweening;
///
/// 滚动3D图片组件
///
public class Scroll3DImage : MonoBehaviour, IDragHandler, IEndDragHandler
{
//默认4张图片
public int itemNum = 4;
//原来的4张
private int itemNumCache = 4;
//播放动画时间
private int animalTime = 1;
public Vector3 minScaler = new Vector3(0.5f, 0.5f, 1);
public Vector3 maxScaler = Vector3.one;
//拿到当前物体的RectTransform组件
RectTransform rectTransform;
//做图片位置用
public List<ScrollImage> imageObjects;
public List<ScrollImage> cahceList;
void Start() {
imageObjects = new List<ScrollImage>();
cahceList = new List<ScrollImage> ();
itemNumCache = itemNum;
rectTransform = GetComponent<RectTransform>();
rectTransform.sizeDelta = new Vector2(800, 600);
rectTransform.anchoredPosition = Vector2.zero;
InitSpriteRes();
}
void Update() {
fresh();
}
///
/// 监听并且修改元素,一般情况下不会动这个函数
///
void fresh() {
if (itemNum == itemNumCache) {
return;
}
//发现和原来不相等重新刷新并且生成滚动的子物体
itemNumCache = itemNum;
InitSpriteRes();
}
///
/// 初始化资源
///
void InitSpriteRes() {
//把原来的东西销毁掉
//刚刚初始化的时候物体必定为空的东西
for (int i = 0; i < imageObjects.Count; i++) {
Destroy(imageObjects[i].transform.gameObject);
}
imageObjects.Clear();
cahceList.Clear();
//获取对象模板
GameObject temple = CreateItemTemp();
//先做颜色缓存
float offsetColor = 1 / (float)itemNum;
for (int i = itemNum -1; i >=0; i--) {
GameObject item = Instantiate(temple);
ScrollImage scrollImage = item.AddComponent<ScrollImage>();
scrollImage.SetParent(transform);
//为了区分不同的item稍微改改颜色
item.GetComponent<Image>().color = new Color(offsetColor * i, offsetColor * i, offsetColor * i);
imageObjects.Add(scrollImage);
scrollImage.Order = i;
//初始化坐标
float x = GetX(scrollImage.Order);
scrollImage.GetRectTransform().sizeDelta = new Vector2(200, 200);
scrollImage.GetRectTransform().anchoredPosition = new Vector3(x, 0, 0);
scrollImage.GetRectTransform().localScale = GetScale(i);
cahceList.Add(scrollImage);
//scrollImage.transform.SetSiblingIndex(scrollImage.Order);
}
cahceList.Sort(cacheListSort);
for (int i = 0;i < cahceList.Count;i++ ) {
cahceList[i].transform.SetSiblingIndex(i);
}
//模板用完丢掉
Destroy(temple);
}
public int cacheListSort(ScrollImage x, ScrollImage y) {
if (x.GetRectTransform().localScale.x > y.GetRectTransform().localScale.x)
return 1;
else
return -1;
}
///
/// 获取这个元素的x
///
/// 元素的索引
public float GetX(int index) {
float gradient = GetGradient(index);
return 2 * rectTransform.rect.width * gradient;
}
///
/// 获取变化梯度
///
///
public float GetGradient(int index) {
float gradient = 1 / (float)itemNum * (float)index;
if (gradient >= 0 && gradient <= 0.25)
{
return gradient;
}
else if (gradient > 0.25 && gradient <= 0.5)
{
return (0.5f - gradient);
}
else if (gradient > 0.5 && gradient <= 0.75)
{
return 0.5f - gradient;
}
else
{
return -(1f - gradient);
}
return gradient;
}
///
/// 获取缩放
///
public Vector3 GetScale(int index) {
Vector3 offsetScale = (maxScaler - minScaler) / 0.5f;
float offsetX = GetX(index);
float gradient = 1 / (float)itemNum * (float)index; ;
//返回最大和最小的情况
if (gradient == 0 || gradient == 1) {
return maxScaler;
}
if (gradient == 0.5) {
return minScaler ;
}
if (gradient > 0f && gradient < 0.5f) {
return maxScaler - (gradient * offsetScale);
}
return maxScaler - ((1f- gradient) * offsetScale);
}
///
/// 创建模板对象
///
GameObject CreateItemTemp() {
GameObject gameObject = new GameObject("Item");
Image image = gameObject.AddComponent<Image>();
Sprite sprite = TexManger.Instance.getSpriteByAssetName("minmap");
image.sprite = sprite;
return gameObject;
}
public void OnDrag(PointerEventData eventData)
{
Vector2 vector = eventData.delta;
}
public void OnEndDrag(PointerEventData eventData)
{
Vector2 vector = eventData.delta;
//Debug.Log(vector);
ChangeOrder(vector.x);
}
///
/// 修改层级
///
public void ChangeOrder(float offsetX) {
int moveX = offsetX > 0 ? 1 : -1;
for (int i = 0; i < imageObjects.Count; i++) {
int lastIndex = imageObjects[i].Order + moveX;
if (lastIndex < 0)
{
lastIndex = imageObjects.Count - 1;
}
else if (lastIndex > imageObjects.Count - 1) {
lastIndex = 0;
}
imageObjects[i].Order = lastIndex;
imageObjects[i].SetScrollImageData(lastIndex);
}
cahceList.Clear();
for (int i = 0; i < imageObjects.Count; i++) {
updateData(imageObjects[i]);
cahceList.Add(imageObjects[i]);
}
cahceList.Sort(cacheListSort);
for (int i = 0; i < cahceList.Count; i++)
{
cahceList[i].transform.SetSiblingIndex(i);
}
}
///
/// 等一般的动画时间过后才能往下执行换元素顺序
///
///
IEnumerator Wait()
{
yield return new WaitForSeconds(animalTime/2);
for (int i = 0; i < cahceList.Count; i++)
{
cahceList[i].transform.SetSiblingIndex(i);
}
}
///
/// 更新数据
///
///
public void updateData(ScrollImage scrollImage)
{
float newX = GetX(scrollImage.Order);
Vector3 newScaler = GetScale(scrollImage.Order);
scrollImage.GetRectTransform().localScale = newScaler;
scrollImage.GetRectTransform().DOAnchorPos(new Vector2(newX, 0), animalTime);
scrollImage.GetRectTransform().DOScale(newScaler, animalTime);
}
}
using System.Collections;
using System.Collections.Generic;
using UnityEngine;
[RequireComponent(typeof(RectTransform))]
public class ScrollImage : MonoBehaviour
{
public int Order = 0; //UI元素的排列方式
///
/// 这个物体的UI布局组件
///
RectTransform rectTransform;
private void Awake()
{
rectTransform = GetComponent<RectTransform>();
}
///
/// 设置父物体
///
public void SetParent(Transform transform) {
rectTransform.SetParent(transform);
}
///
/// 获取物体的Rect
///
public RectTransform GetRectTransform() {
return rectTransform;
}
///
/// 修改层级显示
///
public void SetScrollImageData(int order) {
this.Order = order;
}
}
实现原理和案例2一样,只是多加了一个功能需要,可以修改对应拖拽的点来修改多边形形状
///
/// 自定义多边形UI组件
///
public class CustomPolyImage : Image
{
//构成的点集合
List<CustomPloyImageHandler> pointList = null;
///
/// 构成多边形的点数
///
[SerializeField]
public int pointNum = 5;
protected override void Awake()
{
base.Awake();
fresh();
SetVerticesDirty();
}
///
/// 重新编写顶点数据
///
///
protected override void OnPopulateMesh(VertexHelper toFill)
{
toFill.Clear();
AddVerts(toFill);
AddTriangles(toFill);
}
///
/// 添加顶点
///
void AddVerts(VertexHelper toFill) {
for(int index = 0;index < pointList.Count;index++ ) {
CustomPloyImageHandler handler = pointList[index];
UIVertex v = new UIVertex();
if (index != 0) {
v.color = Color.red; ;
}
v.position = handler.rectTransform.anchoredPosition;
toFill.AddVert(v);
}
}
///
/// 添加三角形索引
///
void AddTriangles(VertexHelper toFill) {
int id = 1;
for (int i = 0;i<pointNum;i++){
int nextId = id + 1;
if (nextId > pointNum) {
nextId = 1;
}
toFill.AddTriangle(id, 0, nextId);
id++;
}
}
///
/// 初始化点
///
void InitPoint() {
for (int index = 0; index < pointNum + 1;index++) {
GameObject go = new GameObject ("Point"+index);
CustomPloyImageHandler handler = go.AddComponent<CustomPloyImageHandler>();
handler.SetParent(transform.transform);
handler.color = Color.blue;
InitPointRect(index, handler);
pointList.Add (handler);
}
}
///
/// 初始化点的位置
///
void InitPointRect(int index, CustomPloyImageHandler handler){
handler.rectTransform.sizeDelta = new Vector2(10,10);
//第一个为中心点,必定是0,0处
if (index == 0) {
handler.rectTransform.anchoredPosition = Vector2.zero;
return;
}
//弧度
float radius = 2 * Mathf.PI /(float)pointNum * (index - 1);
//半径,直接认为是宽度
float width = rectTransform.rect.width / 2;
float x = Mathf.Cos(radius) * width;
float y = Mathf.Sin(radius) * width;
handler.rectTransform.anchoredPosition = new Vector2(x, y);
}
void ClearPoint() {
foreach (CustomPloyImageHandler handler in pointList) {
DestroyImmediate (handler); //立即销毁
}
pointList.Clear ();
}
///
/// 刷新函数
///
void fresh() {
pointList = new List<CustomPloyImageHandler>();
rectTransform.sizeDelta = new Vector2(500,500);
ClearPoint();
InitPoint();
}
}
using System.Collections;
using System.Collections.Generic;
using UnityEngine;
using UnityEngine.EventSystems;
using UnityEngine.UI;
[RequireComponent(typeof(RectTransform))]
public class CustomPloyImageHandler : Image,IDragHandler
{
public void OnDrag(PointerEventData eventData)
{
rectTransform.anchoredPosition += eventData.delta / rectTransform.lossyScale.x;
//通知父物体进行脏标记
rectTransform.parent.gameObject.GetComponent<CustomPolyImage>().SetVerticesDirty();
}
///
/// 修改父物物体
///
///
public void SetParent(Transform transform){
rectTransform.SetParent(transform);
}
}
-- 3d滚动图实现
local case6 = {}
local UnityEngine = CS.UnityEngine;
local Color = CS.UnityEngine.Color;
local Vector2 = CS.UnityEngine.Vector2;
case6.init = function ()
--找到画布
local canvas = UnityEngine.GameObject.Find("Canvas");
PloyImage = UnityEngine.GameObject("PloyImage");
rect = PloyImage:AddComponent(typeof(UnityEngine.RectTransform));
rect:SetParent(canvas.transform);
PloyImage:AddComponent(typeof(CS.CustomPolyImage));
rect.anchoredPosition = Vector2(0,0);
end
return case6
血量越少,血条的进度就跟着减少。
50%以上血量为翡翠绿色
20% - 50 % 的血量为橘色
20%以下血量为红色
using System.Collections;
using System.Collections.Generic;
using UnityEngine;
using UnityEngine.EventSystems;
using UnityEngine.UI;
///
/// 挂上这个组件自动申请别的组件
///
[RequireComponent(typeof(RectTransform))]
public class CustomLifeBarComponet : MonoBehaviour
{
RectTransform rectTransform;
RectTransform liftBarRect;
///
/// 健康血量颜色
///
Color color1 = new Color(83/255f,137/255f,64/255f);
///
/// 风险血量颜色
///
Color color2 = new Color(243 / 255f, 124 / 255f, 54 / 255f);
///
/// 风险血量颜色
///
Color color3 = new Color(243 / 255f, 65 / 255f, 74 / 255f);
public float curHitPoint = 1f;
void Update() {
if (Input.GetKey(KeyCode.D)) {
curHitPoint += 1/10f * Time.deltaTime * 2;
if (curHitPoint >= 1) {
curHitPoint = 1;
}
}
if (Input.GetKey(KeyCode.A))
{
curHitPoint -= 1 / 10f*Time.deltaTime * 2;
if (curHitPoint <= 0){
curHitPoint = 0;
}
}
liftBarRect.offsetMax = new Vector2((curHitPoint - 1) * rectTransform.rect.width, liftBarRect.offsetMax.y);
if (curHitPoint > 0.5) {
liftBarRect.GetComponent<Image>().color = color1;
}
if (curHitPoint>0.2 && curHitPoint <= 0.5 ) {
liftBarRect.GetComponent<Image>().color = color2;
}
if (curHitPoint< 0.2) {
liftBarRect.GetComponent<Image>().color = color3;
}
}
//当前血量
private void Awake()
{
rectTransform = GetComponent<RectTransform>();
rectTransform.anchoredPosition = Vector2.zero;
liftBarRect = gameObject.transform.GetChild(1).GetComponent<RectTransform>();
}
}