基于Qiskit——《量子计算编程实战》读书笔记(六)
目录
第9章 量子AND门和OR门
布尔可满足性问题
关于3SAT的经典实现
量子AND和OR
关于Toffoli门——量子AND门
量子OR门
多量子情况下运行AND和OR
关于3SAT量子电路的实现
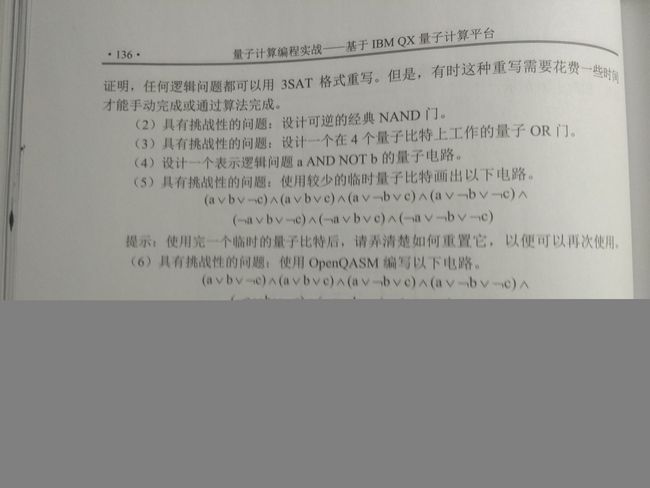
练习与问题
第10章 Grover算法
Grover算法原理
Grover算法的实现
1.创建量子AND门和OR门(适用于双或三量子比特)
2.创建可逆门的逆矩阵并测试
3.创建并测试经典逻辑
4.在量子电路中实现checker函数
5.测试函数
6.mover函数实现
运行Grover算法
拓展阅读
欢迎加入Qiskit交流群:1064371332
温馨提醒:由于本文有大量代码需要手动输入且操作性极强,特别分享了相关Jupyter Notebook文件以供下载
链接:https://pan.baidu.com/s/17hJEMi1yOmj_OpnL0Qbi0A?pwd=8rjk
提取码:8rjk
第9章 量子AND门和OR门
布尔可满足性问题
布尔表达式:由运算符AND、OR、NOT加上变量以及括号组成的表达式称为布尔表达式(Boolean Expression)
布尔表达式可以根据需要而延长,除了在程序中表示逻辑流程外,还可以用于编码有关特定情况的信息。这是什么意思呢?让我们暂且搁置固有的if else语句的思维,回忆C家族语言中唯一的三元表达式:
int max = a > b ? a : b;等价于:
if(a > b)
    max = a;
else
    max = b;
所以在本节中,我需要各位读者关注布尔表达式本身的意义,而非依旧认为它只是条件判断语句的附庸(就好像离了if语句布尔表达式就活不了似的)。那么现在考虑以下实例:
编写一程序以确定在新工作第一天审查文件时可接受的所有可能的文件组合:
def documents_ok(passport,permanent_resident_card,drivers_license,voter_registration,under_18,report_card,doctor_record,daycare_record,school_id,social_security_card,birth_certificate):
    return (passport or permanent_resident_card) or \
            ((drivers_license or school_id or voter_registration) or \
                (under_18 and \
                (report_card or doctor_record or daycare_record)) and \
(social_security_card or birth_certificate))根据返回值,足见其复杂程度。假想文件检查者的老板需要一个表,将所有有效的文件组合放在表的一边,另一边则是无效的文件组合。那么,文件检查者需要遍历![]() 种组合。为了让此任务更可行,我们设计了这样一种算法,代替文件检查者遍历所有文件有效与否的true/false组合来验证可接受的文件组合:
种组合。为了让此任务更可行,我们设计了这样一种算法,代替文件检查者遍历所有文件有效与否的true/false组合来验证可接受的文件组合:
import itertools
works=[]
doesnt_work=[]
for combo in itertools.product([True,False],repeat=11):
    if documents_ok(combo[0],combo[1],combo[2],combo[3],combo[4],combo[5],combo[6],combo[7],combo[8],combo[9],combo[10]):
        works+=[combo]
    else:
        doesnt_work+=[combo]
对于先前给定的布尔表达式,我们得到了2005种有效的文件组合,而只有43种可能的无效文件组合。类似地,意欲得到满足布尔表达式的任何可能组合的过程被称为布尔可满足性问题(Boolean Satisfiability Problem, SAT)。
关于3SAT的经典实现
通过and, or和not运算符,我们可以将任何表达式重写为每个部分最多包含三个变量的形式,这在算法分析中很有用,如有必要,还可以引入哑元(dummy variable)以简化算法分析。例如:
(not a or b or d) and \
(not b or c or d) and \
(a or not c or d) and \
(not a or not b or not d) and \
(b or not c or not d) and \
(not a or c or not d) and \
(a or b or c) and \
(not a or not b or not c)
对应的SAT问题将研究哪一种a,b,c和d的组合会使该表达式判断为true。因为我们限制每部分最多包含三个变量,因此我们称类似的布尔满足性问题为3SAT。
现在编写函数研究先前的表达式是否可以被满足:
def checker(f,candidate):
    """
    f: can be any function which takes as a string of 1s and 0s which is at least as long as the number of variables in f. Right most character is the 0th bit.
    candidate: should be a string of 1s and 0s which is at least as long as the number of variables in f. Right most character is the 0th bit.
    """
    return(f(candidate))

def try_all_inputs(f,len_input):
    import itertools
    result=[]
    for candidate in ["".join(seq) for seq in itertools.product("01", repeat=len_input)]:
        if checker(f,candidate):
            result+=[candidate]
    return result

def is_satisfiable(f,len_input):
    return len(try_all_inputs(f,len_input))>0


def a_3sat_function_4(binary_string):
    """
    binary_string is a string that is at least 4 characters long with 1s and 0s with the rightmost character representing the 0th bit
    """
    binary_list=[int(i) for i in binary_string]
    binary_list.reverse()
    a,b,c,d=binary_list[0:4]
    return (not a or b or d) and \
            (not b or c or d) and \
            (a or not c or d) and \
            (not a or not b or not d) and \
            (b or not c or not d) and \
            (not a or c or not d) and \
            (a or b or c) and \
            (not a or not b or not c)
查看函数a_3sat_function_4是否可以被满足和所有可能的输入列表:
print(is_satisfiable(a_3sat_function_4,4))
print(try_all_inputs(a_3sat_function_4,4))
代码结果:
True
['1010', '1110']
量子AND和OR
关于Toffoli门——量子AND门
| 输入 | 输出 | ||||
|---|---|---|---|---|---|
| a | b | c | a' | b' | c'=c XOR (a AND b) |
| 0 | 0 | 0 | 0 | 0 | 0 |
| 0 | 0 | 1 | 0 | 0 | 1 |
| 0 | 1 | 0 | 0 | 1 | 0 |
| 0 | 1 | 1 | 0 | 1 | 1 |
| 1 | 0 | 0 | 1 | 0 | 0 |
| 1 | 0 | 1 | 1 | 0 | 1 |
| 1 | 1 | 0 | 1 | 1 | 1 |
| 1 | 1 | 1 | 1 | 1 | 0 |
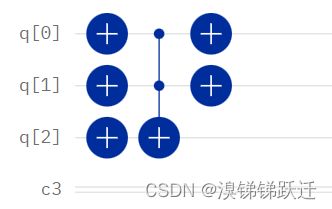
对比最后两行和其他两行的结果不难发现,只有在两个控制位量子比特均为1时,才决定反转目标位量子比特,因此,Toffoli门也被称为控-控-非门(Controlled-Controlled-NOT Gate, CCNOT门),缩写为ccx。一个AND门可以通过如下基本门实现(注意CCNOT门不是基本门):
 Toffoli门表示符号
  Toffoli门等价门
使用时则编写如下代码进行调用:
qc.ccx(qc[0], qc[1], qc[2])量子OR门
可以根据c'的表达式发现,OR门与AND门有着类似的结构,因此我们可以借助Toffoli门间接实现OR门:
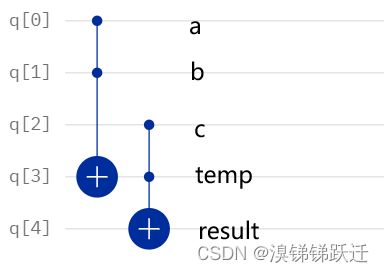
多量子情况下运行AND和OR
两种情况可以分别归纳为以下两个模型:
关于3SAT量子电路的实现
考虑以下布尔表达式:
翻译成Python代码即为:
(a or b or not c) and \
(a or b or c) and \
(a or not b or c) and \
(a or not b or not c) and \
(not a or b or not c) and \
(not a or not b or c) and \
(not a or not b or not c)
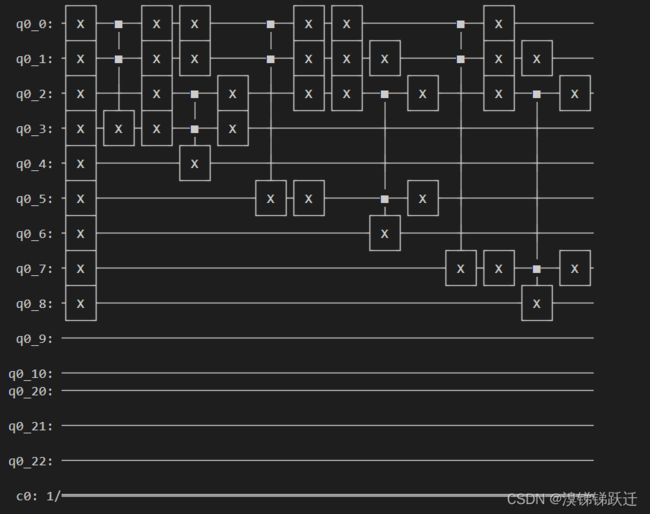
通过观察,不难知道我们需要14次OR操作和6次AND操作,也就是说我们会需要19+1=20个量子比特来储存数据(19个临时比特,1个结果)以及3个输入比特,画出前三个分句的电路图如下:
from qiskit import QuantumCircuit, QuantumRegister, ClassicalRegister
q = QuantumRegister(23)
c = ClassicalRegister(1)
qc = QuantumCircuit(q, c)
qc.x(q[0])
qc.x(q[1])
qc.x(q[2])
qc.x(q[3])
qc.ccx(q[0], q[1], q[3])
qc.x(q[0])
qc.x(q[1])
qc.x(q[2])
qc.x(q[3])
qc.x(q[4])
qc.ccx(q[2], q[3], q[4])
qc.x(q[2])
qc.x(q[3])
qc.x(q[0])
qc.x(q[1])
qc.x(q[2])
qc.x(q[5])
qc.ccx(q[0], q[1], q[5])
qc.x(q[0])
qc.x(q[1])
qc.x(q[2])
qc.x(q[5])
qc.x(q[6])
qc.ccx(q[2],q[5],q[6])
qc.x(q[0])
qc.x(q[1])
qc.x(q[2])
qc.x(q[5])
qc.x(q[1])
qc.x(q[7])
qc.ccx(q[0], q[1], q[7])
qc.x(q[0])
qc.x(q[1])
qc.x(q[2])
qc.x(q[7])
qc.x(q[8])
qc.ccx(q[2], q[7], q[8])
qc.x(q[1])
qc.x(q[2])
qc.x(q[7])
print(qc.draw())
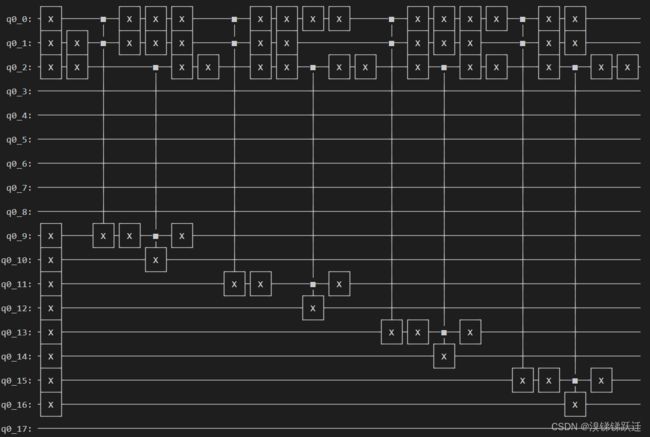
之后四条分句:
代码实现(高度不建议手打):
qc.x(q[0])
qc.x(q[1])
qc.x(q[2])
qc.x(q[1])
qc.x(q[9])
qc.ccx(q[0], q[1], q[9])
qc.x(q[0])
qc.x(q[1])
qc.x(q[2])
qc.x(q[9])
qc.x(q[10])
qc.ccx(q[2], q[9], q[10])
qc.x(q[1])
qc.x(q[2])
qc.x(q[9])
qc.x(q[0])
qc.x(q[2])
qc.x(q[0])
qc.x(q[1])
qc.x(q[2])
qc.x(q[11])
qc.ccx(q[0], q[1], q[11])
qc.x(q[0])
qc.x(q[1])
qc.x(q[2])
qc.x(q[11])
qc.x(q[12])
qc.ccx(q[2],q[11],q[12])
qc.x(q[0])
qc.x(q[2])
qc.x(q[11])
qc.x(q[0])
qc.x(q[2])
qc.x(q[0])
qc.x(q[1])
qc.x(q[13])
qc.ccx(q[0], q[1], q[13])
qc.x(q[2])
qc.x(q[0])
qc.x(q[1])
qc.x(q[13])
qc.x(q[14])
qc.ccx(q[2],q[13],q[14])
qc.x(q[0])
qc.x(q[2])
qc.x(q[13])
qc.x(q[2])
qc.x(q[0])
qc.x(q[1])
qc.x(q[0])
qc.x(q[1])
qc.x(q[15])
qc.ccx(q[0],q[1],q[15])
qc.x(q[2])
qc.x(q[0])
qc.x(q[1])
qc.x(q[15])
qc.x(q[16])
qc.ccx(q[2],q[15],q[16])
qc.x(q[2])
qc.x(q[0])
qc.x(q[1])
qc.x(q[15])
qc.x(q[2])
最后的6个AND由于逻辑过于简单不予实现。
练习与问题
第10章 Grover算法
Grover算法原理
我们仍以上章末尾的SAT问题为例:
我们希望找到一组(a,b,c)使得上面的布尔表达式为真,这里暂且先给出结果(1,1,0)。经典算法是遍历每一种(a,b,c)的可能,直到该表达式为真,也就是说时间复杂度为![]() ,那么接下来我们则希望找到一种算法,来加速上面的搜索或称求解过程,此时量子算法的优越性就体现出来了,理论上可以做到“平方加速”,也就是说时间复杂度会降低至
,那么接下来我们则希望找到一种算法,来加速上面的搜索或称求解过程,此时量子算法的优越性就体现出来了,理论上可以做到“平方加速”,也就是说时间复杂度会降低至![]() 。
。
因为有三个变量,每个变量有2种可能取值(0或1),所以一共有8种可能的组合,对于经典算法只能一个一个试,但对于量子算法,我们可以通过制备叠加态的方法来规避机械的遍历。
制备方法很简单:在本例中一共有三个变量,为了表达存在两种取值可能,我们对每一个变量(量子比特)使用哈达玛门,进一步推广,如果有n个变量(量子比特),那么就需要预先设置n个哈达玛门。接着,依从量子计算的思维,在制备好叠加态并输入后,我们实际上是同时检验了八种可能,但咱检验不能白检验,还需要根据检验的结果进行一定的操作。
通过新声明一个checker函数,我们可以检验该量子态,并将其转换为如下量子态:
我们在110态前加入了一个负号用以表示预期的结果,也就是说这个量子态就是我们检验的结果。之后,我们创建mover函数使概率尽量偏向110态。
mover函数:
如上操作就被称为一次迭代,在本例中,理论上的迭代次数是![]() 次。这样一次迭代后,我们得到了如下量子态:
次。这样一次迭代后,我们得到了如下量子态:
可以明显看到概率发生了偏移!
在物理学文献中,checker函数常被称为oracle函数,而mover函数则被称为diffusion函数。综上,Grover算法的流程可被概况如下:
- 设置步骤;
- 设置checker和mover函数;
- 测量结果.
Grover算法的实现
1.创建量子AND门和OR门(适用于双或三量子比特)
从前一章可见,手动编写量子电路必然会遇到很多重复的操作,我们可以通过将相关操作转写为函数来简化编写流程。关于两个或三个量子比特的AND门和OR门代码如下(照搬照抄即可,原理前一章中已经讲过):
import matplotlib
import qiskit
import time
from qiskit import IBMQ
from qiskit import Aer
IBMQ.enable_account("换成你的IBMQ API Token")

from qiskit import QuantumCircuit, ClassicalRegister, QuantumRegister
from qiskit.exceptions import QiskitError
from  qiskit.tools.visualization  import circuit_drawer

def setup_input(qr,qc,a,b,c,d=None): #量子电路中初始态即为0,若欲设置成1反转即可
    if a:
        qc.x(qr[0])
    if b:
        qc.x(qr[1])
    if c:
        qc.x(qr[2])
    if d:
        qc.x(qr[4])

def quantumand_3(qr,qc,w,x,y,t1,t2):  #三比特需要中间比特临时储存结果,这里以
    qc.ccx(qr[w],qr[x],qr[t1])        #索引为t2的比特为最终结果
    qc.ccx(qr[y],qr[t1],qr[t2])
    return t2


def quantumand_2(qr,qc,w,x,t1):        #双比特直接设置门即可
    qc.ccx(qr[w],qr[x],qr[t1])
    return t1

def quantumor_2(qr,qc,w,x,t1):
    qc.x(qr[w])
    qc.x(qr[x])
    qc.x(qr[t1])
    qc.ccx(qr[w],qr[x],qr[t1])
    qc.x(qr[w])
    qc.x(qr[x])
    return t1

def quantumor_3(qr,qc,w,x,y,t1,t2):
    qc.x(qr[w])
    qc.x(qr[x])
    qc.x(qr[t1])
    qc.ccx(qr[w],qr[x],qr[t1])
    qc.x(qr[w])
    qc.x(qr[x])

    qc.x(qr[y])
    qc.x(qr[t1])
    qc.x(qr[t2])
    qc.ccx(qr[y],qr[t1],qr[t2])
    qc.x(qr[y])
    qc.x(qr[t1])
    return t2
2.创建可逆门的逆矩阵并测试
上述量子逻辑门都是可逆门,意味着存在逆矩阵/逆操作,代码实现如下:
def quantumor_2_reverse(qr,qc,w,x,t1):
    qc.x(qr[x])
    qc.x(qr[w])
    qc.ccx(qr[w],qr[x],qr[t1])
    qc.x(qr[t1])
    qc.x(qr[x])
    qc.x(qr[w])
    return t1

def quantumor_3_reverse(qr,qc,w,x,y,t1,t2):
    qc.x(qr[t1])
    qc.x(qr[y])
    qc.ccx(qr[y],qr[t1],qr[t2])
    qc.x(qr[t2])
    qc.x(qr[t1])
    qc.x(qr[y])

    qc.x(qr[x])
    qc.x(qr[w])
    qc.ccx(qr[w],qr[x],qr[t1])
    qc.x(qr[t1])
    qc.x(qr[x])
    qc.x(qr[w])
    return t2
接下来就是检验门的创建是否正确了(各位可以测试着玩,理论上在学习和实际业务中是必须走这一步的,但现在可以看看就行):
import itertools
def run_local_sim_one_result(qc):
    backend = Aer.get_backend('qasm_simulator')
    job_exp = qiskit.execute(qc,backend=backend)
    result = job_exp.result()
    final=result.get_counts(qc)
    result_in_order=list(final.keys())[0][::-1]
    return result_in_order

def test_logic_function_2(f,frev):
    print("inputs","forward","reverse")
    print("abc","a'b'c'","a''b''c''")
    for combo in itertools.product([0,1],repeat=3):
        # forward
        qr = QuantumRegister(3)
        cr = ClassicalRegister(3)
        qc = QuantumCircuit(qr,cr)
        setup_input(qr,qc,combo[0],combo[1],combo[2])
        f(qr,qc,0,1,2)
        for i in range(3):
            qc.measure(qr[i],cr[i])
        forward_result=run_local_sim_one_result(qc)
        # forward then reverse
        qr = QuantumRegister(3)
        cr = ClassicalRegister(3)
        qc = QuantumCircuit(qr,cr)
        setup_input(qr,qc,combo[0],combo[1],combo[2])
        f(qr,qc,0,1,2)
        frev(qr,qc,0,1,2)
        for i in range(3):
            qc.measure(qr[i],cr[i])
        reverse_result=run_local_sim_one_result(qc)
        print('%d%d%d %s %s'%(combo[0],combo[1],combo[2],forward_result,reverse_result))


def test_logic_function_3(f,frev):
    print("inputs","forward","reverse")
    print("abcd","a'b'c'd'","a''b''c''d''")
    for combo in itertools.product([0,1],repeat=4):
        # forward
        qr = QuantumRegister(5)
        cr = ClassicalRegister(5)
        qc = QuantumCircuit(qr,cr)
        setup_input(qr,qc,combo[0],combo[1],combo[2],combo[3])
        f(qr,qc,0,1,2,3,4)
        for i in range(5):
            qc.measure(qr[i],cr[i])
        forward_result=run_local_sim_one_result(qc)
        # forward then reverse
        qr = QuantumRegister(5)
        cr = ClassicalRegister(5)
        qc = QuantumCircuit(qr,cr)
        setup_input(qr,qc,combo[0],combo[1],combo[2],combo[3])
        f(qr,qc,0,1,2,3,4)
        frev(qr,qc,0,1,2,3,4)
        for i in range(5):
            qc.measure(qr[i],cr[i])
        reverse_result=run_local_sim_one_result(qc)

        forward_result=forward_result[0:3]+forward_result[4]
        reverse_result=reverse_result[0:3]+reverse_result[4]

        print('%d%d%d%d %s %s'%(combo[0],combo[1],combo[2],combo[3],forward_result,reverse_result))

print("Testing two qubit quantum AND")
test_logic_function_2(quantumand_2,quantumand_2)
print()

print("Testing two qubit quantum OR")
test_logic_function_2(quantumor_2,quantumor_2_reverse)
print()

print("Testing three qubit quantum AND")
test_logic_function_3(quantumand_3,quantumand_3)
print()

print("Testing three qubit quantum OR")
test_logic_function_3(quantumor_3,quantumor_3_reverse)
3.创建并测试经典逻辑
先以经典方式表述之前我们需要求解的布尔表达式:
def _3sat_mystery3_classical(a,b,c):
    return int((a or b or not c) and (a or b or c) and (a or not b or c) and (a or not b or not c) and (not a or b or not c)  and (not a or b or c) and (not a or not b or not c) )
然后检查所有可能的输入组合,并检验哪一个组合返回true:
for combo in itertools.product([0,1],repeat=3):
    print(combo,'->',_3sat_mystery3_classical(combo[0],combo[1], combo[2]))
4.在量子电路中实现checker函数
(1)创建一个用于设置或清除逻辑函数:
def setup_or_teardown_logic(qr,qc,is_a,is_b,is_c):
    """
    is_a,is_b,and is_c: False indicates the variable should be negated, True left as is.
    Negation is done with the X gate.

    """
    if not is_a:
        qc.x(qr[0])
    if not is_b:
        qc.x(qr[1])
    if not is_c:
        qc.x(qr[2])
(2)创建checker函数:
checker函数是我们算法的第一核心,它承担着表达布尔表达式(理论和后期上还可以是任意判断真假的式子,这也是为什么Grover算法又称为量子搜索算法的原因)的重要任务,在该函数中你需要表达出你想要的逻辑。需要注意一点的是,在施加完操作后,由于我们使用了不少临时量子比特,而且我们可能需要不止一次迭代,也就是不止一次会用到临时量子比特,所以我们需要在每一次迭代的最后反转我们对临时量子比特的操作,这一步被称为逆运算(uncomputation):
def _3sat_mystery_3(qr,qc,reverse=True,full_reverse=False):
    # w,x,y对应寄存器0,1,2号.
    # 其余均为临时/结果寄存器
    # 大体流程:
    # 1. 设置逻辑
    # 2. 执行计算
    # 3. 恢复状态

    # (a or b or not c)
    setup_or_teardown_logic(qr,qc,True,True,False)
    first_clause=quantumor_3(qr,qc,0,1,2,3,4)
    setup_or_teardown_logic(qr,qc,True,True,False)

    # (a or b or c)
    setup_or_teardown_logic(qr,qc,True,True,True)
    second_clause=quantumor_3(qr,qc,0,1,2,5,6)
    setup_or_teardown_logic(qr,qc,True,True,True)

    # (a or not b or c)
    setup_or_teardown_logic(qr,qc,True,False,True)
    third_clause=quantumor_3(qr,qc,0,1,2,7,8)
    setup_or_teardown_logic(qr,qc,True,False,True)

    # (a or not b or not c)
    setup_or_teardown_logic(qr,qc,True,False,False)
    fourth_clause=quantumor_3(qr,qc,0,1,2,9,10)
    setup_or_teardown_logic(qr,qc,True,False,False)

    # (not a or b or not c)
    setup_or_teardown_logic(qr,qc,False,True,False)
    fifth_clause=quantumor_3(qr,qc,0,1,2,11,12)
    setup_or_teardown_logic(qr,qc,False,True,False)

    # (not a or b or c)
    setup_or_teardown_logic(qr,qc,False,True,True)
    sixth_clause=quantumor_3(qr,qc,0,1,2,13,14)
    setup_or_teardown_logic(qr,qc,False,True,True)

    # (not a or not b or not c)
    setup_or_teardown_logic(qr,qc,False,False,False)
    seventh_clause=quantumor_3(qr,qc,0,1,2,15,16)
    setup_or_teardown_logic(qr,qc,False,False,False)


    # Let's whittle down
    intermediate_and_pair1=quantumand_2(qr,qc,first_clause,second_clause,17)
    intermediate_and_pair2=quantumand_2(qr,qc,third_clause,fourth_clause,18)
    intermediate_and_pair3=quantumand_2(qr,qc,fifth_clause,sixth_clause,19)

    # Now whittling down further
    intermediate_and_pair_12=quantumand_2(qr,qc,intermediate_and_pair1,intermediate_and_pair2,20)
    intermediate_and_pair_34=quantumand_2(qr,qc,intermediate_and_pair3,seventh_clause,21)

    # Now whittling down to 1 result
    final_result_and_pair_1234=quantumand_2(qr,qc,intermediate_and_pair_12,intermediate_and_pair_34,22)

    if reverse:
        if full_reverse:
            final_result_and_pair_1234=quantumand_2(qr,qc,intermediate_and_pair_12,intermediate_and_pair_34,22)
        intermediate_and_pair_34=quantumand_2(qr,qc,intermediate_and_pair3,seventh_clause,21)
        intermediate_and_pair_12=quantumand_2(qr,qc,intermediate_and_pair1,intermediate_and_pair2,20)
        intermediate_and_pair3=quantumand_2(qr,qc,fifth_clause,sixth_clause,19)
        intermediate_and_pair2=quantumand_2(qr,qc,third_clause,fourth_clause,18)
        intermediate_and_pair1=quantumand_2(qr,qc,first_clause,second_clause,17)
        # (not a or not b or not c)
        setup_or_teardown_logic(qr,qc,False,False,False)
        seventh_clause=quantumor_3_reverse(qr,qc,0,1,2,15,16)
        setup_or_teardown_logic(qr,qc,False,False,False)
        # (not a or b or c)
        setup_or_teardown_logic(qr,qc,False,True,True)
        sixth_clause=quantumor_3_reverse(qr,qc,0,1,2,13,14)
        setup_or_teardown_logic(qr,qc,False,True,True)
        # (not a or b or not c)
        setup_or_teardown_logic(qr,qc,False,True,False)
        fifth_clause=quantumor_3_reverse(qr,qc,0,1,2,11,12)
        setup_or_teardown_logic(qr,qc,False,True,False)
        # (a or not b or not c)
        setup_or_teardown_logic(qr,qc,True,False,False)
        fourth_clause=quantumor_3_reverse(qr,qc,0,1,2,9,10)
        setup_or_teardown_logic(qr,qc,True,False,False)
        # (a or not b or c)
        setup_or_teardown_logic(qr,qc,True,False,True)
        third_clause=quantumor_3_reverse(qr,qc,0,1,2,7,8)
        setup_or_teardown_logic(qr,qc,True,False,True)
        # (a or b or c)
        setup_or_teardown_logic(qr,qc,True,True,True)
        second_clause=quantumor_3_reverse(qr,qc,0,1,2,5,6)
        setup_or_teardown_logic(qr,qc,True,True,True)
        # (a or b or not c)
        setup_or_teardown_logic(qr,qc,True,True,False)
        first_clause=quantumor_3_reverse(qr,qc,0,1,2,3,4)
        setup_or_teardown_logic(qr,qc,True,True,False)
5.测试函数
import time
from qiskit.tools.visualization import plot_histogram
provider = IBMQ.get_provider()
def try_input_combination(input_combination,shots=1,reverse=False,full_reverse=True):

    backend  = provider.get_backend('ibmq_qasm_simulator') # remote simulator
    qr = QuantumRegister(23)
    cr = ClassicalRegister(23)
    qc = QuantumCircuit(qr,cr)
    # setting up the input
    for i in range(3):
        if input_combination[i]:
            qc.x(qr[i])
    # calling the function on that input
    _3sat_mystery_3(qr,qc,reverse=reverse,full_reverse=full_reverse)
    # measuring every qubit as we will want to verify reversibility
    for i in range(23):
        qc.measure(qr[i],cr[i])

    # Executing the job on IBM QX
    job_exp = qiskit.execute(qc, backend=backend,shots=shots)
    result = job_exp.result()
    final=result.get_counts(qc)
    if not len(final)==1:
        print(input_combination,final)
    else:
        # note that due to IBM's choice the result returned is in opposite order with last register coming first
        # and the first register coming last. For clarity we reverse the output so the first register is first
        # and the last register is last.

        result_in_order=list(final.keys())[0][::-1]
        print(input_combination,'->',result_in_order[-1],'(measured bits: '+result_in_order+')')
(1)无反转测试:
import itertools
for combo in itertools.product([0,1],repeat=3):
    try_input_combination(combo)
(2)完全反转测试:
import itertools
for combo in itertools.product([0,1],repeat=3):
    try_input_combination(combo, reverse=True, full_reverse=True)
(3)部分反转测试:
import itertools
for combo in itertools.product([0,1],repeat=3):
    try_input_combination(combo,reverse=True,full_reverse=False)
6.mover函数实现
mover函数是我们Grover算法的第二核心,对于当前阶段处理两或三个量子比特的问题,mover函数完全就可以照抄.注意,此处mover函数的实现仅适用于两个或三个量子比特,具体实现原理暂不说明:
def control_Z(qr,qc,num_inputs):
    if num_inputs not in [2,3]:
        raise Exception("currently only supports 2 or 3 inputs")
    if num_inputs==2:
        qc.h(qr[1])
        qc.cx(qr[0],qr[1])
        qc.h(qr[1])
    elif num_inputs==3:
        qc.h(qr[2])
        qc.ccx(qr[0],qr[1],qr[2])
        qc.h(qr[2])

def mover(qr,qc,num_inputs):
    if num_inputs not in [2,3]:
        raise Exception("currently only supports 2 or 3 inputs")
    for i in range(num_inputs):
        qc.h(qr[i])
    for i in range(num_inputs): # D matrix
        qc.x(qr[i])
    control_Z(qr,qc,num_inputs)
    for i in range(num_inputs):
        qc.x(qr[i])
    for i in range(num_inputs):
        qc.h(qr[i])
运行Grover算法
def grovers_algorithm(checker,num_inputs,num_registers,num_iterations=None):
    if num_iterations == None:
        from math import floor,sqrt
        iterations=floor(sqrt(2**num_inputs))
    else:
        iterations=num_iterations
    print("Running Grover's algorithm for %d iterations"%iterations)
    qr = QuantumRegister(num_registers)
    cr = ClassicalRegister(num_registers)
    qc = QuantumCircuit(qr,cr)
    # Configuring the input
    for i in range(num_inputs):
        qc.h(qr[i])
    # Setting up the output of the checker function
    qc.x(qr[num_registers-1])
    qc.h(qr[num_registers-1])

    # Do the Grovers steps
    for it in range(iterations):
        checker(qr,qc)
        mover(qr,qc,num_inputs)
    # Measure the inputs
    for j in range(num_inputs):
        qc.measure(qr[j], cr[j])
    return cr,qr,qc

def run_3sat_mystery_grover_ibm_sim(num_iterations=None,backend=None):
    if not backend:
        backend = provider.get_backend('ibmq_qasm_simulator')
    import time
    from qiskit.tools.visualization import plot_histogram
    shots=512
    cr,qr,qc = grovers_algorithm(_3sat_mystery_3,3,23,num_iterations=num_iterations)
    job_exp = qiskit.execute(qc, backend=backend,shots=shots)
    result = job_exp.result()
    final=result.get_counts(qc)
    print(final)
    return final
测试如下(不要忘记迭代次数为3是如何推导出来的):
final=run_3sat_mystery_grover_ibm_sim(num_iterations=3)
plot_histogram(final)
拓展阅读
Grover 搜索算法理论 - Azure Quantum | Microsoft Docs:微软的这篇文档较为详细地分析了Grover算法,并给出了其几何意义图像以及平方加速原理的推导。
A fast quantum mechanical algorithm for database search:这篇文章是正式提出Grover算法的原论文。
