vue路由
1.生活中的路由
设备和ip的映射关系
2.后端路由
接口和服务的映射关系
3.前端路由
路径和组件的映射关系
4.为什么使用路由
在一个页面里,切换业务场景
vue单页面应用(SPA):所有的功能在一个html页面上实现
优点:
- 整体不刷新页面,用户体验好
- 数据传递容易,开发效率高
缺点:
- 开发成本高(需要学习专门知识)
- 首次加载比较慢,不利于SEO
5.vue-router介绍
vue集成路由
https://router.vuejs.org/zh/guide/
vue-router模块包,它和vue.js深度集成
定义映射规则—模块化—提供2个内置的全局组件
6.路由组件分类
.vue组件分两类,一个页面组件,一个复用组件
.vue文件本质无区别
src/views(pages)文件夹 —页面组件 —配合路由使用
src/components 文件夹 —复用组件(展示数据—复用)
总结:views下的页面组件,配合路由切换;components下的一般引入到views下的vue中复用展示数据
7.vue-router使用
安装
npm i vue-router@3.5.1
在vue2项目中要使用3.xx的vue-router
在vue3项目中要使用4.xx的vue-router
导入路由
src下创建router/index.js
使用路由组件
创建路由规则【*】
创建路由对象
import Vue from 'vue'
// 1. 导入路由
import VueRouter from "vue-router"

// 引入组件
import Home from '../views/Home'
import Login from '../views/Login'
import Register from '../views/Register'

// 2. 使用路由插件
// 在vue中,使用vue插件,需要调用Vue.use()
Vue.use(VueRouter)

// 3. 创建路由规则
const routes = [
    // 路径和组件的映射关系
    {
        path: '/',
        component: Home,
    },
    {
        path: '/login',
        component: Login,
    },
    {
        path: '/register',
        component: Register,
    }
]

// 4. 创建路由对象,传入规则
const router = new VueRouter({
    // routes: routes,
    routes,
})

// 导出路由对象
export default router
关联到vue实例
main.js
import Vue from 'vue'
import App from './App.vue'

import router from './router'

Vue.config.productionTip = false

new Vue({
  router,
  render: h => h(App),
}).$mount('#app')
路由出口!!【*】
App.vue
路由懒加载
每次全部引入所有组件会导致性能问题
使用路由懒加载,当匹配到路由路径时才引入
import Vue from 'vue'
// 1. 导入路由
import VueRouter from "vue-router"

// 引入组件
// import Home from '../views/Home'
// import Login from '../views/Login'
// import Register from '../views/Register'

// 2. 使用路由插件
// 在vue中,使用vue插件,需要调用Vue.use()
Vue.use(VueRouter)

// 3. 创建路由规则
const routes = [
    // 路径和组件的映射关系
    {
        path: '/',
        // component: Home,
        // 路由懒加载
        component: () => import('../views/Home'),
    },
    {
        path: '/login',
        // component: Login,
        component: () => import('../views/Login')
    },
    {
        path: '/register',
        // component: Register,
        component: () => import('../views/Register')
    }
]

// 4. 创建路由对象,传入规则
const router = new VueRouter({
    // routes: routes,
    routes,
})

// 导出路由对象
export default router
8.声明式导航-router-link跳转
使用全局组件 router-link 来替代 a 标签
- vue-router 提供了一个全局组件 router-link
- router-link 实质上最终会渲染成 a 链接,to 属性等价于提供 href 属性(to无需#)
- router-link 提供了声明式导航高亮的功能(自带类名)
<template>
  <div>
    <div class="nav">
      <router-link to="/">首页</router-link>
      <router-link to="/login">登录</router-link>
      <router-link to="/register">注册</router-link>
    </div>
    <router-view></router-view>
  </div>
</template>

<script>
export default {

}
</script>

<style scoped>
.nav {
  display: flex;
  justify-content: space-around;
}

.router-link-exact-active {
  color: red;
}
</style>
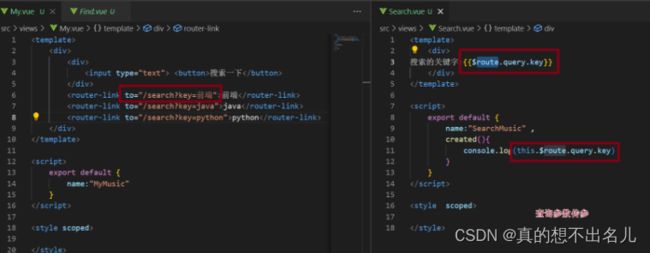
9.声明式导航-路由传参
在跳转路由时,进行传参
to="/path?参数名=值&参数名2=值"

//页面组件接收传递过来的值
$route.query.参数名
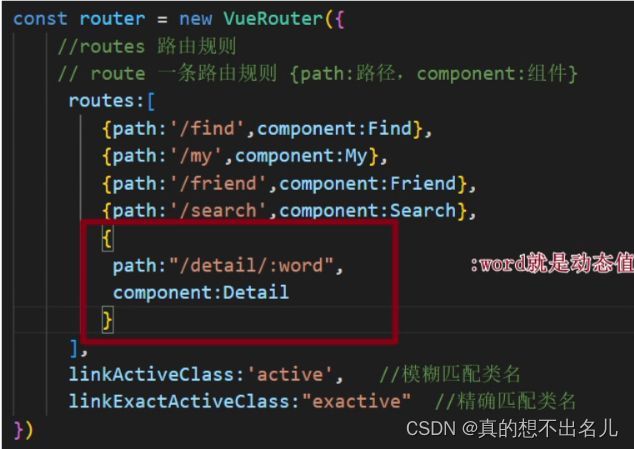
- 动态路由传参
注意
/detail/:word 表示必须要传参数,如果不传参数,也希望匹配,可以加个可选符 “?”
{
	path:"/detail/:word?",
	component:Detail
}
10.声明式导航—导航链接类名区别
router-link 自带的2个类名的区别是什么?
router-link-active(模糊匹配) url中 hash 值,包含 href属性值这个路径
------to = “/my” 可以匹配 /my/a /my/b …
router-link-exact-active(精确匹配) url中 hash 值路径,与 href属性值完全相同,设置此类名
------to = “/my” 只能匹配 /my…
自定义类名
linkActiveClass:--------模糊匹配类名
linkExactActiveClass:--------精确匹配类名
const router = new VueRouter({
    // routes: routes,
    routes,
    linkActiveClass: 'active',
	linkExactActiveClass: 'exactActive',
})
11.重定向
强制切换到目标path上
- 网页打开url默认hash值是 / 路径
- redirect是设置要重定向到哪个路由路径
需求:网页默认打开,,匹配路由 ‘/’ 强制切换到 '/home’上
const routes = [
    {
        path: '/',
        redirect: '/home',  // 重定向到 /home
    },
    // 路径和组件的映射关系
    {
        path: '/',
        // component: Home,
        // 路由懒加载
        component: () => import('../views/Home'),
    },
    {
        path: '/login',
        // component: Login,
        component: () => import('../views/Login')
    },
    {
        path: '/register',
        // component: Register,
        component: () => import('../views/Register')
    },
    // 写在最后
    {
        path: '*',
        redirect: '/home',
    },
]
总结:强制重定向后,还会重新来数组中匹配一次规则
12.路由-404页面
如果路由hash值没有和数组里规则匹配
默认给一个404页面
路由最后,path*匹配任意路径—前面都不匹配,就匹配最后这个,显示对应的组件
- 创建NotFound页面
<template>
    <div>
        404
    </div>
</template>

<script>
export default {

}
</script>

<style scoped></style>
- 修改路由配置
const routes = [
    {
        path: '/',
        redirect: '/home',  // 重定向到 /home
    },
    // 路径和组件的映射关系
    {
        path: '/home',
        // component: Home,
        // 路由懒加载
        component: () => import('../views/Home'),
    },
    {
        path: '/login',
        // component: Login,
        component: () => import('../views/Login')
    },
    {
        path: '/register',
        // component: Register,
        component: () => import('../views/Register')
    },
    // // 写在最后
    // {
    //     path: '*',
    //     redirect: '/home',
    // },
    {
        path: '*',
        component: () => import('../views/NotFound')
    }
]
总结
如果路由未命中任何规则,给出一个兜底的404页面
13.路由模式设置
一、hash路由
1.hash定义
hash 模式是一种把前端路由的路径用 # 拼接在真实 url 后面的模式,地址栏url中的 # 符号 http://localhost:8080/#/home,通过 hashchange 事件监听 hash 值的改变来渲染页面对应的组件。hash 模式不会向后端发送 http 请求,所有的 hash 值操作都与后端无关。改变hash不会重新加载页面
使用 location.hash 获取 hash 值:

2.location 对象
location 是 window.location 或者 document.location 的简写模式。

以 url 地址:http://localhost:8080/#/about?name=she&age=16 示例:
| 属性 | 解释 | 值 |
|---|---|---|
| hash | 设置或返回从#开始的锚点信息 | #/about?name=she&age=16 |
| host | 设置或返回主机名+端口号 | localhost:8080 |
| hostname | 设置或返回主机名 | localhost |
| port | 设置或返回端口号 | 8080 |
| href | 设置或返回完整的 URL | http://localhost:8080/#/about?name=she&age=16 |
| origin | 设置或返回协议+主机+端口 | http://localhost:8080 |
| pathname | 设置或返回当前 URL 的路径 | /(hash 值不算在路径里面,此处返回的是#之前的斜杠) |
| protocol | 设置或返回当前协议 | http: |
| search | 设置或返回从?开始的查询字符串 | ?name=she&age=16 |
location 常用方法:
| 方法名 | 解释 | 语法 |
|---|---|---|
| assign() | 加载并显示指定的 URL 的内容 | location.assign(url); |
| reload() | 刷新当前页面,就像刷新按钮一样 | location.reload(); |
| replace() | 以给定的 URL 来替换当前的资源 | location.replace(url); |
调用 location.replace() 方法后,当前页面不会保存到会话历史中(session History),这样,用户点击回退按钮时,将不会再跳转到该页面。
3.window.onhashchange 事件
当 URL 的片段标识符(hash 值)更改时,将触发 hashchange 事件 (跟在#符号后面的 URL 部分,包括#符号)。
- 使用 addEventListener 监听 hashchange 事件:
window.addEventListener('hashchange', function() {
  console.log('hash值被修改了')
}, false);
- onhashchange 事件处理程序
function locationHashChanged() {
	if (location.hash === '#/about') {
		console.log("欢迎进入about页面");
	}
}
window.onhashchange = locationHashChanged;
测试 hashchage 事件:
window.addEventListener('hashchange', function () {
	console.log('hashchage 事件被触发了');
});
// hash值的改变也会触发 window.onpopstate事件,onpopstate事件在 history模式中再做介绍
window.addEventListener("popstate", () => {
	console.log("popstate 事件被触发了");
})
直接修改浏览器url地址,添加 hash 值 #/about。可以看出,修改 hash 值会优先触发 popstate 事件,然后再触发 hashchange 事件
二、history路由
1.history 定义
history 是 HTML5 提供的新特性,允许开发者直接更改前端路由,也就是更改 url 地址而无需向后端发送 http 请求。
history 是 window.history 的简写模式,是 History 构造函数的实例化对象。
History 接口允许操作浏览器的曾经在标签页或者框架里访问的会话历史记录。
也就是说 History 里面保存着当前标签页的所有浏览页面的访问记录。
2.history API
1.实例化对象属性
| 属性 | 解释 | 值 |
|---|---|---|
| length | 会话历史记录中元素的数目,包括当前加载的页面 Integer | (整型数值) |
| scrollRestoration | 设置浏览器的默认滚动行为 | auto(默认值,浏览器自动滚动) / manual(关闭浏览器自动滚动) |
| state | 返回一个表示历史堆栈顶部的状态的任意值 | any(任意值) |
2.实例化对象方法
| 属性 | 解释 | 值 |
|---|---|---|
| back() | 在会话历史记录中向后移动一页。如果没有上一页,则此方法调用不执行任何操作 | window.history.back() |
| forward() | auto(默认值,浏览器自动滚动) / manual(关闭浏览器自动滚动) | window.history.forward(); |
| go() | go方法从会话历史记录中加载特定页面 | window.history.go(-1); 负值表示向后移动back(),正值表示向前移动forward(); 值为0或不传时重新加载当前页面 |
| pushState() | 向当前浏览器历史中添加记录 | history.pushState(state, title[, url]) |
| replaceState() | 修改当前历史记录实体,可以更新 state 对象以及 URL 地址。 | history.replaceState(stateObj, title[, url]); |
3.history.pushState()的使用
history.pushState() 方法接收三个参数:
- state:一个对象,popState 事件触发时,state 对象会传入回调函数。如无需传参,则设置为 null
- title:新页面的标题,但是所有浏览器目前都忽略这个值,因此可以设置为空字符串 “” 或者 null
- url:新的网址地址,必须与当前页面处于同一个域下,浏览器的地址栏将显示这个网址
- 接下来做一个测试,有一个 a.html 页面
- 使用 pushState 方法添加一条记录到 History 会话历史中,并传参
- 使用 pushState 添加一条记录后,url 地址更新,但是页面并没有更新,也就是说 pushState 方法只是更新了 url 地址
4.history.replaceState()的使用
history.replaceState() 方法接收的参数与 history.pushState() 方法相同,唯一的不同是,使用 replaceState 会更新当前页面的记录,包括 state 对象和 URL 地址。
举个例子,使用 pushState 添加 a.html b.html c.html 三个记录,然后使用 replaceState 添加 d.html ,最后查看历史记录栈中收录了几条历史记录。
历史记录栈中只存有三条记录,即 ["a.html", "b.html", "d.html"]。原因就是 replaceState 将 c.html 替换为了 d.html。
所以使用 history.back() 会返回 b.html。
使用 history.forward()也只会显示 d.html :
3.window.onpopstate 事件
window.onpopstate 事件是用来监听浏览历史记录变化的。
调用 history.pushState() 或者 history.replaceState() 不会触发 popstate 事件。popstate 事件只会在浏览器某些行为下触发,比如点击前进、后退按钮(或者在 JavaScript 中调用 history.back()、history.forward()、 history.go() 方法)。即,在同一文档的两个历史记录条目之间导航会触发该事件。
- 使用 addEventListener 监听 popstate 事件:
window.addEventListener('popstate', function(event) {
  console.log(event);
}, false);
- 使用 onpopstate 事件处理程序
function historyStateChanged(event) {
	console.log(event);
}
window.onpopstate= historyStateChanged;
测试,使用 popstate 监听记录栈的改变:
window.addEventListener("popstate", (event) => {
	console.log(event);
})
使用 pushState 以及 replaceState 并未触发 popstate 事件
使用 history.back() ,触发了 popstate 事件并打印了参数 event,** event事件对象中保存着 state 对象。**
http://localhost:8080/home(需要服务器支持,否则找的是文件夹)
利用了HTML5新增的pushState() 和 replaceState()方法
// 4. 创建路由对象,传入规则
const router = new VueRouter({
    // routes: routes,
    routes,
    mode: 'history', // 默认是hash
})
4.解决history模式下页面刷新404问题
在 history 下,你可以自由的修改 path,但刷新页面时,如果服务器中没有相应的响应或者资源,则会出现404页面,因为刷新页面会发送 http 请求。也就是说,使用 history 路由模式,需要通过服务端来允许地址可访问,后端也必须配置了当前资源路径地址才行。
如果后台部署使用了 nginx,可以对 nginx 进行如下配置来解决页面刷新问题(摘录):
server {
	listen	8080;
	server_name  localhost;
	location / {
	    root  'E:\dist';
	    index  /index.html;
	    try_files $uri $uri/ /index.html;
	}
}
14.编程式导航-js代码实现跳转
编程式导航:用js代码实现跳转
声明式导航:router-link实现跳转
语法:
- path路径跳转
this.$router.push({
	path:"路由路径",
})
- name命名路由跳转
this.$router.push({
	name:"路由名",
})
router/index.js路由规则里,给路由起名字
const routes = [
    {
        path: '/',
        redirect: '/home',  // 重定向到 /home
    },
    // 路径和组件的映射关系
    {
        path: '/home',
        name: 'home',
        component: () => import('../views/Home'),
    },
    {
        path: '/login',
        name: 'login',
        component: () => import('../views/Login')
    },
    {
        path: '/register',
        name: 'register',
        component: () => import('../views/Register')
    },
App.vue中router-link换成span,配合js的编程式导航跳转
<template>
  <div>
    <div class="nav">
      <span @click="goto('/home', 'home')">首页</span>
      <span @click="goto('/login', 'login')">登录</span>
      <span @click="goto('/register', 'register')">注册</span>
    </div>
    <router-view></router-view>
  </div>
</template>

<script>
/*
编程式导航:js方式实现跳转路由
语法:
this.$router.push({path:"路由路径"})
this.$router.push({name:"路由名"})
注意:
虽然用name跳转,但是url的hash值还是切换path路径值
使用场景:
使用name跳转,方便修改,(name路由名在页面上看不到,随便修改)适合路径比较长的时候
使用path跳转,可以在url的hash值看到,要尽量符合组件内规范
*/
export default {
  methods: {
    goto(targetPath, targetName) {
      this.$router.push({
        // path: targetPath
        name: targetName
      })
    }
  },
}
</script>

<style scoped>
.nav {
  display: flex;
  justify-content: space-around;
}

.router-link-exact-active {
  color: red;
}
</style>
总结
编程式导航:js方式实现跳转路由
语法:
this.$router.push({path:"路由路径"})
this.$router.push({name:"路由名"})
注意:
虽然用name跳转,但是url的hash值还是切换path路径值
使用场景:
使用name跳转,方便修改,(name路由名在页面上看不到,随便修改)适合路径比较长的时候
使用path跳转,可以在url的hash值看到,要尽量符合组件内规范
15.编程式导航-路由传参
两种传参方式:查询传参 + 动态路由传参
两种跳转方式,对两种传参方式都支持
- path路径跳转传参
    methods: {
        // 查询参数
        goSearch() {
            // this.$router.push(`/search?key=${this.iptValue}`)
            this.$router.push({
                path: '/search',
                query: {
                    key: this.iptValue
                }
            })
        }
    },
methods: {
		// 动态路由传参
		// 一定要先在路由规则中配置动态路由   path: '/detail/:word?',
        goSearch() {
            // this.$router.push(`/detail/${this.iptValue}`)
            this.$router.push({
                path: `/detail/${this.iptValue}`
            })
        }
    },
- name命名路由跳转传参
methods: {
        goSearch() {
            // 命名路由
            // 查询传参
            this.$router.push({
                name: 'search',
                query: {
                    key: this.iptValue
                }
            })
        }
   }
methods: {
        goSearch() {
            // 命名路由
            // 动态路由传参 ==> 一定要先在路由规则中配置动态路由 ==> path: '/detail/:word?',
            this.$router.push({
                name: 'detail',
                params: {
                    word: this.iptValue
                }
            })
        }
   }
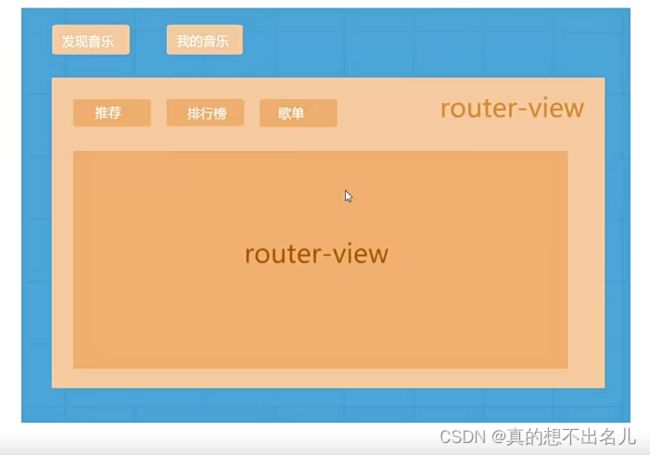
16.嵌套路由
在现有的一级路由下,再嵌套二级路由
- 创建需要用的所有组件
- src/views/Find.vue —发现音乐
- src/views/My.vue —我的音乐
- src/views/Second/Recommend.vue —发现音乐/推荐界面
- src/views/Second/Ranking.vue —发现音乐/排行榜
- src/views/Second/SongList.vue —发现音乐/歌单页面
- main.js 配置2级路由
- 一级路由 path 从 / 开始定义
- 二级路由往后 path 直接写名字,无需 /开头
- 二级路由在上级路由的children数组里编写路由信息对象
- 说明
- App.vue 的 router-view 负责发现音乐 和 我的音乐 页面切换
- Find.vue的 router-view 负责发现音乐下的三个页面切换
配置路由规则
// 3. 创建路由规则
const routes = [
    {
        path: '/',
        redirect: '/find'
    },
    {
        path: '/find',
        redict:'/find/recommend',
        component: () => import('../views/Find'),
        children: [
            {
                path: 'recommend',
                component: () => import('../views/Second/Recommend')
            },
            {
                path: 'ranking',
                component: () => import('../views/Second/Ranking')
            },
            {
                path: 'songlist',
                component: () => import('../views/Second/SongList')
            },
        ]
    },
    {
        path: '/my',
        component: () => import('../views/My')
    },
    {
        path: '*',
        component: () => import('../views/NotFound')
    },
]
App.vue中写路由出口
App.vue 的 router-view 负责发现音乐 和 我的音乐 页面切换
<template>
  <div>
    <div class="nav">
      <router-link to="/find">发现音乐</router-link>
      <router-link to="/my">我的音乐</router-link>
    </div>
    <router-view></router-view>
  </div>
</template>

<script>
export default {

}
</script>

<style scoped>
.nav {
  display: flex;
  width: 400px;
  justify-content: space-around;
}
</style>
Find.vue写二级路由出口
Find.vue的 router-view 负责发现音乐下的三个页面切换
<template>
    <div>
        <div class="nav_main">
            <router-link to="/find/recommend">推荐</router-link>
            <router-link to="/find/ranking">排行榜</router-link>
            <router-link to="/find/songlist">歌单</router-link>
        </div>
        <router-view></router-view>
    </div>
</template>

<script>
export default {

}
</script>

<style scoped>
.nav_main {
    display: flex;
    justify-content: space-around;
    width: 400px;
    background-color: red;
    border-radius: 7px;
}

.nav_main a {
    text-decoration: none;
}

.nav_main .router-link-exact-active {
    background-color: brown;
    border-radius: 5px;
}
</style>
解决方法:
在路由规则给find一级路由添加重定向redict:'/find/recommend'
总结
嵌套路由找准在哪个页面里写router-view 和 对应的规则里写 children
17.组件缓存
从面经 点到详情 又点返回 数据重新加载了-----》希望回到原来的位置
原因:路由跳转后,组件被销毁了,返回回来的组件又重新创建,所以数据重新被加载了
keep-alive 是什么
keep-alive是Vue的内置组件,当它包裹动态组件时,会缓存不活动的组件实例,而不是销毁他们
keep-alive是一个抽象组件,它自身不会渲染成一个dom元素,也不会出现在父组件链中
优点:
在组件切换过程中,吧切换出去的组件保留在内存中,防止重复渲染dom
减少加载时间以及性能消耗,提高用户体验
三个属性
- include 组件名数组 ,只有匹配的组件会被缓存
- exclude 组件名数组 任何匹配的组件都不会被缓存
- max 最多可以缓存多少组件实例
两个生命周期钩子函数
- actived 激活时,组件被看到时触发
- deactived 失活时 ,离开页面组件看不见触发
18.vue滚动行为控制——页面跳转返回上一个页面保留滚动位置
- 缓存?解决这个问题,第一时间想到的是缓存keep-alive,但是缓存只是不执行create/mounted生命周期钩子,页面滚动位置是无法保留的,通过缓存的方法无法实现这个效果。
- 滚动?但是vue是单页面应用框架,整个项目就一个window对象,实现起来也是比较麻烦的,而且效果不一定好。
- 最后就找到了vue官方提供的进阶功能——滚动行为,通过这个功能,可以自定义路由切换时页面如何滚动。
功能行为 :
使用前端路由,当切换到新路由时,想要页面滚到顶部,或者是保持原先的滚动位置,就像重新加载页面那样。 vue-router 能做到,而且更好,它让你可以自定义路由切换时页面如何滚动。
const router = new Router({
    mode: "history",
    routes: routes,
    scrollBehavior(to, from, savedPosition) {
        console.log(savedPosition)
        if(savedPosition) {
            return savedPosition
        } else {
            return {
                x: 0,
                y: 0
            }
        }
    }
});
注意:该功能只能在history的路由模式下有效,对于某些页面操作可能会影响上一个页面的展示,那么上一个页面就不应该做滚动处理,这个时候就可以根据路由的来源和去向来判断是否需要滚动了。
如果是hash模式的路由,那么就只能靠方式间接实现滚动状态保持了…


