人工智能模型转ONNX & 连接摄像头使用ONNX格式的模型进行推理
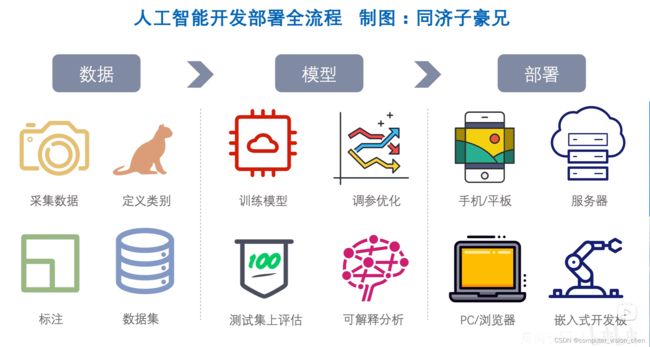
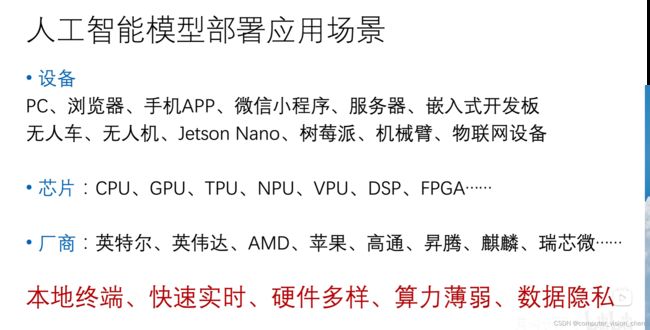
部署之后模型的运算基本上能快5倍。本地部署之后,联网都不需要,数据和隐私不像在网上那样容易泄露了。
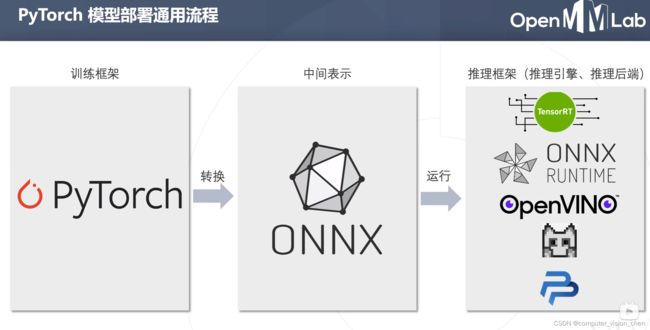
模型部署的通用流程
各大厂商都有自己的推理工具。
训练的归训练,部署的归部署,人工智能也分训练端和部署端,每一个端操心自己事就好了。
ONNX
1.安装ONNX需要的环境
# 如果Pytorch已经安装,请忽略下一步
# pip3 install torch torchvision --extra-index-url https://download.pytorch.org/whl/cu113

# 安装工具
# pip install numpy pandas matplotlib tqdm opencv-python pillow -i https://pypi.tuna.tsinghua.edu.cn/simple

# 安装onnx和onnxruntime
# pip install onnx -i https://pypi.tuna.tsinghua.edu.cn/simple
# pip install onnxruntime -i https://pypi.tuna.tsinghua.edu.cn/simple

import onnx
print('ONNX 版本', onnx.__version__)

import onnxruntime as ort
print('ONNX Runtime 版本', ort.__version__)
2.将训练好的模型转换为ONNX格式
import torch
from torchvision import models

# 有 GPU 就用 GPU,没有就用 CPU
device = torch.device('cuda:0' if torch.cuda.is_available() else 'cpu')
print('device', device)

# 导入训练好的模型
model = torch.load('../checkpoint/best_0.727.pth')
model = model.eval().to(device)


# Pytorch模型转ONNX模型
x = torch.randn(1, 3, 256, 256).to(device)

with torch.no_grad():
    torch.onnx.export(
        model,                   # 要转换的模型
        x,                       # 模型的任意一组输入
        'resnet18_fruit30.onnx', # 导出的 ONNX 文件名
        opset_version=11,        # ONNX 算子集版本
        input_names=['input'],   # 输入 Tensor 的名称(自己起名字)
        output_names=['output']  # 输出 Tensor 的名称(自己起名字)
    )
3.验证onnx模型导出成功
import onnx

# 读取 ONNX 模型
onnx_model = onnx.load('resnet18_shizi.onnx')

# 检查模型格式是否正确
onnx.checker.check_model(onnx_model)

print('无报错,onnx模型载入成功')

# 以可读的形式打印计算图
print(onnx.helper.printable_graph(onnx_model.graph))
4.连接摄像头使用ONNX Runtime格式的模型进行推理
'''
FPS为 40左右,为什么比没有部署前少了10个fps左右
'''
import os

import cv2
import numpy as np
import pandas as pd
import time

from tqdm import tqdm # 进度条

import torch
import torch.nn.functional as F
from torchvision import transforms

import onnxruntime

from PIL import Image, ImageFont, ImageDraw

import matplotlib.pyplot as plt

# 导入中文字体,指定字体大小
font = ImageFont.truetype('/opt/software/computer_vision/codes/My_codes/obeject_detection/tongjizhihaoxiong/data/SimHei.ttf', 32)

# 载入onnx模型
model = onnxruntime.InferenceSession('resnet18_shizi.onnx')

# 载入类别名称 和 ID索引号 的映射字典
idx_to_labels = np.load('/opt/software/computer_vision/codes/My_codes/obeject_detection/tongjizhihaoxiong/recognize_shizi/idx_to_labels.npy', allow_pickle=True).item()
# 获得类别名称
classes = list(idx_to_labels.values())

# 测试集图像预处理-RCTN:缩放裁剪、转 Tensor、归一化
test_transform = transforms.Compose([transforms.Resize(256),
                                     transforms.CenterCrop(256),
                                     transforms.ToTensor(),
                                     transforms.Normalize(
                                         mean=[0.485, 0.456, 0.406],
                                         std=[0.229, 0.224, 0.225])
                                    ])

# 处理帧函数
def process_frame(img_bgr):
    # 记录该帧开始处理的时间
    start_time = time.time()

    img_rgb = cv2.cvtColor(img_bgr, cv2.COLOR_BGR2RGB)  # BGR转RGB
    img_pil = Image.fromarray(img_rgb)  # array 转 PIL

    ## 预处理
    input_img = test_transform(img_pil)  # 预处理
    input_tensor = input_img.unsqueeze(0).numpy()

    ## onnx runtime 预测
    ort_inputs = {'input': input_tensor}  # onnx runtime 输入
    pred_logits = model.run(['output'], ort_inputs)[0]  # onnx runtime 输出
    pred_logits = torch.tensor(pred_logits)
    pred_softmax = F.softmax(pred_logits, dim=1)  # 对 logit 分数做 softmax 运算

    ## 解析图像分类预测结果
    n = 5
    top_n = torch.topk(pred_softmax, n)  # 取置信度最大的 n 个结果
    pred_ids = top_n[1].cpu().detach().numpy().squeeze()  # 解析出类别
    confs = top_n[0].cpu().detach().numpy().squeeze()  # 解析出置信度

    ## 在图像上写中文
    draw = ImageDraw.Draw(img_pil)
    for i in range(len(confs)):
        pred_class = idx_to_labels[pred_ids[i]]

        # 写中文:文字坐标,中文字符串,字体,rgba颜色
        text = '{:<15} {:>.3f}'.format(pred_class, confs[i])  # 中文字符串
        draw.text((50, 100 + 50 * i), text, font=font, fill=(255, 0, 0, 1))

    img_rgb = np.array(img_pil)  # PIL 转 array
    img_bgr = cv2.cvtColor(img_rgb, cv2.COLOR_RGB2BGR)  # RGB转BGR

    # 记录该帧处理完毕的时间
    end_time = time.time()
    # 计算每秒处理图像帧数FPS
    FPS = 1 / (end_time - start_time)
    # 图片,添加的文字,左上角坐标,字体,字体大小,颜色,线宽,线型
    img_bgr = cv2.putText(img_bgr, 'FPS  ' + str(int(FPS)), (50, 80), cv2.FONT_HERSHEY_SIMPLEX, 2, (255, 0, 255), 4,
                          cv2.LINE_AA)
    return img_bgr

def view_video(video_path):
    # 设置显示窗口的大小
    width,height = 800,600

    video = cv2.VideoCapture(video_path)
    '''把摄像头设置为1980 x 1080'''
    video.set(cv2.CAP_PROP_FRAME_WIDTH,1920)
    video.set(cv2.CAP_PROP_FRAME_HEIGHT,1080)
    video.set(cv2.CAP_PROP_FOURCC,cv2.VideoWriter.fourcc('M','J','P','G'))

    if video.isOpened():
        '''
            video.read() 一帧一帧地读取
            open 得到的是一个布尔值,就是 True 或者 False
            frame 得到当前这一帧的图像
        '''
        open, frame = video.read()
    else:
        open = False

    while open:
        ret, frame = video.read()
        # 如果读到的帧数不为空,那么就继续读取,如果为空,就退出
        if frame is None:
            break
        if ret == True:
            # !!!处理帧函数
            frame = process_frame(frame)
            cv2.namedWindow('video',cv2.WINDOW_NORMAL)
            cv2.imshow("video", frame)
            # 50毫秒内判断是否受到esc按键的信息
            if cv2.waitKey(50) & 0xFF == 27:
                break
    video.release()
    cv2.destroyAllWindows()

if __name__ == '__main__':
    # 取前1个参数 和 摄像头的Id
    camera_id = 0
    view_video(camera_id)
TensorRT和ONNX的区别
TensorRT和ONNX是深度学习模型优化和跨平台移植方面两个各有优势的工具。

TensorRT是NVIDIA推出的用于深度学习模型优化的高性能库,旨在最大程度地提高深度学习推理的效率和吞吐量。
它可以将训练好的神经网络模型转换为高度优化的代码,以便在GPU上进行实时推理。
TensorRT针对不同类型的层使用了一系列高效的算法和技巧来加速计算,并且可以通过与CUDA和cuDNN等NVIDIA库的集成,以及利用GPU硬件加速来进一步提高性能。

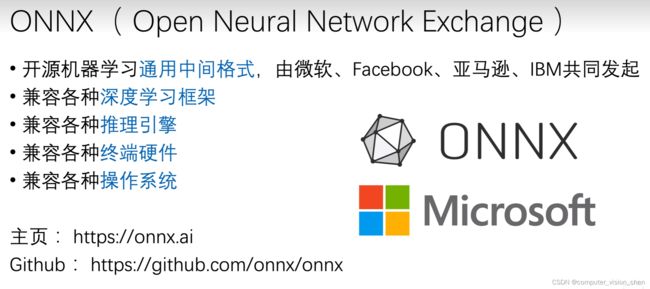
ONNX(Open Neural Network Exchange)是由微软、Facebook和亚马逊等科技公司联合开发的跨平台深度学习框架,
它借助中间表示的方式将深度学习框架之间的模型和权重参数相互转换,使得用户可以方便地将自己训练好的模型迁移到其他框架或硬件平台上使用。
相比之下,ONNX主要关注的是模型的跨平台移植性,使得用户可以方便地在不同的硬件平台上部署模型,并且支持多种硬件平台,包括CPU、GPU和FPGA等。


