Android 几种换肤方式和原理分析
1.通过Theme切换主题
通过在setContentView之前设置Theme实现主题切换。
在styles.xml定义一个夜间主题和白天主题:
设置主要切换主题View的背景:
切换主题:
通过调用setTheme()
@Override
protected void onCreate(Bundle savedInstanceState) {
    super.onCreate(savedInstanceState);
    setTheme(R.style.BlackTheme);
    setContentView(R.layout.activity_main);
}


finish();
Intent intent = getIntent();
intent.setFlags(Intent.FLAG_ACTIVITY_NEW_TASK | Intent.FLAG_ACTIVITY_CLEAR_TASK);
startActivity(intent);
overridePendingTransition(0, 0);
2.通过AssetManager切换主题
下载皮肤包,通过AssetManager加载皮肤包里面的资源文件,实现资源替换。
ClassLoader
Android可以通过classloader获取已安装apk或者未安装apk、dex、jar的context对象,从而通过反射去获取Class、资源文件等。
加载已安装应用的资源
//获取已安装app的context对象
Context context = ctx.getApplicationContext().createPackageContext("com.noob.resourcesapp",         Context.CONTEXT_INCLUDE_CODE | Context.CONTEXT_IGNORE_SECURITY);
//获取已安装app的resources对象
Resources resources = context.getResources();
//通过resources获取classloader,反射获取R.class
Class aClass = context.getClassLoader().loadClass("com.noob.resourcesapp.R$drawable");
int resId = (int) aClass.getField("icon_collect").get(null);
imageView.setImageDrawable(resources.getDrawable(id));
加载未安装应用的资源
String apkPath = Environment.getExternalStorageDirectory().getAbsolutePath() + "/test.apk";
//通过反射获取未安装apk的AssetManager
AssetManager assetManager = AssetManager.class.newInstance();
//通过反射增加资源路径
Method method = assetManager.getClass().getMethod("addAssetPath", String.class);
method.invoke(assetManager, apkPath);
File dexDir = ctx.getDir("dex", Context.MODE_PRIVATE);
if (!dexDir.exists()) {
    dexDir.mkdir();
}
//获取未安装apk的Resources
Resources resources = new Resources(assetManager, ctx.getResources().getDisplayMetrics(),
        ctx.getResources().getConfiguration());
//获取未安装apk的ClassLoader
ClassLoader classLoader = new DexClassLoader(apkPath, dexDir.getAbsolutePath(), null, ctx.getClassLoader());
//反射获取class
Class aClass = classLoader.loadClass("com.noob.resourcesapp.R$drawable");
int id = (int) aClass.getField("icon_collect").get(null);
imageView.setImageDrawable(resources.getDrawable(id));
3.在view生成的时候去动态加载背景
思考先:一个TextView在xml简析时,后面会经历什么呢?setContentView(R.id.activity_main)后面经历了什么呢?
直接说答案:
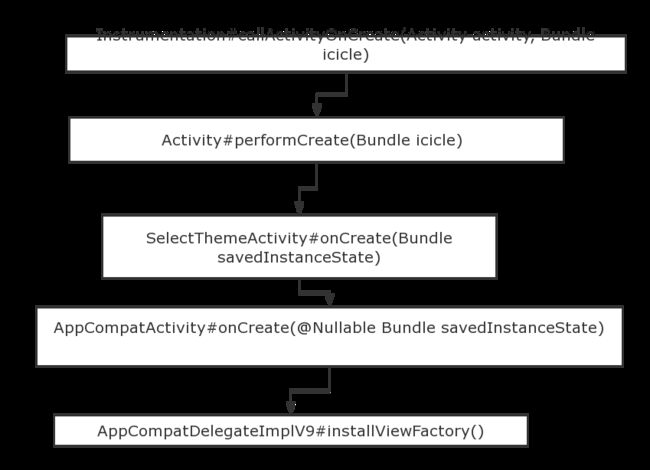
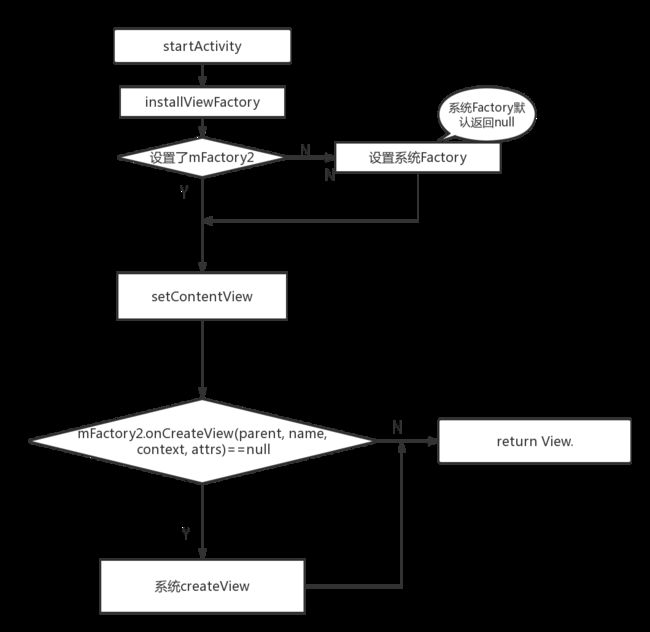
Activity -> OnCreat的流程如下:
然后:
这里注意一点layoutInflater.getFactory(),返回的是LayoutInflater的一个内部接口Factory。默认没有人为干预的情况下,我们不设置Factory的情况下,layoutInflater.getFactory()等于null,系统会自己创建一个Factory去处理XML到View的转换。反之,如果我们设置了自己的Factory,那么系统就会走我们Factory的onCreateView,他会返回一个我们定制化的View。
Factory定义如下:
public interface Factory {
        /**
         * Hook you can supply that is called when inflating from a LayoutInflater.
         * You can use this to customize the tag names available in your XML
         * layout files.
         *
         *
         * Note that it is good practice to prefix these custom names with your
         * package (i.e., com.coolcompany.apps) to avoid conflicts with system
         * names.
         *
         * @param name Tag name to be inflated.
         * @param context The context the view is being created in.
         * @param attrs Inflation attributes as specified in XML file.
         *
         * @return View Newly created view. Return null for the default
         *         behavior.
         */
        public View onCreateView(String name, Context context, AttributeSet attrs);
    }
Factory
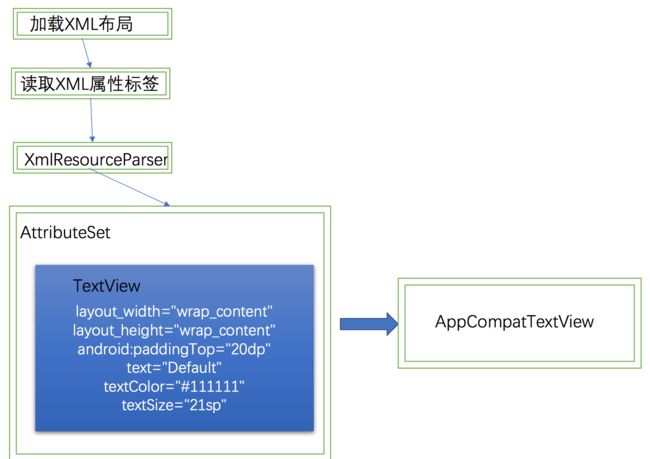
Factory是一个很强大的接口。当我们使用inflating一个XML布局时,可以使用这个类进行拦截解析到的XML中的标签属性-AttributeSet和上下文-Context,以及标签名称-name(例如:TextView)。然后我们根据这些属性可以创建对应的View,设置一些对应的属性。
比如:我读取到XML中的TextView标签,这时,我就创建一个AppCompatTextView对象,它的构造方法中就是我读取到的XML属性。然后,将构造好的View返回即可。
默认情况下,从context.getSystemService(Context.LAYOUT_INFLATER_SERVICE)得到LayoutInflater,通过layoutInflater.getFactory()刚开始是null,然后执行LayoutInflaterCompat.setFactory(layoutInflater, this);方法。
看下这个方法:
  * Attach a custom Factory interface for creating views while using
     * this LayoutInflater. This must not be null, and can only be set once;
     * after setting, you can not change the factory.
     *
     * @see LayoutInflater#setFactory(android.view.LayoutInflater.Factory)
     */
    public static void setFactory(LayoutInflater inflater, LayoutInflaterFactory factory) {
        IMPL.setFactory(inflater, factory);
    }
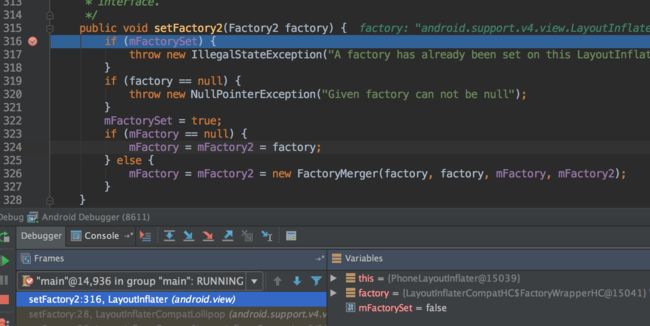
在这里我们关注下传入的LayoutInflaterFactory的实例,最终这个设置的LayoutInflaterFactory传入到哪里了呢?向下debug,进入LayoutInflater中的下面:
给mFactory = mFactory2 = factory执行了,进行mFactory和mFactory2的赋值。
到这里为止,初始化好了LayoutInflater和LayoutInflaterFactory。
好了,现在就走完了SelectThemeActivity#onCreate中的super.onCreate(savedInstanceState);下面开始走setContentView(R.layout.activity_select_theme);
setContentView(int resId)
setContentView会走到LayoutInflate的下面这里:
public View inflate(@LayoutRes int resource, @Nullable ViewGroup root, boolean attachToRoot) {
        final Resources res = getContext().getResources();
        if (DEBUG) {
            Log.d(TAG, "INFLATING from resource: \"" + res.getResourceName(resource) + "\" ("
                    + Integer.toHexString(resource) + ")");
        }
            //在这里将Resource得到layout的XmlResourceParser对象
        final XmlResourceParser parser = res.getLayout(resource);
        try {
            return inflate(parser, root, attachToRoot);
        } finally {
            parser.close();
        }
    }
再向下就到了LayoutInflate重点:
public View inflate(XmlPullParser parser, @Nullable ViewGroup root, boolean attachToRoot) {
        synchronized (mConstructorArgs) {
            .....
            //将上面给我的XmlPullParser转换为对应的View的属性AttributeSet供View的构造方法或其他方法使用
            final AttributeSet attrs = Xml.asAttributeSet(parser);
            ....
          try {
          if{
                ....
             } else {
             //默认布局会走到这里,Temp是XML文件的根布局
                    // Temp is the root view that was found in the xml
                    final View temp = createViewFromTag(root, name, inflaterContext, attrs);
                        ...

                    // Inflate all children under temp against its context.
                    rInflateChildren(parser, temp, attrs, true);
                        ....
                        //添加解析到的根View
                    // to root. Do that now.
                    if (root != null && attachToRoot) {
                        root.addView(temp, params);
                    }
                        ....
                    }

            } catch (XmlPullParserException e) {
               ....
            return result;
        }
    }
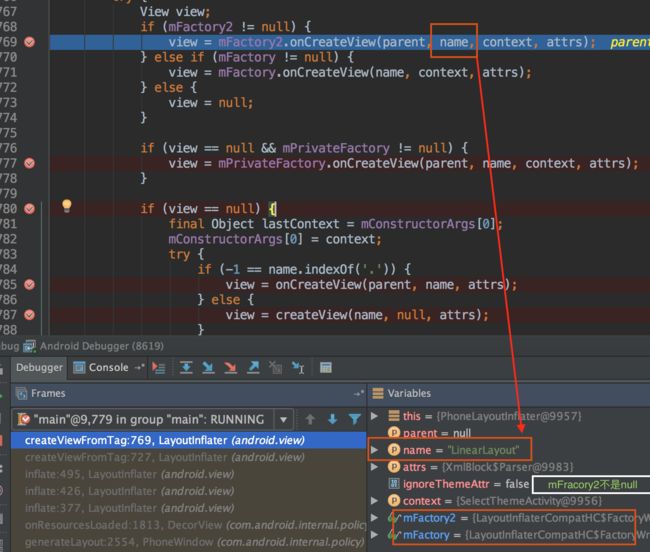
进入到createViewFromTag方法之中,会进入到LayoutInflate的View createViewFromTag(View parent, String name, Context context, AttributeSet attrs, boolean ignoreThemeAttr)中。
这里的name传入的就是就是解析到的标签值LinearLayout。
@Override
    public final View onCreateView(View parent, String name, Context context, AttributeSet attrs) {
        // First let the Activity's Factory try and inflate the view
        先试着进行解析布局
        final View view = callActivityOnCreateView(parent, name, context, attrs);
        if (view != null) {
            return view;
        }

        // If the Factory didn't handle it, let our createView() method try
        return createView(parent, name, context, attrs);
    }
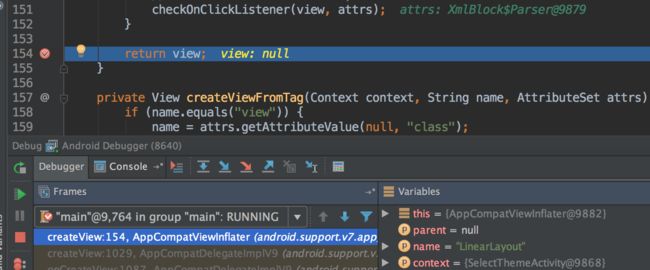
很遗憾, callActivityOnCreateView返回的总是null:
@Override
    View callActivityOnCreateView(View parent, String name, Context context, AttributeSet attrs) {
        // On Honeycomb+, Activity's private inflater factory will handle calling its
        // onCreateView(...)
        return null;
    }
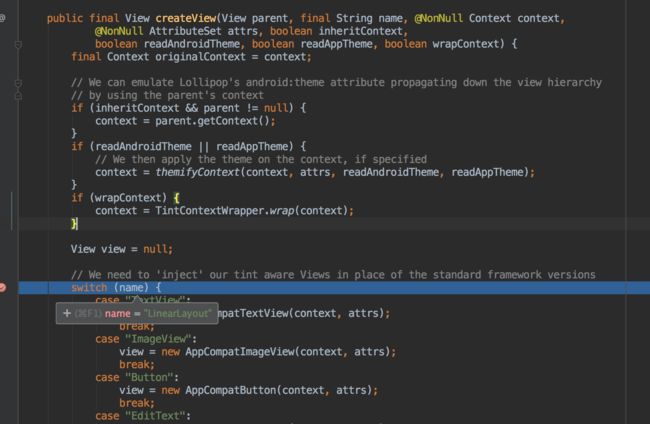
然后进入到下面的,createView(parent, name, context, attrs);中。重点来了!!!,期盼已久的看看Google源码是如何创建View的。
从XML到View的华丽转身
担心图片失效,再复制一遍代码:
public final View createView(View parent, final String name, @NonNull Context context,
            @NonNull AttributeSet attrs, boolean inheritContext,
            boolean readAndroidTheme, boolean readAppTheme, boolean wrapContext) {
        final Context originalContext = context;

        // We can emulate Lollipop's android:theme attribute propagating down the view hierarchy
        // by using the parent's context
        if (inheritContext && parent != null) {
            context = parent.getContext();
        }
        if (readAndroidTheme || readAppTheme) {
            // We then apply the theme on the context, if specified
            context = themifyContext(context, attrs, readAndroidTheme, readAppTheme);
        }
        if (wrapContext) {
            context = TintContextWrapper.wrap(context);
        }

        View view = null;

        // We need to 'inject' our tint aware Views in place of the standard framework versions
        switch (name) {
            case "TextView":
                view = new AppCompatTextView(context, attrs);
                break;
            case "ImageView":
                view = new AppCompatImageView(context, attrs);
                break;
            case "Button":
                view = new AppCompatButton(context, attrs);
                break;
            case "EditText":
                view = new AppCompatEditText(context, attrs);
                break;
            case "Spinner":
                view = new AppCompatSpinner(context, attrs);
                break;
            case "ImageButton":
                view = new AppCompatImageButton(context, attrs);
                break;
            case "CheckBox":
                view = new AppCompatCheckBox(context, attrs);
                break;
            case "RadioButton":
                view = new AppCompatRadioButton(context, attrs);
                break;
            case "CheckedTextView":
                view = new AppCompatCheckedTextView(context, attrs);
                break;
            case "AutoCompleteTextView":
                view = new AppCompatAutoCompleteTextView(context, attrs);
                break;
            case "MultiAutoCompleteTextView":
                view = new AppCompatMultiAutoCompleteTextView(context, attrs);
                break;
            case "RatingBar":
                view = new AppCompatRatingBar(context, attrs);
                break;
            case "SeekBar":
                view = new AppCompatSeekBar(context, attrs);
                break;
        }

        if (view == null && originalContext != context) {
            // If the original context does not equal our themed context, then we need to manually
            // inflate it using the name so that android:theme takes effect.
            view = createViewFromTag(context, name, attrs);
        }

        if (view != null) {
            // If we have created a view, check it's android:onClick
            checkOnClickListener(view, attrs);
        }

        return view;
    }
可以看到,它是拿标签名称进行switch的比较,是哪一个就进入到哪一个中进行创建View。
有人会说,这里没有LinearLayout对应的switch啊。的确。最终返回null。
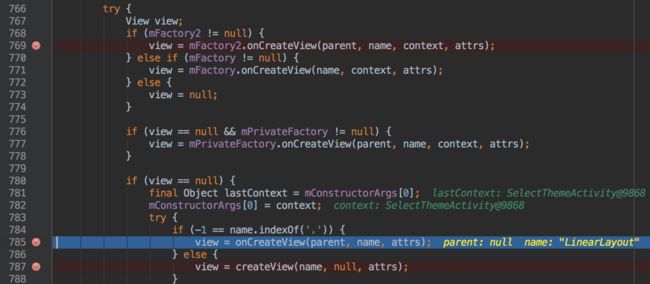
回到最初,由于Line769返回null,同时name值LinearLayout不包含".",进入到Line785onCreateView(parent, name, attrs)。
到这里,知道这个标签是LinearLayout了,那么开始创建这个对象了。问题来了,我们知道这个对象名称了,但是它属于哪个包名?如何创建呢?
根据标签名称创建对象
我们知道,Android控件中的包名总共就那么几个:android.widget、android.webkit、android.app,既然就这么几种,干脆挨个用这些字符串进行如下拼接:
android.widget.LinearLayout、android.webkit.LinearLayout、android.app.LinearLayout、,然后挨个创建对象,一旦创建成功即说明这个标签所在的包名是对的,返回这个对象即可。
那么,从上面debug会进入到如下源码:
sClassPrefixList的定义如下:
private static final String[] sClassPrefixList = {
        "android.widget.",
        "android.webkit.",
        "android.app."
    };
注意:是final的
创建Android布局标签对象
继续向下,进入到真正的创建Android布局标签对象的实现。在这个方法中,才是“android.widget.”包下的,LinearLayout、RelativeLayout等等的具体实现。
name="LinearLayout"
prefix="android.widget."
分析下这段代码(下面的方法中去掉了一些无用代码):
public final View createView(String name, String prefix, AttributeSet attrs)
            throws ClassNotFoundException, InflateException {
//step1 :sConstructorMap是<标签名称:标签对象>的map,用来缓存对象的。第一次进入时,这个map中是空的。
        Constructor constructor = sConstructorMap.get(name);
        if (constructor != null && !verifyClassLoader(constructor)) {
            constructor = null;
            sConstructorMap.remove(name);
        }
        Class clazz = null;

        try {
//step2:在map缓存中没有找到对应的LinearLayout为key的对象,则创建。
            if (constructor == null) {
                // Class not found in the cache, see if it's real, and try to add it

//step3:【关键点,反射创建LinearLayout对象】,根据"prefix + name"值是"android.widget.LinearLayout"加载对应的字节码文件对象。
              clazz = mContext.getClassLoader().loadClass(
                        prefix != null ? (prefix + name) : name).asSubclass(View.class);

                if (mFilter != null && clazz != null) {
                    boolean allowed = mFilter.onLoadClass(clazz);
                    if (!allowed) {
                        failNotAllowed(name, prefix, attrs);
                    }
                }
//step4:获取LinearLayout的Constructor对象
                constructor = clazz.getConstructor(mConstructorSignature);
                constructor.setAccessible(true);
//step5:缓存LinearLayout的Constructor对象
                sConstructorMap.put(name, constructor);
            } else {
                // If we have a filter, apply it to cached constructor
                if (mFilter != null) {
                    // Have we seen this name before?
                    Boolean allowedState = mFilterMap.get(name);
                    if (allowedState == null) {
                        // New class -- remember whether it is allowed
                        clazz = mContext.getClassLoader().loadClass(
                                prefix != null ? (prefix + name) : name).asSubclass(View.class);

                        boolean allowed = clazz != null && mFilter.onLoadClass(clazz);
                        mFilterMap.put(name, allowed);
                        if (!allowed) {
                            failNotAllowed(name, prefix, attrs);
                        }
                    } else if (allowedState.equals(Boolean.FALSE)) {
                        failNotAllowed(name, prefix, attrs);
                    }
                }
            }

            Object[] args = mConstructorArgs;
            args[1] = attrs;
//step6:args的两个值分别是SelectThemeActivity,XmlBlock$Parser。到这里就调用了LinearLayout的两个参数的构造方法去实例化对象。至此,LinearLayout的实现也就是Android中的布局文件的实现全部完成。最后把创建的View给return即可。
            final View view = constructor.newInstance(args);
            if (view instanceof ViewStub) {
                // Use the same context when inflating ViewStub later.
                final ViewStub viewStub = (ViewStub) view;
                viewStub.setLayoutInflater(cloneInContext((Context) args[0]));
            }
            return view;

        }
                                      ......
    }
在这个方法中关键的步骤就是如何去实例化布局标签对象。这也是我们换肤的前提知识。
总结下根据标签+属性创建View的思路:
两个关键点:
- 是否设置了Factory
- Factory的onCreateView是否返回null
再让我们回到最初的地方:
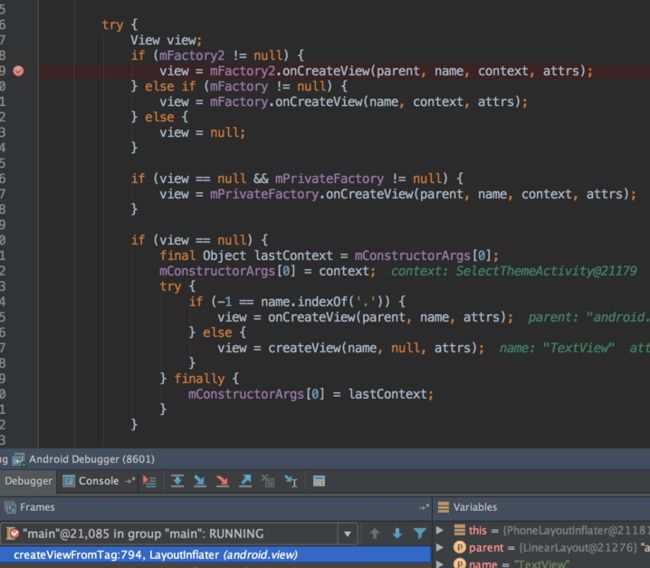
View view;
            if (mFactory2 != null) {
                view = mFactory2.onCreateView(parent, name, context, attrs);
            } else if (mFactory != null) {
                view = mFactory.onCreateView(name, context, attrs);
            } else {
                view = null;
            }

            if (view == null && mPrivateFactory != null) {
                view = mPrivateFactory.onCreateView(parent, name, context, attrs);
            }
//请注意下面这个判断,系统肯定会走上面的mFactory2.onCreateView,
//默认系统的Factory返回的是null,
//所以系统会走下面自己的创建View的实现逻辑。

//如果我们在上面的流程图的第一步中设置了自己的Factory,那么系统
//会调用我们自己的Factory的createView的方法,这个时候,如果我们
//自己的Factory#onCreateView != null,那么就是返回我们的View了。
            if (view == null) {
                final Object lastContext = mConstructorArgs[0];
                mConstructorArgs[0] = context;
                try {
                    if (-1 == name.indexOf('.')) {
                        view = onCreateView(parent, name, attrs);
                    } else {
                        view = createView(name, null, attrs);
                    }
                } finally {
                    mConstructorArgs[0] = lastContext;
                }
            }

 return view;
总的换肤开始:
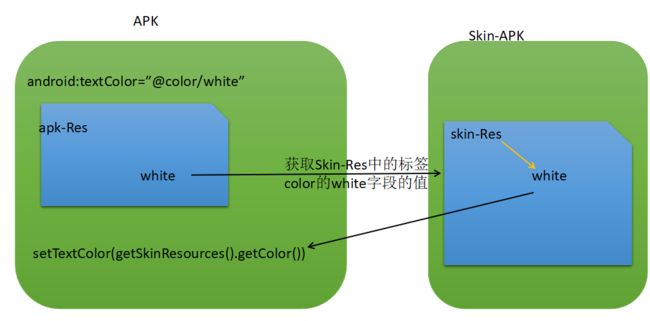
我们通过我们view的属性的值white,拿到skin-apk中的white属性的skinResId,然后根据skinRes.getColor(skinResId)返回color,然后设置到我们的TextView上面。
step1 实现LayoutInflaterFactory接口,创建自己的Factory
public  class SkinActivity extends AppCompatActivity {

    protected LayoutInflaterFactoryImpl layoutInflaterFactory;

    @Override
    protected void onCreate(Bundle savedInstanceState) {
        layoutInflaterFactory = new LayoutInflaterFactoryImpl();
        LayoutInflaterCompat.setFactory(getLayoutInflater(), layoutInflaterFactory);
        super.onCreate(savedInstanceState);
    }

}
看下运行结果:
OK!没问题,每一个View的实现我们都可以拦截到,下一步开始拿取View的background、或者TextColor进行相应的更改。
step2 获取view需要换肤的属性
保存view的相关属性
public class ViewAttrs {


    public String attributeName, resourceEntryName, resourceTypeName;
    public int resId;


    public ViewAttrs(String attributeName, int resId, String resourceEntryName, String resourceTypeName) {
        this.attributeName = attributeName;
        this.resId = resId;
        this.resourceEntryName = resourceEntryName;
        this.resourceTypeName = resourceTypeName;
    }


}
View换肤时的操作
public class SkinView {

    private View view;

    private ArrayList viewAttrses;

    public SkinView(View view, ArrayList viewAttrses) {
        this.view = view;
        this.viewAttrses = viewAttrses;
    }

    //android:textColor = "@color/red_color"
    //android:background = "@mipmap/pic1"
    //android:background = "@drawable/selector"
    //android:background = "@color/blue_color"

    public void changeTheme() {
         //TODO 待实现的换肤代码
    }
}
onCreateView创建View后,读取view的属性值,并且保存
 /**
     * 解析本地view的属性,并保存该view
     * 解析:view的属性名称;view的属性值;view的background;view的resId
     * @param view
     * @param context
     * @param attrs
     */
    private void saveViewAttrs(View view, Context context, AttributeSet attrs) {
        //将view的每一种属性 以及对应的值放在list中
        ArrayList viewAttrses = new ArrayList<>();
        for (int i = 0; i < attrs.getAttributeCount(); i++) {
            String attributeName = attrs.getAttributeName(i);//background或者textColor
            String attributeValue = attrs.getAttributeValue(i);//拿到view的id。类似于@2131361811
            if(SkinConstans.BACKGROUND.equalsIgnoreCase(attributeName) || SkinConstans.TEXT_COLOR.equalsIgnoreCase(attributeName)){//暂且这样判断,后面会有优化后的代码
                int resId = Integer.parseInt(attributeValue.substring(1));//截取@2131361811 ,拿到实际的在R文件中的值
                String resourceTypeName = context.getResources().getResourceTypeName(resId);//background的mipmap或者drawable或者color等
                String resourceEntryName = context.getResources().getResourceEntryName(resId); //mipmap、drawable、color对应的值
                ViewAttrs viewAttrs = new ViewAttrs(attributeName, resId, resourceEntryName, resourceTypeName);
                viewAttrses.add(viewAttrs);
            }

        }
        if(viewAttrses.size() > 0){
            //保存需要换肤的view以及对应的属性
            SkinView skinView = new SkinView(view, viewAttrses);
            skinViews.add(skinView);
        }
    }
执行换肤时调用:
public void changeTheme(){
        for (int i = 0; i < skinViews.size(); i++) {
            skinViews.get(i).changeTheme();
        }
    }
step3 实现加载插件apk,并且拿到插件的资源对象
public void loadSkin(String skinPath) {
        //------------拿到skinPackageName----------
        skinPackageName = context.getPackageManager().getPackageArchiveInfo(skinPath, PackageManager.GET_ACTIVITIES).packageName;
        //----------拿到skin中的Resource对象----------
        AssetManager assets = null;
        try {
            assets = AssetManager.class.newInstance();
            Method addAssetPath = AssetManager.class.getMethod("addAssetPath", String.class);
            addAssetPath.invoke(assets, skinPath);
        } catch (InstantiationException e) {
            e.printStackTrace();
        } catch (IllegalAccessException e) {
            e.printStackTrace();
        } catch (NoSuchMethodException e) {
            e.printStackTrace();
        } catch (InvocationTargetException e) {
            e.printStackTrace();
        }
        skinRes = new Resources(assets, context.getResources().getDisplayMetrics(), context.getResources().getConfiguration());
    }
step 4 获取插件中的resId的值
    /**
     * @param resId
     * @return
     */
    public int getColor(int resId) {
        if (skinRes == null) {
            return resId;
        }
        //通过本地APP中的resId拿到本app对应的资源名称,然后再skin apk中找到该资源名称, 在根据skin中的资源名称 拿到对应的资源值
        String resourceName = context.getResources().getResourceName(resId);
        //String name, String defType, String skinPackageName  拿到skin包中的resId
        int skinResId = skinRes.getIdentifier(resourceName.substring(resourceName.indexOf("/") + 1), SkinConstans.COLOR, skinPackageName);
        if (skinResId == 0) {//说明在skin皮肤中没有找到对应的resId,则返回原本的resId
            return context.getResources().getColor(resId);
        }
        return skinRes.getColor(skinResId);
    }

    public Drawable getDrawable(int resId) {
        Drawable drawable = context.getResources().getDrawable(resId);
        if (skinRes == null) {
            return drawable;
        }

        String resourceName = context.getResources().getResourceName(resId);
        //String name, String defType, String skinPackageName  拿到skin包中的resId
        int skinResId = skinRes.getIdentifier(resourceName.substring(resourceName.indexOf("/") + 1), SkinConstans.DRAWABLE, skinPackageName);
        if (skinResId == 0) {//说明在skin皮肤中没有找到对应的resId,则返回原本的resId
            return drawable;
        }

        return skinRes.getDrawable(skinResId);
    }
step 5 SkinView中换肤
public void changeTheme() {
        for (int i = 0; i < viewAttrses.size(); i++) {
            ViewAttrs viewAttrs = viewAttrses.get(i);
            if (SkinConstans.TEXT_COLOR.equalsIgnoreCase(viewAttrs.attributeName)) {
                if (view instanceof TextView) {
                    //替换textColor
                    if (SkinConstans.COLOR.equalsIgnoreCase(viewAttrs.resourceTypeName)){
                        ((TextView) view).setTextColor(SkinManager.getInstance().getColor(viewAttrs.resId));
                    }
                }
            } else if (SkinConstans.BACKGROUND.equalsIgnoreCase(viewAttrs.attributeName)) {

                if (SkinConstans.DRAWABLE.equalsIgnoreCase(viewAttrs.resourceTypeName)) {

                    view.setBackgroundDrawable(SkinManager.getInstance().getDrawable(viewAttrs.resId));
                } else if (SkinConstans.COLOR.equalsIgnoreCase(viewAttrs.resourceTypeName)) {

                    view.setBackgroundColor(SkinManager.getInstance().getColor(viewAttrs.resId));
                } else if (SkinConstans.MIPMAP.equalsIgnoreCase(viewAttrs.resourceTypeName)) {

                }
            }
        }
    }
代码跑起来
activity_main.xml
color.xml
    #3F51B5
    #303F9F
    #FF4081
    #aadd00
    #3F51B5
    #009977
MainActivity
public class MainActivity extends SkinActivity {

    @Override
    protected void onCreate(Bundle savedInstanceState) {
        super.onCreate(savedInstanceState);
        setContentView(R.layout.activity_main);
    }


    public void changeTheme(View view){
        SkinManager.getInstance().initContext(this);
        ActivityCompat.requestPermissions(this,
                new String[]{Manifest.permission.READ_EXTERNAL_STORAGE, Manifest.permission.WRITE_EXTERNAL_STORAGE}, 100);
    }

    @Override
    public void onRequestPermissionsResult(int requestCode, String[] permissions, int[] grantResults) {
        super.onRequestPermissionsResult(requestCode, permissions, grantResults);
        SkinManager.getInstance().loadSkin(Environment.getExternalStorageDirectory().getAbsolutePath()+"/skinplugin-debug.apk");
        layoutInflaterFactory.changeTheme();
    }
}
下面是skin-apk的color.xml
    #3F51B5
    #303F9F
    #3F51B5
    #FF4081
    #1199aa
    #aadd00
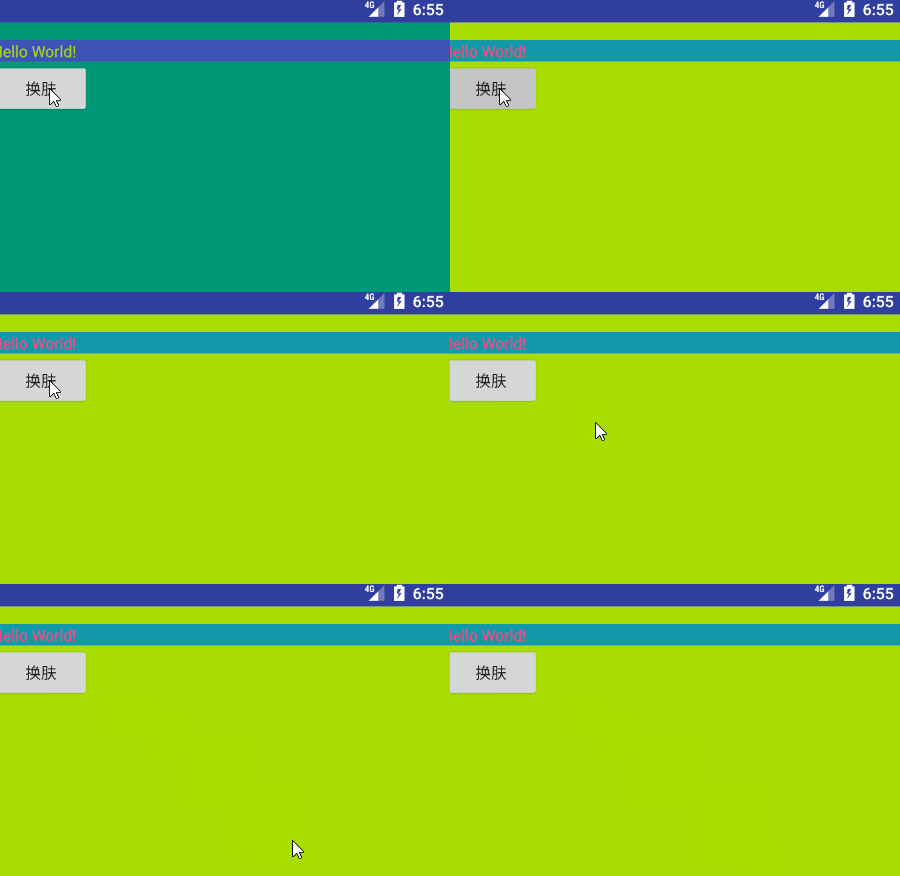
Activity的background和TextView的textColor都换了。
总的来说,原理流程也就是这样。当然代码优化还有很多工作要做,不过先了解了原理,后面也就是时间问题了。
Android换肤框架Debug 7.1.1源码一步步写
