Banana Pi BPI-M5 Boot Log 导出说明
准备:
Preparation:
1、 一块bpi的开发板,一根ttl的串口线,以及一张烧录好镜像的sd/tf卡(烧录到eMMC也行)。
1. A BPI development board, a TTL serial port cable, and an SD/TF card with a burned image (it can also be burned to eMMC).
2、 MobaXterm download : MobaXterm Xserver with SSH, telnet, RDP, VNC and X11 - Download (mobatek.net)
开始
Start

 接下来使用BPI-M5作为展示。
Next, use BPI-M5 as a demonstration.
 1、 打开MobaXterm,然后点击左上角的Session,选择Serial。
1. Open MobaXterm, then click on Session in the upper left corner and select Serial.
2、 将TTL线一端接入电脑
2. Connect one end of the TTL cable to the computer
另一端插入开发板。(RX和TX需要反接,VCC不用接)
Insert the development board at the other end. (RX and TX need to be connected in reverse, VCC does not need to be connected)


3、 在Serial port处选择端口,Speed(bps)处选择波特率,然后点击OK。
(BPI的大部分开发板都是115200,只有BPI-R2 Pro和BPI-W3是1500000)
3. Select the port at the Serial port, select the baud rate at Speed (bps), and then click OK.
(Most development boards for BPI are 115200, with only BPI-R2 Pro and BPI-W3 being 1500000)

4、 给板子插上电源启动
4. Plug in the power to the board and start it
5、 板子启动完成,输入账号密码。
5. Development board startup completed, enter account password
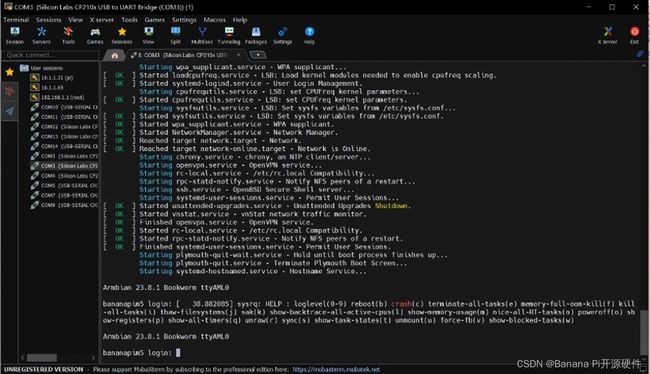
6、 完成你想进行的操作后,接下来就可以进行导出log。
点击左上角的Terminal,然后点击Save terminal tsxt
6. After completing the operation you want, you can now export the log.
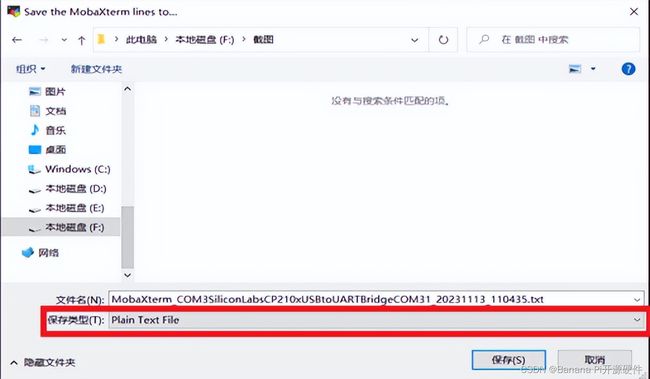
Click on Terminal in the upper left corner, then click on Save terminal tsxt

选择保存位置,保存类型更改为Plain Text File.
Select the save location and change the save type to Plain Text File
7、 打开你保存的位置即可看到log文件。
7. Open the location you saved to see the log file.
