tomcat的启动过程分析
一. 了解类加载器
要了解类加载器首先要了解什么是类加载机制
Java虚拟机把描述类的数据从Class文件加载进内存,并对数据进行校验,转换解析和初始化,最终形成可以呗虚拟机直接使用的Java类型,这就是虚拟机的类加载机制。
虚拟机设计团队把类加载阶段中的“通过一个类的全限定名来获取描述此类的二进制字节流”这个动作放到Java虚拟机外部去实现,以便让应用程序自己决定如何去获取所需要的类。实现这动作的代码模块成为“类加载器”。
类加载器虽然只用于实现类的加载动作,但它在Java程序中起到的作用却远远不限于类加载阶段。对于任意一个类,都需要由加载他的类加载器和这个类本身一同确立其在Java虚拟机中的唯一性,每一个类加载器,都拥有一个独立的类命名空间。这句话可以表达的更通俗一些:比较两个类是否“相等”,只有在这两个类是由同一个类加载器加载的前提下才有意义,否则,即使这两个类来自同一个Class文件,被同一个虚拟机加载,只要加载他们的类加载器不同,那这个两个类就必定不相等。
了解完类加载机制,就不得不来看看双亲委派模型了,我们简单说一下双亲委派吧TvT
如果一个类加载器收到了类加载的请求,它不会加载自己尝试加载此类,而是委派请求给父类加载器进行加载,这就是双亲委派模型。从Java虚拟机的角度来说,只存在两种不同类加载器:一种是启动类加载器(Bootstrap ClassLoader),这个类加载器使用C++语言实现(只限HotSpot),是虚拟机自身的一部分;另一种就是所有其他的类加载器,这些类加载器都由Java语言实现,独立于虚拟机外部,并且全都继承自抽象类java.lang.ClassLoader。
但是对我们所熟知的类加载器,一般分为:
- 启动类加载器(Bootstrap ClassLoader):负责加载存放在
\lib -Xbootclasspath参数所指定的路径中存放的,且文件名能被识别的类库(如 rt.jar、tools.jar,文件名不符合目录正确也不会被加载)加载到 JVM 内存中。此加载器无法被 Java 程序直接使用,自定义类加载器若需要委派加载请求给此加载器加载,直接使用 null 代替即可。 - 扩展类加载器(Extension ClassLoader):负责加载
\lib\ext java.ext.dirs系统变量所指定路径中的所有类库。此类库中存放具有通用性的扩展类库,且允许用户自行添加,即扩展机制。在类sun.misc.Launcher$ExtClassLoader中以 Java 代码形式实现,故用户可直接在程序中使用此类加载器加载 Class 文件。JDK 9 中,此扩展类加载器被平台类加载器替代。 - 应用程序类加载器(Application ClassLoader):负责加载用户类路径(ClassPath)上所有类库,开发者可直接使用此类加载器。由于此加载器在
ClassLoader类中是方法getSystemClassLoader()的返回值,故又称系统类加载器。若用户未自定义加载器,一般情况下为默认加载器。 - 平台类加载器(Platform Class Loader):由于模块化系统中,整个 JDK 都基于模块化构建,故Java 类库为满足模块化需求,未保留
\lib\ext

使用双亲委派模型的目的是为了类的保证唯一和隔离,若不采用双亲委派机制,同一个类有可能被多个类加载器加载,这样该类会被识别为两个不同的类;隔离功能,保证核心类库的纯净和安全,防止恶意加载,避免了 Java 的核心 API 被篡改。
双亲委派模型仅仅是 Java 设计者推荐开发者们的类加载器实现方式,并不是强制约束的模型。截至目前,大多数 Java 相关的类加载器都遵循此模型,但基础类型也会存在调用回用户代码的场景,所以双亲委派模型并不是万能的,他只是一种推荐用法。为解决此问题,Java 设计团队引入了线程上下文类加载器。此加载器可通过 java.lang.Thread 类的 setContextClassLoader() 方法进行设置,如果创建线程时未设置,它将从父类继承一个,如果应用程序全局范围内都未设置,则这个类加载器默认为应用程序类加载器。故以此即可加载所需的 SPI 服务代码。此方式为一种父类加载器请求子类加载器完成类加载的行为。
二. tomcat的类加载器
上面说了java的默认推荐的类加载器和双亲委派模型,那么如果tomcat使用双亲委派模型可不可以呢?答案是不可以的。原因如下:
- 一个web容器可能需要部署两个应用程序,不同的应用程序可能会依赖同一个第三方类库的不同版本,要保证每个应用程序的类库都是独立的,保证相互隔离,如果使用默认的类加载器机制,那么是无法加载两个相同类库的不同版本的,默认的类加载器加载机制只根据全限定类名加载类,并且只有一份,同一个类的不同版本就无法做到相互隔离
- web容器也有自己依赖的类库,应该和容器中应用程序的类库隔离开,不能混淆
- 对于不同应用程序的相同版本的类库,可以共享,只需要加载一次就够了,不需要重复加载。这个问题双亲委派就可以处理,但是还要满足前两个的话就不行了
因此tomcat违背了双亲委派模型,使用了自己的类加载机制。
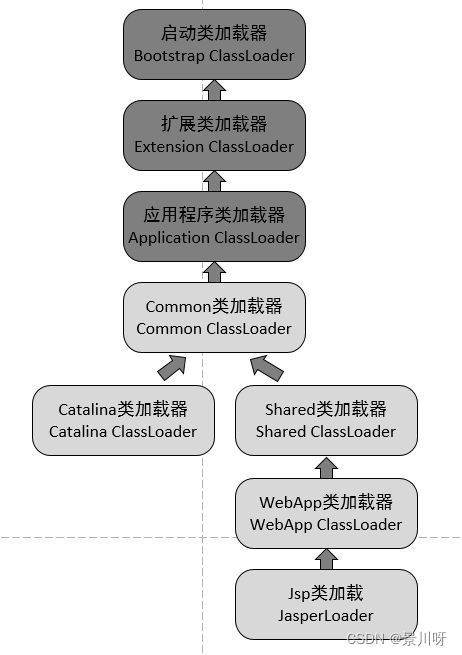
Common ClassLoader:Tomcat最基本的类加载器,加载路径中的class可以被Tomcat容器本身以及各个Webapp访问,Common ClassLoader能加载的类都可以被Catalina ClassLoader和Shared ClassLoader使用,从而实现了公有类库的共用,而Catalina ClassLoader和Shared ClassLoader自己能加载的类则与对方相互隔离。Catalina ClassLoader:Tomcat容器私有的类加载器,加载路径中的class对于Webapp不可见Shared ClassLoader:各个Webapp共享的类加载器,加载路径中的class对于所有Webapp可见,但是对于Tomcat容器不可见WebApp ClassLoader:各个Webapp私有的类加载器,加载路径中的class只对当前Webapp可见,WebApp ClassLoader可以使用Shared ClassLoader加载到的类,但各个WebApp ClassLoader实例之间相互隔离。
当使用tomcat的这套类加载机制之后,再配合线程上下文类加载器机制,就既可以实现隔离的目的,也能实现唯一性,同时还能保证父加载子的类。比如Common ClassLoader想要加载 WebApp ClassLoader中的类,就可以使用线程上下文类加载器。
三. 通过源码分析tomcat的启动过程
首先通过上一篇的tomcat的宏观架构这一篇文章,我们了解到tomcat的架构设计思路,父子组件化和事件驱动,通过模板方法进行事件层层初始化并通知下层组件触发事件。然后通过本篇上面的讲解,我们又了解了tomcat的类加载器相关,接下来通过跟进源码来分析容器启动过程。
我们都知道tomcat启动是通过bin目录下的startup脚本开始的,startup实际就是执行了bin目录下的catalina脚本并传参start表示启动,在catalina脚本中最终调用了org.apache.catalina.startup.Bootstrap#main方法来作为入口启动容器。
public static void main(String args[]) {

       synchronized (daemonLock) {
           if (daemon == null) {
               // Don't set daemon until init() has completed
               Bootstrap bootstrap = new Bootstrap();
               try {
                   /*初始化资源 设置类加载器*/
                   bootstrap.init();
               } catch (Throwable t) {
                   handleThrowable(t);
                   t.printStackTrace();
                   return;
               }
               daemon = bootstrap;
           } else {
               // When running as a service the call to stop will be on a new
               // thread so make sure the correct class loader is used to
               // prevent a range of class not found exceptions.
               Thread.currentThread().setContextClassLoader(daemon.catalinaLoader);
           }
       }

       try {
           String command = "start";
           if (args.length > 0) {
               command = args[args.length - 1];
           }

           if (command.equals("startd")) {
               args[args.length - 1] = "start";
               daemon.load(args);
               daemon.start();
           } else if (command.equals("stopd")) {
               args[args.length - 1] = "stop";
               daemon.stop();
           } else if (command.equals("start")) {
               daemon.setAwait(true);
               /*加载资源解析server.xml*/
               daemon.load(args);
               daemon.start();
               if (null == daemon.getServer()) {
                   System.exit(1);
               }
           } else if (command.equals("stop")) {
               daemon.stopServer(args);
           } else if (command.equals("configtest")) {
               daemon.load(args);
               if (null == daemon.getServer()) {
                   System.exit(1);
               }
               System.exit(0);
           } else {
               log.warn("Bootstrap: command \"" + command + "\" does not exist.");
           }
       } catch (Throwable t) {
           // Unwrap the Exception for clearer error reporting
           if (t instanceof InvocationTargetException &&
                   t.getCause() != null) {
               t = t.getCause();
           }
           handleThrowable(t);
           t.printStackTrace();
           System.exit(1);
       }
   }
上面这个就是tomcat的启动入口,我们首先开看bootstrap.init()方法
public void init() throws Exception {
     /*初始化类加载器*/
     initClassLoaders();
     /*设置当前线程的类加载器*/
     Thread.currentThread().setContextClassLoader(catalinaLoader);
     /*Java安全相关*/
     SecurityClassLoad.securityClassLoad(catalinaLoader);

     // Load our startup class and call its process() method
     if (log.isDebugEnabled()) {
         log.debug("Loading startup class");
     }
     /*使用设置好的类加载器 反射加载org.apache.catalina.startup.Catalina*/
     Class<?> startupClass = catalinaLoader.loadClass("org.apache.catalina.startup.Catalina");
     Object startupInstance = startupClass.getConstructor().newInstance();

     // Set the shared extensions class loader
     if (log.isDebugEnabled()) {
         log.debug("Setting startup class properties");
     }
     /*调用Catalina setParentClassLoader 设置ClassLoader*/
     String methodName = "setParentClassLoader";
     Class<?> paramTypes[] = new Class[1];
     paramTypes[0] = Class.forName("java.lang.ClassLoader");
     Object paramValues[] = new Object[1];
     paramValues[0] = sharedLoader;
     Method method =
         startupInstance.getClass().getMethod(methodName, paramTypes);
     method.invoke(startupInstance, paramValues);

     catalinaDaemon = startupInstance;
}
上面这个init()方法作用是:初始化资源,设置类加载器,最终反射调用了Catalina的setParentClassLoader方法设置ClassLoader,继续跟进到initClassLoaders();
private void initClassLoaders() {
    try {
        commonLoader = createClassLoader("common", null);
        if (commonLoader == null) {
            // no config file, default to this loader - we might be in a 'single' env.
            commonLoader = this.getClass().getClassLoader();
        }
        catalinaLoader = createClassLoader("server", commonLoader);
        sharedLoader = createClassLoader("shared", commonLoader);
    } catch (Throwable t) {
        handleThrowable(t);
        log.error("Class loader creation threw exception", t);
        System.exit(1);
    }
}
这个方法很明显就是创建三个类加载器,分别是common、server、shared,通过不同的传参获取类加载器,我们跟进createClassLoader("common", null)方法最终会在org.apache.catalina.startup.ClassLoaderFactory#createClassLoader(java.util.List方法中创建一个URLClassLoader的类加载器。其实可以看到默认情况下都是创建的URLClassLoader,只是加载的资源类型不同。当common的类加载器创建完成后,把创建的类加载器传入createClassLoader("server", commonLoader)进行server的类加载器创建,但是由于配置文件中没有server.loader配置,所以就是用了默认的也就是传进来的类加载器,这个逻辑在org.apache.catalina.startup.Bootstrap#createClassLoader开头位置。这里就不详细的贴出代码了,代码不难阅读。
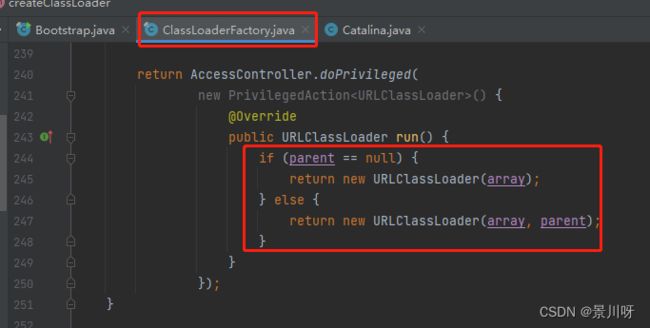
所以当initClassLoaders() 方法执行完成之后,common、server、shared其实都是URLClassLoader的类加载器。然后回到org.apache.catalina.startup.Bootstrap#init()方法可以看到线程上下文类加载器也被设置为这个URLClassLoader。
然后回到org.apache.catalina.startup.Bootstrap#main方法,init()方法加载资源并设置完类加载器。因为我们分析的是启动过程,所以我们来看main()方法的start参数的if分支
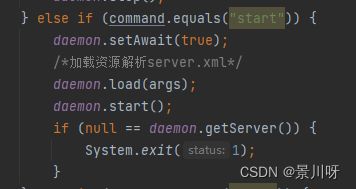
首先设置通过反射调用org.apache.catalina.startup.Catalina#setAwait设置属性值为true,然后我们进入daemon.load(args)
private void load(String[] arguments) throws Exception {
    // Call the load() method
    String methodName = "load";
    Object param[];
    Class<?> paramTypes[];
    if (arguments==null || arguments.length==0) {
        paramTypes = null;
        param = null;
    } else {
        paramTypes = new Class[1];
        paramTypes[0] = arguments.getClass();
        param = new Object[1];
        param[0] = arguments;
    }
    Method method =
        catalinaDaemon.getClass().getMethod(methodName, paramTypes);
    if (log.isDebugEnabled()) {
        log.debug("Calling startup class " + method);
    }
    method.invoke(catalinaDaemon, param);
}
该方法比较简单,就是反射调用org.apache.catalina.startup.Catalina#load()方法。
public void load() {
   /*加载标志位 加载了 直接返回*/
    if (loaded) {
        return;
    }
    loaded = true;

    long t1 = System.nanoTime();
    /*空实现  啥也没有*/
    initDirs();

    // Before digester - it may be needed
    /*jndi tomcat 一般用作数据源共享*/
    initNaming();

    // Create and execute our Digester
    /*创建xml解析器 添加规则*/
    Digester digester = createStartDigester();

    InputSource inputSource = null;
    InputStream inputStream = null;
    File file = null;
    try {
        try {
            file = configFile();
            inputStream = new FileInputStream(file);
            inputSource = new InputSource(file.toURI().toURL().toString());
        } catch (Exception e) {
            if (log.isDebugEnabled()) {
                log.debug(sm.getString("catalina.configFail", file), e);
            }
        }
        if (inputStream == null) {
            try {
                inputStream = getClass().getClassLoader()
                    .getResourceAsStream(getConfigFile());
                inputSource = new InputSource
                    (getClass().getClassLoader()
                     .getResource(getConfigFile()).toString());
            } catch (Exception e) {
                if (log.isDebugEnabled()) {
                    log.debug(sm.getString("catalina.configFail",
                            getConfigFile()), e);
                }
            }
        }

        // This should be included in catalina.jar
        // Alternative: don't bother with xml, just create it manually.
        if (inputStream == null) {
            try {
                inputStream = getClass().getClassLoader()
                        .getResourceAsStream("server-embed.xml");
                inputSource = new InputSource
                (getClass().getClassLoader()
                        .getResource("server-embed.xml").toString());
            } catch (Exception e) {
                if (log.isDebugEnabled()) {
                    log.debug(sm.getString("catalina.configFail",
                            "server-embed.xml"), e);
                }
            }
        }


        if (inputStream == null || inputSource == null) {
            if  (file == null) {
                log.warn(sm.getString("catalina.configFail",
                        getConfigFile() + "] or [server-embed.xml]"));
            } else {
                log.warn(sm.getString("catalina.configFail",
                        file.getAbsolutePath()));
                if (file.exists() && !file.canRead()) {
                    log.warn("Permissions incorrect, read permission is not allowed on the file.");
                }
            }
            return;
        }
        /*读取xml配置文件并解析 */
        try {
            inputSource.setByteStream(inputStream);
            /*解析出来的对象 赋值给 this 当前对象 Catalina*/
            digester.push(this);
            /*执行解析*/
            digester.parse(inputSource);
        } catch (SAXParseException spe) {
            log.warn("Catalina.start using " + getConfigFile() + ": " +
                    spe.getMessage());
            return;
        } catch (Exception e) {
            log.warn("Catalina.start using " + getConfigFile() + ": " , e);
            return;
        }
    } finally {
        if (inputStream != null) {
            try {
                inputStream.close();
            } catch (IOException e) {
                // Ignore
            }
        }
    }
    /*设置CatalinaHome 默认指向apache-tomcat-8.5.72-src\home*/
    getServer().setCatalina(this);
    getServer().setCatalinaHome(Bootstrap.getCatalinaHomeFile());
    getServer().setCatalinaBase(Bootstrap.getCatalinaBaseFile());

    // Stream redirection
    /*设置系统输出为 console打印*/
    initStreams();

    // Start the new server
    try {
        /*拿到digester解析并创建的StandardServer并初始化*/
        getServer().init();
    } catch (LifecycleException e) {
        if (Boolean.getBoolean("org.apache.catalina.startup.EXIT_ON_INIT_FAILURE")) {
            throw new java.lang.Error(e);
        } else {
            log.error("Catalina.start", e);
        }
    }

    long t2 = System.nanoTime();
    if(log.isInfoEnabled()) {
        log.info("Initialization processed in " + ((t2 - t1) / 1000000) + " ms");
    }
}
上面这段代码就是反射调用的org.apache.catalina.startup.Catalina#load()方法,先是createStartDigester()创建解析server.xml文件的Digester,这个方法的代码就不粘贴出来了,比较长也没啥重点内容
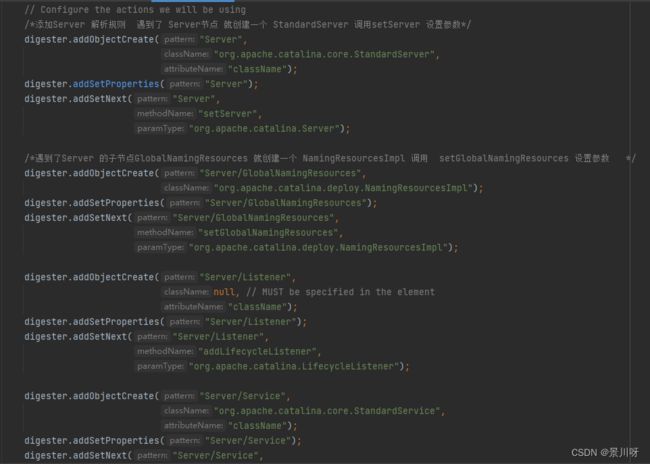
比如图中所示,xml文件中遇到Server标签就创建StandardServer,大家可以在源码中详细看标签对应的Class。当规则设置完成后就是回到org.apache.catalina.startup.Catalina#load()方法中,调用digester.parse(inputSource)根据既定的规则创建实例。当解析完成后,Server就有了,也就是StandardServer,然后在org.apache.catalina.startup.Catalina#load()方法中调用getServer().init()执行StandardServer的init()方法,但是从我们前面的文章可以知道,tomcat的组件都实现了Lifecycle生命周期接口,因此这个init()实际调用的是org.apache.catalina.util.LifecycleBase#init方法
public final synchronized void init() throws LifecycleException {
    /*如果当前状态不是NEW直接抛出生命周期异常*/
    if (!state.equals(LifecycleState.NEW)) {
        invalidTransition(Lifecycle.BEFORE_INIT_EVENT);
    }

    try {
        /*设置当前组件的 初始化状态 并执行事件*/
        setStateInternal(LifecycleState.INITIALIZING, null, false);
        initInternal();
        setStateInternal(LifecycleState.INITIALIZED, null, false);
    } catch (Throwable t) {
        handleSubClassException(t, "lifecycleBase.initFail", toString());
    }
}
这很明显是个模板方法,根据不同的入参执行对应的逻辑,我们首先跟进到setStateInternal(LifecycleState.INITIALIZING, null, false)看:
private synchronized void setStateInternal(LifecycleState state, Object data, boolean check)
            throws LifecycleException {

    if (log.isDebugEnabled()) {
        log.debug(sm.getString("lifecycleBase.setState", this, state));
    }

    if (check) {
        // Must have been triggered by one of the abstract methods (assume
        // code in this class is correct)
        // null is never a valid state
        if (state == null) {
            invalidTransition("null");
            // Unreachable code - here to stop eclipse complaining about
            // a possible NPE further down the method
            return;
        }

        // Any method can transition to failed
        // startInternal() permits STARTING_PREP to STARTING
        // stopInternal() permits STOPPING_PREP to STOPPING and FAILED to
        // STOPPING
        if (!(state == LifecycleState.FAILED ||
                (this.state == LifecycleState.STARTING_PREP &&
                        state == LifecycleState.STARTING) ||
                (this.state == LifecycleState.STOPPING_PREP &&
                        state == LifecycleState.STOPPING) ||
                (this.state == LifecycleState.FAILED &&
                        state == LifecycleState.STOPPING))) {
            // No other transition permitted
            invalidTransition(state.name());
        }
    }

    /*设置状态并执行事件*/
    this.state = state;
    String lifecycleEvent = state.getLifecycleEvent();
    if (lifecycleEvent != null) {
        fireLifecycleEvent(lifecycleEvent, data);
    }
}
这个方法的逻辑不复杂,由于入参的check是false,所以前面的逻辑都不会执行,直接走到最后面,设置事件状态并触发事件。

可以看到StandardServer下有6个监听事件,依次循环进行事件触发,那么这6个事件从哪里来的呢?来看server.xml
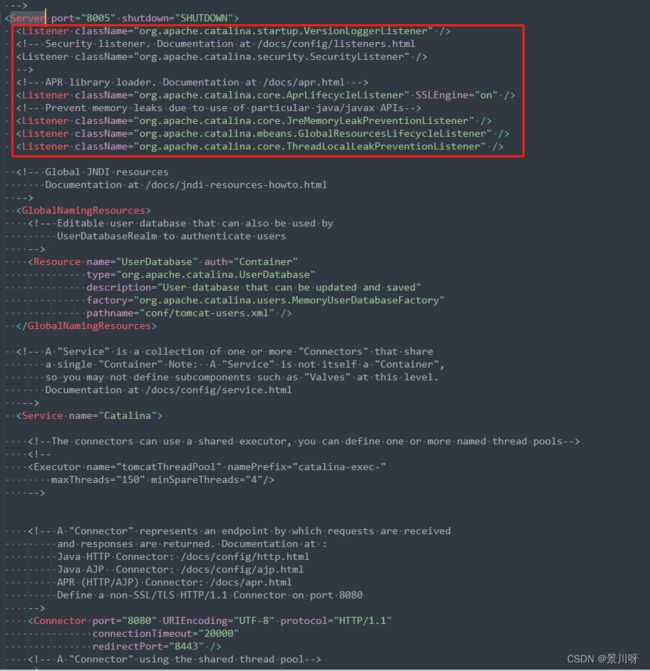
这张图是tomcat默认的server.xml中的配置,在前面步骤中Digester解析xml之后,这个配置文件中的5个监听就被加入了,但是断点里面有6个监听,其中第一个监听实际是在StandardServer构造器中被添加进去的。
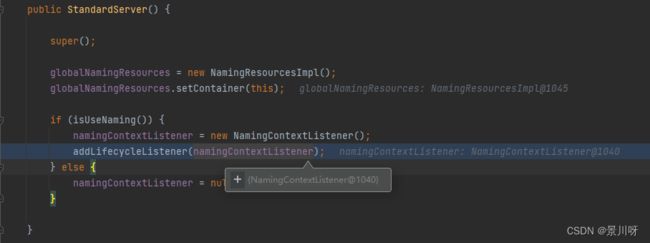
所以一共有6个监听事件需要被触发,这就是前面我们一直在说的tomcat父子组件和生命周期,通过父组件的生命周期函数触发自组件事件,完成自组件的初始化等等操作。
然后我们再回到org.apache.catalina.util.LifecycleBase#init方法中看一下initInternal()方法:org.apache.catalina.core.StandardServer#initInternal
protected void initInternal() throws LifecycleException {

    super.initInternal();

    // Register global String cache
    // Note although the cache is global, if there are multiple Servers
    // present in the JVM (may happen when embedding) then the same cache
    // will be registered under multiple names
    onameStringCache = register(new StringCache(), "type=StringCache");

    // Register the MBeanFactory
    MBeanFactory factory = new MBeanFactory();
    factory.setContainer(this);
    onameMBeanFactory = register(factory, "type=MBeanFactory");

    // Register the naming resources
    globalNamingResources.init();

    // Populate the extension validator with JARs from common and shared
    // class loaders
    if (getCatalina() != null) {
        ClassLoader cl = getCatalina().getParentClassLoader();
        // Walk the class loader hierarchy. Stop at the system class loader.
        // This will add the shared (if present) and common class loaders
        /*停止系统类加载器 使用 common类加载器*/
        while (cl != null && cl != ClassLoader.getSystemClassLoader()) {
            if (cl instanceof URLClassLoader) {
                URL[] urls = ((URLClassLoader) cl).getURLs();
                for (URL url : urls) {
                    if (url.getProtocol().equals("file")) {
                        try {
                            File f = new File(url.toURI());
                            if (f.isFile() &&
                                f.getName().endsWith(".jar")) {
                                ExtensionValidator.addSystemResource(f);
                            }
                        } catch (URISyntaxException | IOException e) {
                            // Ignore
                        }
                    }
                }
            }
            cl = cl.getParent();
        }
    }
    // Initialize our defined Services
    /*初始化service组件*/
    for (Service service : services) {
        service.init();
    }
}
这个方法一开始是处理了Class注册到JMX相关的一些操作,我们重点看最后一步,循环调用Server的多个子组件Service 并执行他们的init()生命周期方法,看到这里就更直观的理解了tomcat的父子组件和生命周期函数了,父组件先执行生命周期函数,然后在调用子组件的生命周期函数,一层一层的完成所有组件的初始化等等。现在再回去看tomcat的宏观架构这篇文章,就会有更明确的理解。
后续的自组件init()这里就不继续跟进了。我们从org.apache.catalina.startup.Bootstrap#main的daemon.load(args)看完了init()生命周期函数,再回到org.apache.catalina.startup.Bootstrap#main方法,跟进daemon.start()这一步。其实看到这里,大家也能猜到这一步实际就是执行生命周期Lifecycle的start()步骤了。
public void start() throws Exception {
    if (catalinaDaemon == null) {
        init();
    }
	// 反射调用org.apache.catalina.startup.Catalina#start方法
    Method method = catalinaDaemon.getClass().getMethod("start", (Class [])null);
    method.invoke(catalinaDaemon, (Object [])null);
}
上面这个方法很简单,我们直接跟进到Catalina的start()方法:
public void start() {

    if (getServer() == null) {
        load();
    }

    if (getServer() == null) {
        log.fatal("Cannot start server. Server instance is not configured.");
        return;
    }

    long t1 = System.nanoTime();

    // Start the new server
    try {
	    // 获取StandardServer  然后调用其生命周期方法start
	    // 这里和init逻辑生命周期方法类似  父组件一层一层通知自组件完成start
        getServer().start();
    } catch (LifecycleException e) {
        log.fatal(sm.getString("catalina.serverStartFail"), e);
        try {
        	// 如果出现异常就尝试执行销毁
            getServer().destroy();
        } catch (LifecycleException e1) {
            log.debug("destroy() failed for failed Server ", e1);
        }
        return;
    }

    long t2 = System.nanoTime();
    if(log.isInfoEnabled()) {
        log.info("Server startup in " + ((t2 - t1) / 1000000) + " ms");
    }

    // Register shutdown hook
    if (useShutdownHook) {
        if (shutdownHook == null) {
            shutdownHook = new CatalinaShutdownHook();
        }
        // 添加一个钩子 作用是当虚拟机关闭(也就是异常或者正常退出)的时候,执行这个钩子的run方法做一些内存清理等的工作
        Runtime.getRuntime().addShutdownHook(shutdownHook);

        // If JULI is being used, disable JULI's shutdown hook since
        // shutdown hooks run in parallel and log messages may be lost
        // if JULI's hook completes before the CatalinaShutdownHook()
        LogManager logManager = LogManager.getLogManager();
        if (logManager instanceof ClassLoaderLogManager) {
            ((ClassLoaderLogManager) logManager).setUseShutdownHook(
                    false);
        }
    }

    if (await) {
    	// 创建一个SocketServer阻塞等待 SHUTDOWN 命令  否则一直阻塞(也就是已启动)
        await();
        stop();
    }
}
上面这个方法,我们首先跟进getServer().start(),其实就是StandardServer组件的生命周期方法start(),经过init()的分析,我们自然就能明白他执行的是:org.apache.catalina.util.LifecycleBase#start
public final synchronized void start() throws LifecycleException {
    /*如果不是NEW状态直接返回*/
    if (LifecycleState.STARTING_PREP.equals(state) || LifecycleState.STARTING.equals(state) ||
            LifecycleState.STARTED.equals(state)) {

        if (log.isDebugEnabled()) {
            Exception e = new LifecycleException();
            log.debug(sm.getString("lifecycleBase.alreadyStarted", toString()), e);
        } else if (log.isInfoEnabled()) {
            log.info(sm.getString("lifecycleBase.alreadyStarted", toString()));
        }

        return;
    }
    /*如果是new状态 先init*/
    // 此时的状态是INITIALIZED
    if (state.equals(LifecycleState.NEW)) {
        init();
    } else if (state.equals(LifecycleState.FAILED)) {
        stop();
    } else if (!state.equals(LifecycleState.INITIALIZED) &&
            !state.equals(LifecycleState.STOPPED)) {
        invalidTransition(Lifecycle.BEFORE_START_EVENT);
    }

    try {
    	// 这里很init方法类似  都是模板方法  在start前后执行对应状态的事件  这里是启动前的事件
        setStateInternal(LifecycleState.STARTING_PREP, null, false);
        // 执行StandardServer的start方法  肯定也在里面触发了自组件的start生命周期方法
        startInternal();
        // 根据start的状态决定执行哪一步 比如失败了就stop
        if (state.equals(LifecycleState.FAILED)) {
            // This is a 'controlled' failure. The component put itself into the
            // FAILED state so call stop() to complete the clean-up.
            stop();
        } else if (!state.equals(LifecycleState.STARTING)) {
            // Shouldn't be necessary but acts as a check that sub-classes are
            // doing what they are supposed to.
            invalidTransition(Lifecycle.AFTER_START_EVENT);
        } else {
            setStateInternal(LifecycleState.STARTED, null, false);
        }
    } catch (Throwable t) {
        // This is an 'uncontrolled' failure so put the component into the
        // FAILED state and throw an exception.
        handleSubClassException(t, "lifecycleBase.startFail", toString());
    }
}
上面这段代码和init()流程基本一致,也是模板方法。setStateInternal(LifecycleState.STARTING_PREP, null, false)就不跟进分析了,和init()里面的流程一样的,主要就是触发监听的子组件事件做start之前的预处理。我们跟进startInternal();来看:
protected void startInternal() throws LifecycleException {
	// 触发configure_start事件
    fireLifecycleEvent(CONFIGURE_START_EVENT, null);
    // 设置为启动中状态
    setState(LifecycleState.STARTING);
    globalNamingResources.start();

    // Start our defined Services
    synchronized (servicesLock) {
    	// 循环调用StandardServer下的所有service的start方法  也就是Server组件的service子组件的start方法  和init如出一辙
        for (Service service : services) {
            service.start();
        }
    }
}
上面这段代码很简单,触发事件 - 设置状态 - 先globalNamingResources.start() - 再循环所有service的start。默认情况下StandardServer下只有一个StandardService,所以我们去看StandardService的生命周期方法org.apache.catalina.util.LifecycleBase#start,看到这里别懵了哈。。。所有的组件都实现了LifecycleBase,模板方法一层一层向下执行。所以同样是这个org.apache.catalina.util.LifecycleBase#start方法,只不过他是StandardService的,这点一定要理解,我们一直说的父子组件、模板方法一层一层向下执行生命周期方法就是这个道理。
既然这个start方法是StandardService的,那么其中的startInternal();自然就是org.apache.catalina.core.StandardService#startInternal
protected void startInternal() throws LifecycleException {

    if(log.isInfoEnabled()) {
        log.info(sm.getString("standardService.start.name", this.name));
    }
    setState(LifecycleState.STARTING);

    // Start our defined Container first
    if (engine != null) {
        synchronized (engine) {
        	// engine组件start
            engine.start();
        }
    }

    synchronized (executors) {
        for (Executor executor: executors) {
            executor.start();
        }
    }

    mapperListener.start();

    // Start our defined Connectors second
    synchronized (connectorsLock) {
        for (Connector connector: connectors) {
            try {
                // If it has already failed, don't try and start it
                if (connector.getState() != LifecycleState.FAILED) {
                	// connector组件start
                    connector.start();
                }
            } catch (Exception e) {
                log.error(sm.getString(
                        "standardService.connector.startFailed",
                        connector), e);
            }
        }
    }
}
这个方法到这里就不继续跟进了,很明显都是子组件的start了,其实这里面也有很多重要的内容,比如engine.start()、connector.start()都是很重要的点,但是一一分析篇幅会过长,所以就简单提一下略过了。感兴趣的同学可以debug跟进了解。
那么到这里,我们Catalina的start()方法中的getServer().start()就算是分析完成了,接下来我们看Catalina的start()方法的最后await()这一步,实际是org.apache.catalina.core.StandardServer#await方法:
public void await() {
   // Negative values - don't wait on port - tomcat is embedded or we just don't like ports
    if (port == -2) {
        // undocumented yet - for embedding apps that are around, alive.
        return;
    }
    if (port == -1) {
        try {
            awaitThread = Thread.currentThread();
            while (!stopAwait) {
                try {
                    Thread.sleep(10000);
                } catch (InterruptedException ex) {
                    // continue and check the flag
                }
            }
        } finally {
            awaitThread = null;
        }
        return;
    }

    // Set up a server socket to wait on
    try {
    	// 默认情况下创建一个port=8085  address=localhost的ServerSocket
        awaitSocket = new ServerSocket(port, 1,
            InetAddress.getByName(address));
    } catch (IOException e) {
        log.error("StandardServer.await: create[" + address
            + ":" + port
            + "]: ", e);
        return;
    }

    try {
        awaitThread = Thread.currentThread();

        // Loop waiting for a connection and a valid command
        // 循环等待连接和有效命令   实际就是一个死循环,内部是socket阻塞等待SHUTDOWN
        while (!stopAwait) {
            ServerSocket serverSocket = awaitSocket;
            if (serverSocket == null) {
                break;
            }

            // Wait for the next connection
            Socket socket = null;
            StringBuilder command = new StringBuilder();
            try {
                InputStream stream;
                long acceptStartTime = System.currentTimeMillis();
                try {
                	// 阻塞等待命令SHUTDOWN
                    socket = serverSocket.accept();
                    socket.setSoTimeout(10 * 1000);  // Ten seconds
                    stream = socket.getInputStream();
                } catch (SocketTimeoutException ste) {
                    // This should never happen but bug 56684 suggests that
                    // it does.
                    log.warn(sm.getString("standardServer.accept.timeout",
                        Long.valueOf(System.currentTimeMillis() - acceptStartTime)), ste);
                    continue;
                } catch (AccessControlException ace) {
                    log.warn(sm.getString("standardServer.accept.security"), ace);
                    continue;
                } catch (IOException e) {
                    if (stopAwait) {
                        // Wait was aborted with socket.close()
                        break;
                    }
                    log.error(sm.getString("standardServer.accept.error"), e);
                    break;
                }

                // Read a set of characters from the socket
                int expected = 1024; // Cut off to avoid DoS attack
                while (expected < shutdown.length()) {
                    if (random == null) {
                        random = new Random();
                    }
                    expected += (random.nextInt() % 1024);
                }
                while (expected > 0) {
                    int ch = -1;
                    try {
                        ch = stream.read();
                    } catch (IOException e) {
                        log.warn(sm.getString("standardServer.accept.readError"), e);
                        ch = -1;
                    }
                    // Control character or EOF (-1) terminates loop
                    if (ch < 32 || ch == 127) {
                        break;
                    }
                    command.append((char) ch);
                    expected--;
                }
            } finally {
                // Close the socket now that we are done with it
                try {
                    if (socket != null) {
                        socket.close();
                    }
                } catch (IOException e) {
                    // Ignore
                }
            }

            // Match against our command string
            boolean match = command.toString().equals(shutdown);
            if (match) {
                log.info(sm.getString("standardServer.shutdownViaPort"));
                break;
            } else {
                log.warn(sm.getString("standardServer.invalidShutdownCommand", command.toString()));
            }
        }
    } finally {
        ServerSocket serverSocket = awaitSocket;
        awaitThread = null;
        awaitSocket = null;

        // Close the server socket and return
        if (serverSocket != null) {
            try {
                serverSocket.close();
            } catch (IOException e) {
                // Ignore
            }
        }
    }
}
上面这个方法虽然比较长,但是主要就是根据配置的端口和地址,创建一个ServerSocket并循环调用serverSocket.accept()阻塞等待SHUTDOWN命令来关闭容器,如果没有关闭命令,那么容器就一直是启动着的。
那么到此,tomcat容器的启动流程基本就算完成了,当serverSocket.accept()等到SHUTDOWN命令之后,这个循环阻塞等待就退出来了,然后关闭socket等等。await()方法也就执行完了,然后回到Catalina的start()的最后一步stop(),然后后续的stop()也是生命周期函数,执行流程都一样。