- 什么是 QueryGPT?智能查询工具如何重塑信息检索的未来?
镜舟科技
StarRocksQueryGPT数据查询数据分析多模态交互
从客户行为数据到供应链信息,从市场趋势到内部运营指标,这些数据蕴含着巨大的商业价值。然而,数据量的激增也带来了前所未有的检索挑战:如何在海量信息中快速定位所需数据?如何确保查询结果的准确性和时效性?据统计,75%的企业正受困于低效的查询工具,这已成为阻碍企业数字化转型的关键痛点。传统的数据查询方式主要依赖SQL语句或特定的查询语言,这要求用户具备专业的编程知识和对数据结构的深入理解。即使对于数据分
- [Python] 使用 dataclass 简化数据结构:定义、功能与实战
踏雪无痕老爷子
Pythonpython开发语言
在经典面向对象编程中,为了保存和操作数据往往需要定义多个类,手写__init__()、__repr__()、__eq__()等方法。Python3.7引入了@dataclass装饰器,它能自动生成这些常见方法,大幅减少样板代码。本文将介绍dataclass的定义与参数、比较与普通类的差别、实战示例,以及常见注意事项。一、什么是dataclass@dataclass是一种类装饰器,它通过类成员的类型
- 算法竞赛备考冲刺必刷题(C++) | 洛谷 P8814 解密
热爱编程的通信人
算法c++开发语言
本文分享的必刷题目是从蓝桥云课、洛谷、AcWing等知名刷题平台精心挑选而来,并结合各平台提供的算法标签和难度等级进行了系统分类。题目涵盖了从基础到进阶的多种算法和数据结构,旨在为不同阶段的编程学习者提供一条清晰、平稳的学习提升路径。欢迎大家订阅我的专栏:算法题解:C++与Python实现!附上汇总贴:算法竞赛备考冲刺必刷题(C++)|汇总【题目来源】洛谷:P8814[CSP-J2022]解密-洛
- 008 【入门】算法和数据结构简介
要天天开心啊
算法专栏算法数据结构
算法与数据结构系统概览|[算法]-[基础]-[通用]一、算法分类与应用1.硬计算类算法|[算法]-[中级]-[通用]特点应用场景复杂度特征-精确求解问题-可能带来较高计算复杂度-大厂笔试/面试-ACM竞赛-所有程序员岗位必考⏱️通常为O(n)~O(n²)//[示例]快速排序算法-分治思想核心实现publicvoidquickSort(int[]arr,intleft,intright){if(le
- 009 【入门】单双链表及其反转-堆栈诠释
要天天开心啊
算法专栏算法链表
链表与堆栈系统详解|[数据结构]-[中级]-[通用]一、基础概念与内存模型1.按值传递vs按引用传递|[Java]-[基础]-[内存]//[典型错误示例]-Java中的引用传递陷阱voidmodify(Nodenode){node=node.next;//[警告]错误!仅修改局部引用的指向,不影响原始链表}//[正确做法]-通过引用修改对象内部状态voidrealModify(Nodenode){
- Ansible——lookup,过滤器
凤凰战士芭比Q
Ansibleansiblelinux
文章目录Ansible——lookup,过滤器lookup读取文件lookup生成随机密码lookup读取环境变量lookup读取Linux命令的执行结果lookup读取template变量替换后的文件lookup读取配置文件lookup读取DNS解析的值过滤器过滤器使用的位置过滤器对普通变量的操作过滤器对文件路径的操作过滤器对字符串变量的操作过滤器对JSON的操作过滤器对数据结构的操作过滤器的链
- 【数据结构】顺序表
nanguochenchuan
数据结构数据结构
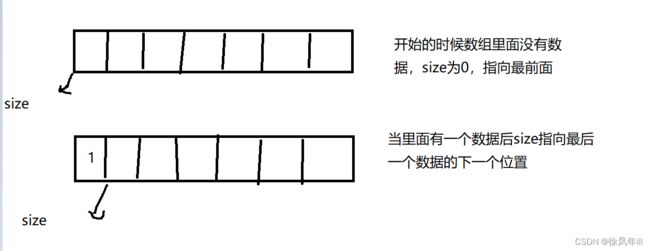
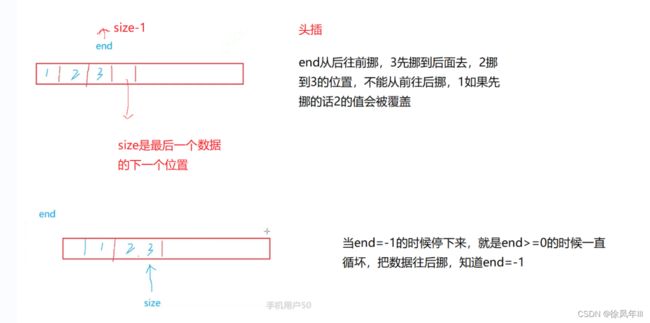
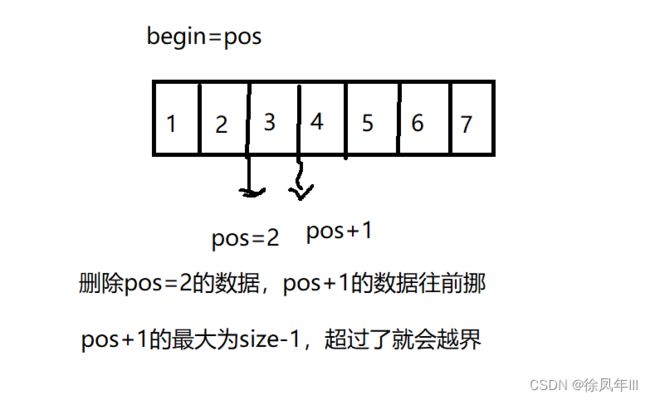
一,顺序表1.顺序表的定义顺序表是一种线性表的数据结构,它的数据元素按照一定次序依次存储在计算机存储器中,使用连续的存储空间来存储。顺序表中每个数据元素的位置都有一个序号,这个序号也称为元素在顺序表中的下标。顺序表的特点是:元素的逻辑顺序与物理顺序相同,支持随机访问,插入和删除元素的时间复杂度为O(n),查找元素的时间复杂度为O(1)。2.优点与不足优点是访问速度快,因为它的元素在内存中是连续存储
- 区块链技术概述:从比特币到Web3.0
闲人编程
Python区块链50讲区块链web3python元宇宙比特币安全
目录区块链技术概述:从比特币到Web3.0引言:数字革命的下一篇章1.区块链技术基础1.1区块链定义与核心特征1.2区块链数据结构可视化2.比特币:区块链的开端2.1比特币的核心创新2.2比特币交易生命周期3.以太坊与智能合约革命3.1以太坊的核心创新3.2智能合约执行流程4.Web3.0:互联网的新范式4.1Web3.0的核心特征4.2Web3技术栈5.Python实现简易区块链系统5.1区块类
- 构建四则运算解析器:字符串处理与计算逻辑实战
大熊小清新
本文还有配套的精品资源,点击获取简介:四则运算解析器是将包含四则运算符号的字符串表达式转化为可执行计算的程序。它对编程初学者而言是理解编程逻辑和语法分析的基础。通过理解四则运算的优先级规则,实现输入处理、词法分析、语法分析和计算步骤,可以采用递归下降解析或堆栈解析等方法。本解析器的实现涉及字符串处理、数据结构的运用,有助于学习者掌握编程语言的底层工作方式,提升编程技能和问题解决能力。1.四则运算解
- 博图SCL语言中用户自定义数据类型(UDT)使用详解
控界小宇宙
西门子PLC博途(TIAPortal)SCL自动化运维程序人生开发语言
博图SCL语言中用户自定义数据类型(UDT)使用详解一、UDT概述用户自定义数据类型(UDT)是TIAPortal中强大的结构化工具,允许将多个相关变量组合成单一数据结构。UDT本质是可重用的数据模板,具有以下核心优势:结构化组织:将逻辑相关的变量分组管理代码重用:一次定义,多处使用维护便捷:修改UDT定义自动更新所有实例接口标准化:确保数据传递一致性二、UDT创建步骤(图文详解)1.创建UDT项
- cJSON 源码解析
1.概述cJSON是一个轻量级的C语言JSON解析库,支持JSON数据的解析和生成。它采用单一头文件和源文件的设计,易于集成到项目中。主要特性完整的JSON支持(解析和生成)内存管理自动化支持格式化输出支持自定义内存分配器跨平台兼容2.核心数据结构2.1cJSON结构体typedefstructcJSON{structcJSON*next;//指向下一个兄弟节点structcJSON*prev;/
- mongodb和redis的区别:
huangbfeng
mongodbredis数据库
1、内存管理机制Redis数据全部存在内存,定期写入磁盘,当内存不够时,可以选择指定的LRU算法删除数据。MongoDB数据存在内存,由linux系统mmap实现,当内存不够时,只将热点数据放入内存,其他数据存在磁盘。2、支持的数据结构Redis支持的数据结构丰富,包括hash、set、list等。MongoDB数据结构比较单一,但是支持丰富的数据表达,索引,最类似关系型数据库,支持的查询语言非常
- 图像解码之二——使用libpng解码png图片
weixin_55025383
mfcc++
上文《图像解码之一——使用libjpeg解码jpeg图片》介绍了使用libjpeg解码jpeg图片。png图片应用也非常广泛,本文将会简单介绍怎样使用开源libpng库解码png图片。libpng的数据结构png_structp变量是在libpng初始化的时候创建,由libpng库内部使用,代表libpng的是调用上下文,库的使用者不应该对这个变量进行访问。调用libpng的API的时候,需要把这
- 实现并查集数据结构的技术指南
一键难忘
数据结构算法并查集
本文收录于专栏:算法之翼https://blog.csdn.net/weixin_52908342/category_10943144.html订阅后本专栏全部文章可见。实现并查集数据结构的技术指南并查集(DisjointSetUnion,简称并查集)是一种常用的数据结构,用于管理元素之间的等价关系。它主要支持两种操作:合并(Union)和查找(Find)。并查集通常用于解决各种问题,如图论中的连
- 并查集(Disjoint-Set Union)详解
追逐此刻
算法方法python开发语言
并查集是一种处理不相交集合的合并与查询问题的数据结构,主要支持两种操作:Find:查询元素所属集合Union:合并两个集合基本概念数据结构表示通常用树形结构表示集合,每个集合用一棵树表示,树的根节点作为该集合的代表元素。核心操作初始化:每个元素自成一个集合,父节点指向自己查找(Find):找到元素的根节点(代表元素)合并(Union):将两个集合合并为一个实现方式基础实现(无优化)classDSU
- C#推箱子游戏源代码解析与实践指南
Boa波雅
本文还有配套的精品资源,点击获取简介:C#推箱子游戏是一个经典的益智游戏,适合编程初学者学习C#语言和游戏开发的基础知识。本篇文章将深入探讨使用C#语言开发推箱子游戏的源代码,涉及面向对象编程、图形用户界面(GUI)、事件驱动编程、数据结构与算法、状态管理、错误检查与边界条件、游戏逻辑以及调试技巧。通过学习本课程,初学者将能够掌握C#编程的基础和游戏逻辑的实现,并能够创建用户友好的界面。1.面向对
- 数据结构进阶 第七章 图(Graph)
an_胺
数据结构进阶数据结构深度优先图论
第7章图(Graph)7.1图的基本术语图的定义图是由顶点集合V和边集合E组成的数据结构,记为G=(V,E),其中:顶点集V:有限非空集合边集E:顶点对的集合基本概念无向图:边没有方向,用无序对(vi,vj)表示有向图:边有方向,用有序对表示完全图:任意两个顶点之间都有边稀疏图:边数相对较少的图,|E|vexnum,&G->arcnum);for(i=0;ivexnum;i++){scanf(&G
- Java进阶-查找算法
晚风烟火
JavaSE笔记java算法数据结构
常见的七种查找算法:1.基本查找也叫做顺序查找说明:顺序查找适合于存储结构为数组或者链表。基本思想:顺序查找也称为线形查找,属于无序查找算法。从数据结构线的一端开始,顺序扫描,依次将遍历到的结点与要查找的值相比较,若相等则表示查找成功;若遍历结束仍没有找到相同的,表示查找失败。示例代码:publicclassA01_BasicSearchDemo1{publicstaticvoidmain(Str
- 【社招】一年测开经验转后端开发经历。
、烟雨楼
算法phtyon面试大数据python开发语言xmlrpc
背景先说下背景吧,我是2019年毕业的本科生,985非科班,而且是和计算机专业八杆子打不着的那种非科班。大二的时候打球认识了我们学校一个计算机专业的学生,听他说互联网现在薪资好高,写代码特别有意思,于是开始跟着他学了一些写代码的知识。我之所以说是“写代码的知识”而不是计算机知识,是因为我当时是直接上手学JavaWeb那一套东西,什么数据结构、操作系统、计算机网、数据库完全没看直接就开始搞“xxx管
- 《二分枚举答案(配合数据结构)》题集
英雄哪里出来
数据结构图论英雄算法联盟算法
文章目录1、模板题集2、课内题集3、课后题集1.字符串哈希2.并查集3.ST表1、模板题集分巧克力2、课内题集倒水冶炼金属连续子序列的个数3、课后题集括号内的整数代表完整代码行数。1.字符串哈希你猜猜是啥题(60)2.并查集拯救萌萌(72)3.ST表GCD不小于K的子数组(111) 本题集为作者(英雄哪里出来)在抖音的独家课程《英雄C++入门到精通》、《英雄C语言入门到精通》、《英雄Python
- 《python算法与数据结构2000讲》0639. 解码方法 II
IT狂飙
python算法数据结构
《python算法与数据结构2000讲》0639.解码方法II标签:字符串、动态规划难度:困难题目大意描述:给定一个包含数字和字符'*'的字符串s。该字符串已经按照下面的映射关系进行了编码:A映射为1。B映射为2。…Z映射为26。除了上述映射方法,字符串s中可能包含字符'*',可以表示1~9的任一数字(不包括0)。例如字符串"1*"可以表示为"11"、"12"、…、"18"、"19"中的任何一个编
- 单片机菜单-菜单数据结构
努力努力就能上天吖!
《随手笔记》《单片机应用》单片机数据结构嵌入式硬件
在单片机中如果需要一个可以便于维护的菜单程序,那么设计一个便于封装的菜单数据结构就是必不可少的了。最近观看B站UP主有手也不会发布的视频后,发现其写的菜单数据结构尤为好用,这里用于记录,有误之处还望大家指正!按键采用Multibutton开源框架有兴趣可去GitHub上搜索,也可私信我,我发源码。structMenuItem{unsignedcharmenu_cnt;//当前菜单项目总数unsig
- 谷歌地图的3d街景使用的是什么数据格式?
奇树谦
experience3d三维显示
文章目录一、3D街景(StreetView)1.图像部分2.元数据(Metadata)️二、3D城市模型(GoogleEarth或Maps的倾斜摄影模型)1.模型部分2.瓦片划分(TilingSystem)3.材质贴图注意与标准格式对比(参考)✅一、Google3DMesh使用的格式(Protobuf+Binary)1.**数据结构**2.**典型组成**✅二、glTF(GLTransmissio
- Redis-基本命令
ybq19513345431
redis数据库缓存
Redis是单线程的,有5中数据结构,分别为:String(字符串),hash(哈希),list(列表),set(集合),zset(有序集合),都是键值对的值,redis的命令非常多,对于键来说有一些通用的命令:进入Redis客户端命令:redis-clikeys:语法:keyspattern查询当前服务器上匹配的key。通过一些特殊的符号(通配符)来描述key的模样,匹配上述模样的key就能被查
- 第十章——搜索
小结‧二分查找依赖于数据的有序性,通过循环逐步缩减一半搜索区间来实现查找。它要求输入数据有序,且仅适用于数组或基于数组实现的数据结构。‧暴力搜索通过遍历数据结构来定位数据。线性搜索适用于数组和链表,广度优先搜索和深度优先搜索适用于图和树。此类算法通用性好,无须对数据预处理,但时间复杂度()较高。‧哈希查找、树查找和二分查找属于高效搜索方法,可在特定数据结构中快速定位目标元素。此类算法效率高,时间复
- Cursor 如何保障「代码索引」的安全、高效
编者按:AI编程工具如何迅速检索海量代码库,并精准定位到最相关的代码片段?这个看似不可能完成的任务,却是决定现代AI编程工具用户体验的关键技术挑战。我们今天为大家带来的这篇文章,作者的观点是:Cursor通过巧妙运用默克尔树数据结构,实现了对大型代码库的快速索引和高效增量更新,这正是其能够提供精准AI辅助编程服务的技术基础。作者|Engineer'sCodex编译|岳扬Cursor——这家最近宣布
- 数据结构与算法--Python栈 栈实现综合计算器和逆波兰计算器 前缀表达式 中缀表达式 后缀表达式 逆波兰表达式
storyfull
数据结构与算法算法python栈逆波兰表达式逆波兰计算器
阅读目录栈实现综合计算器思路及Python实现思路Python实现模拟逆波兰计算器思路及Python实现思路Python实现正则表达式实现计算器栈实现综合计算器思路及Python实现思路先建立一个“数栈”用来压入数字,还有一个“符号栈”用来压入运算符,规定:减法从栈底向栈顶方法运算,乘除法优先级高于加减法具体操作过程:以“3+26-2”为例(1)数栈和符号栈皆为空,指针从左向右扫描表达式,数栈入栈
- 数据结构C语言---模式串next数组和nextval数组的生成
一、next数组(简单易懂)next函数值仅取决于模式串本身,与主串无关next数组的生成这里有两种方式:1.前缀后缀匹配2.字符串下标匹配以一个数组为例:ababaaababaa我们要生成这个模式串的next数组,那么首先第一件事就是为这些字符标号,如下;序号j:123456789101112模式串s:ababaaababaa方法一前缀后缀匹配前缀和后缀进行比较,如果前缀和后缀没有相同前缀,则为
- Redis 数据迁移同步:应对大 Key 同步挑战
redis数据同步数据库
在企业级的数据同步和迁移场景中,Redis凭借高性能和灵活的数据结构,常被用于缓存和高频读写场景。随着业务数据的积累,Redis中不可避免会出现包含大量元素的“大Key”,如包含几十万条数据的List、Set或Hash类型。在进行全量同步或迁移时,大Key往往成为性能瓶颈甚至故障源。CloudCanal作为专业的数据迁移同步工具,不断优化Redis同步技术,近期对Redis源端链路又完成了一系列优
- 【Rust】——使用消息在线程之间传递数据
Y小夜
Rust(官方文档重点总结)rust开发语言后端
博主现有专栏:C51单片机(STC89C516),c语言,c++,离散数学,算法设计与分析,数据结构,Python,Java基础,MySQL,linux,基于HTML5的网页设计及应用,Rust(官方文档重点总结),jQuery,前端vue.js,Javaweb开发,Python机器学习等主页链接:Y小夜-CSDN博客目录信道与所有权转移发送多个值并观察接收者的等待通过克隆发送者来创建多个生产者学
- ztree异步加载
3213213333332132
JavaScriptAjaxjsonWebztree
相信新手用ztree的时候,对异步加载会有些困惑,我开始的时候也是看了API花了些时间才搞定了异步加载,在这里分享给大家。
我后台代码生成的是json格式的数据,数据大家按各自的需求生成,这里只给出前端的代码。
设置setting,这里只关注async属性的配置
var setting = {
//异步加载配置
- thirft rpc 具体调用流程
BlueSkator
中间件rpcthrift
Thrift调用过程中,Thrift客户端和服务器之间主要用到传输层类、协议层类和处理类三个主要的核心类,这三个类的相互协作共同完成rpc的整个调用过程。在调用过程中将按照以下顺序进行协同工作:
(1) 将客户端程序调用的函数名和参数传递给协议层(TProtocol),协议
- 异或运算推导, 交换数据
dcj3sjt126com
PHP异或^
/*
* 5 0101
* 9 1010
*
* 5 ^ 5
* 0101
* 0101
* -----
* 0000
* 得出第一个规律: 相同的数进行异或, 结果是0
*
* 9 ^ 5 ^ 6
* 1010
* 0101
* ----
* 1111
*
* 1111
* 0110
* ----
* 1001
- 事件源对象
周华华
JavaScript
<!DOCTYPE html PUBLIC "-//W3C//DTD XHTML 1.0 Transitional//EN" "http://www.w3.org/TR/xhtml1/DTD/xhtml1-transitional.dtd">
<html xmlns="http://www.w3.org/1999/xhtml&q
- MySql配置及相关命令
g21121
mysql
MySQL安装完毕后我们需要对它进行一些设置及性能优化,主要包括字符集设置,启动设置,连接优化,表优化,分区优化等等。
一 修改MySQL密码及用户
- [简单]poi删除excel 2007超链接
53873039oycg
Excel
采用解析sheet.xml方式删除超链接,缺点是要打开文件2次,代码如下:
public void removeExcel2007AllHyperLink(String filePath) throws Exception {
OPCPackage ocPkg = OPCPac
- Struts2添加 open flash chart
云端月影
准备以下开源项目:
1. Struts 2.1.6
2. Open Flash Chart 2 Version 2 Lug Wyrm Charmer (28th, July 2009)
3. jofc2,这东西不知道是没做好还是什么意思,好像和ofc2不怎么匹配,最好下源码,有什么问题直接改。
4. log4j
用eclipse新建动态网站,取名OFC2Demo,将Struts2 l
- spring包详解
aijuans
spring
下载的spring包中文件及各种包众多,在项目中往往只有部分是我们必须的,如果不清楚什么时候需要什么包的话,看看下面就知道了。 aspectj目录下是在Spring框架下使用aspectj的源代码和测试程序文件。Aspectj是java最早的提供AOP的应用框架。 dist 目录下是Spring 的发布包,关于发布包下面会详细进行说明。 docs&nb
- 网站推广之seo概念
antonyup_2006
算法Web应用服务器搜索引擎Google
持续开发一年多的b2c网站终于在08年10月23日上线了。作为开发人员的我在修改bug的同时,准备了解下网站的推广分析策略。
所谓网站推广,目的在于让尽可能多的潜在用户了解并访问网站,通过网站获得有关产品和服务等信息,为最终形成购买决策提供支持。
网站推广策略有很多,seo,email,adv
- 单例模式,sql注入,序列
百合不是茶
单例模式序列sql注入预编译
序列在前面写过有关的博客,也有过总结,但是今天在做一个JDBC操作数据库的相关内容时 需要使用序列创建一个自增长的字段 居然不会了,所以将序列写在本篇的前面
1,序列是一个保存数据连续的增长的一种方式;
序列的创建;
CREATE SEQUENCE seq_pro
2 INCREMENT BY 1 -- 每次加几个
3
- Mockito单元测试实例
bijian1013
单元测试mockito
Mockito单元测试实例:
public class SettingServiceTest {
private List<PersonDTO> personList = new ArrayList<PersonDTO>();
@InjectMocks
private SettingPojoService settin
- 精通Oracle10编程SQL(9)使用游标
bijian1013
oracle数据库plsql
/*
*使用游标
*/
--显示游标
--在显式游标中使用FETCH...INTO语句
DECLARE
CURSOR emp_cursor is
select ename,sal from emp where deptno=1;
v_ename emp.ename%TYPE;
v_sal emp.sal%TYPE;
begin
ope
- 【Java语言】动态代理
bit1129
java语言
JDK接口动态代理
JDK自带的动态代理通过动态的根据接口生成字节码(实现接口的一个具体类)的方式,为接口的实现类提供代理。被代理的对象和代理对象通过InvocationHandler建立关联
package com.tom;
import com.tom.model.User;
import com.tom.service.IUserService;
- Java通信之URL通信基础
白糖_
javajdkwebservice网络协议ITeye
java对网络通信以及提供了比较全面的jdk支持,java.net包能让程序员直接在程序中实现网络通信。
在技术日新月异的现在,我们能通过很多方式实现数据通信,比如webservice、url通信、socket通信等等,今天简单介绍下URL通信。
学习准备:建议首先学习java的IO基础知识
URL是统一资源定位器的简写,URL可以访问Internet和www,可以通过url
- 博弈Java讲义 - Java线程同步 (1)
boyitech
java多线程同步锁
在并发编程中经常会碰到多个执行线程共享资源的问题。例如多个线程同时读写文件,共用数据库连接,全局的计数器等。如果不处理好多线程之间的同步问题很容易引起状态不一致或者其他的错误。
同步不仅可以阻止一个线程看到对象处于不一致的状态,它还可以保证进入同步方法或者块的每个线程,都看到由同一锁保护的之前所有的修改结果。处理同步的关键就是要正确的识别临界条件(cri
- java-给定字符串,删除开始和结尾处的空格,并将中间的多个连续的空格合并成一个。
bylijinnan
java
public class DeleteExtraSpace {
/**
* 题目:给定字符串,删除开始和结尾处的空格,并将中间的多个连续的空格合并成一个。
* 方法1.用已有的String类的trim和replaceAll方法
* 方法2.全部用正则表达式,这个我不熟
* 方法3.“重新发明轮子”,从头遍历一次
*/
public static v
- An error has occurred.See the log file错误解决!
Kai_Ge
MyEclipse
今天早上打开MyEclipse时,自动关闭!弹出An error has occurred.See the log file错误提示!
很郁闷昨天启动和关闭还好着!!!打开几次依然报此错误,确定不是眼花了!
打开日志文件!找到当日错误文件内容:
--------------------------------------------------------------------------
- [矿业与工业]修建一个空间矿床开采站要多少钱?
comsci
地球上的钛金属矿藏已经接近枯竭...........
我们在冥王星的一颗卫星上面发现一些具有开采价值的矿床.....
那么,现在要编制一个预算,提交给财政部门..
- 解析Google Map Routes
dai_lm
google api
为了获得从A点到B点的路劲,经常会使用Google提供的API,例如
[url]
http://maps.googleapis.com/maps/api/directions/json?origin=40.7144,-74.0060&destination=47.6063,-122.3204&sensor=false
[/url]
从返回的结果上,大致可以了解应该怎么走,但
- SQL还有多少“理所应当”?
datamachine
sql
转贴存档,原帖地址:http://blog.chinaunix.net/uid-29242841-id-3968998.html、http://blog.chinaunix.net/uid-29242841-id-3971046.html!
------------------------------------华丽的分割线--------------------------------
- Yii使用Ajax验证时,如何设置某些字段不需要验证
dcj3sjt126com
Ajaxyii
经常像你注册页面,你可能非常希望只需要Ajax去验证用户名和Email,而不需要使用Ajax再去验证密码,默认如果你使用Yii 内置的ajax验证Form,例如:
$form=$this->beginWidget('CActiveForm', array( 'id'=>'usuario-form',&
- 使用git同步网站代码
dcj3sjt126com
crontabgit
转自:http://ued.ctrip.com/blog/?p=3646?tn=gongxinjun.com
管理一网站,最开始使用的虚拟空间,采用提供商支持的ftp上传网站文件,后换用vps,vps可以自己搭建ftp的,但是懒得搞,直接使用scp传输文件到服务器,现在需要更新文件到服务器,使用scp真的很烦。发现本人就职的公司,采用的git+rsync的方式来管理、同步代码,遂
- sql基本操作
蕃薯耀
sqlsql基本操作sql常用操作
sql基本操作
>>>>>>>>>>>>>>>>>>>>>>>>>>>>>>>>>>>>
蕃薯耀 2015年6月1日 17:30:33 星期一
&
- Spring4+Hibernate4+Atomikos3.3多数据源事务管理
hanqunfeng
Hibernate4
Spring3+后不再对JTOM提供支持,所以可以改用Atomikos管理多数据源事务。Spring2.5+Hibernate3+JTOM参考:http://hanqunfeng.iteye.com/blog/1554251Atomikos官网网站:http://www.atomikos.com/ 一.pom.xml
<dependency>
<
- jquery中两个值得注意的方法one()和trigger()方法
jackyrong
trigger
在jquery中,有两个值得注意但容易忽视的方法,分别是one()方法和trigger()方法,这是从国内作者<<jquery权威指南》一书中看到不错的介绍
1) one方法
one方法的功能是让所选定的元素绑定一个仅触发一次的处理函数,格式为
one(type,${data},fn)
&nb
- 拿工资不仅仅是让你写代码的
lampcy
工作面试咨询
这是我对团队每个新进员工说的第一件事情。这句话的意思是,我并不关心你是如何快速完成任务的,哪怕代码很差,只要它像救生艇通气门一样管用就行。这句话也是我最喜欢的座右铭之一。
这个说法其实很合理:我们的工作是思考客户提出的问题,然后制定解决方案。思考第一,代码第二,公司请我们的最终目的不是写代码,而是想出解决方案。
话粗理不粗。
付你薪水不是让你来思考的,也不是让你来写代码的,你的目的是交付产品
- 架构师之对象操作----------对象的效率复制和判断是否全为空
nannan408
架构师
1.前言。
如题。
2.代码。
(1)对象的复制,比spring的beanCopier在大并发下效率要高,利用net.sf.cglib.beans.BeanCopier
Src src=new Src();
BeanCopier beanCopier = BeanCopier.create(Src.class, Des.class, false);
- ajax 被缓存的解决方案
Rainbow702
JavaScriptjqueryAjaxcache缓存
使用jquery的ajax来发送请求进行局部刷新画面,各位可能都做过。
今天碰到一个奇怪的现象,就是,同一个ajax请求,在chrome中,不论发送多少次,都可以发送至服务器端,而不会被缓存。但是,换成在IE下的时候,发现,同一个ajax请求,会发生被缓存的情况,只有第一次才会被发送至服务器端,之后的不会再被发送。郁闷。
解决方法如下:
① 直接使用 JQuery提供的 “cache”参数,
- 修改date.toLocaleString()的警告
tntxia
String
我们在写程序的时候,经常要查看时间,所以我们经常会用到date.toLocaleString(),但是date.toLocaleString()是一个过时 的API,代替的方法如下:
package com.tntxia.htmlmaker.util;
import java.text.SimpleDateFormat;
import java.util.
- 项目完成后的小总结
xiaomiya
js总结项目
项目完成了,突然想做个总结但是有点无从下手了。
做之前对于客户端给的接口很模式。然而定义好了格式要求就如此的愉快了。
先说说项目主要实现的功能吧
1,按键精灵
2,获取行情数据
3,各种input输入条件判断
4,发送数据(有json格式和string格式)
5,获取预警条件列表和预警结果列表,
6,排序,
7,预警结果分页获取
8,导出文件(excel,text等)
9,修