【自主探索】基于 frontier_exploration 的单个机器人自主探索建图
文章目录
- 一、概述
-
- 1、功能
- 2、要求
- 二、使用方法
-
- 1、用于运行演示
- 2、用于开发人员
-
- 2.1. 探索无/地图数据
- 2.2. 使用 /map 数据进行探索
- 三、提供的组件
-
- 1、explore_client
-
- 1.1. 调用的操作
- 1.2. 订阅主题
- 1.3. 发布主题
- 2、explore_server
-
- 2.1. 提供的操作
- 2.2. 调用的操作
- 2.3. 调用的服务
- 2.4. 参数
- 3、BoundedExploreLayer
-
- 3.1. 发布主题
- 3.2. 服务
- 3.3. 参数
一、概述
尝试 frontier_exploration 的最佳方法是使用 husky_navigation 中提供的演示,请参阅演示教程。
1、功能
frontier_exploration 软件包提供了 costmap_2d 层插件 BoundedExploreLayer 以及 actionlib 客户端/服务器节点 explore_client 和 explore_server。
所提供的节点可用于演示成本图层的功能,方法是执行一个以用户定义的多边形区域为边界的边界探索任务。
BoundedExploreLayer 图层当然也可用于执行更复杂的勘探任务,其功能通过两个服务实现: UpdatePolygonBoundary 和 GetNextFrontier。
2、要求
使用本软件包进行边界探索,需要一个真实或模拟的机器人配置,以提供以下功能:
- 激光扫描仪或类似传感器,可清理空间并标记障碍物。
- 适当配置的导航堆栈,可接受移动基地的行动目标。
- (可选)由 map_server、gmapping 或 move_base 提供的全局 / 地图
二、使用方法
1、用于运行演示
使用预先存在的机器人和配置,您可以运行一个演示,看看该软件包如何工作。
- 安装 frontier_exploration 算法
sudo apt-get install ros-kinetic-frontier-exploration ros-kinetic-navigation-stage
- 在独立终端逐一运行必要的节点:
roslaunch navigation_stage move_base_gmapping_5cm.launch
roslaunch navigation_stage move_base.xml
roslaunch frontier_exploration global_map.launch
弹出 RViz,然后在地图中心周围出现一个演示机器人。
- 在 RViz 上打开 Marker 插件(RViz 插件可在弹出窗口中选择,通过 "添加 "按钮打开)。
- 下拉 "Displays --> Marker --> Marker Topic "菜单,然后选择 "exploration_polygon_marker "主题。
- 在 RViz 的地图上,想一个您希望机器人探索的区域。
- 点击 RViz 顶部的 “Publish Point”。
- 点击该区域 n 个角中的一个角(如果您的区域是正方形/长方形,请点击 n=4 个角)。
- 重复上述第 6 和第 7 步 n 次。之后你会看到一个有 n 个角的多边形。
- 再次执行步骤 6,然后点击多边形内的任意位置。
视频演示
看到有个博主跑这个包没成功,出现报错
ERROR: cannot launch node of type [frontier_exploration/explore_client]: Cannot locate node of type [explore_client] in package [frontier_exploration]. Make sure file exists in package path and permission is set to executable (chmod +x)
ERROR: cannot launch node of type [frontier_exploration/explore_server]: Cannot locate node of type [explore_server] in package [frontier_exploration]. Make sure file exists in package path and permission is set to executable (chmod +x)
评论区说编译通过以后在/catkin_ws/devel/lib/frontier_exploration下没有任何文件,所以会出现此报错,感觉包本身是有问题的
2、用于开发人员
如果你只是想开始利用这个软件包的功能,husky_navigation 软件包中的教程会有所帮助。
如果你想了解得更深入一些,一般来说,当启动 explore_server 时,它会一直旋转,直到收到一个探索目标。要提交目标:
- 使用 explore_client 和 RViz - 在 Rviz 中为 exploration_polygon_marker 主题创建一个标记显示,并使用工具栏上的 "Click Point "工具标记探索边界。留意 ROS 控制台对所选边界的反馈。
- 通过 actionlib SimpleActionClient,用自己的节点向服务器提交目标。
探索目标包含一个开始探索的初始点和一个限制探索范围的多边形边界。要运行无边界探索任务,只需将边界留空即可。
服务器收到目标后,就会创建初始探索地图,开始处理传感器/成本地图数据,并发出 move_base 行动目标。默认情况下,探索任务将探索边界内的所有区域(无论之前是否访问过)。下面提供了几种使用案例的启动文件示例。
2.1. 探索无/地图数据
在没有全局/地图信息源的情况下运行动作服务器/客户端时,请启用 resize_too_boundary 参数,以便根据动作目标的多边形边界动态调整地图大小。当机器人在探索边界外行进时,costmap_2d 会出现传感器超出地图边界的错误信息。这些信息可以安全地忽略,也可以使用 rosconsole 配置文件加以抑制。
如果不使用 resize_to_boundary(例如运行无边界探索),请确保成本地图配置了足够大的高度/宽度。
启动文件示例:no_global_map.launch
<launch>
    <!-- Set to your sensor's range -->
    <arg name="sensor_range" default="1.0"/>

    <node pkg="frontier_exploration" type="explore_client" name="explore_client" output="screen"/>

    <node pkg="frontier_exploration" type="explore_server" name="explore_server" output="screen" >

        <param name="frequency" type="double" value="2.0"/>
        <param name="goal_aliasing" type="double" value="$(arg sensor_range)"/>

        #All standard costmap_2d parameters as in move_base, other than BoundedExploreLayer
        <rosparam ns="explore_costmap" subst_value="true">
            #Sample parameters
            footprint: [[0.1, 0.0], [0.0, 0.1], [0.0, -0.1], [-0.1, 0.0]]
            robot_radius: 0.10

            transform_tolerance: 0.5
            update_frequency: 5.0
            publish_frequency: 5.0

            global_frame: map
            robot_base_frame: base_link
            resolution: 0.05

            rolling_window: false
            track_unknown_space: true

            plugins:

                - {name: explore_boundary, type: "frontier_exploration::BoundedExploreLayer"}
                - {name: sensor,           type: "costmap_2d::ObstacleLayer"}
                - {name: inflation,        type: "costmap_2d::InflationLayer"}

            explore_boundary:
                resize_to_boundary: true
                frontier_travel_point: closest

            sensor:
                observation_sources: laser
                laser: {data_type: LaserScan, clearing: true, marking: true, topic: scan, inf_is_valid: true, raytrace_range: $(arg sensor_range), obstacle_range: $(arg sensor_range)}

            inflation:
                inflation_radius: 0.15
      </rosparam>
    </node>
</launch>
2.2. 使用 /map 数据进行探索
在使用全局 /map 信息源(来自 map_server 或 gmapping)运行动作服务器/客户端时,勘探成本地图的大小/分辨率将与静态图层加载的外部地图源地图相匹配,因此必须禁用 resize_too_boundary 参数,并且勘探成本地图的 global_frame 必须与外部 /map 相匹配。
使用 gmapping 进行探索时,还必须禁用 explore_clear_space,以防止节点重新探索已知区域。
启动文件示例:global_map.launch
<launch>

    <!-- Set to your sensor's range -->
    <arg name="sensor_range" default="1.0"/>

    <node pkg="frontier_exploration" type="explore_client" name="explore_client" output="screen"/>

    <node pkg="frontier_exploration" type="explore_server" name="explore_server" output="screen" >

        <param name="frequency" type="double" value="2.0"/>
        <param name="goal_aliasing" type="double" value="$(arg sensor_range)"/>

        #All standard costmap_2d parameters as in move_base, other than BoundedExploreLayer
        <rosparam ns="explore_costmap" subst_value="true">
            footprint: [[0.1, 0.0], [0.0, 0.1], [0.0, -0.1], [-0.1, 0.0]]
            robot_radius: 0.10

            transform_tolerance: 0.5
            update_frequency: 5.0
            publish_frequency: 5.0

            #must match incoming static map
            global_frame: map
            robot_base_frame: base_link
            resolution: 0.05

            rolling_window: false
            track_unknown_space: true

            plugins:

                - {name: static,           type: "costmap_2d::StaticLayer"}
                - {name: explore_boundary, type: "frontier_exploration::BoundedExploreLayer"}
                #Can disable sensor layer if gmapping is fast enough to update scans
                - {name: sensor,           type: "costmap_2d::ObstacleLayer"}
                - {name: inflation,        type: "costmap_2d::InflationLayer"}

            static:
                #Can pull data from gmapping, map_server or a non-rolling costmap
                map_topic: /map
                # map_topic: move_base/global_costmap/costmap
                subscribe_to_updates: true

            explore_boundary:
                resize_to_boundary: false
                frontier_travel_point: middle
                #set to false for gmapping, true if re-exploring a known area
                explore_clear_space: false

            sensor:
                observation_sources: laser
                laser: {data_type: LaserScan, clearing: true, marking: true, topic: scan, inf_is_valid: true, raytrace_range: $(arg sensor_range), obstacle_range: $(arg sensor_range)}

            inflation:
                inflation_radius: 0.15
      </rosparam>
    </node>

</launch>
三、提供的组件
1、explore_client
explore_client 节点侦听 Rviz 发布的点,并构建一个 ExploreTask 行动目标发送给 explore_server。
1.1. 调用的操作
explore_server(frontier_exploration/ExploreTask)
向 explore_server 发送探索目标的客户端。
1.2. 订阅主题
/clicked_point(geometry_msgs/PointStamped)
从 rviz 工具点击的点。
1.3. 发布主题
exploration_polygon_marker(visualization_msgs/Marker)
通过点击点实现边界可视化。
2、explore_server
explore_server 节点为所有已连接的客户端执行探索操作。它使用 costmap_2d 对象来跟踪探索进度,并在必要时为 move_base 创建移动目标。
2.1. 提供的操作
explore_server(frontier_exploration/ExploreTask)
接收勘探任务请求的服务器
2.2. 调用的操作
move_base(move_base_msgs/MoveBaseAction)
向 move_base 发送移动目标的客户端。
2.3. 调用的服务
~explore_costmap/explore_boundary/update_boundary_polygon(frontier_exploration/UpdateBoundaryPolygon)
(来自 Costmap 的内部服务)为勘探任务设置边界。~explore_costmap/explore_boundary/get_next_frontier(frontier_exploration/GetNextFrontier)
(来自 Costmap 的内部服务)获取下一个要探索的边界的姿态。
2.4. 参数
~explore_costmap(插件)
内部 costmap 图层的配置,预计包含 BoundedExploreLayer。~frequency(浮点数,默认值:0.0)
为下一个边界目标重新处理代价图的频率。如果频率为 0.0,则只有在通过 move_base 达到上一个边界目标时,才会询问新的边界目标。频率越高,提交 move_base 目标的频率越高,探索过程也就越 “平滑”。~goal_aliasing(浮点数,默认值:0.1)
当频率 > 0.0 时,~goal_aliasing 是在新目标提交给 move_base 之前,上一个目标和新目标之间所需的距离 delta。在 sensor_range/2 > ~goal_aliasing > 0.0 范围内的任何位置设置都是安全的,而且该参数将减少 "平滑 "探索过程中发送的冗余目标数量。
3、BoundedExploreLayer
frontier_exploration::BoundedExploreLayer 层是一个 costmap_2d 插件,它实现了执行边界探索任务所需的若干功能。
3.1. 发布主题
~frontiers(sensor_msgs/PointCloud2)
点云 pcl::Pointcloud< pcl::PointXYZI> 在调用 ~get_next_frontier 服务时标记检测到的所有边界,并使用强度较高的点标记所选边界。
3.2. 服务
~update_boundary_polygon(frontier_exploration/UpdateBoundaryPolygon)
为探索任务设置边界。~get_next_frontier(frontier_exploration/GetNextFrontier)
获取下一个探索边界的姿态。
3.3. 参数
~resize_too_boundary(bool,默认:false)
当通过 ~update_boundary_polygon 接收到多边形边界时,会根据边界极值调整图层父成本贴图的大小。~frontier_travel_point(字符串,默认:最近)
通过 ~get_next_frontier 输出下一个边界的姿态时,定义要输出为 pose.position 的边界几何属性。可用:离机器人最近的点、边界的中间点、所有边界点的中心点(笛卡尔平均值)。~explore_clear_space(bool,默认:true)
配置探索任务是探索所有清晰空间(true),还是只探索未知空间(false)。
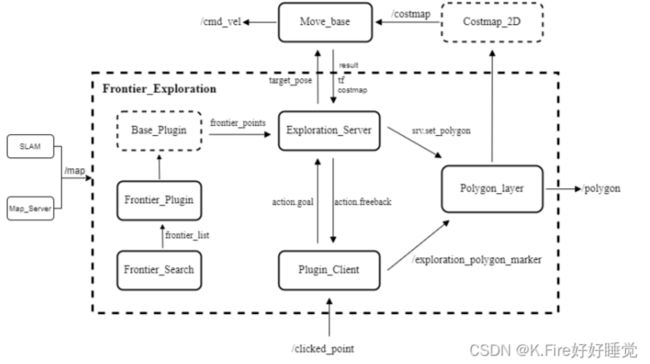
算法流程图如下所示:
参考:
- https://github.com/paulbovbel/frontier_exploration
- http://wiki.ros.org/frontier_exploration
- ROS学习笔记之——基于frontier_exploration的机器人自主探索(未成功运行)
- 结合frontier_exploration + gmapping + move_base包实现指定区域建图
- 【SLAM】ROS平台下三种自主探索算法总结