基于etcd+Patroni的PostgreSQL11高可用方案及离线部署
目录
一、前言
二、软件包及环境说明
1. 环境说明
2. IP规划
三、安装PG
1. 创建安装目录,并解压
2. 创建用户及数据目录
3. 安装依赖包
4. 源码安装PG11
5. 配置环境变量
6. 启动数据库,并修改超级用户postgres密码
四、搭建流复制
1. 关闭防火墙
2. 开启watchdog
3. 配置规则
4. 重启PG服务
5. 备库上重新创建数据目录
6. 创建.pgpass
7. 生成备库
8. 配置备库
9. 启动备库并验证
五、安装etcd集群
1. 解压安装
2. 配置etcd服务并启动,查看集群状态
六、安装patroni
1. 安装pip
2. 安装依赖环境
3. 创建patroni配置文件
4. 配置patroni服务
5. 查看patroni集群
七、安装Keepalived
1. 解压并安装Keepalived
2. 配置主备服务器的Keepalived
3. 启动Keepalived
八、安装HAProxy
1. 安装及配置HAProxy
2. 防火墙配置
3. 启动HAProxy
4. 验证HAProxy
5. HAProxy监控页面
一、前言
本文基于etcd+patroni对PostgreSQL数据库做高可用配置(1主2从),HAProxy+Keepalived搭建负载均衡与虚拟IP漂移功能,使得后端服务无需担心数据库主备切换后造成的IP及端口不一致问题。
二、软件包及环境说明
鉴于大多数服务器并不能直连外网,无法使用yum源直接安装,本文提供一种离线部署方式,以供参考。
安装包下载地址:
链接:https://pan.baidu.com/s/1lDxYJ6U7gjjxY6skNMauyg
提取码:6gsc
1. 环境说明
操作系统:Centos7.x
PG版本:PostgreSQL-11.11,下载网址:https://www.postgresql.org/docs/release/11.11/
etcd版本:etcd-v3.4.7
patroni版本:1.6.1
HAProxy版本:1.7.14
Keepalived版本:1.4.5
2. IP规划
主库IP:192.168.52.121
备库IP:192.168.52.122
备库2IP:192.168.52.123
虚拟IP:192.168.52.120
三、安装PG
上传离线安装环境包pg_ha.tar.gz到三台服务器上
1. 创建安装目录,并解压
mkdir /pghaenv
tar -xvf pg_ha.tar.gz -C /pghaenv/
2. 创建用户及数据目录
groupadd postgres
useradd -g postgres postgres
mkdir -p /software/pgsql/data
chown -R postgres:postgres /software
3. 安装依赖包
cd /pghaenv/postgresql_env/
rpm -ivh *.rpm --nodeps --force
4. 源码安装PG11
cd /pghaenv/
tar -xvf postgresql-11.11.tar.gz
cd postgresql-11.11
./configure -prefix=/software/pgsql -with-blocksize=8 -with-wal-blocksize=8
gmake world
gmake install-world
5. 配置环境变量
#切换为postgres用户
su - postgres

#修改环境变量
vi /home/postgres/.bash_profile

#末尾处加入以下值
PGHOME=/software/pgsql
export PGHOME
PGDATA=/software/pgsql/data
export PGDATA

PATH=$PATH:$HOME/.local/bin:$HOME/bin:$PGHOME/bin
export PATH
别忘了source下:
source /home/postgres/.bash_profile
初始化数据目录
pg_ctl init -D /software/pgsql/data
配置pg_hba.conf
vi /software/pgsql/data/pg_hba.conf
在该文件末尾追加内容:
host all all 0.0.0.0/0 md5
配置postgresql.conf
vi /software/pgsql/data/postgresql.conf
加入以下内容
listen_addresses = '*'
port = 5432
logging_collector = on
log_directory = 'pg_log'
log_filename = 'postgresql-%Y-%m-%d_%H%M%S.log'
log_file_mode = 0600
log_min_messages = warning
log_min_error_statement = error
6. 启动数据库,并修改超级用户postgres密码
pg_ctl start
alter user postgres with password 'post123gres456';
四、搭建流复制
1. 关闭防火墙
systemctl stop firewalld.service
systemctl disable firewalld.service
2. 开启watchdog
modprobe softdog
chown postgres:postgres /dev/watchdog
在主库上创建流复制用户
CREATE USER repuser
 REPLICATION
 LOGIN
 CONNECTION LIMIT 5
 ENCRYPTED PASSWORD 'rep123us345er';
3. 配置规则
vi /software/pgsql/data/pg_hba.conf
末尾添加:
host  replication   repuser     192.168.52.121/32     md5
host  replication   repuser     192.168.52.122/32     md5
host  replication   repuser     192.168.52.123/32     md5
vi /software/pgsql/data/postgresql.conf
archive_mode = on
archive_command = '/bin/date'
max_wal_senders = 3
wal_keep_segments = 16
4. 重启PG服务
su - postgres
pg_ctl restart
5. 备库上重新创建数据目录
主库查看当前数据目录:
![]()
rm -rf /software/pgsql/data
mkdir -p /software/pgsql/data
chown -R postgres:postgres /software/pgsql/data
chmod 0700 /software/pgsql/data
6. 创建.pgpass
在所有库上均执行:
su - postgres
echo 192.168.52.121:5432:replication:repuser:rep123us345er >> .pgpass
chmod 0600 .pgpass
7. 生成备库
pg_basebackup -D /software/pgsql/data -Fp -Xs -v -P -h 192.168.52.121 -p 5432 -U repuser8. 配置备库
cp /software/pgsql/share/recovery.conf.sample /software/pgsql/data/recovery.conf
vi /software/pgsql/data/postgresql.conf
配置参数:hot_standby=on

vi /software/pgsql/data/recovery.conf
standby_mode = on
primary_conninfo = 'host=192.168.52.121 port=5432 user=repuser'
trigger_file = '/software/pgsql/data/postgresql.trigger.5432'
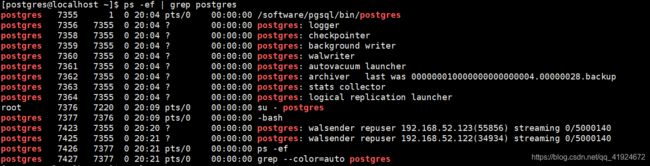
9. 启动备库并验证
#启动备库
pg_ctl start -D $PGDATA
#查看备库进程:
ps -ef | grep postgres
主库进程:
备库进程:

五、安装etcd集群
1. 解压安装
#切换为root用户
cd /pghaenv
tar xvf etcd-v3.4.7-linux-amd64.tar.gz
mv etcd-v3.4.7-linux-amd64 etcd-v3.4.7
mv etcd-v3.4.7 /opt
创建启动脚本
主库所在主机/opt/etcd-v3.4.7目录下创建start_etcd.sh启动脚本
vi /opt/etcd-v3.4.7/start_etcd.sh
内容如下:
/opt/etcd-v3.4.7/etcd --name etcd_01 \
  --initial-advertise-peer-urls http://192.168.52.121:2380 \
  --listen-peer-urls http://192.168.52.121:2380 \
  --listen-client-urls http://192.168.52.121:2379,http://127.0.0.1:2379 \
  --advertise-client-urls http://192.168.52.121:2379 \
  --initial-cluster-token etcd-cluster \
  --initial-cluster etcd_01=http://192.168.52.121:2380,etcd_02=http://192.168.52.122:2380,etcd_03=http://192.168.52.123:2380 \
  --initial-cluster-state new \
  --enable-v2
授权:chmod +x /opt/etcd-v3.4.7/start_etcd.sh
备库1所在主机/opt/etcd-v3.4.7目录下创建start_etcd.sh启动脚本
vi /opt/etcd-v3.4.7/start_etcd.sh
/opt/etcd-v3.4.7/etcd --name etcd_02 \
  --initial-advertise-peer-urls http://192.168.52.122:2380 \
  --listen-peer-urls http://192.168.52.122:2380 \
  --listen-client-urls http://192.168.52.122:2379,http://127.0.0.1:2379 \
  --advertise-client-urls http://192.168.52.122:2379 \
  --initial-cluster-token etcd-cluster \
  --initial-cluster etcd_01=http://192.168.52.121:2380,etcd_02=http://192.168.52.122:2380,etcd_03=http://192.168.52.123:2380 \
  --initial-cluster-state new \
  --enable-v2
授权:chmod +x /opt/etcd-v3.4.7/start_etcd.sh
备库2所在主机/opt/etcd-v3.4.7目录下创建start_etcd.sh启动脚本
vi /opt/etcd-v3.4.7/start_etcd.sh
/opt/etcd-v3.4.7/etcd --name etcd_03 \
  --initial-advertise-peer-urls http://192.168.52.123:2380 \
  --listen-peer-urls http://192.168.52.123:2380 \
  --listen-client-urls http://192.168.52.123:2379,http://127.0.0.1:2379 \
  --advertise-client-urls http://192.168.52.123:2379 \
  --initial-cluster-token etcd-cluster \
  --initial-cluster etcd_01=http://192.168.52.121:2380,etcd_02=http://192.168.52.122:2380,etcd_03=http://192.168.52.123:2380 \
  --initial-cluster-state new \
  --enable-v2
授权:chmod +x /opt/etcd-v3.4.7/start_etcd.sh
2. 配置etcd服务并启动,查看集群状态
vi /usr/lib/systemd/system/etcd.service
#添加以下内容
[Unit]
Description=etcd
After=network.target remote-fs.target nss-lookup.target

[Service]
Type=forking
ExecStart=/bin/bash -c "/opt/etcd-v3.4.7/start_etcd.sh > /opt/etcd-v3.4.7/start_etcd.log 2>&1 &"
[Install]
WantedBy=multi-user.target
保存后退出,执行:
chmod 754 /usr/lib/systemd/system/etcd.service
systemctl daemon-reload
service etcd start
systemctl enable etcd.service
#查看etcd集群状态
/opt/etcd-v3.4.7/etcdctl endpoint status --cluster -w table
六、安装patroni
1. 安装pip
cd /pghaenv
#安装setuptools
tar -xvf setuptools-19.6.tar.gz
cd setuptools-19.6
python setup.py build
python setup.py install
cd ..
#安装pip
tar -xvf pip-19.3.1.tar.gz
cd pip-19.3.1
python  setup.py install
2. 安装依赖环境
cd /pghaenv/
rpm -ivh python*.rpm --nodeps --force
cd /pghaenv/patroni_env/
pip install *.whl
cd /pghaenv/
#按顺序安装以下tar包
pip install psutil-5.6.7.tar.gz
pip install cdiff-1.0.tar.gz
pip install python-etcd-0.4.5.tar.gz
pip install patroni-1.6.1.tar.gz
3. 创建patroni配置文件
主机创建patroni.yml文件
mkdir -p /software/patroni
vi /software/patroni/patroni.yml
添加以下内容:
scope: pg_patroni
namespace: /service/
name: pg_patroni01

restapi:
  listen: 192.168.52.121:8008
  connect_address: 192.168.52.121:8008

etcd:
  #Provide host to do the initial discovery of the cluster topology:
  host: 192.168.52.121:2379

bootstrap:
  # this section will be written into Etcd:///config after initializing new cluster
  # and all other cluster members will use it as a `global configuration`
  dcs:
    ttl: 30
    loop_wait: 10
    retry_timeout: 10
    maximum_lag_on_failover: 1048576
    master_start_timeout: 300
    synchronous_mode: true
    #standby_cluster:
      #host: 127.0.0.1
      #port: 1111
      #primary_slot_name: patroni
    postgresql:
      use_pg_rewind: true
      use_slots: true
      parameters:
      wal_level: locical
      hot_standby: "on"
      wal_keep_segments: 128
      max_wal_senders: 10
      max_replication_slots: 10
      wal_log_hints: "on"
      archive_mode: "on"
      #primary_conninfo: 'host=192.168.52.101 port=31003 user=repuser'
      hot_standby: on
      archive_timeout: 1800s

postgresql:
  listen: 0.0.0.0:5432
  connect_address: 192.168.52.121:5432
  data_dir: /software/pgsql/data
  bin_dir: /software/pgsql/bin
  config_dir: /software/pgsql/data
  pgpass: /home/postgres/.pgpass
  authentication:
    replication:
      username: repuser
      password: rep123us345er
    superuser:
      username: postgres
      password: post123gres456


tags:
    nofailover: false
    noloadbalance: false
    clonefrom: false
nosync: false
watchdog:
    mode: automatic
    device: /dev/watchdog
    safety_margin: 5
备机1创建patroni.yml文件
mkdir -p /software/patroni
vi /software/patroni/patroni.yml
添加以下内容:
scope: pg_patroni
namespace: /service/
name: pg_patroni02

restapi:
  listen: 192.168.52.122:8008
  connect_address: 192.168.52.122:8008

etcd:
  #Provide host to do the initial discovery of the cluster topology:
  host: 192.168.52.122:2379

bootstrap:
  # this section will be written into Etcd:///config after initializing new cluster
  # and all other cluster members will use it as a `global configuration`
  dcs:
    ttl: 30
    loop_wait: 10
    retry_timeout: 10
    maximum_lag_on_failover: 1048576
    master_start_timeout: 300
    synchronous_mode: true
    #standby_cluster:
      #host: 127.0.0.1
      #port: 1111
      #primary_slot_name: patroni
    postgresql:
      use_pg_rewind: true
      use_slots: true
      parameters:
      wal_level: locical
      hot_standby: "on"
      wal_keep_segments: 128
      max_wal_senders: 10
      max_replication_slots: 10
      wal_log_hints: "on"
      archive_mode: "on"
      #primary_conninfo: 'host=192.168.52.102 port=31003 user=repuser'
      hot_standby: on
      archive_timeout: 1800s

postgresql:
  listen: 0.0.0.0:5432
  connect_address: 192.168.52.122:5432
  data_dir: /software/pgsql/data
  bin_dir: /software/pgsql/bin
  config_dir: /software/pgsql/data
  pgpass: /home/postgres/.pgpass
  authentication:
    replication:
      username: repuser
      password: rep123us345er
    superuser:
      username: postgres
      password: post123gres456

tags:
    nofailover: false
    noloadbalance: false
    clonefrom: false
nosync: false
watchdog:
    mode: automatic
    device: /dev/watchdog
    safety_margin: 5
备机2创建patroni.yml文件
mkdir -p /software/patroni
vi /software/patroni/patroni.yml
添加以下内容:
scope: pg_patroni
namespace: /service/
name: pg_patroni03

restapi:
  listen: 192.168.52.123:8008
  connect_address: 192.168.52.123:8008

etcd:
  #Provide host to do the initial discovery of the cluster topology:
  host: 192.168.52.123:2379

bootstrap:
  # this section will be written into Etcd:///config after initializing new cluster
  # and all other cluster members will use it as a `global configuration`
  dcs:
    ttl: 30
    loop_wait: 10
    retry_timeout: 10
    maximum_lag_on_failover: 1048576
    master_start_timeout: 300
    synchronous_mode: true
    #standby_cluster:
      #host: 127.0.0.1
      #port: 1111
      #primary_slot_name: patroni
    postgresql:
      use_pg_rewind: true
      use_slots: true
      parameters:
      wal_level: locical
      hot_standby: "on"
      wal_keep_segments: 128
      max_wal_senders: 10
      max_replication_slots: 10
      wal_log_hints: "on"
      archive_mode: "on"
      #primary_conninfo: 'host=192.168.52.103 port=31003 user=repuser'
      hot_standby: on
      archive_timeout: 1800s

postgresql:
  listen: 0.0.0.0:5432
  connect_address: 192.168.52.123:5432
  data_dir: /software/pgsql/data
  bin_dir: /software/pgsql/bin
  config_dir: /software/pgsql/data
  pgpass: /home/postgres/.pgpass
  authentication:
    replication:
      username: repuser
      password: rep123us345er
    superuser:
      username: postgres
      password: post123gres456
tags:
    nofailover: false
    noloadbalance: false
    clonefrom: false
nosync: false
watchdog:
    mode: automatic
    device: /dev/watchdog
    safety_margin: 5
4. 配置patroni服务
分别对上一步创建好的配置文件授权:
chown -R postgres:postgres /software/patroni/patroni.yml

#配置服务&开机自启动

vi /usr/lib/systemd/system/patroni.service
#添加以下内容:(三台机器都一致)

[Unit]
Description=patroni
After=network.target remote-fs.target nss-lookup.target

[Service]
Type=forking
ExecStart=/bin/bash -c "sudo -u postgres patroni  /software/patroni/patroni.yml> /software/patroni/patroni.log 2>&1 &"
[Install]
WantedBy=multi-user.target
保存退出后,执行:
chmod 754 /usr/lib/systemd/system/patroni.service
systemctl daemon-reload
service patroni start
systemctl enable patroni.service
5. 查看patroni集群
运行patronictl -c /software/patroni/patroni.yml list

七、安装Keepalived
1. 解压并安装Keepalived
mkdir /haproxyKeepalived
tar -xvf HAProxyKeepalived.tar.gz -C /haproxyKeepalived
cd /haproxyKeepalived
rpm -ivh *.rpm --nodeps --force
tar -xvf keepalived-1.4.5.tar.gz
cd /haproxyKeepalived/keepalived-1.4.5
#源码安装Keepalived,--with-kernel-dir参数根据自己服务器的进行设置
./configure --sysconf=/etc --with-kernel-dir=/usr/lib/modules/3.10.0-514.26.2.el7.x86_64/
make && make install
2. 配置主备服务器的Keepalived
mkdir -p /etc/keepalived
#设置开机自启动:
systemctl enable keepalived
#开启vrrp:
firewall-cmd --add-rich-rule='rule protocol value="vrrp" accept' --permanent
firewall-cmd --reload
mv /etc/keepalived/keepalived.conf /etc/keepalived/keepalived.conf.bak
vi /etc/keepalived/keepalived.conf
主服务器的keepalived.conf添加以下内容:
global_defs {
   smtp_connect_timeout 30    #连接超时时间
   router_id LVS_DEVEL01     #相当于给这个服务器起个昵称
}

vrrp_instance VI_1 {
    state MASTER     #定义为主服务器
    interface ens33     #承载漂移ip的网卡 7的系统 ens开头
    virtual_router_id 51   #定义一个热备组,可以认为这是51号热备组
    priority 100          #主服务器优先级要比备服务器高
    advert_int 1          #1秒互相通告一次,检查对方死了没。
    authentication {
        auth_type PASS    #认证类型
        auth_pass 1111    #认证密码  这些相当于暗号
    }
    virtual_ipaddress {
        192.168.52.120    #漂移ip
    }
}
备服务器1的keepalived.conf添加以下内容:
global_defs {
   smtp_connect_timeout 30
   router_id LVS_DEVEL02  #两个服务器不能一样
}

vrrp_instance VI_1 {
    state BACKUP    #备份服务器 是backup
    interface ens33
    virtual_router_id 51
    priority 90    #优先级要低
    advert_int 1
    authentication {
        auth_type PASS
        auth_pass 1111
    }
    virtual_ipaddress {
        192.168.52.120  #漂移ip
}
备服务器2的keepalived.conf添加以下内容:
global_defs {
   smtp_connect_timeout 30
   router_id LVS_DEVEL03  #三个服务器不能一样
}

vrrp_instance VI_1 {
    state BACKUP    #备份服务器 是backup
    interface ens33
    virtual_router_id 51
    priority 80    #优先级要低
    advert_int 1
    authentication {
        auth_type PASS
        auth_pass 1111
    }
    virtual_ipaddress {
        192.168.52.120  #漂移ip
}
3. 启动Keepalived
service keepalived start
可以看到,此时主服务器上已经有了vip绑定:192.168.52.120
八、安装HAProxy
1. 安装及配置HAProxy
cd /haproxyKeepalived/
tar -xvf haproxy-1.7.14.tar.gz
cd haproxy-1.7.14
make TARGET=linux2628 PREFIX=/usr/local/haproxy
make install PREFIX=/usr/local/haproxy
cp examples/haproxy.init /etc/init.d/haproxy
chmod +x /etc/init.d/haproxy
cp /usr/local/haproxy/sbin/haproxy /usr/sbin/
useradd haproxy -s /sbin/nologin
mkdir /etc/haproxy
#编辑配置文件:主备的配置文件可以一致。
vi /etc/haproxy/haproxy.cfg
添加以下内容:
global
    maxconn 100000
    stats  timeout 5s
    user   haproxy
    group  haproxy
    daemon

defaults
    mode               tcp
    log                global
    retries            2
    timeout queue      5s
    timeout connect    5s
    timeout client     60m
    timeout server     60m
    timeout check      15s

listen stats
    mode  http
    bind  192.168.52.121:7000
    stats enable
    stats uri /stats

listen master
    bind 192.168.52.120:5000
    mode tcp
    maxconn 2000
    option tcplog
    option httpchk OPTIONS /master
    http-check expect status 200
    default-server inter 3s fastinter 1s fall 3 rise 4 on-marked-down shutdown-sessions
    server db01 192.168.52.121:5432 check port 8008
    server db02 192.168.52.122:5432 check port 8008
    server db03 192.168.52.123:5432 check port 8008

listen replicas
    bind 192.168.52.120:5001
    mode tcp
    maxconn 6000
    option tcplog
    option httpchk OPTIONS /replica
    balance roundrobin
    http-check expect status 200
    default-server inter 3s fastinter 1s fall 3 rise 2 on-marked-down shutdown-sessions
    server db01 192.168.52.121:5432 check port 8008
    server db02 192.168.52.122:5432 check port 8008
    server db03 192.168.52.123:5432 check port 8008
2. 防火墙配置
firewall-cmd --zone=public --add-port=7000/tcp --permanent
firewall-cmd --zone=public --add-port=5000/tcp --permanent
firewall-cmd --zone=public --add-port=5001/tcp --permanent
service firewalld restart
3. 启动HAProxy
启动前,先修改内核参数:内核文件参数不允许监听不存在的地址,需要将此项关闭:
vi /etc/sysctl.conf
#文件末尾新增
net.ipv4.ip_nonlocal_bind = 1
sysctl -p
service haproxy start
4. 验证HAProxy
使用psql连接到vip的5000端口,查看是否为主库,并且能否写入/读取数据:
su - postgres
/software/pgsql/bin/psql -h192.168.52.120 -p5000
select * from pg_is_in_recovery();
insert into test_1 values (6,now());
select * from test_1;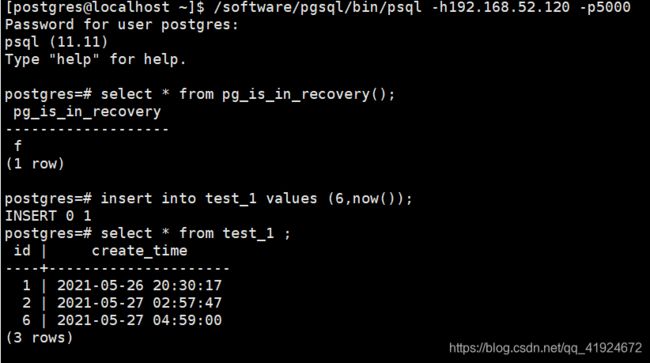
可读写,验证通过。
使用psql连接到5001端口,查看是否为备库,是否可以写入/读取数据

只读,不可写,验证通过。
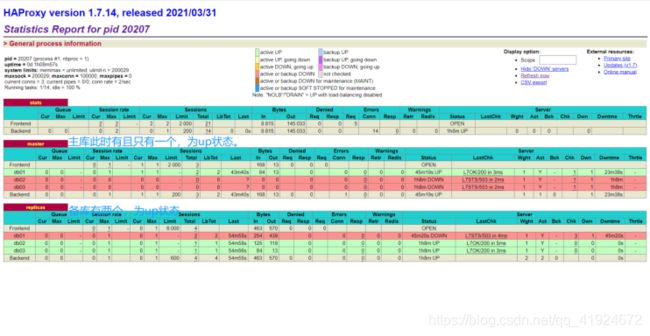
5. HAProxy监控页面
访问地址:http://192.168.52.121:7000/stats即可打开HAProxy自带的监控页面