WMS简单分析
WMS
带着问题看源码
token的作用?
WMS在移除一个window的时候会移除它的子window嘛?
我们以一个dialog为例
  public void show() {
        //省略、、
        //mWindowManager是在前面初始化的 还是进行的一个addview的方式

        mWindowManager.addView(mDecor, l);
        if (restoreSoftInputMode) {
            l.softInputMode &=
                    ~WindowManager.LayoutParams.SOFT_INPUT_IS_FORWARD_NAVIGATION;
        }

        mShowing = true;

        sendShowMessage();
    }
WindowManagerImpl的addView方式
 @Override
    public void addView(@NonNull View view, @NonNull ViewGroup.LayoutParams params) {
        applyDefaultToken(params);
        mGlobal.addView(view, params, mContext.getDisplayNoVerify(), mParentWindow,
                mContext.getUserId());
    }
在 WindowManagerGlobal 里的addView方式 前面有提到 WindowManagerGlobal的作用 在这里不在重复贴了
WMS的小问题_一只刘小彤!的博客-CSDN博客
那么 继续看
  public void addView(View view, ViewGroup.LayoutParams params,
            Display display, Window parentWindow, int userId) {
        if (view == null) {
            throw new IllegalArgumentException("view must not be null");
        }
        if (display == null) {
            throw new IllegalArgumentException("display must not be null");
        }
        if (!(params instanceof WindowManager.LayoutParams)) {
            throw new IllegalArgumentException("Params must be WindowManager.LayoutParams");
        }

        final WindowManager.LayoutParams wparams = (WindowManager.LayoutParams) params;
        if (parentWindow != null) {
            parentWindow.adjustLayoutParamsForSubWindow(wparams);
        } else {
            // If there's no parent, then hardware acceleration for this view is
            // set from the application's hardware acceleration setting.
            final Context context = view.getContext();
            if (context != null
                    && (context.getApplicationInfo().flags
                            & ApplicationInfo.FLAG_HARDWARE_ACCELERATED) != 0) {
                wparams.flags |= WindowManager.LayoutParams.FLAG_HARDWARE_ACCELERATED;
            }
        }

        ViewRootImpl root;
        View panelParentView = null;

        synchronized (mLock) {
            // Start watching for system property changes.
            if (mSystemPropertyUpdater == null) {
                mSystemPropertyUpdater = new Runnable() {
                    @Override public void run() {
                        synchronized (mLock) {
                            for (int i = mRoots.size() - 1; i >= 0; --i) {
                                mRoots.get(i).loadSystemProperties();
                            }
                        }
                    }
                };
                SystemProperties.addChangeCallback(mSystemPropertyUpdater);
            }

            int index = findViewLocked(view, false);
            if (index >= 0) {
                if (mDyingViews.contains(view)) {
                    // Don't wait for MSG_DIE to make it's way through root's queue.
                    mRoots.get(index).doDie();
                } else {
                    throw new IllegalStateException("View " + view
                            + " has already been added to the window manager.");
                }
                // The previous removeView() had not completed executing. Now it has.
            }

            // If this is a panel window, then find the window it is being
            // attached to for future reference.
            if (wparams.type >= WindowManager.LayoutParams.FIRST_SUB_WINDOW &&
                    wparams.type <= WindowManager.LayoutParams.LAST_SUB_WINDOW) {
                final int count = mViews.size();
                for (int i = 0; i < count; i++) {
                    if (mRoots.get(i).mWindow.asBinder() == wparams.token) {
                        panelParentView = mViews.get(i);
                    }
                }
            }

            //在这里建立 ViewRootImpl
            root = new ViewRootImpl(view.getContext(), display);

            view.setLayoutParams(wparams);

            mViews.add(view);
            mRoots.add(root);
            mParams.add(wparams);

            // do this last because it fires off messages to start doing things
            try {
                //然后setView 看下ViewRootImpl 的构造函数和 setView
                root.setView(view, wparams, panelParentView, userId);
            } catch (RuntimeException e) {
                // BadTokenException or InvalidDisplayException, clean up.
                if (index >= 0) {
                    removeViewLocked(index, true);
                }
                throw e;
            }
        }
    }
看下ViewRootImpl的构造函数
   public ViewRootImpl(Context context, Display display) {
        this(context, display, WindowManagerGlobal.getWindowSession(),
                false /* useSfChoreographer */);
    }
其实这里面就获得了WMS的对象,老规矩,一个跨进程的服务
看下ViewRootImpl setView方法
   public void setView(View view, WindowManager.LayoutParams attrs, View panelParentView,
            int userId) {
        synchronized (this) {

、、、、、
                    mOrigWindowType = mWindowAttributes.type;
                    mAttachInfo.mRecomputeGlobalAttributes = true;
                    collectViewAttributes();
                    adjustLayoutParamsForCompatibility(mWindowAttributes);
                    //看下 mWindowSession 的 addToDisplayAsUser
                    res = mWindowSession.addToDisplayAsUser(mWindow, mSeq, mWindowAttributes,
                            getHostVisibility(), mDisplay.getDisplayId(), userId, mTmpFrame,
                            mAttachInfo.mContentInsets, mAttachInfo.mStableInsets,
                            mAttachInfo.mDisplayCutout, inputChannel,
                            mTempInsets, mTempControls);
                    setFrame(mTmpFrame);

    }
然后看下Seccion里的
    @Override
    public int addToDisplay(IWindow window, int seq, WindowManager.LayoutParams attrs,
            int viewVisibility, int displayId, Rect outFrame, Rect outContentInsets,
            Rect outStableInsets,
            DisplayCutout.ParcelableWrapper outDisplayCutout, InputChannel outInputChannel,
            InsetsState outInsetsState, InsetsSourceControl[] outActiveControls) {
        return mService.addWindow(this, window, seq, attrs, viewVisibility, displayId, outFrame,
                outContentInsets, outStableInsets, outDisplayCutout, outInputChannel,
                outInsetsState, outActiveControls, UserHandle.getUserId(mUid));
    }
实际上调用的是WMS里的 addWindow
接下来先介绍WMS里的几个基础类
DisplayContent:
用来管理一个逻辑屏上的所有窗口,有几个屏幕就会有几个DisplayContent。使用displayId来区分。
处于不同DisplayContent的两个窗口在布局、显示顺序以及动画处理上不会产生任何耦合。 因此,就这几个方面来说,DisplayContent就像一个孤岛,所有这些操作都可以在其内部独立执行。
1.DisplayContent的子容器是其内部类DisplayChildWindowContainer
2.DisplayContent内部使用:IBinder为key,WindowToken为value的键值对保存在HashMap中。
3.DisplayContent是在Window添加到WMS的时候初始化的:
WMS:
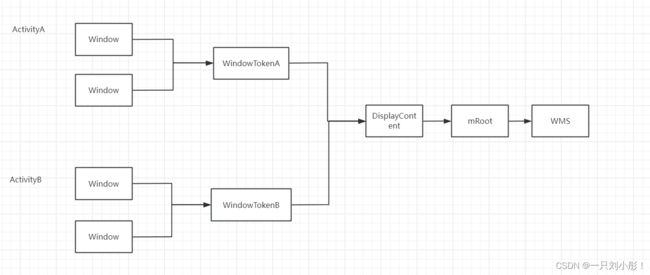
mRoot是RootWindowContainer类型的对象,看名字就知道其是窗口容器的根。 说明在Window体系中,RootWindowContainer节点是容器最顶端的父容器。
其继承了WindowContainer,这里的DisplayContent是一个泛型声明,表示其子容器的类型是DisplayContent, 在getDisplayContent方法中也可知,其mChildren列表是DisplayContent的集合。这也变相的说明DisplayContent也是一个容器
class RootWindowContainer extends WindowContainer
        implements DisplayManager.DisplayListener {
RootWindowContainer 继承了 WindowContainer mChildren 是一个 DisplayContent 集合
protected final WindowList mChildren = new WindowList(); WindowToken:
类声明:
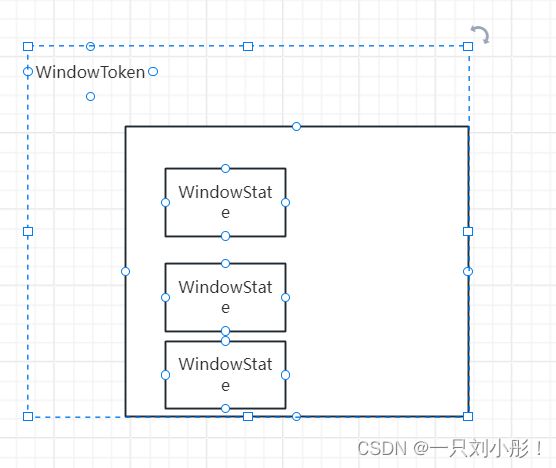
class WindowToken extends WindowContainer表明WindowToken也是子容器,其子容器是WindowState,所以WindowState也是一个容器。
WindowToken在窗口体系中有两个作用:
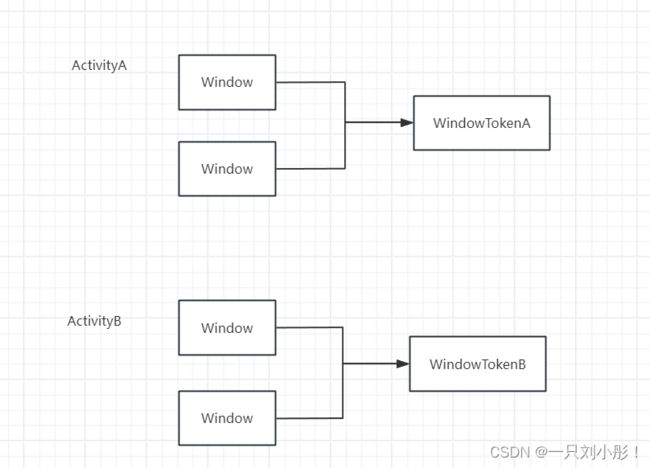
- 1.应用组件标识:将属于同一个应用组件的窗口组织在一起,这里的应用组件可以是:Activity、InputMethod、Wallpaper以及Dream。 WMS在对窗口的管理过程中:用WindowToken来指代一个应用组件。例如在进行窗口的Z-Order排序时,属于同一个WindowToken的窗口会被安排在一起。
- 2.令牌作用:WindowToken由应用组件或其管理者负责向WMS声明并持有,应用组件在需要更新窗口时,需要向WMS提供令牌表明自己的身份, 并且窗口的类型必须与所持有的WindowToken的类型一致。
但是系统窗口是个例外,并不需要提供token,WMS会隐式声明一个WindowToken。
那是不是说谁都可以添加系统窗口了呢?非也,在addWindow开始处就会调用下面代码:
mPolicy.checkAddPermission()它要求客户端必须拥有SYSTEM_ALERT_WINDOW或INTERNAL_SYSTEM_WINDOW权限才能创建系统类型的窗口。
WindowState:
表明WindowState也是一个WindowContainer容器,但是其子容器也是WindowState,一般窗口有子窗口SUB_WINDOW的情况下,WindowState才有子容器节点。
WindowState在WMS中表示一个Window窗口状态属性,其内部保存了一个Window所有的属性信息。
其与View以及WindowToken关系如下:
如何查看当前设备Window窗口状态命令?
adb shell dumpsys window windows
接下来分析下addWindow的流程
  public int addWindow(Session session, IWindow client, int seq,
            LayoutParams attrs, int viewVisibility, int displayId, Rect outFrame,
            Rect outContentInsets, Rect outStableInsets,
            DisplayCutout.ParcelableWrapper outDisplayCutout, InputChannel outInputChannel,
        //首先先进行鉴权
        int res = mPolicy.checkAddPermission(attrs.type, isRoundedCornerOverlay, attrs.packageName,
                appOp);


        synchronized (mGlobalLock) {

            //在这里创建 displayContent
            final DisplayContent displayContent = getDisplayContentOrCreate(displayId, attrs.token);

            if (displayContent == null) {
                ProtoLog.w(WM_ERROR, "Attempted to add window to a display that does "
                        + "not exist: %d. Aborting.", displayId);
                return WindowManagerGlobal.ADD_INVALID_DISPLAY;
            }
            //如果不是特殊类型的 窗口
            //之前在一个项目里Activity给的也是这个类型的窗口,不给token就会抛异常
            //还有个项目 因为父布局是个window,如果不给token也会抛异常
            if (type >= FIRST_SUB_WINDOW && type <= LAST_SUB_WINDOW) {
                //就必须有父窗口,没有则抛异常
                parentWindow = windowForClientLocked(null, attrs.token, false);
                if (parentWindow == null) {
                    ProtoLog.w(WM_ERROR, "Attempted to add window with token that is not a window: "
                            + "%s.  Aborting.", attrs.token);
                    return WindowManagerGlobal.ADD_BAD_SUBWINDOW_TOKEN;
                }
            }


            // Use existing parent window token for child windows since they go in the same token
            // as there parent window so we can apply the same policy on them.
            //如果前面都没问题,就会在这进行token获取,如果没有则新建,并且将它加入到displayContent 里
            WindowToken token = displayContent.getWindowToken(
                    hasParent ? parentWindow.mAttrs.token : attrs.token);

            if (token == null) {
                final IBinder binder = attrs.token != null ? attrs.token : client.asBinder();
                token = new WindowToken(this, binder, type, false, displayContent,
                        session.mCanAddInternalSystemWindow, isRoundedCornerOverlay);
            }

            在这新建一个 WindowState 并将它加入 token
            final WindowState win = new WindowState(this, session, client, token, parentWindow,
                    appOp[0], seq, attrs, viewVisibility, session.mUid, userId,
                    session.mCanAddInternalSystemWindow);

            final DisplayPolicy displayPolicy = displayContent.getDisplayPolicy();
            //根据mPolicy调整window的attr属性,mPolicy的实现类是PhoneManagerPolicy。
            displayPolicy.adjustWindowParamsLw(win, win.mAttrs, callingPid, callingUid);

            //执行WindowState的openInputChannel,这里主要是打通和Input系统的通道,用于接收IMS的输入事件请求。
            final boolean openInputChannels = (outInputChannel != null
                    && (attrs.inputFeatures & INPUT_FEATURE_NO_INPUT_CHANNEL) == 0);
            if  (openInputChannels) {
                win.openInputChannel(outInputChannel);
            }


            win.attach();
            //将客户端app层的Window对象和WindowState关联上,这样WMS就可以通过Window找到WMS中的WindowState对象、
            mWindowMap.put(client.asBinder(), win);
            win.initAppOpsState();
            //win.mToken是前面创建的WindowToken对象,所以此处就是将WindowState加入到WindowToken的子容器集合中。
            win.mToken.addWindow(win);
            displayPolicy.addWindowLw(win, attrs);

}那么add既然是这个流程,那大胆猜测,移除掉一个window会移除掉它所有的子window(因为可以拿到这个数据)我们看下移除是否是这样
    void removeWindow(Session session, IWindow client) {
        synchronized (mGlobalLock) {
            //首先先拿到这个WindowState (也就是window)
            WindowState win = windowForClientLocked(session, client, false);
            if (win != null) {
                win.removeIfPossible();
                return;
            }

            // Remove embedded window map if the token belongs to an embedded window
            mEmbeddedWindowController.remove(client);
        }
    }
@Override
void removeIfPossible() {
super.removeIfPossible();
removeIfPossible(false /*keepVisibleDeadWindow*/);
immediatelyNotifyBlastSync();
}看下父类这个方法 果然,移除一个window它会把自己所有子window移除掉
    /**
     * Removes this window container and its children taking care not to remove them during a
     * critical stage in the system. For example, some containers will not be removed during
     * animation if this method is called.
     */
    // TODO: figure-out implementation that works best for this.
    // E.g. when do we remove from parent list? maybe not...
    void removeIfPossible() {
        for (int i = mChildren.size() - 1; i >= 0; --i) {
            final WindowContainer wc = mChildren.get(i);
            wc.removeIfPossible();
        }
    }
继续分析WMS的一些知识
比如动画
我们知道在Android内部有两种动画:Window切换移动动画以及app层的View的动画, 动画操作的是View而Window切换操作的是Surface,对不同层级的SurfaceControl进行操纵,会产生不同的动画效果, 注意区分。
我们这里涉及到的是Window切换移动动画:
但是不管是View的动画还是Window切换操作,对底层屏幕刷新来说都是针对不同帧动画来说,所以会涉及到VSync同步信号相关知识。
WindowStateAnimator
 WindowState(WindowManagerService service, Session s, IWindow c, WindowToken token,
            WindowState parentWindow, int appOp, int seq, WindowManager.LayoutParams a,
            int viewVisibility, int ownerId, int showUserId,
            boolean ownerCanAddInternalSystemWindow, PowerManagerWrapper powerManagerWrapper) {
        super(service);
        。。。

        mWinAnimator = new WindowStateAnimator(this);
        mWinAnimator.mAlpha = a.alpha;
        。。。
}看方法说明,这个类还是用于WMS中的窗口动画以及Surface操作的单例工具类,WMS将动画的工作都委托他来处理。其在WMS构造的时候创建了实例。
final WindowSurfacePlacer mWindowPlacerLocked;这个对象是用于Surface的摆放的操作,说明WindowAnimator还支持Surface的各种操作
final Handler mAnimationHandler = new Handler(AnimationThread.getHandler().getLooper());WindowSurfacePlacer对象,这个对象是用于Surface的摆放的操作,说明WindowAnimator还支持Surface的各种操作 注释2处使用AnimationThread线程进行Window的动画操作,AnimationThread内部使用的是HandlerThread机制,说明其内部也创建了一个异步消息处理机制。
Choreographer设置一个回调,在Choreographer接收到 VSync信号时,在doFrame中触发这个回调,一般是用来监听帧率等操作。
而这里是在接收到doFrame的时候回调的是一个animate(frameTimeNs)动画处理的方法。animate函数执行流程很长,包括更新壁纸、转屏动画等逻辑均包含在其中。
那么mAnimationFrameCallback回调是什么时候发送到Choreographer中去的呢?
WindowAnimator的scheduleAnimation方法: 当我们需要一个动画就会进行这个post
   void scheduleAnimation() {
        if (!mAnimationFrameCallbackScheduled) {
            mAnimationFrameCallbackScheduled = true;
            mChoreographer.postFrameCallback(mAnimationFrameCallback);
        }
    }
void updateWindowsForAnimator(WindowAnimator animator) {
mTmpWindowAnimator = animator;
forAllWindows(mUpdateWindowsForAnimator, true /* traverseTopToBottom */);
}
boolean forAllWindows(ToBooleanFunction callback, boolean traverseTopToBottom) {
```
...
final int count = mChildren.size();
for (int i = 0; i < count; i++) {
final DisplayChildWindowContainer child = mChildren.get(i);
if (child == mImeWindowsContainers && mService.mInputMethodTarget != null) {
// In this case the Ime windows will be processed above their target so we skip
// here.
continue;
}
if (child.forAllWindows(callback, traverseTopToBottom)) {
return true;
}
}
...
return false;
```
} forAllWindows方法会遍历整个容器树都去调用mUpdateWindowsForAnimator回调。 这个回调内部就会去执行winAnimator.stepAnimationLocked去更新Window的更新操作。 stepAnimationLocked,代表单步动画。这里面的操作大家自行查看也不难、
这里对动画做个小结: 通过在需要动画的时候,post一个FrameCallBack给Choreographer,在VSync信号到来的时候,会优先执行动画操作。动画回调内部会去遍历整个容器树模型,依次更改每个Window对应的Surface的状态。然后在绘制完成后,提交给SurfaceFlinger
Surface管理:
WMS负责创建Surface以及对Surface的摆放工作,之后将Surface提交给SurfaceFlinger进行合并。 在App层也创建了一个Surface对象,但是那个是空对象,用于WMS的填充。
Surface的创建:
Surface的创建在WMS中使用WindowStateAnimator代理创建,而WindowStateAnimator中又创建了一个WindowSurfaceController对Surface进行管理。
private WindowSurfaceController mPendingDestroySurface;
什么时候发起 Surface绘制的?看下ViewRootImpl
 private int relayoutWindow(WindowManager.LayoutParams params, int viewVisibility,
            boolean insetsPending) throws RemoteException {

        此时 mSurfaceControl还是空的 等待WMS填充
        int relayoutResult = mWindowSession.relayout(mWindow, mSeq, params,
                (int) (mView.getMeasuredWidth() * appScale + 0.5f),
                (int) (mView.getMeasuredHeight() * appScale + 0.5f), viewVisibility,
                insetsPending ? WindowManagerGlobal.RELAYOUT_INSETS_PENDING : 0, frameNumber,
                mTmpFrame, mTmpRect, mTmpRect, mTmpRect, mPendingBackDropFrame,
                mPendingDisplayCutout, mPendingMergedConfiguration, mSurfaceControl, mTempInsets,
                mTempControls, mSurfaceSize, mBlastSurfaceControl);

        return relayoutResult;
    }
result = createSurfaceControl(outSurfaceControl, outBLASTSurfaceControl,
result, win, winAnimator);getSurface方法将WMS中创建的WindowSurfaceController中SurfaceControl对象的mNativeObject对象传递给新的Surface
那么为什么谷歌要绕这么大圈来创建Surface呢?直接在App层去创建不就可以了么?
个人见解谷歌是希望统一管理Surface而不是单独让某个应用持有,且Surface的摆放操作等都是得由WMS进行处理,所以就直接让WMS去创建,然后返回给App层去绘制Surface操作。
WindowSurfacePlacer
WMS在构造的时候就创建了WindowSurfacePlacer对象。这个对象主要用来给Surface进行位置的定位、
定位到WindowSurfacePlacer的performSurfacePlacement方法,这个方法可以说是WMS最核心的方法,其负责了所有窗口的摆放工作:如何显示?显示在屏幕什么位置?区域大小等。 这些将在确认后,下发给SurfaceFlinger进行处理。
WMS中任何窗口状态发生改变都会触发该方法,整个方法进行容器树的遍历,确认窗口可见性等。
 final void performSurfacePlacement() {
        performSurfacePlacement(false /* force */);
    }

    final void performSurfacePlacement(boolean force) {
        if (mDeferDepth > 0 && !force) {
            mDeferredRequests++;
            return;
        }
        int loopCount = 6;
        do {
            mTraversalScheduled = false;
            performSurfacePlacementLoop();
            mService.mAnimationHandler.removeCallbacks(mPerformSurfacePlacement);
            loopCount--;
        } while (mTraversalScheduled && loopCount > 0);
        mService.mRoot.mWallpaperActionPending = false;
}最终在showSurfaceRobustlyLocked中调mSurfaceController.showRobustlyInTransaction()方法进行Surface的提交给SurfaceFlinger进行合成并显示在屏幕上。
点击事件的处理
InputChannel
public int addWindow(InputChannel outInputChannel,) {addWindow 时候会把 App层的 outInput添加到WMS
WindowState里会进行
  void openInputChannel(InputChannel outInputChannel) {
        if (mInputChannel != null) {
            throw new IllegalStateException("Window already has an input channel.");
        }
        String name = getName();
        InputChannel[] inputChannels = InputChannel.openInputChannelPair(name);

        mInputChannel = inputChannels[0];
        mClientChannel = inputChannels[1];
registerInputChannel传入的是server端InputChannel给IMS。
        mWmService.mInputManager.registerInputChannel(mInputChannel);
        mInputWindowHandle.token = mInputChannel.getToken();
        if (outInputChannel != null) {
将client端的InputChannel与app端传入的outInputChannel关联起来了。
            mClientChannel.transferTo(outInputChannel);
            mClientChannel.dispose();
            mClientChannel = null;
        } else {
private native void nativeTransferTo(InputChannel other);
接下来就是底层
android_view_InputChannel.cpp:
static jobjectArray android_view_InputChannel_nativeOpenInputChannelPair(JNIEnv* env...) {
    ...
    sp serverChannel;
    sp clientChannel;
    status_t result = InputChannel::openInputChannelPair(name, serverChannel, clientChannel);
23 status_t InputChannel::openInputChannelPair(const std::string& name,
224 sp& outServerChannel, sp& outClientChannel) {
225 int sockets[2];
226 if (socketpair(AF_UNIX, SOCK_SEQPACKET, 0, sockets)) {
227 status_t result = -errno;
228 ALOGE("channel '%s' ~ Could not create socket pair. errno=%d",
229 name.c_str(), errno);
230 outServerChannel.clear();
231 outClientChannel.clear();
232 return result;
233 }
234
235 int bufferSize = SOCKET_BUFFER_SIZE;
236 setsockopt(sockets[0], SOL_SOCKET, SO_SNDBUF, &bufferSize, sizeof(bufferSize));
237 setsockopt(sockets[0], SOL_SOCKET, SO_RCVBUF, &bufferSize, sizeof(bufferSize));
238 setsockopt(sockets[1], SOL_SOCKET, SO_SNDBUF, &bufferSize, sizeof(bufferSize));
239 setsockopt(sockets[1], SOL_SOCKET, SO_RCVBUF, &bufferSize, sizeof(bufferSize));
240
241 std::string serverChannelName = name;
242 serverChannelName += " (server)";
243 outServerChannel = new InputChannel(serverChannelName, sockets[0]);
244
245 std::string clientChannelName = name;
246 clientChannelName += " (client)";
247 outClientChannel = new InputChannel(clientChannelName, sockets[1]);
248 return OK;
249 } 通过以上代码可以看出InputChannel使用的是sockets通讯
这样服务端在InputChannel就可以写入input事件,然后在app端的InputChannel就可以接受到数据了。


