cocosCreator 之 Bundle使用
版本: v3.4.0
语言: TypeScript
环境: Mac
Bundle简介
全名 Asset Bundle(简称AB包),自cocosCreator v2.4开始支持,用于作为资源模块化工具。
允许开发者根据项目需求将贴图、脚本、场景等资源划分在 Bundle 中,用于减少启动时需要加载的资源数量, 从而降低首次下载或加载游戏时所需要的时间。
我们知道针对于动态加载的资源,我们会将其放到 resources 目录中。但cocosCreator启动时,会默认加载 resources下的所有资源,这样可能会导致启动时间过长。如果将 resources目录中的一部分资源放到自定义的 Bundle 中,在需要的时候再进行加载,这样游戏启动就更快。
另外,在很多的项目中可能会集成着各种不同类型的小游戏,可以将它们设置为不同的 Bundle,点击某个入口按钮,先下载,然后加载显示,不需要的时候再销毁掉。这样能够灵活的对资源进行管理。
Asset Bundle 是一个很强大的资源模块化工具,它可以根据需求进行随意放置:
- 本地
- 远程服务器
- 小游戏平台分包
- 跨项目复用
使用 Asset Bunlde 可以更灵活的加载,管理、共享资源甚至进行压缩和加密,提升游戏的性能和安全。
本篇文章会介绍下:
- 内置Bundle,及
AssetManager下的主要接口 - 自定义Bundle的创建、优先级、结构配置等
- 自定义Bundle在本地的使用
- 其他
如有编写或理解不当,感谢您的指出!
内置Bundle
在之前的博客: cocosCreator 之 resources动态加载和预加载 中曾说过 resources 也是Bundle,它是内置Bundle之一。cocosCreator主要的内置Bundle有:
| 名称 | 说明 | 配置 |
|---|---|---|
resources |
存放在resources目录下的所有资源及依赖资源 | 在资源管理器的assets目录下增加resources文件夹即可 |
main |
存放所有在 构建发布 面板的 参与构建场景 中勾选的场景以及其依赖资源 | 通过配置 构建发布 面板的 主包压缩类型 和 配置主包为远程包 两项 |
start-scene |
如果在 构建发布 面板中勾选了 初始场景分包,则首场景将会被构建到 start-scene 中 |
无法配置 |
在cc.d.ts的定义文件下也可以看到:
export namespace AssetManager {
  // 内置bundle名称
  export enum BuiltinBundleName {
    RESOURCES = "resources",
    MAIN = "main",
    START_SCENE = "start-scene"
  }
}
AssetManager, 可以将它理解为加载、释放Bundle的管理类。
自定义Bundle
自定义的Bundle是以文件夹的形式存在的,且不支持 嵌套。Bundle的命名不要使用内置Bundle名称,也就是resources, main, start-scene等。
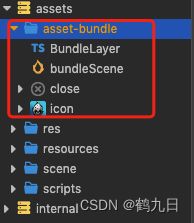
在资源管理器的assets目录下新增文件夹后,命名比如为:“asset-bundle”, 选中该文件夹,查看 属性检查器:

主要参数有:
| 配置参数 | 说明 |
|---|---|
| Bundle名称 | 默认使用创建文件夹的名字,可根据需要修改 |
| Bundle优先级 | 从大到小 的顺序对Bundle进行加载,主要是为了 避免资源依赖或者资源重复等问题 |
| 目标平台 | 不同的平台可使用不同的配置,构建时会根据平台配置来构建Bundle |
| 压缩类型 | 决定Bundle的最后输出方式,包括 合并依赖、无压缩、合并所有 JSON、小游戏分包、Zip 5 种压缩类型 |
| 配置为远程包 | 不支持web平台,勾选以后,Bundle会被放到 remote文件夹 |
Bundle优先级
项目中可能存在着很多的Bundle, 容易出现资源A在BundleA中,但被BundleB或C依赖的情况。内置的Bundle的层级默认为:
| 内置Bundle | 层级 |
|---|---|
main |
7 |
resources |
8 |
start-scane |
20 |
如果自定义了Bundle,优先级设置尽量不要高于自定义的Bundle,且注意优先级的加载从大到小。
不同Bundle之间的脚本尽量也减少依赖关系,这样以后方便Bundle跨项目复用等。
压缩类型
压缩类型不仅在自定义Bundle中使用,也在构建发布的主包压缩类型中也会使用。
- 无压缩 没有任何压缩操作, 会保留原始的文件大小和格式。这种方式能够保留资源的最佳质量,但包体会增大
- 合并依赖 将相互依赖的资源的 JSON 文件合并在一起,从而减少运行时的加载请求次数
- 合并所有JSON 将所有资源的 JSON 文件合并为一个,从而最大化减少请求数量。 原生平台不推荐使用,会增加热更新的包体大小
- 小游戏分包 主要针对于提供了分包功能的小游戏平台,设置该类型后, 配置为远程包 选项不可勾选。
- ZIP 在部分小游戏平台,构建 Bundle 时会将资源文件压缩成一个 Zip 文件,从而降低网络请求。如果放在本地,则没有必要使用,与 配置为远程包配合使用。
Bundle构建
在上文中我们构建了一个asset-bundle, 在里面添加点场景,资源,脚本什么的。

然后通过构建发布, 主包压缩类型选择: 合并依赖, 分别构建:Android和微信小游戏包。如下图所示:


包括内置Bundle在内,他们的目录结构是类似的, 主要包括 代码 和 资源 部分。
- 代码 文件夹中的所有代码会根据发布平台合并成一个
index.js或game.js的入口脚本文件 - 资源 文件夹中的所有资源以及文件夹外的相关依赖资源都会放到
import或native目录下 - 资源配置 所有资源的配置信息包括路径、类型、版本信息都会被合并成一个
config.json文件
简要看下index.js 的代码:
// ...
(function(r) {
  r('virtual:///prerequisite-imports/asset-bundle', 'chunks:///_virtual/asset-bundle');
})(function(mid, cid) {
  System.register(mid, [cid], function (_export, _context) {
    return {
      setters: [function(_m) {
        var _exportObj = {};

        for (var _key in _m) {
          if (_key !== "default" && _key !== "__esModule") _exportObj[_key] = _m[_key];
        }

        _export(_exportObj);
      }],
      execute: function () { }
    };
  });
});
脚本加载Bundle
自定义的 Bundle 在脚本中的使用,与resources的使用时类似的。但调用,需要依靠 cc.assetManager进行调用。
export const assetManager: AssetManager;
AssetManager 模块是用来管理、加载、释放的资源管理类。针对于 Bundle,它的主要方法有:
export class AssetManager {
  // 获取已加载的bundle缓存
  bundles: __private.cocos_core_asset_manager_cache_ICache<AssetManager.Bundle>;
  // 获取内置main包
  get main(): AssetManager.Bundle | null;
  // 获取内置resources包
  get resources(): AssetManager.Bundle | null;
  // 获取已加载的分包
  getBundle(name: string): AssetManager.Bundle | null;
  // 移除包,包内的资源不会自动释放
  removeBundle(bundle: AssetManager.Bundle): void;
  // 加载包
  loadBundle(name, options, onComplete);
}
关于Bundle的主要方法,曾在 cocosCreator 之 resources动态加载和预加载 说明过,这里简要罗列下:
| 名字 | 描述 |
|---|---|
name |
bundle的名称 |
base |
bundle的根路径 |
getInfoWithPath(path, type) |
通过路径获取指定资源的配置信息 |
getDirWithPath(path, type, out) |
获取某个指定文件夹下的所有资源信息 |
getAssetInfo(uuid) |
通过uuid获取资源信息 |
getSceneInfo(name) |
通过场景名获取场景信息 |
load(path, type, onPrgress, onComplete) |
通过相对路径加载资源 |
loadDir(dir, type, onProgree, onComplete) |
加载目标文件夹中的所有资源 |
loadScene(name, optins, onProgress, onComplete) |
通过场景名称加载分包中的场景 |
preload(paths,type, onProgress, onComplete) |
通过相对路径预加载分包中的资源 |
preloadDir(dir, type, onProgress, onComplete) |
预加载目标文件夹中的所有资源 |
preloadScene(name, optins, onProgress, onComplete) |
通过场景名称预加载分包中的场景 |
releaseUnusedAssets() |
释放此包中的所有没有用到的资源 |
releaseAll() |
释放此包中的所有资源 |
方法虽然类似,但使用Bundle 需要注意,先加载,才能使用。接口是:assetManager.loadBundle
// 加载Bundle
assetManager.loadBundle("asset_bundle", (err, bundle) => {
  if (err) {
    return console.error(err.message);
  }
  this.tipLabel.string = `加载的Bundle:${bundle.name} 成功`;
});
如果不太确定Bundle是否已加载,可通过assetManager.getBundle进行检测获取
// 获取已加载的Bundle
let bundle = assetManager.getBundle(BUNDLE_NAME);
if (bundle) {
  return;
}
// ...
跟踪如下:
内置的Bundle比如main、resources已经被加载了。
在加载Bundle成功后,就可以调用Bundle内部的图片,预制体页面、场景等。
let bundle = assetManager.getBundle(BUNDLE_NAME);
if (!bundle) {
  this.tipLabel.string = "操作失败,请先点击加载Bundle";
  return;
}

// 加载预制体页面
bundle.load("testLayer", Prefab, (err, prefab) => {
  if (err) {
    return console.error(err.message);
  }

  let layerNode = instantiate(prefab);
  layerNode.parent = this.node;
});

// 加载纹理
bundle.load("icon/texture", Texture2D, (err, texture) => {
  if (err) {
    return console.error(err.message);
  }

  let node = new Node("sprite");
  node.layer = Layers.Enum.UI_2D;
  node.setPosition(0, 0, 0);
  node.scale = v3(0.5, 0.5, 0.5);
  let sprite = node.addComponent(Sprite);
  const spriteFrame = new SpriteFrame();
  spriteFrame.texture = texture;
  sprite.spriteFrame = spriteFrame;
  node.parent = this.tipLabel.node.parent;
});

// 加载场景
bundle.loadScene("subScene", (err, scene) => {
  if (err) {
    return console.error(err.message);
  }
  director.runScene(scene);
});
如果Bundle不想使用了,可以从管理器中进行移除
let bundle = assetManager.getBundle(BUNDLE_NAME);
if (!bundle) {
  return;
}

// 移除Bundle, 移除并不会释放资源
// 如果再想使用,比如调用loadBundle
assetManager.removeBundle(bundle);
注意: Bundle释放后,如果想在使用,比如loadBundle
后续待补充…

