四 、QML常用控件的使用详解
在Qt Quick的世界里,window对象用于创建一个与操作系统相关的顶层窗口,而其他的元素,如Text Rectangle,Image等,都睡Windows提功能场景里面的显示对象,Window还有一个派生类,即是大名鼎鼎的Application Window ,可以作为QML 文档的根对象。
windows窗口对象属性的说明
import QtQuick.Window 2.1通过上面的引用,Window对象就可以创建一个最顶层的窗口作为Qt Quick的活动窗口。他自动设置好了窗口的基本属性,例如 标题 系统按钮 图标等。也可以手动进行编辑window基本对话框显示的属性更改。windows基本对话框完成之后,就可以引用QtQuick 2.x QtQuick.Controls 1.x 等模块开始起作用了
Window属性设置
Window 属性有mininumWidth,minimunHeight 来限制窗口的最小尺寸,对于管理属性如下介绍:
Window. Windowed 设置窗口占屏幕的一部分
Window.Minimized 最小化到任务栏的一个图标
Window.Maximized 最大化
Window.FullScreen 全屏显示
Window.AutomaticVisibility 给window设置一个默认的显示状态
Window.Hidden 隐藏窗口
color 属性的设置
color属性用来谁窗口的颜色,可以使用 blue ,“#897776”,Qt.rgba()等形式;
contentOrientation属性的设置
Qt.PrimaryOrientaton 使用显示设备的首选方向
Qt.LandscapeOrientation 横屏
Qt.PortraitPrientation 竖屏
Qt.InvertedLandscapeOrientation 先对横屏旋转180度
模态属性
一个窗口的状态由modality(模态)属性决定的,
Qt.NonModal 非模态
Qt.WindowModal 窗口级别的模态,设置此属性的窗口只针对某一个窗口的模态的,子窗口相对父窗口是是模态的。
Qt.ApplicationModal 应用级别的模态,设置此属性会阻止同一应用的其他事件输入的响应;
ApplicationWindow介绍
ApplicationWindow是Window的派生类,使用他需要使用下面语句引入Controls模块
import QtQuick.Controls 1.2如果学习过Qt ApplicationWindow 有点像QMainWindow 窗口有menuBar,toolBar等状态栏。
基本控件的使用介绍
如果进行过GUi开发,想必对控件的使用不会不熟悉,例如Button ListTable 等;
Rectangle
下面就对一个矩阵对话框控件的创建和显示进行讲解
Rectangle{
width: 320    //宽
height:480  //长
color :"blue"  //内部颜色
border.color:"#808080"   //边框颜色
border.width :2  //边框宽度
radius:12  //四周弧度
}
Item
Item是QtQuick所有可视元素的基类,其属性有 x、y、width、height 、anchoring、key、z、rotation等,具体的使用如下,修改自定义Rectangle的显示位置等信息;
Item{
    Rectangle{
    x:20    //可以进行设置显示的位置
    y:20
    id: win1
    width: 320    //宽
    height:480  //长
    color :"blue"  //内部颜色
    border.color:"#808080"   //边框颜色
    border.width :2  //边框宽度
    radius:12  //四周弧度
    }
    Rectangle{
    id:win2
    x:123
    y:30
    width: 320    //宽
    height:480  //长
    color :"blue"  //内部颜色
    border.color:"#808080"   //边框颜色
    border.width :2  //边框宽度
    radius:12  //四周弧度
    }
}
使用锚(anchoring)布局定位器
anchors 提供了一种,确定元素显示的位置定位
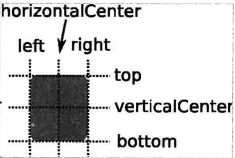
你可以理解为,每个Item都有七条不可见的锚线:left,right,top,bottom,horizontalCenter,verticalCenter
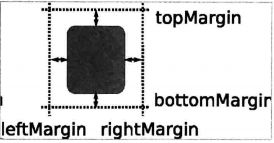
使用anchors 布局的时候,除了对齐锚线,还可以指定控件的四周的留白,margin代表着四周的留白;
指定topMargin bottomMargin,leftMargin,rightMargin 如上图
Rectangle{
    width:200
    height:300
        Rectangle{
        //设置rectangle 与父窗口左上对齐
        anchors.left :parent.left
        anchors.leftMargin:20
        anchors.top:parent.top
        anchors.topMargin:20
        x:20    //可以进行设置显示的位置
        y:20
        id: win1
        width: 320    //宽
        height:480  //长
        color :"blue"  //内部颜色
        border.color:"#808080"   //边框颜色
        border.width :2  //边框宽度
        radius:12  //四周弧度
        }
        Rectangle{
        //设置rectangle 靠近win1 对话框显示
        anchors.left :win1.right   //设置win2 在win1右边显示
        anchors.leftMargin:20
        anchors.top:win1.top
        anchors.topMargin:20

        id:win2
        x:123
        y:30
        width: 320    //宽
        height:480  //长
        color :"blue"  //内部颜色
        border.color:"#808080"   //边框颜色
        border.width :2  //边框宽度
        radius:12  //四周弧度
        }
}
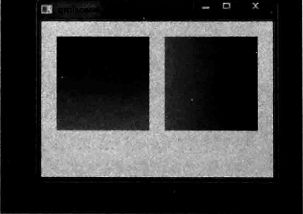
具体如下图显示
按键Key的使用
Keys对象也是Qt Quick提供的,专门供Item处理按键事件的对象。
import QtQuick 2.2
Rectangle{
    width:300;
    height:200;
    color :"red";
    focus:true;
    Keys.enabled:true;
    Keys.onEscapedPressed:Qt.quit();  //当esc按键点击的时候 就会处理后边关闭应用的借口调用
    Keys.onBackPressed:Qt.quit();

}
Text属性介绍
Text属性就是label标签的字体显示
import QtQuick 2.2
Rectangle{
    width:200;
    height:100;
    text:"hello world!"; //在屏幕上显示helloworld字样
    font.bold:true  //对字体属性设置 加粗
    font.underline:true //字体下面显示横线
    anchors.centerIn :parent //显示在窗口的中间
}
Button 控件的讲解
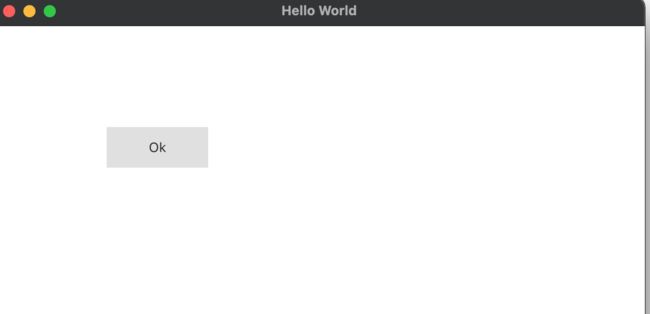
按是Gui软件中使用频率比较高的一控件,有Clicked release等触发事件;
import QtQuick 2.2
import QtQuick.Control 1.2
Rectangle{
    width:320
    height:240
    Button{
        text:"Ok"
        anchors.centerIn:parent
        onClicked:{
            Qt.quit(); //点击信号槽定义和书写
        }
    }
}
FileDialog
FileDialog 是Qt Quick 中的文件对话框大可以用来选择已有的文件,文件夹,支持单选,多选,也可以用来保存文件或创建文件夹时让客户提供一个名字
FileDialog{
    id:filedialog
    title:"please select a file,"
    nameFilters:["Image Files (*.jpg)]  //过滤图片文件
    selectednameFilter:"Image Files(*.jpg)"  // 过滤的名字
    selectMultiple:true  //设置多选
    onASsccepted:{
        imageViewer.source = fileDialog.fileUrls[0] //保存路径
}
}
总结
通过今天的讲解,就把QtQuick 初步使用的基础详细的介绍了一遍,例如Text Button Key的使用,如果一路操作下来应该对Qml编写的语法有了初步的理解;接下来我们开始对ECMAScript语言规范进行详细的介绍,这样就能对qml语言有了清晰的认知,敬请期待!


