数字图像处理(实践篇)十五 基于傅里叶变换的高通滤波和低通滤波
目录
一 Numpy 实现傅里叶变换
1 涉及的函数
2 实践
二 OpenCV 实现傅里叶变换
1 涉及的函数
2 实践
为了有效地和快速地对图像进行处理和分析,常常需要将原定义在图像空间的图像以某种形式转换(正变换)到另外一些空间,并利用在这些空间的特有性质方便地进行一定的加工,最后再转换回图像空间(反变换或逆变换)以得到所需要的效果。傅里叶变换就是把图像从图像空间变换到频率空间。
对于一幅图像来说在分析其频率特性时,它的边缘,突变部分以及颗粒噪声往往代表图像信号的高频分量,而大面积的图像背景区则代表图像信号的低频分量。根据此特点使用滤波的方法滤除其高频部分也就能够去除噪声,使图像得到一定的平滑。
低通滤波器:只保留低频,会使得图像变得模糊。
高通滤波器:只保留高频,会使得图像细节增强。例如边界增强。
一 Numpy 实现傅里叶变换
1 涉及的函数
- np.fft.fft2()
通过 numpy 实现傅里叶变换用到的函数是 np.fft.fft2():
fft.fft2(a, s=None, axes=(-2, -1), norm=None)函数的功能:计算二维离散傅里叶变换。
输入:
①a:输入数组.array_like
②s:可选。整数序列,输出数组的大小。
返回:
complex ndarray。
通过 np.fft.fft2() 函数进行傅里叶变换得到频率分布,再调np.fft.fftshift 函数将中心位置转移至中间位置。
- np.fft.ifft2()
np.fft.ifft2(a, s=None, axes=(-2, -1), norm=None)函数的功能:实现图像逆傅里叶变换,返回一个复数数组。
输入:
①a:输入数组.array_like
②s:可选。整数序列,输出数组的大小。
返回:
complex ndarray。
以上只是对常用的参数进行介绍,其他的参数可以详见官方文档去学习哈。
2 实践
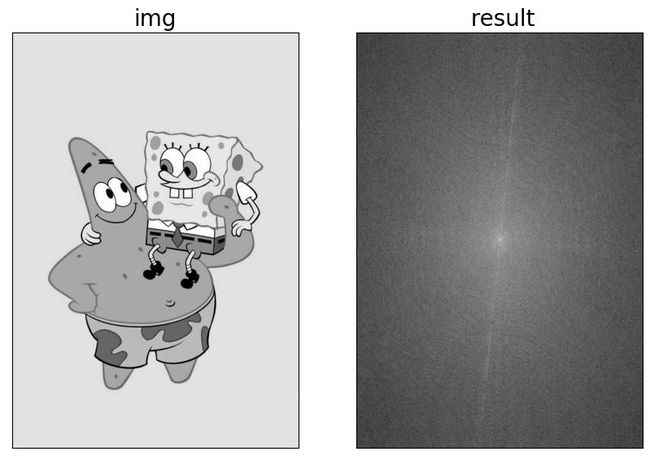
实践①:图像的傅里叶变换
- 代码
import numpy as np
import cv2
import matplotlib.pyplot as plt
def dealImg(img):
    b, g, r = cv2.split(img)
    img_rgb = cv2.merge([r, g, b])
    return img_rgb
def dealImageResult(img_path):
    im = cv2.imread(img_path, 0)
    # 实现傅里叶变换
    f = np.fft.fft2(im)
    # 实现中心位置转移至中间位置
    fshift = np.fft.fftshift(f)
    # 将复数转为浮点数进行傅里叶频谱图显示
    fimg = 20 * np.log(np.abs(fshift))
    fig = plt.figure(figsize=(10, 10))
    titles = ["img", " result"]
    images = [im, fimg]
    for i in range(2):
        plt.subplot(1, 2, i + 1), plt.imshow(images[i], "gray")
        plt.title("{}".format(titles[i]), fontsize=20, ha='center')
        plt.xticks([]), plt.yticks([])
    #plt.subplots_adjust(left=None, bottom=None, right=None, top=None, wspace=0.3, hspace=0)
    # plt.tight_layout()
    plt.show()
    fig.savefig('test_results.jpg', bbox_inches='tight')
if __name__ == '__main__':
    dealImageResult("1.png")
pass- 结果图
实践②:图像的傅里叶变换与逆变换
- 代码
import numpy as np
import cv2
import matplotlib.pyplot as plt
def dealImg(img):
    b, g, r = cv2.split(img)
    img_rgb = cv2.merge([r, g, b])
    return img_rgb
def dealImageResult(img_path):
    im = cv2.imread(img_path, 0)
    # 实现傅里叶变换
    f = np.fft.fft2(im)
    # 实现中心位置转移至中间位置
    fshift = np.fft.fftshift(f)
    # 将复数转为浮点数进行傅里叶频谱图显示
    fimg = 20 * np.log(np.abs(fshift))
    ifshift = np.fft.ifftshift(fshift)
    # 将复数转为浮点数进行傅里叶频谱图显示
    ifimg = np.log(np.abs(ifshift))
    if_img = np.fft.ifft2(ifshift)
    result_im = np.abs(if_img)
    fig = plt.figure(figsize=(10, 10))
    titles = ["im", " fimg", "ifimg", "result_im"]
    images = [im, fimg, ifimg, result_im]
    for i in range(4):
        plt.subplot(2, 2, i + 1), plt.imshow(images[i], "gray")
        plt.title("{}".format(titles[i]), fontsize=20, ha='center')
        plt.xticks([]), plt.yticks([])
    #plt.subplots_adjust(left=None, bottom=None, right=None, top=None, wspace=0.3, hspace=0)
    # plt.tight_layout()
    plt.show()
    fig.savefig('test_results.jpg', bbox_inches='tight')
if __name__ == '__main__':
    dealImageResult("1.png")
pass- 结果图

实践③:低通滤波
- 代码
import numpy as np
import cv2
import matplotlib.pyplot as plt
def dealImg(img):
    b, g, r = cv2.split(img)
    img_rgb = cv2.merge([r, g, b])
    return img_rgb
def dealImageResult(img_path):
    im = cv2.imread(img_path, 0)
    # 实现傅里叶变换
    f = np.fft.fft2(im)
    # 实现中心位置转移至中间位置
    fshift = np.fft.fftshift(f)
    rows, cols = im.shape
    crow, ccol = rows//2, cols//2
    # 掩模,大小和图像一样,np.zeros初始化
    mask = np.zeros((rows, cols), np.uint8)
    mask[crow-40:crow+40, ccol-40:ccol+40] = 1
    fshift = fshift * mask
    # 傅里叶逆变换
    ifshift = np.fft.ifftshift(fshift)
    ifimg = np.fft.ifft2(ifshift)
    result_im = np.abs(ifimg)
    fig = plt.figure(figsize=(10, 10))
    titles = ["im", "result_im"]
    images = [im, result_im]
    for i in range(2):
        plt.subplot(1, 2, i + 1), plt.imshow(images[i], "gray")
        plt.title("{}".format(titles[i]), fontsize=20, ha='center')
        plt.xticks([]), plt.yticks([])
    #plt.subplots_adjust(left=None, bottom=None, right=None, top=None, wspace=0.3, hspace=0)
    # plt.tight_layout()
    plt.show()
    fig.savefig('test_results.jpg', bbox_inches='tight')
if __name__ == '__main__':
    dealImageResult("1.png")
pass- 结果图

实践④:高通滤波
- 代码
import numpy as np
import cv2
import matplotlib.pyplot as plt
def dealImg(img):
    b, g, r = cv2.split(img)
    img_rgb = cv2.merge([r, g, b])
    return img_rgb
def dealImageResult(img_path):
    im = cv2.imread(img_path, 0)
    # 实现傅里叶变换
    f = np.fft.fft2(im)
    # 实现中心位置转移至中间位置
    fshift = np.fft.fftshift(f)
    rows, cols = im.shape
    crow, ccol = rows//2, cols//2
    # 掩模
    mask = np.ones((rows, cols), np.uint8)
    mask[crow-40:crow+40, ccol-40:ccol+40] = 0
    fshift = fshift * mask
    # 傅里叶逆变换
    ifshift = np.fft.ifftshift(fshift)
    ifimg = np.fft.ifft2(ifshift)
    result_im = np.abs(ifimg)
    fig = plt.figure(figsize=(10, 10))
    titles = ["im", "result_im"]
    images = [im, result_im]
    for i in range(2):
        plt.subplot(1, 2, i + 1), plt.imshow(images[i], "gray")
        plt.title("{}".format(titles[i]), fontsize=20, ha='center')
        plt.xticks([]), plt.yticks([])
    #plt.subplots_adjust(left=None, bottom=None, right=None, top=None, wspace=0.3, hspace=0)
    # plt.tight_layout()
    plt.show()
    fig.savefig('test_results.jpg', bbox_inches='tight')
if __name__ == '__main__':
    dealImageResult("1.png")
pass- 结果图

二 OpenCV 实现傅里叶变换
Opencv 中主要通过 cv2.dft() 和 cv2.idft()实现傅里叶变换和逆变换。
在输入图像之前需要先把图像从 np.uint8转换为 np.float32格式; 傅里叶变换其得到的结果中,频率为0的部分会在左上角位置,通常需要通过 shift 变换转换到中心的位置。cv2.idft()返回的结果是双通道的(实部,虚部),还需要转换成图像格式才能够展示。
1 涉及的函数
dst = cv.dft(src[, dst[, flags[, nonzeroRows]]])

dst = cv2.idft(src[, dst[, flags[, nonzeroRows]]])
2 实践
实践①:图像的傅里叶变换
- 代码
import numpy as np
import cv2
import matplotlib.pyplot as plt
def dealImg(img):
    b, g, r = cv2.split(img)
    img_rgb = cv2.merge([r, g, b])
    return img_rgb
def dealImageResult(img_path):
    im = cv2.imread(img_path, 0)
    # 实现傅里叶变换
    result = cv2.dft(np.float32(im), flags=cv2.DFT_COMPLEX_OUTPUT)
    # 实现中心位置转移至中间位置
    fshift = np.fft.fftshift(result)
    result_fft = 20 * np.log(cv2.magnitude(fshift[:, :, 0], fshift[:, :, 1]))
    fig = plt.figure(figsize=(10, 10))
    titles = ["im", "result_fft"]
    images = [im, result_fft]
    for i in range(2):
        plt.subplot(1, 2, i + 1), plt.imshow(images[i], "gray")
        plt.title("{}".format(titles[i]), fontsize=20, ha='center')
        plt.xticks([]), plt.yticks([])
    #plt.subplots_adjust(left=None, bottom=None, right=None, top=None, wspace=0.3, hspace=0)
    # plt.tight_layout()
    plt.show()
    fig.savefig('test_results.jpg', bbox_inches='tight')
if __name__ == '__main__':
    dealImageResult("5.jpg")
    pass
结果图

实践②:低通滤波
- 代码
import numpy as np
import cv2
import matplotlib.pyplot as plt
def dealImg(img):
    b, g, r = cv2.split(img)
    img_rgb = cv2.merge([r, g, b])
    return img_rgb
def dealImageResult(img_path):
    im = cv2.imread(img_path, 0)
    # 实现傅里叶变换
    result = cv2.dft(np.float32(im), flags=cv2.DFT_COMPLEX_OUTPUT)
    # 实现中心位置转移至中间位置
    fshift = np.fft.fftshift(result)
    result_fft = 20 * np.log(cv2.magnitude(fshift[:, :, 0], fshift[:, :, 1]))
    rows, cols = im.shape
    crow, ccol = rows//2, cols//2
    # 掩模
    mask = np.zeros((rows, cols, 2), np.uint8)
    mask[crow-40:crow+40, ccol-40:ccol+40] = 1
    fshift = fshift * mask
    # 傅里叶逆变换
    ifshift = np.fft.ifftshift(fshift)
    result_im = cv2.idft(ifshift)
    result_im = cv2.magnitude(result_im[:, :, 0], result_im[:, :, 1])
    fig = plt.figure(figsize=(10, 10))
    titles = ["im", "result_im"]
    images = [im, result_im]
    for i in range(2):
        plt.subplot(1, 2, i + 1), plt.imshow(images[i], "gray")
        plt.title("{}".format(titles[i]), fontsize=20, ha='center')
        plt.xticks([]), plt.yticks([])
    #plt.subplots_adjust(left=None, bottom=None, right=None, top=None, wspace=0.3, hspace=0)
    # plt.tight_layout()
    plt.show()
    fig.savefig('test_results.jpg', bbox_inches='tight')
if __name__ == '__main__':
    dealImageResult("5.jpg")
pass- 结果图

实践③:高通滤波
- 代码
import numpy as np
import cv2
import matplotlib.pyplot as plt
def dealImg(img):
    b, g, r = cv2.split(img)
    img_rgb = cv2.merge([r, g, b])
    return img_rgb
def dealImageResult(img_path):
    im = cv2.imread(img_path, 0)
    # 实现傅里叶变换
    result = cv2.dft(np.float32(im), flags=cv2.DFT_COMPLEX_OUTPUT)
    # 实现中心位置转移至中间位置
    fshift = np.fft.fftshift(result)
    result_fft = 20 * np.log(cv2.magnitude(fshift[:, :, 0], fshift[:, :, 1]))
    rows, cols = im.shape
    crow, ccol = rows//2, cols//2
    # 掩模
    mask = np.ones((rows, cols, 2), np.uint8)
    mask[crow-40:crow+40, ccol-40:ccol+40] = 0
    fshift = fshift * mask
    # 傅里叶逆变换
    ifshift = np.fft.ifftshift(fshift)
    result_im = cv2.idft(ifshift)
    result_im = cv2.magnitude(result_im[:, :, 0], result_im[:, :, 1])
    fig = plt.figure(figsize=(10, 10))
    titles = ["im", "result_im"]
    images = [im, result_im]
    for i in range(2):
        plt.subplot(1, 2, i + 1), plt.imshow(images[i], "gray")
        plt.title("{}".format(titles[i]), fontsize=20, ha='center')
        plt.xticks([]), plt.yticks([])
    #plt.subplots_adjust(left=None, bottom=None, right=None, top=None, wspace=0.3, hspace=0)
    # plt.tight_layout()
    plt.show()
    fig.savefig('test_results.jpg', bbox_inches='tight')
if __name__ == '__main__':
    dealImageResult("5.jpg")
pass- 结果图

前文回顾
入门篇目录
数字图像处理(入门篇)一 图像的数字化与表示
数字图像处理(入门篇)二 颜色空间
数字图像处理(入门篇)三 灰度化
数字图像处理(入门篇)四 像素关系
数字图像处理(入门篇)五 图像数据预处理之颜色空间转换
数字图像处理(入门篇)六 图像数据预处理之坐标变化
数字图像处理(入门篇)七 图像数据预处理之灰度变化
数字图像处理(入门篇)八 图像数据预处理之直方图
数字图像处理(入门篇)九 图像数据预处理之滤波
数字图像处理(入门篇)十 边缘检测
数字图像处理(入门篇)十一 形态学处理
数字图像处理(入门篇)十二 自适应阈值分割
数字图像处理(入门篇)十三 仿射变换
数字图像处理(入门篇)十四 透视变换
实践篇目录
数字图像处理(实践篇)一 将图像中的指定目标用bBox框起来吧!
数字图像处理(实践篇)二 画出图像中目标的轮廓
数字图像处理(实践篇)三 将两张图像按照指定比例融合
数字图像处理(实践篇)四 图像拼接-基于SIFT特征点和RANSAC方法
数字图像处理(实践篇)五 使用Grabcut算法进行物体分割
数字图像处理(实践篇)六 利用hough变换进行直线检测
数字图像处理(实践篇)七 利用霍夫变换进行圆环检测
数字图像处理(实践篇)八 Harris角点检测
数字图像处理(实践篇)九 基于边缘的模板匹配
数字图像处理(实践篇)十 图像质量检测
数字图像处理(实践篇)十一 图像中的条形码解析
数字图像处理(实践篇)十二 基于小波变换的图像降噪
数字图像处理(实践篇)十三 数据增强之给图像添加噪声!
数字图像处理(实践篇)十四 图像金字塔