学习pytorch20 pytorch完整的模型验证套路

pytorch完整的模型验证套路

  • 使用非数据集的测试数据,测试训练好模型的效果
  • 代码
  • 预测结果
  • 解决报错

B站小土堆pytorch学习视频 https://www.bilibili.com/video/BV1hE411t7RN/?p=32&spm_id_from=pageDriver&vd_source=9607a6d9d829b667f8f0ccaaaa142fcb

学习pytorch20 pytorch完整的模型验证套路_第1张图片

使用非数据集的测试数据,测试训练好模型的效果

 测试:训练好的模型,提供对外真实数据的一个实际应用

从网上下载两张图片,整理图片的输入格式,输入模型测试模型效果
学习pytorch20 pytorch完整的模型验证套路_第2张图片
学习pytorch20 pytorch完整的模型验证套路_第3张图片

代码

import torch
from torch import nn
from torchvision import transforms
from PIL import Image
import cv2

dog_path = './images/dog.jpg'
airplane_path = './images/airplane.jpg'
model_path = './images/net_epoch9_gpu.pth'

dog_pil = Image.open(dog_path)
airp_pil = Image.open(airplane_path)
print(dog_pil)  # 
# RGB 3通道 匹配模型输入的通道数
dog_pil = dog_pil.convert('RGB')  # def convert(self, mode=None, matrix=None, dither=None, palette=Palette.WEB, colors=256):
airp_pil = airp_pil.convert('RGB')
# dog_cv = cv2.imread(dog_path)  # numpy.array
# # print(dog_cv)
# img_trans = torchvision.transforms.ToTensor()  # 实例化转tensor的类
# dog_tensor = img_trans(dog_pil)
# dog_cv_tensor = img_trans(dog_cv)
# print(dog_tensor)
# print(dog_tensor.shape)
# print(dog_cv_tensor)
# 输入模型shape 需要是32*32大小的
transform = transforms.Compose([transforms.Resize((32,32)),
                                transforms.ToTensor()])
dog_tensor = transform(dog_pil)
airp_tensor = transform(airp_pil)
# print(dog_tensor)
print(dog_tensor.shape, airp_tensor.shape)


class Cifar10Net(nn.Module):
    def __init__(self):
        super(Cifar10Net, self).__init__()
        self.net = nn.Sequential(
            nn.Conv2d(in_channels=3, out_channels=32, kernel_size=5, stride=1, padding=2),
            nn.MaxPool2d(kernel_size=2),
            nn.Conv2d(32, 32, 5, 1, 2),
            nn.MaxPool2d(kernel_size=2),
            nn.Conv2d(32, 64, 5, 1, 2),
            nn.MaxPool2d(kernel_size=2),
            nn.Flatten(),
            nn.Linear(64*4*4, 64),
            nn.ReLU(),
            nn.Linear(64, 10)
        )

    def forward(self, x):
        x = self.net(x)
        return x

# 加载模型要考虑是以哪种形式保存的模型  模型保存方式1:保存模型结构和参数 方式二:只保存模型参数
model = torch.load(model_path, map_location=torch.device('cpu'))
print(model)
dog_tensor = dog_tensor.reshape((1, 3, 32, 32))
airp_tensor = airp_tensor.reshape((1, 3, 32, 32))
model.eval() # 设置模型为测试状态 网络层有dropout batchNormal层不加eval函数会有问题
with torch.no_grad(): # 测试不做梯度计算 节省算力
    dog_output = model(dog_tensor)
    airp_output = model(airp_tensor)
print(dog_output)
print(dog_output.argmax())
print(dog_output.argmax(1))
print(airp_output)
print(airp_output.argmax(1))  # 概率值不便于解读 使用argmax 可以很方便的读出模型预测的是哪个类别

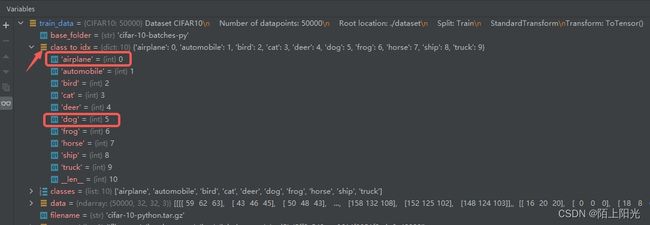
预测结果

学习pytorch20 pytorch完整的模型验证套路_第4张图片

tensor([[ 1.1317, -4.3441,  3.2116,  2.8930,  2.6749,  4.6079, -3.2860,  3.1357,
         -3.0432, -4.1703]])
tensor(5)
tensor([5])
tensor([[ 5.5993, -0.6140,  4.4758,  0.8463,  1.6311, -1.0217, -3.9990, -2.8343,
          1.1050, -1.6423]])
tensor([0])

预测结果和训练数据的标注一直,预测正确

解决报错

RuntimeError: mat1 and mat2 shapes cannot be multiplied (64x16 and 1024x64)
解决: dog_tensor = dog_tensor.reshape((1, 3, 32, 32)) 转换输入是4维的, 模型输入有一个batch-size维度

RuntimeError: Attempting to deserialize object on a CUDA device but torch.cuda.is_available() is False. If you are running on a CPU-only machine, please use torch.load with map_location=torch.device(‘cpu’) to map your storages to the CPU.
解决:model = torch.load(model_path, map_location=torch.device(‘cpu’))
在gpu上训练的模型,要在cpu上测试,模型加载的时候指定cpu设备

你可能感兴趣的:(学习pytorch,pytorch,python)