C++ | vector用法指南
目录
前言
一、初始vector
二、接口介绍(成员函数)
1、构造函数
2、迭代器
3、容量相关接口
4、访问相关接口
5、修改相关接口
前言
关于vector,还是分为两部分来学习,首先,我们得学会vector常用接口的使用,然后我们围绕着这些接口进行一次模拟实现,深刻理解与掌握vector相关知识;本文所有资料查阅于C++文档
一、初始vector
首先,我们得认识到vector是一种我们以前学过得顺序表的结构,只不过,我们用C++来进行实现,加入融汇了一些C++语法与C++的模板知识;有了上一章string的理解学习,vector的使用也会得心应手;
二、接口介绍(成员函数)
1、构造函数
首先我们需要看的便是构造函数了,相对于string,vector的构造函数就比较精简了;有如下四个;

void test_vector1()
{
	// 1、无参构造
	// explicit vector();
	vector v1;
	// 2、用n个val初始化vector
	// explicit vector (size_type n, const value_type& val = value_type());
	vector v2(8, 5);
	// 3、迭代器区间构造
	// template
	// vector(InputIterator first, InputIterator last);\
	// 任意合理迭代器区间都可(左闭右开)
	vector v3(v2.begin(), v2.end());
	// 还可以用数组名(左闭右开)
	int arr[] = { 1, 2, 3, 4, 5, 6 };
	vector v4(arr, arr + 6);
	// 4、vector构造
	// vector (const vector& x);
	vector v5(v4);
}
2、迭代器
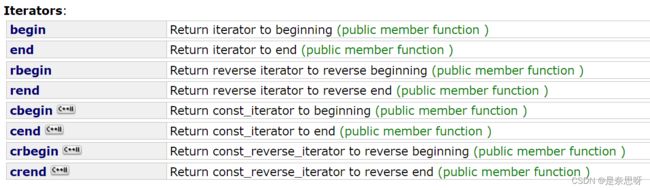
与string的迭代器一样,我们可理解为指针,在VS下,实际上对其做了封装,而在Linux的GCC编译环境下,实际上就是指针;有了迭代器也就可以使用我们的范围for,实际上,范围for最后会被编译器替换成迭代器的方式,因此,后面模拟实现时,我们实现出迭代器遍历的方法就可以使用范围for了;r系类为反向迭代器,c系列为const常量迭代器;
void test_vector2()
{
	vector v1;
	// 尾插
	v1.push_back(1);
	v1.push_back(2);
	v1.push_back(3);
	v1.push_back(4);
	v1.push_back(5);
	// 迭代器遍历
	//vector::iterator it = v1.begin();
	// 也可以用auto
	auto it1 = v1.begin(); // 新手建议还是写全,不要用auto
	while (it1 != v1.end())
	{
		cout << *it1 << " ";
		it1++;
	}
	cout << endl;

	for (auto e : v1)
	{
		cout << e << " ";
	}
	cout << endl;

	// 反向迭代器
	vector::reverse_iterator it2 = v1.rbegin();
	while (it2 != v1.rend())
	{
		cout << *it2 << " ";
		it2++;
	}
	cout << endl;
}
3、容量相关接口
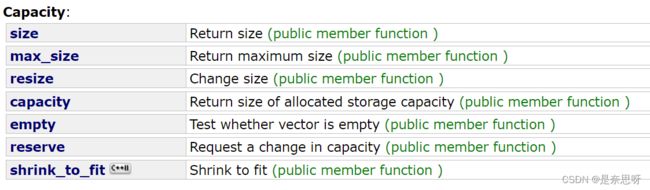
容量相关接口与string容量相关接口也大同小异;最常用的也只有那几个;
void test_vector3()
{
	vector v;
	v.push_back(1);
	v.push_back(2);
	v.push_back(3);
	v.push_back(4);
	v.push_back(5);

	cout << v.size() << endl;
	cout << v.capacity() << endl;
	cout << v.max_size() << endl;
	cout << v.empty() << endl;
}
关于resize与reserve,与string用法也一致,我们采用三个范围的数据测试着两个接口对size与capacity的影响;
void test_vector4()
{
	vector v1;
	v1.push_back(1);
	v1.push_back(2);
	v1.push_back(3);
	v1.push_back(4);
	v1.push_back(5);
	vector v2(v1);
	// reserve测试
	cout << "size: " << v1.size() << endl;
	cout << "capacity: " << v1.capacity() << endl;
	v1.reserve(3);
	cout << "size: " << v1.size() << endl;
	cout << "capacity: " << v1.capacity() << endl;
	v1.reserve(5);
	cout << "size: " << v1.size() << endl;
	cout << "capacity: " << v1.capacity() << endl;
	v1.reserve(100);
	cout << "size: " << v1.size() << endl;
	cout << "capacity: " << v1.capacity() << endl << endl;
	// resize测试
	cout << "size: " << v2.size() << endl;
	cout << "capacity: " << v2.capacity() << endl;
	v2.resize(3);
	cout << "size: " << v2.size() << endl;
	cout << "capacity: " << v2.capacity() << endl;
	v2.resize(5);
	cout << "size: " << v2.size() << endl;
	cout << "capacity: " << v2.capacity() << endl;
	v2.resize(100);
	cout << "size: " << v2.size() << endl;
	cout << "capacity: " << v2.capacity() << endl;
} 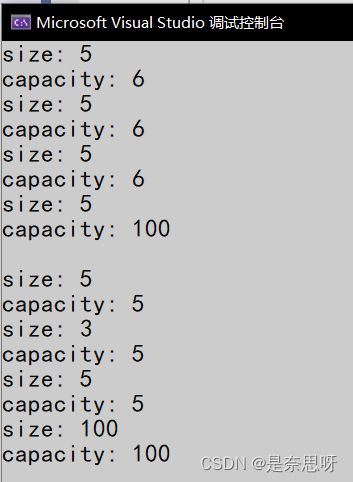
通过上述,我们发现reserve和resize都不会缩容,并且,resize会改变resize,用第二个参数(或默认参数)来填充;
4、访问相关接口
我们访问vector中元素也可以像访问下标一样访问,我们可以就像访问数组元素一样访问vector中的元素,因为我们重载了[];

void test_vector5()
{
	vector v1;
	v1.push_back(1);
	v1.push_back(2);
	v1.push_back(3);
	v1.push_back(4);
	v1.push_back(5);
	// 使用[]访问vector
	for (int i = 0; i < v1.size(); i++)
	{
		cout << v1[i] << " ";
	}
	cout << endl;
	// 使用at访问数组(与[]唯一区别是[]访问越界是直接断言,而at则是抛异常)
	for (int i = 0; i < v1.size(); i++)
	{
		cout << v1.at(i) << " ";
	}
	cout << endl;
	// 返回vector头部数据
	cout << v1.front() << endl;
	// 返回vector的尾部数据
	cout << v1.back() << endl;
	// 返回指向这一串数据的那个指针
	cout << v1.data() << endl;
}
5、修改相关接口
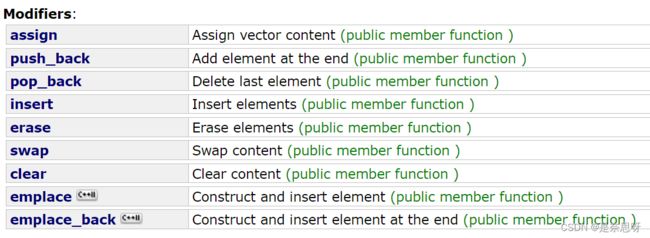
最后这一串接口也是我们的老朋友了,除了最后两个接口,其他接口都出现在string过,实际上使用也无二异;这里重点讲解insert和erase,因为在vector中,我们选择数据插入位置多数都是选择迭代器,而不像string,使用下标;


void test_vector6()
{
	vector v1;
	v1.push_back(1);
	v1.push_back(2);
	v1.push_back(3);
	v1.push_back(4);
	v1.push_back(5);

	// vector没有提供find接口,我们使用算法库中的find即可;
	vector::iterator it = find(v1.begin(), v1.end(), 3);
	v1.insert(it, 300);
	for (auto e : v1)
	{
		cout << e << " ";
	}
	cout << endl;
	// 插入n个值
	it = find(v1.begin(), v1.end(), 2);
	v1.insert(it, 3, 9);
	for (auto e : v1)
	{
		cout << e << " ";
	}
	cout << endl;
	// 删除一段迭代区间的值(左闭右开)
	v1.erase(v1.begin() + 1, v1.begin() + 5);
	for (auto e : v1)
	{
		cout << e << " ";
	}
	cout << endl;
}
具体细节内容我们在下一篇文章,vector的实现中来具体介绍,本文主要以介绍vector的使用为基础,带着初学STL的朋友来使用vector;