链表面试题的总结和思路分享
꒰˃͈꒵˂͈꒱ write in front ꒰˃͈꒵˂͈꒱
ʕ̯•͡˔•̯᷅ʔ大家好,我是xiaoxie.希望你看完之后,有不足之处请多多谅解,让我们一起共同进步૮₍❀ᴗ͈ . ᴗ͈ აxiaoxieʕ̯•͡˔•̯᷅ʔ—CSDN博客
本文由xiaoxieʕ̯•͡˔•̯᷅ʔ 原创 CSDN 如需转载还请通知˶⍤⃝˶
个人主页:xiaoxieʕ̯•͡˔•̯᷅ʔ—CSDN博客
系列专栏:xiaoxie的刷题系列专栏——CSDN博客●'ᴗ'σσணღ*
我的目标:"团团等我( ◡̀_◡́ ҂)"( ⸝⸝⸝›ᴥ‹⸝⸝⸝ )欢迎各位→点赞 + 收藏⭐️ + 留言+关注(互三必回)!
链表篇(点击标题即可进入力扣界面)
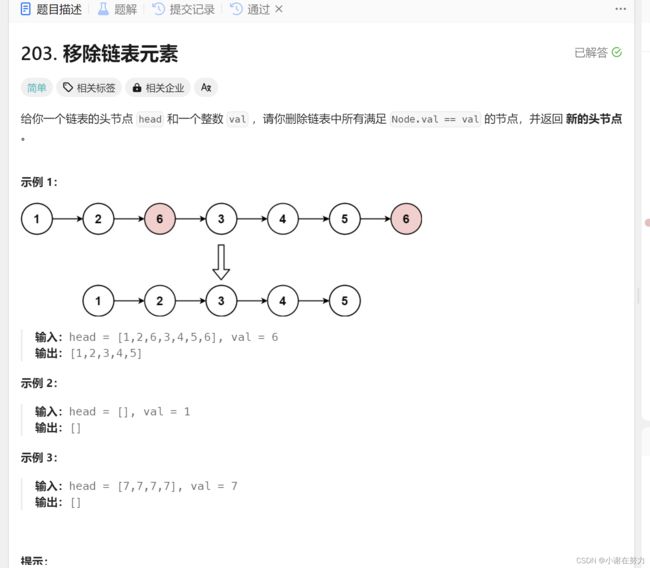
1.移除链表元素
这是一道来自力扣的简单题但却有一些小细节值得注意,博主将画图为大家讲解,这题该如何解答
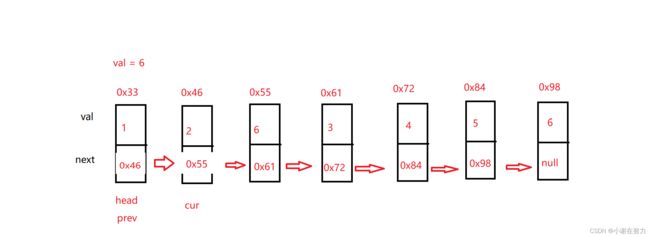
首先由题意以知,这是一个单链表其次就是等于val 的节点可以有多个,那我们是不是可以设置两个指针,一个为比较的节点,一个为比较的节点的前一个节点的指针
可以得到以下代码:
if(head == null) return null;
        ListNode prev = head;
ListNode cur = head.next;然后我们就移动cur指针只要cur.val的值和val相等我们就删除该节点,那么好,既然要遍历指针,我们是不是首先确定好循环条件,避免发生空指针异常,由于因为是要遍历所有指针,所以呢循环条件为cur != null 其次还需要注意的一点就是,如何删,在这里博主有个小技巧就是只要是删除,首先,就是要先把要删除节点后面的部分,给联系上,否则就丢了。代码如下
while(cur != null) {
            if(cur.val == val) {
                prev.next = cur.next;//先连接后面的
            }else {
                prev = cur;
            }
              cur = cur.next;//无论是否找到都要移动cur
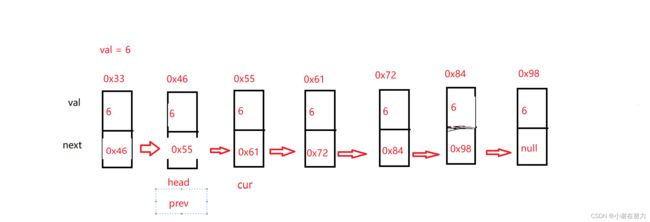
}这就完了吗,我想有许多细心的小伙伴可以发现头结点还没有比较呢,这个循环遍历的是把除了头结点以外的节点都遍历,当头节点的val等于val就少删除了一个节点所以在最后还需要判断一下头结点,完整代码如下
java版本:
class Solution {
    public ListNode removeElements(ListNode head, int val) {
     if(head == null) return null;
        ListNode prev = head;
        ListNode cur = head.next;
        while(cur != null) {
            if(cur.val == val) {
                prev.next = cur.next;
            }else {
                prev = cur;
            }
             cur = cur.next;
        }
         //判断头结点
        if(head.val == val) {
            head = head.next;
        }
        return head;
    }
}
c++版本:
class Solution {
public:
    ListNode* removeElements(ListNode* head, int val) {
        if (head == nullptr) {
            return nullptr;
        }
        ListNode* prev = head;
        ListNode* cur = head->next;
        while (cur != nullptr) {
            if (cur->val == val) {
                prev->next = cur->next;
                delete cur;
            } else {
                prev = cur;
            }
            cur = cur->next;
        }

        if (head->val == val) {
            ListNode* newHead = head->next;
            delete head;
            return newHead;
        }
        return head;
    }
};至于为什么不先判断呢而是最后才判断是为了防止出现以下情况,所以我们把除了头结点以外的节点都遍历比较一遍,最后在比较即可
时间复杂度为O(n),空间复杂度为O(1)
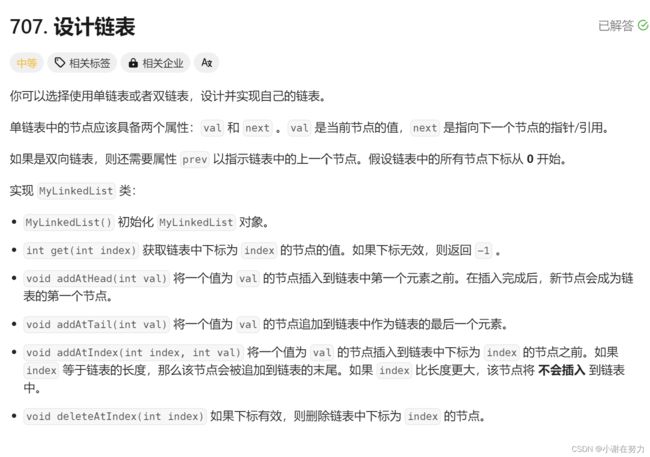
2.设计链表
要想学好数据结构,首先就得收悉它的底层实现,可以完成该题练习链表操作,是为后续的刷链表题的一个基础
JAVA版本
class MyLinkedList {
    //静态内部类
    static class LNode {
        public int val;
        public LNode next;
        public LNode(int val) {
            this.val = val;
        }
    }
     int size;
     LNode head;
    public MyLinkedList() {
        //size存储链表元素的个数
        int size;
        head = new LNode(0);
    }

    public int get(int index) {
        //判断index是否的合法
        if (index < 0 || index >= size) {
            return -1;
        }
        LNode cur = head;
         for (int i = 0; i <= index; i++) {
           cur = cur.next;
        }
        return cur.val;
    }

    //在链表最前面插入一个节点,等价于在第0个元素前添加
    public void addAtHead(int val) {
         addAtIndex(0, val);
    }
     //在链表的最后插入一个节点,等价于在(末尾+1)个元素前添加
    public void addAtTail(int val) {
        addAtIndex(size, val);
    }

    public void addAtIndex(int index, int val) {
         if (index > size) {
            return;
        }
        if (index < 0) {
            index = 0;
        }
        size++;
        LNode cur = head;
        for (int i = 0; i < index; i++) {
            cur = cur.next;
        }
        LNode toAdd = new LNode(val);
        toAdd.next = cur.next;
        cur.next = toAdd;
    }

    public void deleteAtIndex(int index) {
     if (index < 0 || index >= size) {
            return;
        }
        size--;
        if (index == 0) {
            head = head.next;
	    return;
        }
        LNode cur = head;
        for (int i = 0; i < index ; i++) {
            cur = cur.next;
        }
        cur.next = cur.next.next;
    }

}
C++版本
#include

class MyLinkedList {
private:
    // 定义链表节点的结构
    struct LNode {
        int val;
        LNode* next;
        LNode(int v) : val(v), next(nullptr) {}
    };

    int size;
    LNode* head;

public:
    // 构造函数用于初始化链表
    MyLinkedList() : size(0), head(new LNode(0)) {}

    // 获取指定索引处的值
    int get(int index) {
        if (index < 0 || index >= size) {
            return -1;
        }
        LNode* cur = head->next;
        for (int i = 0; i < index; i++) {
            cur = cur->next;
        }
        return cur->val;
    }

    // 在链表开头添加一个节点
    void addAtHead(int val) {
        addAtIndex(0, val);
    }

    // 在链表末尾添加一个节点
    void addAtTail(int val) {
        addAtIndex(size, val);
    }

    // 在指定索引处添加一个节点
    void addAtIndex(int index, int val) {
        if (index > size) {
            return;
        }
        if (index < 0) {
            index = 0;
        }
        size++;
        LNode* cur = head;
        for (int i = 0; i < index; i++) {
            cur = cur->next;
        }
        LNode* toAdd = new LNode(val);
        toAdd->next = cur->next;
        cur->next = toAdd;
    }

    // 删除指定索引处的节点
    void deleteAtIndex(int index) {
        if (index < 0 || index >= size) {
            return;
        }
        size--;
        LNode* cur = head;
        for (int i = 0; i < index; i++) {
            cur = cur->next;
        }
        LNode* temp = cur->next;
        cur->next = cur->next->next;
        delete temp;
    }
};
3.反转链表
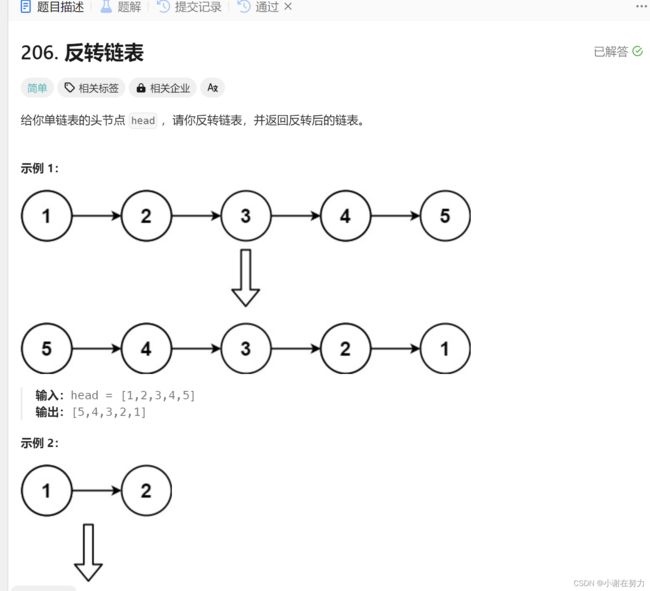
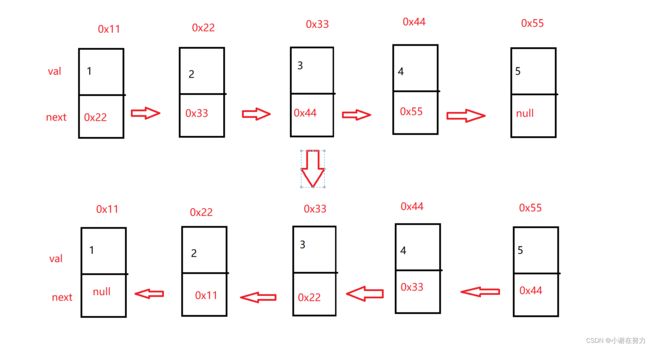
在这里博主给大家一个小建议,如果你是初学者,做数据结构这类的题目,首先就是需要画图来理解题意,这样才可以有好的思路
由图我们可以看出反转链表既是改变next指针的指向,我们只需要把节点前一个的地址等于节点后一个的地址就可以了
首先定义一个cur指针,指向头结点,再定义一个pre指针,初始化为null。
然后就要开始反转了,首先要把 cur->next 节点用tmp指针保存一下,也就是保存一下这个节点。
为什么要保存一下这个节点呢,因为接下来要改变 cur->next 的指向了,将cur->next 指向pre ,此时已经反转了第一个节点了。
接下来,就是循环走如下代码逻辑了,继续移动pre和cur指针。
最后,cur 指针已经指向了null,循环结束,链表也反转完毕了。 此时我们return pre指针就可以了,pre指针就指向了新的头结点
JAVA版本
class Solution {
    public ListNode reverseList(ListNode head) {
        ListNode prev = null; // 将prev初始化为null
        ListNode cur = head; // 将cur初始化为head
        while(cur != null) { // 遍历链表
            ListNode tmp = cur.next; // 存储下一个节点
            cur.next = prev; // 反转指针
            prev = cur; // 将prev移到当前节点
            cur = tmp; // 将当前节点移到下一个节点
        }
        return prev; // 返回反转后的链表头节点
    }
}
C++版本
class Solution {
public:
    ListNode* reverseList(ListNode* head) {
        ListNode* prev = nullptr; // 将prev初始化为nullptr
        ListNode* cur = head; // 将cur初始化为head
        while (cur != nullptr) { // 遍历链表
            ListNode* tmp = cur->next; // 存储下一个节点
            cur->next = prev; // 反转指针
            prev = cur; // 将prev移到当前节点
            cur = tmp; // 将当前节点移到下一个节点
        }
        return prev; // 返回反转后的链表头节点
    }
};
4.两两交换链表中的节点
一样需要用画图理解,解这题有两种方法分别是使用递归和哨兵节点的方法
1.递归
首先我们要清楚解决递归问题的关键点什么:
- 返回值
- 做了什么
- 终止条件
- 递归有传递就有归
这里博主先公布代码,如果递归看不懂的可以看博主的递归过程
Java版本:
class Solution {
    public ListNode swapPairs(ListNode head) {
        if(head == null || head.next == null) {
            return head;
        }
        ListNode newhead = head.next;
        head.next = swapPairs(newhead.next);
        newhead.next = head;
        return newhead;
    }
}
C++版本
class Solution {
public:
    ListNode* swapPairs(ListNode* head) {
        if (head == nullptr || head->next == nullptr) {
            return head;
        }
        ListNode* newHead = head->next;
        head->next = swapPairs(newHead->next);
        newHead->next = head;
        return newHead;
    }
};
递归的过程
以 1 -> 2 -> 3 -> 4为例
第一步:1 -> 2 -> 3 -> 4 head = 1, newhead = 2;
第二步:head.next 1的下一个节点 为,swapairs(newhead.next) 进入递归
第三步:head = 3, newhead = 4,
第四步: head.next 3 的下一个节点为swapairs(newhead.next) 进入递归。
第五步: head = null , newhead = null,所以要返回 null.
第六步: head.next 3 的下一个节点为swapairs(newhead.next)的返回值为null 此时 3的下一个节点就为null。
第七步 :newhead.next = head,也就是 4 -> 3,然后返回newhead,
第八步: head.next 1 的下一个节点为swapairs(newhead.next)的返回值为4,此时 3的下一个节点就为4。也就是1 -> 4 ->3.递归结束
第九步:newhead.next = head 所以 2 -> 1 ->4 -3.
如果你还是觉得很难理解,可以自己动手画画图,或者是复制粘贴一下博主的代码,在编译器上用调试功能看递归过程是如何实现的。同时博主这里还有一种解法
2.哨兵节点
哨兵节点(也被称为虚拟头节点或者哑节点)和头指针是两个不同的概念:
-
哨兵节点:这是一个额外创建的节点,通常用于简化链表操作的代码。哨兵节点的next指针通常指向链表的头节点。哨兵节点本身不存储任何有效数据,它的主要作用是作为一个固定的节点,使得对链表头节点的操作和对其他节点的操作一致。
-
头指针:这是一个指向链表头节点的指针。头指针通常用于表示整个链表,因为通过头指针,我们可以访问链表的所有节点。
在链表操作中,我们通常会创建一个哨兵节点,并让一个头指针指向这个哨兵节点。这样,我们就可以通过头指针来访问整个链表,包括哨兵节点。
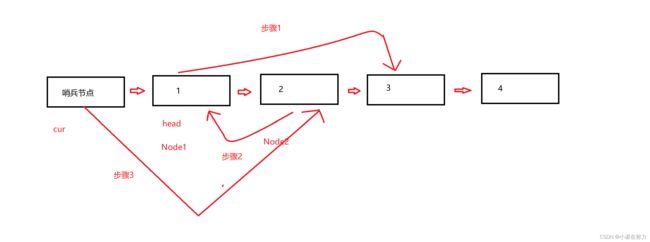
根据图可知
Java版本
class Solution {
    public ListNode swapPairs(ListNode head) {
     ListNode dummy = new ListNode(-1);//创建一个哨兵节点,它的下一个节点是头节点
     dummy.next = head;
     ListNode cur = dummy;// 创建一个临时节点,用于遍历链表
     while(cur.next != null && cur.next.next != null) {//因为要交换两个节点
     ListNode node1 = cur.next;
     ListNode node2 = cur.next.next;
     //交换过程
      node1.next = node2.next;//步骤1
      node2.next = node1;//步骤2
      cur.next = node2;//步骤3
      cur = node1;//移动cur到下一个要交换的节点
     }
     return dummy.next;
 }
}
C++版本
class Solution {
public:
    ListNode* swapPairs(ListNode* head) {
        ListNode* dummy = new ListNode(-1); // 创建一个哨兵节点,它的下一个节点是头节点
        dummy->next = head;
        ListNode* cur = dummy; // 创建一个临时节点,用于遍历链表
        while (cur->next != nullptr && cur->next->next != nullptr) { // 因为要交换两个节点
            ListNode* node1 = cur->next;
            ListNode* node2 = cur->next->next;
            node1->next = node2->next; // 步骤1
            node2->next = node1; // 步骤2
            cur->next = node2; // 步骤3
            cur = node1; // 移动cur到下一个要交换的节点
        }
        return dummy->next;
    }
};
5.删除链表的倒数第N个节点
这题我们可以使用快慢指针来做,同时考虑到要遍历所有的节点,所以还需要设置一个哨兵节点,同意博主通过画图来解这道题
先让快指针走n+1步,然后快慢指针在一起走 直到快指针指向null,慢指针指向的就是要删除的前一个节点(这也就是为什么快指针先走n+1步,让慢指针指向前一个,更好进行删除操作)
代码如下:
Java版本
class Solution {
    public ListNode removeNthFromEnd(ListNode head, int n) {
        ListNode dummy = new ListNode(-1);
        dummy.next = head;
        ListNode fast = dummy;
        ListNode slow = dummy;
        for(int i = 0;i <= n;i++) {
            fast = fast.next;
        }
        while(fast != null) {
            fast = fast.next;
            slow = slow.next;
        }
        slow.next = slow.next.next;
         return dummy.next;
    }

}
C++版本
class Solution {
public:
    ListNode* swapPairs(ListNode* head,int n) {
        ListNode* dummy = new ListNode(-1);
        dummy->next = head;
        ListNode*fast = dummy;
        ListNode*slow = dummy;
        for(int i = 0;i <= n;i++)
        {
           fast = fast -> next;
         }
        while (fast != nullptr) {
            fast = fast->next;
            slow = slow->next;
        }
            slow->next = slow ->next -> next;
        return dummy->next;
    }
};
6.环形链表II
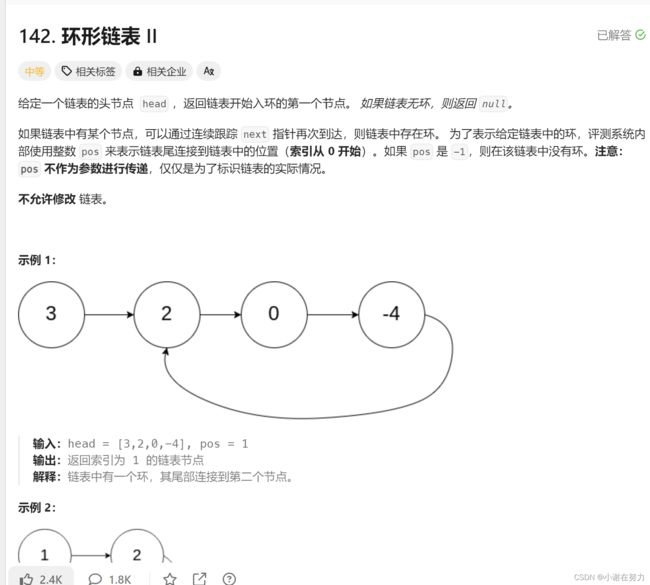
以使用快慢指针法,分别定义 fast 和 slow 指针,从头结点出发,fast指针每次移动两个节点,slow指针每次移动一个节点,如果 fast 和 slow指针在途中相遇 ,说明这个链表有环。
此时已经可以判断链表是否有环了,那么接下来要找这个环的入口了。
我们假设假设从头结点到环形入口节点 的节点数为x。 环形入口节点到 fast指针与slow指针相遇节点 节点数为a。 从相遇节点 再到环形入口节点节点数为 b。 如图所示:
我们知道fast指针的速度是slow指针的两倍所以它们两个所走的 fast = 2 *slow
所以有:x+a+n(a+b) = 2*(x+a)
化简可得: x = nb.
设n = 1 就可得 x = b
所以我们可以先当它们相遇后,让fast / slow 指向头结点,然后让它们以同时的速度,当它们再次相遇后既是环形入口点
代码可得
Java版本
public class Solution {
    public ListNode detectCycle(ListNode head) {
        if(head == null || head.next == null) {
            return null;
        }
        ListNode fast = head;
        ListNode slow = head;
        while(fast != null && fast.next != null) {
            fast = fast.next.next;
            slow = slow.next;
            if(fast == slow) break;
        } //没有环
        if(fast == null || fast.next == null) {
            return null;
        }
        fast = head;
        while(slow != fast) {
            slow = slow.next;
            fast = fast.next;
        }
        return fast;
    }
}
C++版本
class Solution {
public:
    ListNode* detectCycle(ListNode* head) {
        if(head == nullptr || head->next == nullptr) {
            return nullptr;
        }
        ListNode* fast = head;
        ListNode* slow = head;
        while(fast != nullptr && fast->next != nullptr) {
            fast = fast->next->next;
            slow = slow->next;
            if(fast == slow) break;
        } // 没有环
        if(fast == nullptr || fast->next == nullptr) {
            return nullptr;
        }
        fast = head;
        while(slow != fast) {
            slow = slow->next;
            fast = fast->next;
        }
        return fast;
    }
};
以上就是一些博主自己整理练习的面试题啦,如果对这一类博文感兴趣的话,可以关注博主哦,博主后面还会整理更多题目分享给大家
