redis复习资料
redis
一、NOSQL
NOSQL: no only sql(不仅仅SQL)
泛指非关系型数据库
NoSQL特点:
1.方便扩展(数据之间没有关系,很好扩展)
2.大数据量高性能(Redis一秒写8万次,读取1万,NoSQL的缓存记录级,时一种细粒度的的缓存,性能会比较高)
3.数据类型时多样型的(不需要事先设计数据库,随取随用,如果时数据量十分大的表,很多人就无法设计了)
4.传统RDBMS 和 NoSQL
RDBMS
-
结构化组织
-
SQL
-
数据和关系都存在单独的表中
-
数据操作,数据定义语言
-
严格的一致性
-
基础的事务
NoSQL
-
不仅仅是数据
-
没有固定的查询语言
-
键值对存储,列存储,文档存储,图形数据库(社交关系)
-
最终一致性
-
CAP定理和BASE(异地多活)初级架构师
-
高性能,高可用,高可扩
了解 3V + 3高
- 3V
1.海量Volume
2.多样Variety
3实时Velocity
- 3高
1.高可用
2.高可扩
3.高性能
二、阿里巴巴实践分析理解数据架构演进
1.商品的基本信息:
名称、价格、商家信息:
关系型数据库就可以解决:MYSQL / Oracle (淘宝早年就去IOE了–王坚 --阿里云这群疯子)
(IOE: IBM小型机 --Oracle数据库 --EMC存储设备)
2.商品的描述、评论(文字比较多)
文档型数据库中,MongDB
3.图片
分布式文件系统 FastDFS
-
淘宝自己的 TFS
-
Google的 GFS
-
hadoop HDFS
-
阿里云的 oss
4.商品的关键字 (搜索)
-
搜素引擎 solr elasticsearch
-
ISearch:多隆
三、NoSQL四大分类
KV键值对:
-
\新浪:Redis
-
美团:Redis + Tair
-
阿里、百度:Redis+memcache
文档型数据库:(bson格式和json一样)
- MongoDB(一般必须掌握)
1.MongDB是一个基于分布式文件存储的数据库,C++编写,主要用于处理大量文档
2.MongDB是一个介于关系型数据库和非关系型数据库中中间的产品,MongoDB是非关系型数据库中功能最丰富,最像关系型数据库
3.ConthDB
列存储数据库:
-
HBase
-
分布式文件系统
图关系数据库:
-
他不是存图形,放的是关系,比如:朋友圈社交网络、网络推荐
-
Neo4J, InfoGrid
四、Redis的概述
Redis的概述(Remote Dictionary Server)即远程字典服务
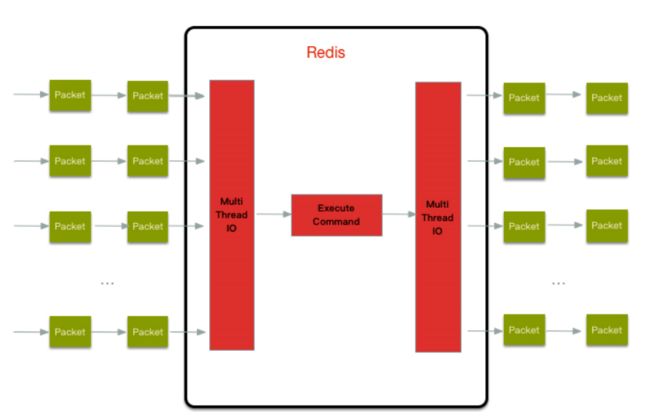
是单线程的多路IO复用
是一个开源的使用ANSI C语言编写、支持网络、可基于内存亦可持久化的日志型、key-Value数据库,并提供多种语言的API
1.周期性把更新的数据写入磁盘或者把修改操作写入追加的记录文件
2.实现master-slaver(主从)同步
3.免费和开源,是当下最热门的NoSQL技术之一
4.结构化数据库
Redis能干嘛?
1.内存存储,持久化(rdb,aof)
2.效率高,可以用于高速缓存
3.发布订阅系统
4.地图信息分析
5.计时器、计数器(浏览量)
特征:
1.多样的数据类型
2.持久化
3.集群
4.事务
Redis推荐都是基于Linux搭建
五、Window版本Redis
版本:3.2.100
默认端口:6379
官方文档:http://redis.cn/topics/introduction
六、Linux安装Redis
Linux安装Redis
1.基本的环境配置:
(1)
yum install gcc-c++
(2)
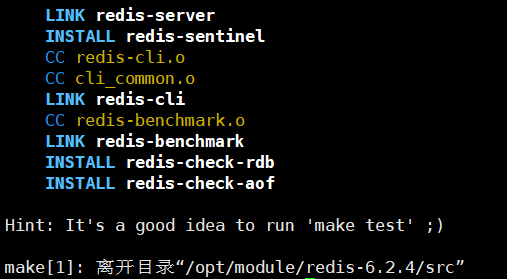
# make
(3)
make install
2.redis默认安装路径:/usr/local/bin
3.redis配置文件:
(1)在/usr/local/bin/ 下新建文件夹kconfig
(2)将redis配置文件redis.conf,复制到/usr/local/bin/kconfig
(3)redis默认不是后台启动,需要修改配置文件,改为后台启动
4.启动redis服务:
(1)启动redis服务端
redis-server kconfig/redis.conf
(2)使用客户端连接端口号6379
redis-cli -p 6379
5.查看进程:
ps -ef |grep redis[服务名]
6.关闭redis服务:
shutdown

not connected> exit

#
七、redis性能测试
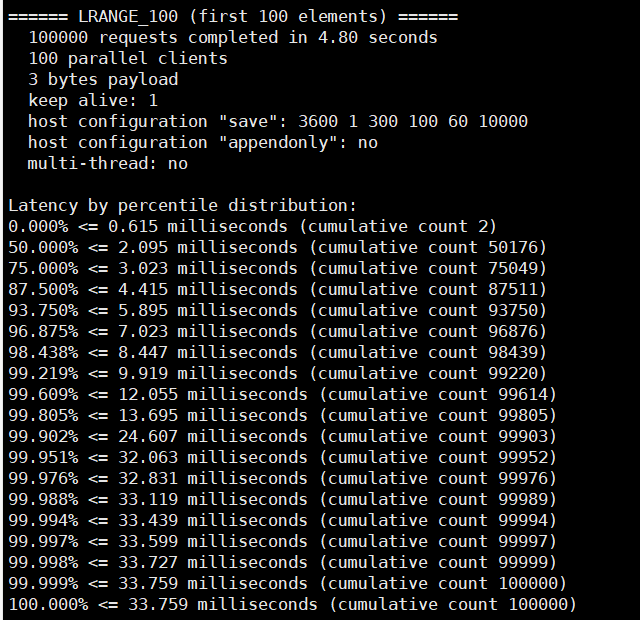
测试:100个并发连接 10 0000请求
$ redis-benchmark -h localhost -p 6379 -c 100 -n 100000
八、基础知识
1.redis默认有16个数据库,默认使用的是第0个
(1)切换数据库:
127.0.0.1:6379> select 3
(2)数据库大小:
127.0.0.1:6379> DBSIZE
(3)查看所有key:
127.0.0.1:6379> keys *
(4)清除当前数据库
127.0.0.1:6379> flushdb
(5)清除全部数据内容
127.0.0.1:6379> flushall
(6)删除指定key数据
127.0.0.1:6379> del key
(7)根据value选择非阻塞删除
127.0.0.1:6379> unline key
(8)为给定的key设置过期时间
# 10秒钟
127.0.0.1:6379> expire key 10
2.Redis是单线程
Redis为什么单线程这么快?
1.误区1:高性能的服务器一定是多线程的?
2.误区2:多线程(CPU上下文会切换)一定比单线程效率高
核心:redis是所有的数据全部放在内存中的,所以说使用单线程去操作效率是最高的,多线程会切换CPU上下文切换,对于内存系统来说,没有上下文切换是效率最高的,多次读写都是在单个CPU上操作的
九、基本命令
设置key过期时间:
127.0.0.16379> EXPIRE name 10
查看key的剩余时间:
127.0.0.16379> ttl name[key]
查看key的类型
127.0.0.16379> type name
Redis命令帮助文档:https://redis.io/commands
十、五大数据类型
String
String二进制安全的,意味着Redis中的String可以包含任何数据,比如jpg或序列化对象,字符串value最大可以是512M
判断存在:
127.0.0.1:6379> exist key
追加:(key值不存在,相当于set)
127.0.0.1:6379> append key1 "hello"
获取长度:
127.0.0.1:6379> strlen key1
自增1:
127.0.0.1:6379> incr key  自减1:
127.0.0.1:6379> dect key
指定增量:
127.0.0.1:6379> incrby key 10
指定减量:
127.0.0.1:6379> decrby key 10
获取字符串指定范围:
127.0.0.1:6379> GETRANGE key 0 3 #[0,3]
替换指定位置开始的字符串:
127.0.0.1:6379> SETRANGE key 1 xx
设置过期时间:
#setex(set with expire) # 设置过期时间
127.0.0.1:6379> setex key 30 "hello"
#setnx(set if not exist) # 不存在设置(分布式锁中常常使用)
127.0.0.1:6379> setnx key "redis"
批量set、get
#mset
127.0.0.1:6379> mset k1 v1 k2 v2 k3 v3
#msetnx
127.0.0.1:6379> msetnx k1 v1 k4 v4 #原子性,要么全成功,要么全失败
#对象
127.0.0.1:6379> set user:1{name:zhangsan,zge:3}
#user:{id}:{filer}
getset #先get然后再set
127.0.0.1:6379> getset db redis
1.#如果不存在值,则返回nil
2.#如果存在值,则返回原来的值
List
List的数据结构为快速链表quickList
首先在列表元素较少的情况请下会使用一块连续的内存储存,这个结构是ziplist,即是压缩列表
它将所有的元素紧挨着一起储存,分配的是一块连续的内存
当数据量比较多的时候才会改成quickList
因为普通的链表需要的附加指针空间太大,会比较浪费空间,比如这个列表里存的是int类型的数据,结构上还需要两个额外的指针prev和next
在redis里面,我们可以把list当成是对栈、队列、阻塞队列的操作
所有list命令都是用l开头的
# LPUSH
127.0.0.1:6379> LPUSH list one # 将一个值或多个值,插入到列表头部(左)
(integer) 1
127.0.0.1:6379> LPUSH list two
(integer) 2
127.0.0.1:6379> LPUSH list three
(integer) 3
############################################################
# LRANGE
127.0.0.1:6379> LRANGE list 0 -1 # 获取list中所有值
1) "three"
2) "two"
3) "one"
127.0.0.1:6379> LRANGE list 0  1 # 通过区间获取具体的值
1) "three"
2) "two"
127.0.0.1:6379> LRANGE list 0  2
1) "three"
2) "two"
3) "one"
############################################################
# RPUSH、LPOP、RPOP
127.0.0.1:6379> RPUSH list right # 将一个值或多个值,插入到列表尾部(右)
(integer) 4
127.0.0.1:6379> LRANGE list 0 -1
1) "three"
2) "two"
3) "one"
4) "right"
127.0.0.1:6379> LPOP list # 移除list的第一个元素
"three"
127.0.0.1:6379> RPOP list
"right"
127.0.0.1:6379> LRANGE list 0 -1 # 移除list的最后一个元素
1) "two"
2) "one"
127.0.0.1:6379>
############################################################
# LINDEX、LPUSH、LLEN
127.0.0.1:6379> lindex list 1 # 通过下标获得list 中的某一个值
"one"
127.0.0.1:6379> lindex list 0
"two"
127.0.0.1:6379>
127.0.0.1:6379> Lpush list one
(integer) 1
127.0.0.1:6379> Lpush list two
(integer) 2
127.0.0.1:6379> Lpush list three
(integer) 3
127.0.0.1:6379> Llen list # 获取list长度
(integer) 3
127.0.0.1:6379> Lpush list thre
(integer) 4
127.0.0.1:6379> LRANGE list 1 -1
1) "three"
2) "two"
3) "one"
127.0.0.1:6379> LRANGE list 0 -1
1) "thre"
2) "three"
3) "two"
4) "one"
############################################################
# LREM
127.0.0.1:6379> Lrem list 1 thre # 移除列表列表中一个元素为thre
(integer) 1
127.0.0.1:6379> Lpush list three
(integer) 4
127.0.0.1:6379> LRANGE list 0 -1
1) "three"
2) "three"
3) "two"
4) "one"
127.0.0.1:6379> Lrem list 2 three
(integer) 2
127.0.0.1:6379> LRANGE list 0 -1
1) "two"
2) "one"
trim 修剪;list截断
# LTRIM
127.0.0.1:6379> keys *
(empty array)
127.0.0.1:6379> Rpush mylist "hello"
(integer) 1
127.0.0.1:6379> Rpush mylist "hello1"
(integer) 2
127.0.0.1:6379> Rpush mylist "hello2"
(integer) 3
127.0.0.1:6379> Rpush mylist "hello3"
(integer) 4
127.0.0.1:6379> ltrim mylist 1 2 # 截取下标指定的长度,其他被截断
OK
127.0.0.1:6379> LRANGE mylist 0 -1
1) "hello1"
2) "hello2"
############################################################
RPOPLPUSH
127.0.0.1:6379> rpush mylist "hello"
(integer) 1
127.0.0.1:6379> rpush mylist "hello1"
(integer) 2
127.0.0.1:6379> rpush mylist "hello2"
(integer) 3
127.0.0.1:6379> rpoplpush mylist myotherlist # 移除最后一个元素并将它移入新的列表中
"hello2"
127.0.0.1:6379> LRANGE mylist 0 -1
1) "hello"
2) "hello1"
127.0.0.1:6379> LRANGE myotherlist 0 -1
1) "hello2"
############################################################
# LSET
127.0.0.1:6379> exists list
(integer) 0
127.0.0.1:6379> lset list 0 item # 如果不存在列表我们去更新就会报错
(error) ERR no such key
127.0.0.1:6379> LPUSH list value1
(integer) 1
127.0.0.1:6379> LRANGE list 0 0
1) "value1"
127.0.0.1:6379> LRANGE list 0 1
1) "value1"
127.0.0.1:6379> LSET list 0 item # 如果存在,更新当前下标的值
OK
127.0.0.1:6379> LRANGE list 0 0
1) "item"
127.0.0.1:6379> LSET list 1 other # 如果不存在则会报错
(error) ERR index out of range
############################################################
# LINSERT
Linsert # 将某个具体的value插入到列表中某个元素的前面或者后面!
127.0.0.1:6379> RPUSH mylist "hello"
(integer) 1
127.0.0.1:6379> RPUSH mylist "world"
(integer) 2
127.0.0.1:6379> LINSERT mylist before "world" "other"
(integer) 3
127.0.0.1:6379> LRANGE mylist 0 -1
1) "hello"
2) "other"
3) "world"
127.0.0.1:6379> LINSERT mylist after "world" "new"
(integer) 4
127.0.0.1:6379> LRANGE mylist 0 -1
1) "hello"
2) "other"
3) "world"
4) "new"
总结:
list实际是一个链表,before Node after , left , right都可以插入值
如果key不存在,创建新的链表
如果key存在,新增内容
如果移除了所有值,空链表,也代表不存在
在两边插入或者改动值,效率最高,中间元素,相对来说效率会低一点
消息队列 | LpushRpop , 栈 | LpushLpop
Set
Set数据结构是dict字典,字典使用哈希表实现的
Java中HashSet的内部实现使用的是HashMap,只不过所有的value都指向同一个对象
Redis的set结构也是一样,它的内部也使用了hash结构,所有的value都指向同一个内部值
# SADD、SMEMBERS、SISMEMBER、SCARD
127.0.0.1:6379> sadd myset "hello" # set集合添加元素
(integer) 1
127.0.0.1:6379> sadd myset "kuangshen"
(integer) 1
127.0.0.1:6379> sadd myset "world"
(integer) 1
127.0.0.1:6379> SMEMBERS myset # 查看指定set所有值
1) "world"
2) "kuangshen"
3) "hello"
127.0.0.1:6379> SISMEMBER myset "hello" # 判断某一个值是不是在集合set中
(integer) 1
127.0.0.1:6379> SISMEMBER myset "happy"
(integer) 0
127.0.0.1:6379> scard myset # 获取集合set中元素的个数
(integer) 3
127.0.0.1:6379>
############################################################
# SRANDMEMBER
127.0.0.1:6379> SMEMBERS myset
1) "world"
2) "kuangshen"
3) "hello"
127.0.0.1:6379> SRANDMEMBER myset # 随机抽选出一个元素
"hello"
127.0.0.1:6379> SRANDMEMBER myset
"hello"
127.0.0.1:6379> SRANDMEMBER myset
"world"
127.0.0.1:6379> SRANDMEMBER myset
"kuangshen"
127.0.0.1:6379> SRANDMEMBER myset 2 随机抽选出指定个数的元素
1) "kuangshen"
2) "world"
127.0.0.1:6379> SRANDMEMBER myset 2
1) "kuangshen"
2) "hello"
############################################################
# SPOP
127.0.0.1:6379> SMEMBERS myset
1) "world"
2) "kuangshen"
3) "hello"
127.0.0.1:6379> spop myset # 随机删除一些set集合中的元素
"world"
127.0.0.1:6379> spop myset
"kuangshen"
127.0.0.1:6379> SMEMBERS myset
1) "hello"
############################################################
# SMOVE
将一个指定的值,移动到另一个set集合
127.0.0.1:6379> clear
127.0.0.1:6379> sadd myset "hello"
(integer) 1
127.0.0.1:6379> sadd myset "world"
(integer) 1
127.0.0.1:6379> sadd myset "kuangshen"
(integer) 1
127.0.0.1:6379> sadd myset2 "kuangshen"
(integer) 1
127.0.0.1:6379> SMEMBERS myset
1) "kuangshen"
2) "world"
3) "hello"
127.0.0.1:6379> SMEMBERS myset2
1) "kuangshen"
127.0.0.1:6379> SMOVE myset myset2 "hello" # 将一个指定的值,移动到另一个set集合
(integer) 1
127.0.0.1:6379> SMEMBERS myset
1) "kuangshen"
2) "world"
127.0.0.1:6379> SMEMBERS myset2
1) "kuangshen"
2) "hello"
############################################################
# SDIFF、SINTER、SUNION
B站、微博共同关注(并集)
127.0.0.1:6379> sadd key1 a
(integer) 1
127.0.0.1:6379> sadd key1 b
(integer) 1
127.0.0.1:6379> sadd key1 c
(integer) 1
127.0.0.1:6379> sadd key2 a
(integer) 1
127.0.0.1:6379> sadd key2 d
(integer) 1
127.0.0.1:6379> sadd key2 e
(integer) 1
127.0.0.1:6379> SDIFF key1 key2 # 差集 左 - 右
1) "c"
2) "b"
127.0.0.1:6379> SDIFF key2 key1
1) "e"
2) "d"
127.0.0.1:6379> SINTER key1 key2 # 交集
1) "a"
127.0.0.1:6379> SUNION key1 key2 # 并集
1) "a"
2) "c"
3) "b"
4) "e"
5) "d"
Hash
Map集合,key-map 这个值是一个Map,本质和Sring没有太大区别,还是一个简单的key-value
Hash类型对应的数据结构有两种:ziplist(压缩列表)、hashtable(哈希表),当field-value长度交短且个数较少时,使用ziplist,否则使用hashtable
set myhash field kuangshen
# HSET、HGET、HMSET、HMGET、HGETALL
127.0.0.1:6379> hset myhash field1 kuangshen # set 一个具体key-value
(integer) 1
127.0.0.1:6379> hget myhash field1 # 获取一个字段值
"kuangshen"
127.0.0.1:6379> hmset myhash field1 hello field2 world # set 多个key-value
OK
127.0.0.1:6379> hmget myhash field1 field2 # 获取多个字段值
1) "hello"
2) "world"
127.0.0.1:6379> hgetall myhash # 获取全部的数据
1) "field1"
2) "hello"
3) "field2"
4) "world"
############################################################
# HDEL
127.0.0.1:6379> hset myhash field1 hello
(integer) 1
127.0.0.1:6379> hset myhash field2 world
(integer) 1
127.0.0.1:6379> hgetall myhash
1) "field1"
2) "hello"
3) "field2"
4) "world"
127.0.0.1:6379> hdel myhash field1 # 删除hash指定ley字段,对应的value也就消失了
(integer) 1
127.0.0.1:6379> hgetall myhash
1) "field2"
2) "world"
############################################################
# hlen
127.0.0.1:6379> hlen myhash # 获取hash表的字段数量
(integer) 1
############################################################
# HEXISTS
127.0.0.1:6379> HEXISTS myhash field1 #判断hash 中指定的字段是否存在
(integer) 0
127.0.0.1:6379> HEXISTS myhash field2
(integer) 1
############################################################
# HKEYS 、HVALS
只获得所有field,只获得所有value
127.0.0.1:6379> hkeys myhash # 只获得所有field
1) "field2"
127.0.0.1:6379> hvals myhash # 只获得所有value
1) "world"
############################################################
# HINCRBY、HSETNX
127.0.0.1:6379> hset myhash field3 5
(integer) 1
127.0.0.1:6379> HINCRBY myhash field3 1 # 指定增量
(integer) 6
127.0.0.1:6379> HINCRBY myhash field3 -1
(integer) 5
127.0.0.1:6379> HSETNX myhash field4 hello  # 如果value不存在则可以设置
(integer) 1
127.0.0.1:6379> HSETNX myhash field4 world # 如果value存在则不允许设置
(integer) 0
hash变更的数据user name age,尤其是用户信息之类的,经常变动的信息,hash更适合于对象的存储,String更适合字符串存储
Zset
SortedSet(zset)是Redis提供的一个非常特别的数据结构,一方面它等价于Java数据结构Map
查找使用的是跳跃链表
在set的基础上,增加了一个值,增加了一个值,set k1 v1 , zset k1 score1 v1
# ZADD、ZRANGE
127.0.0.1:6379> zadd myset 1 one # 添加一个值
(integer) 1
127.0.0.1:6379> zadd myset 2 two 3 three # 添加多个值
(integer) 2
127.0.0.1:6379> ZRANGE myset 0 -1
1) "one"
2) "two"
3) "three"
############################################################
# ZRANGEBYSCORE
127.0.0.1:6379> zadd salary 2500 xiaohong
(integer) 1
127.0.0.1:6379> zadd salary 5000 zhagsan
(integer) 1
127.0.0.1:6379> zadd salary 500 kuangshen
(integer) 1
127.0.0.1:6379> ZRANGE salary 0 -1  # 显示全部用户,从小到大
1) "zhangsan"
2) "xiaohong"
3) "xiaoming"
127.0.0.1:6379> ZRANGEBYSCORE salary -inf +inf # 显示全部用户 从小到大
1) "kuangshen"
2) "xiaohong"
3) "zhagsan"
127.0.0.1:6379> ZRANGEBYSCORE salary -inf +inf withscores # 从小到大显示全部用户并且附带成绩
1) "kuangshen"
2) "500"
3) "xiaohong"
4) "2500"
5) "zhagsan"
6) "5000"
127.0.0.1:6379> ZRANGEBYSCORE salary -inf 2500 withscores
1) "kuangshen"
2) "500"
3) "xiaohong"
4) "2500"
############################################################
# ZREVRANGE、ZREVRANGEBYSCORE
127.0.0.1:6379> zadd  salary 2500 xiaoming
(integer) 1
127.0.0.1:6379> zadd  salary 1800 xiaohong
(integer) 1
127.0.0.1:6379> zadd salary 1500 zhangsan
(integer) 1
127.0.0.1:6379> ZREVRANGE salary 0 -1 # 显示全部用户,从大到小
1) "xiaoming"
2) "xiaohong"
3) "zhangsan"
127.0.0.1:6379> ZREVRANGEBYSCORE salary +inf -inf # 从大到小显示
1) "xiaoming"
2) "xiaohong"
3) "zhangsan"
127.0.0.1:6379> ZREVRANGEBYSCORE salary +inf -inf withscores # 从大到小显示全部用户并且附带成绩
1) "xiaoming"
2) "2500"
3) "xiaohong"
4) "1800"
5) "zhangsan"
6) "1500"
############################################################
# ZCOUNT
127.0.0.1:6379> zcount salary 1500 3000 # 读取指定区间的用户数量
(integer) 3
总结:
- ZRANGE 后面只能跟 0 -1
- ZRANGEBYSCORE后面只能跟 范围,例如: -inf +inf
十一、三大特殊数据类型
Geospatial地理位置
八命令:
# geoadd 添加地理位置
#规则 两级无法直接添加,我们一般会下载城市数据,直接通过java程序一次性导入
#参数 key 值(经度 纬度 名称)
127.0.0.1:6379> geoadd china:city 116.40 39.90 beijing
(integer) 1
127.0.0.1:6379> geoadd china:city 121.47 31.23 shanghai
(integer) 1
127.0.0.1:6379> geoadd china:city 106.50 29.53 chongqing 114.05 22.52 shengzhen
(integer) 2
127.0.0.1:6379> geoadd china:city 120.16 30.24 hangzhou
(integer) 1
127.0.0.1:6379>
############################################################
#geopos
127.0.0.1:6379> GEOPOS china:city beijing # 获取地理位置坐标
1) 1) "116.39999896287918091"
   2) "39.90000009167092543"
127.0.0.1:6379> GEOPOS china:city shanghai
1) 1) "121.47000163793563843"
   2) "31.22999903975783553"
# GEODIST
两人之间的距离
单位:
- m表示单位为米
- km表示单位为千米
- mi表示单位为英里
- ft表示单位为英尺
# GEODIST
127.0.0.1:6379> GEODIST china:city beijing shanghai # 北京到上海的直径距离
"1067378.7564"
127.0.0.1:6379> GEODIST china:city beijing shanghai km
"1067.3788"
127.0.0.1:6379> GEODIST china:city beijing chongqing km
"1464.0708"
# GEORADIUS [WITHCOORD] [WITHDIST]
127.0.0.1:6379> GEORADIUS china:city 110 30 1000 km # 获取处在某个具体坐标指定半径内的地理位置
1) "chongqing"
2) "xian"
3) "shengzhen"
4) "hangzhou"
127.0.0.1:6379> GEORADIUS china:city 110 30 500 km
1) "chongqing"
2) "xian"
127.0.0.1:6379> GEORADIUS china:city 110 30 500 km withdist
1) 1) "chongqing"
   2) "341.9374"
2) 1) "xian"
   2) "483.8340"
127.0.0.1:6379> GEORADIUS china:city 110 30 500 km withcoord
1) 1) "chongqing"
   2) 1) "106.49999767541885376"
      2) "29.52999957900659211"
2) 1) "xian"
   2) 1) "108.96000176668167114"
      2) "34.25999964418929977"
127.0.0.1:6379> GEORADIUS china:city 110 30 500 km withdist withcoord count 1
1) 1) "chongqing"
   2) "341.9374"
   3) 1) "106.49999767541885376"
      2) "29.52999957900659211"
127.0.0.1:6379> GEORADIUS china:city 110 30 500 km withdist withcoord count 2
1) 1) "chongqing"
   2) "341.9374"
   3) 1) "106.49999767541885376"
      2) "29.52999957900659211"
2) 1) "xian"
   2) "483.8340"
   3) 1) "108.96000176668167114"
      2) "34.25999964418929977"
# GEOHASH
该命令返回11个字符的Geohash字符串
# 将二维的经纬度转换为一维的字符串,如果两个字符串越接近,name则距离越近
127.0.0.1:6379> GEOHASH china:city beijing chongqing
1) "wx4fbxxfke0"
2) "wm5xzrybty0"
GEO 底层的实现原理其实就是Zset,我们可以使用Zset命令来操作geo
127.0.0.1:6379> ZRANGE china:city 0 -1
1) "chongqing"
2) "xian"
3) "shengzhen"
4) "hangzhou"
5) "shanghai"
6) "beijing"
127.0.0.1:6379> ZREM china:city beijing
(integer) 1
127.0.0.1:6379> ZRANGE china:city 0 -1
1) "chongqing"
2) "xian"
3) "shengzhen"
4) "hangzhou"
5) "shanghai"
Hyperloglog基数统计
Redis2.8.9版本就更新了Hyperloglog数据结构
Redis Hyperloglog基数统计的算法
优点:占用的内存是固定,计算2^64不同的元素的技术,只需要费12KB内存,如果要从内存角度来比较,Hyperloglog首选
网页的UV
传统方式:set保存用户的id,然后统计set中的元素数量作为标准判断
0.81%错误率,统计UV任务,可以忽略不计
# PFADD、PFCOUNT、PFMERGE
测试
127.0.0.1:6379> pfadd mykey a b c d e f g h i # 创建第一组元素 key
(integer) 1
127.0.0.1:6379> pfadd mykey2 i j z x c v b n m
(integer) 1
127.0.0.1:6379> pfcount mykey2 # 统计mykey2元素的基数数量
(integer) 9
127.0.0.1:6379> pfmerge mykey3 mykey mykey2 # 合并两组 mykey mykey2 => mykey3 并集
OK
127.0.0.1:6379> pfcount mykey3 # 统计并集中的元素数量
(integer) 15
要使用Hyperloglog,前提是允许容错!
Bitmaps位图场景
位存储
- 统计用户信息,活跃,未活跃,登录,未登录,打卡,365打卡,两个状态的,都可以使用Bitmapes!
Bitmaps位图,数据结构!都是操作二进制位来进行记录,就只有0和1两个状态
- 合理地使用操作位能够有效地提高内存使用率和开发效率
(1)Bitmaps本身不是一种数据类型,实际上它就是字符串(key-value),但是它可以对字符串的位进行操作
(2)Bitmaps单独提供了一套命令,所以在Redis中使用Bitmaps和使用字符串的方法不太相同。可以把Bitmaps想象成一个以位为单位的数组,数组的每个单元只能存储1和0,数组的下标在Bitmaps中叫做偏移量
365天=365bit 1字节=8bit 46个字节左右
测试
# SETBIT、GETBIT
127.0.0.1:6379> setbit sign 0 1 # 设置第一天打卡
(integer) 0
127.0.0.1:6379> setbit sign 1 0
(integer) 0
127.0.0.1:6379> setbit sign 2 1
(integer) 0
127.0.0.1:6379> setbit sign 3 0
(integer) 0
127.0.0.1:6379> setbit sign 3 1
(integer) 0
127.0.0.1:6379> setbit sign 4 1
(integer) 0
127.0.0.1:6379> getbit sign 3 # 查看第三天是否有打卡
(integer) 1
# bitop
(1)格式
bitop and(or/not/xor) <destkey> [key....]
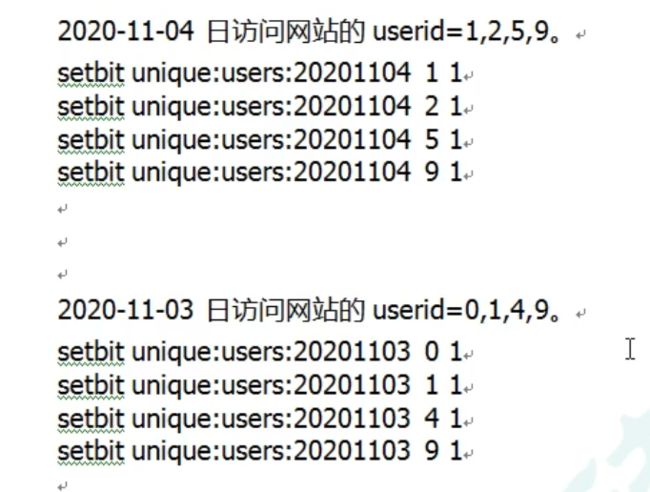
bitop是一个复合操作,它可以做多个Bitmaps的and(交集)、or(并集)、not(非)。
xor(异或)操作并将结果保存在destkey中
- 注:
很多用户的id以一个指定的id开头,直接将用户的id和Bitmaps的偏移量对应势必会造成一定的浪费,通常的做法是每次做setbit操作时将用户id减去这个指定数字。
在第一次初始化Bitmaps时,假如偏移量非常大,那么整个初始化过程执行会比较慢,可能会造成Redis阻塞。
十二、Redis实现乐观锁
监控 Watch(面试常问!)
悲观锁:
- 很悲观,认为什么时候都会出问题,无论做什么都会加锁
- 传统的关系数据库里边就用到这种锁机制,比如行锁、表锁等,读锁、写锁等,都是在做操作之前先上锁
- 实现方法:在sql后面加上 for update或者for update nowait
乐观锁:
- 很乐观,认为什么时候都不会出现问题,所以不会上锁,更新数据的时候去判断一下,在此期间是否有人修改过这个数据,
- 获取version
- 更新的时候比较数据库的version
- 乐观锁于多读的应用类型,这样可以提高吞吐量,Redis就是利用这种check-and-set机制实现事务的。
Redis监视测试
两种之间的差别就是,在并发执行的时候,悲观锁会阻塞,而乐观锁会不执行
执行成功:
127.0.0.1:6379> set money 100
OK
127.0.0.1:6379> set out 0
OK
127.0.0.1:6379> watch money # 监视 money 对象
OK
127.0.0.1:6379> multi # 事务正常结束,数据期间没有发生变动,这个时候就正常执行成功
OK
127.0.0.1:6379(TX)> DECRBY money 20
QUEUED
127.0.0.1:6379(TX)> INCRBY out 20
QUEUED
127.0.0.1:6379(TX)> exec
1) (integer) 80
2) (integer) 20
执行失败:
客户端1:
127.0.0.1:6379> watch money # 监视money
OK
127.0.0.1:6379> multi
OK
127.0.0.1:6379(TX)> DECRBY money 10
QUEUED
127.0.0.1:6379(TX)> INCRBY out 10
QUEUED
127.0.0.1:6379(TX)> exec # 执行之前,另外一个线程,修改了我们的值,这个时候,就会导致事务执行失败
(nil)
127.0.0.1:6379> get money
"1000"
127.0.0.1:6379>
客户端2:
[fangyupeng@hadoop102 ~]$ redis-cli -p 6379
127.0.0.1:6379> get money
"80"
127.0.0.1:6379> set money 1000
OK
原因:watch到脏数据,需要unwatch后再watch
注意:实现乐观锁开启监视必须在开启事务之前!
十三、Redis基本事务操作
Redis事务本质:一组命令的集合,一个事务中的所有命令都会被序列化,在事务执行过程中,会按照顺序执行
一次性、顺序性、排他性,执行一些列的命令
Redis事务的主要作用串联多个命令,防止别的命令插队
- 单独的隔离操作,事务执行过程中不会被客户端发送来的命令请求所打断
- Redis事务没有隔离级别的概念
所有的命令在事务中,并没有直接被执行,只有发起执行命令的时候才会被执行,exec
- Redis单挑命令是保证原子性的,但是事务不保证原子性
redis事务:
- 开启事务(Multi)
- 命令入队(…)
- 执行事务(exec)
正常执行事务
127.0.0.1:6379> multi # 开启事务
OK
127.0.0.1:6379(TX)> set k1 v1
QUEUED
127.0.0.1:6379(TX)> set k2 v2
QUEUED
127.0.0.1:6379(TX)> get k2
QUEUED
127.0.0.1:6379(TX)> set k3 v3
QUEUED
127.0.0.1:6379(TX)> exec # 执行事务
1) OK
2) OK
3) "v2"
4) OK
放弃事务
127.0.0.1:6379(TX)> set k1 v1
QUEUED
127.0.0.1:6379(TX)> set k2 v2
QUEUED
127.0.0.1:6379(TX)> set k4 v4
QUEUED
127.0.0.1:6379(TX)> DISCARD
OK
127.0.0.1:6379> get k4
(nil)
编译型异常(代码有问题,命令有错),事务中所有的命令都不会执行
127.0.0.1:6379> multi
OK
127.0.0.1:6379(TX)> set k1 v1
QUEUED
127.0.0.1:6379(TX)> set k2 v2
QUEUED
127.0.0.1:6379(TX)> set k3 v3
QUEUED
127.0.0.1:6379(TX)> getset k3 # 错误的命令
(error) ERR wrong number of arguments for 'getset' command
127.0.0.1:6379(TX)> set k4 v4
QUEUED
127.0.0.1:6379(TX)> set k5 v5
QUEUED
127.0.0.1:6379(TX)> exec # 所有的命令都不会执行
(error) EXECABORT Transaction discarded because of previous errors.
127.0.0.1:6379> get k5
(nil)
运行时异常(1/0),如果事务队列中存在语法性,那么执行命令的时候,其他命令可以正常执行,错误命令抛出异常
127.0.0.1:6379> set k1 "v1"
OK
127.0.0.1:6379> multi # 开启事务
OK
127.0.0.1:6379(TX)> incr k1 # 失败
QUEUED
127.0.0.1:6379(TX)> set k2 v2
QUEUED
127.0.0.1:6379(TX)> set k3 v3
QUEUED
127.0.0.1:6379(TX)> get k3
QUEUED
127.0.0.1:6379(TX)> exec # 事务可以执行
1) (error) ERR value is not an integer or out of range
2) OK
3) OK
4) "v3"
127.0.0.1:6379> get k2
"v2"
127.0.0.1:6379> get k3
"v3"
127.0.0.1:6379> get k1
"v1"
实现秒杀
- 使用乐观锁(库存遗留问题)
- 使用 lua(解决库存遗留问题)
库存遗留问题:第一个用户成功秒杀时,并发时的其他用户都秒杀失败,就算存在库存,lua作为嵌入式语言,可以使得整个事务具有原子性,不会被其他命令插队,不存在版本号不同问题
十四、通过Jedis操作Redis
依赖:
<dependency>
    <groupId>redis.clientsgroupId>
    <artifactId>jedisartifactId>
    <version>3.6.0version>
dependency>


<dependency>
    <groupId>com.alibabagroupId>
    <artifactId>fastjsonartifactId>
    <version>1.2.62version>
dependency>


<dependency>
    <groupId>org.slf4jgroupId>
    <artifactId>slf4j-nopartifactId>
    <version>1.7.2version>
dependency>
- testList
package com.zhkucst;


import redis.clients.jedis.Jedis;


public class TestList   {
    public static void main(String[] args) {
        Jedis jedis = new Jedis("192.168.10.102",6379);


        jedis.flushDB();
        System.out.println("======添加一个List======");
        jedis.lpush("collections","ArrayList", "Vector","Stack", "HashMap","WeakHashMap","LinkedHashMap");
        jedis.lpush("collections","HashSet");
        jedis.lpush("collections","TreeSet");
        jedis.lpush("collections","TressMap");
        System.out.println("collection的内容:" + jedis.lrange("collections",0, -1));
        System.out.println("============================");
        System.out.println("删除指定元素个数:" + jedis.lrem("collections",2, "HashMao"));
        System.out.println("删除下表0-3区间之外的元素:" + jedis.ltrim("collections",0,3));
        System.out.println("collections的内容:" + jedis.lrange("collections",0, -1));
        System.out.println("collections列表出栈(左端):" + jedis.lpop("collections"));
        System.out.println("collections的内容:" + jedis.lrange("collections",0, -1));
        System.out.println("collections列表出栈(右端 ):" + jedis.rpop("collections"));
        System.out.println("collections的内容:" + jedis.lrange("collections",0, -1));
        System.out.println("修改collections列表指定下标1的内容:" + jedis.lset("collections",1,"UpdateHashSet"));
        System.out.println("collections的内容:" + jedis.lrange("collections",0, -1));
        System.out.println("============================");
        System.out.println("collections的长度:" + jedis.llen("collections"));
        System.out.println("获取collections下标为2的元素:" + jedis.lindex("collections",2));
        System.out.println("============================");
        jedis.lpush("sortedList", "3","6","2","8","7","4");
        System.out.println("sortedList排序前:" + jedis.lrange("sortedList", 0, -1));
        System.out.println(jedis.sort("sortedList"));
        System.out.println("sortedList排序后:" + jedis.lrange("sortedList", 0, -1));


    }
}
- testSet
package com.zhkucst;


import redis.clients.jedis.Jedis;


public class TestSet {
    public static void main(String[] args) {
        Jedis jedis = new Jedis("192.168.10.102", 6379);
        jedis.flushDB();
        System.out.println("======向集合中添加元素(不重复)======");
        System.out.println(jedis.sadd("eleSet","e1","e2","e3","e4","e0","e8","e7","e5"));
        System.out.println(jedis.sadd("eleSet","e6"));
        System.out.println(jedis.sadd("eleSet","e6"));
        System.out.println("eleSet的所有元素为:" + jedis.smembers("eleSet"));
        System.out.println("删除一个元素e0:" + jedis.srem("eleSet","e0"));
        System.out.println("eleSet的所有元素为:" + jedis.smembers("eleSet"));
        System.out.println("删除两个元素e7,e6:" + jedis.srem("eleSet","e7", "e6"));
        System.out.println("eleSet的所有元素为:" + jedis.smembers("eleSet"));
        System.out.println("随机地移除集合中的一个元素:" + jedis.spop("eleSet"));
        System.out.println("随机地移除集合中的一个元素:" + jedis.spop("eleSet"));
        System.out.println("eleSet的所有元素为:" + jedis.smembers("eleSet"));
        System.out.println("eleSet集合中包含的元素个数:" + jedis.scard("eleSet"));
        System.out.println("e3是否在eleSet集合中:" + jedis.sismember("eleSet","e3"));
        System.out.println("e1是否在eleSet集合中:" + jedis.sismember("eleSet","e1"));
        System.out.println("e5是否在eleSet集合中:" + jedis.sismember("eleSet","e5"));
        System.out.println("============================");
        System.out.println("eleSet1:" + jedis.sadd("eleSet1","e1","e2","e4","e3","e0","e8","e7","e5"));
        System.out.println("eleSet2:" + jedis.sadd("eleSet2","e1","e2","e4","e3","e0","e8"));
        System.out.println("eleSet1的元素:" + jedis.smembers("eleSet1"));
        System.out.println("eleSet2的元素:" + jedis.smembers("eleSet2"));
        System.out.println("将eleSet1中删除e1并存入eleSet3:" + jedis.smove("eleSet1","eleSet3","e1"));
        System.out.println("将eleSet1中删除e2并存入eleSet3:" + jedis.smove("eleSet1","eleSet3","e2"));
        System.out.println("eleSet1的元素:" + jedis.smembers("eleSet1"));
        System.out.println("eleSet3的元素:" + jedis.smembers("eleSet3"));
        System.out.println("======集合运算======");
        System.out.println("eleSet1的元素:" + jedis.smembers("eleSet1"));
        System.out.println("eleSet2的元素:" + jedis.smembers("eleSet2"));
        System.out.println("eleSet1与eleSet2的交集:" + jedis.sinter("eleSet1", "eleSet2"));
        System.out.println("eleSet1与eleSet2的并集:" + jedis.sunion("eleSet1","eleSet2"));
        System.out.println("eleSet1与eleSet2的差集:" + jedis.sdiff("eleSet1","eleSet2"));


    }
}
- testHash
package com.zhkucst;


import redis.clients.jedis.Jedis;


import java.util.HashMap;
import java.util.Map;


public class TestHash {
    public static void main(String[] args) {
        Jedis jedis = new Jedis("192.168.10.102", 6379);
        jedis.flushDB();
        Map<String,String> map = new HashMap<>();
        map.put("k1","v1");
        map.put("k2","v2");
        map.put("k3","v3");
        map.put("k4","v4");


        jedis.hmset("hash",map);
        jedis.hset("hash","key5","value5");
        System.out.println("散列hash的所有键值对为:" + jedis.hgetAll("hash"));
        System.out.println("散列hash的所有键:"  + jedis.keys("hash"));
        System.out.println("散列hash的所有值:" + jedis.hvals("hash"));
        System.out.println("将k6保存的值加上一个整数,如果k6不存在则添加k6:" + jedis.hincrBy("hash","key6",6));
        System.out.println("散列hash的所有键值对为:" + jedis.hgetAll("hash"));
        System.out.println("将k6保存的值加上一个整数,如果k6不存在则添加k6:" + jedis.hincrBy("hash","key6",3));
        System.out.println("散列hash的所有键值对为:" + jedis.hgetAll("hash"));
        System.out.println("删除一个或多个键值对:" + jedis.hdel("hash","k2"));
        System.out.println("散列hash的所有键值对为:" + jedis.hgetAll("hash"));
        System.out.println("散列表hash中键值对个数:" + jedis.hlen("hash"));
        System.out.println("判断hash中是否存在k2:" + jedis.hexists("hash","k2"));
        System.out.println("判断hash中是否存在k3:" + jedis.hexists("hash","k3"));
        System.out.println("获取hash中k3的值:" + jedis.hmget("hash","k2"));
        System.out.println("获取hash中k2、k3的值:" + jedis.hmget("hash","k2","k3"));


    }
}
十五、通过Jedis操作事务
TestTX.jar
package com.zhkucst;


import com.alibaba.fastjson.JSONObject;
import redis.clients.jedis.Jedis;
import redis.clients.jedis.Transaction;


public class TextTX {
    public static void main(String[] args) {
        Jedis jedis = new Jedis("192.168.10.102",6379);


        JSONObject jsonObject = new JSONObject();
        jsonObject.put("hello","world");
        jsonObject.put("name","zhangsan");


        jedis.flushDB();
        System.out.println("开启事务...");
        Transaction multi = jedis.multi();


        //jedis.watch();//开启监视
        // .....
        //jedis.unwatch();关闭监视
        try {
            String result = jsonObject.toJSONString();


            multi.set("user1",result);
            multi.set("user2",result);
            int i = 1/0;
            multi.exec();
        } catch (Exception exception) {
            multi.discard();
            exception.printStackTrace();//放弃事务
        } finally {
            System.out.println(jedis.get("user1"));
            System.out.println(jedis.get("user2"));
            jedis.close();//关闭连接
        }


    }
}
十六、自定义RedisTemplate
通过自动配置类源码:
/*
 * Copyright 2012-2020 the original author or authors.
 *
 * Licensed under the Apache License, Version 2.0 (the "License");
 * you may not use this file except in compliance with the License.
 * You may obtain a copy of the License at
 *
 *      https://www.apache.org/licenses/LICENSE-2.0
 *
 * Unless required by applicable law or agreed to in writing, software
 * distributed under the License is distributed on an "AS IS" BASIS,
 * WITHOUT WARRANTIES OR CONDITIONS OF ANY KIND, either express or implied.
 * See the License for the specific language governing permissions and
 * limitations under the License.
 */


package org.springframework.boot.autoconfigure.data.redis;


import org.springframework.boot.autoconfigure.EnableAutoConfiguration;
import org.springframework.boot.autoconfigure.condition.ConditionalOnClass;
import org.springframework.boot.autoconfigure.condition.ConditionalOnMissingBean;
import org.springframework.boot.autoconfigure.condition.ConditionalOnSingleCandidate;
import org.springframework.boot.context.properties.EnableConfigurationProperties;
import org.springframework.context.annotation.Bean;
import org.springframework.context.annotation.Configuration;
import org.springframework.context.annotation.Import;
import org.springframework.data.redis.connection.RedisConnectionFactory;
import org.springframework.data.redis.core.RedisOperations;
import org.springframework.data.redis.core.RedisTemplate;
import org.springframework.data.redis.core.StringRedisTemplate;


/**
 * {@link EnableAutoConfiguration Auto-configuration} for Spring Data's Redis support.
 *
 * @author Dave Syer
 * @author Andy Wilkinson
 * @author Christian Dupuis
 * @author Christoph Strobl
 * @author Phillip Webb
 * @author Eddú Meléndez
 * @author Stephane Nicoll
 * @author Marco Aust
 * @author Mark Paluch
 * @since 1.0.0
 */
@Configuration(proxyBeanMethods = false)
@ConditionalOnClass(RedisOperations.class)
@EnableConfigurationProperties(RedisProperties.class)
@Import({ LettuceConnectionConfiguration.class, JedisConnectionConfiguration.class })
public class RedisAutoConfiguration {


   @Bean
   @ConditionalOnMissingBean(name = "redisTemplate")
   @ConditionalOnSingleCandidate(RedisConnectionFactory.class)
   public RedisTemplate<Object, Object> redisTemplate(RedisConnectionFactory redisConnectionFactory) {
      RedisTemplate<Object, Object> template = new RedisTemplate<>();
      template.setConnectionFactory(redisConnectionFactory);
      return template;
   }


   @Bean
   @ConditionalOnMissingBean
   @ConditionalOnSingleCandidate(RedisConnectionFactory.class)
   public StringRedisTemplate stringRedisTemplate(RedisConnectionFactory redisConnectionFactory) {
      StringRedisTemplate template = new StringRedisTemplate();
      template.setConnectionFactory(redisConnectionFactory);
      return template;
   }


}
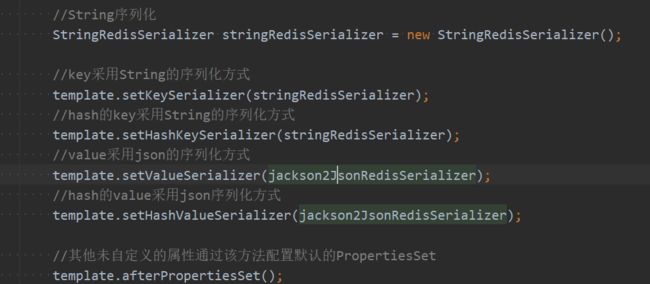
可知,Redis可以自定义配置类,来实现序列化
- 通过接口 public interface RedisSerializer 的实现类分析,有几种序列化方式
- pojo类实现接口Serializable以实现能够序列化对象
- 自定义RedisTemplate
package com.zhkucst.conf;
import com.fasterxml.jackson.annotation.JsonAutoDetect;
import com.fasterxml.jackson.annotation.PropertyAccessor;
import com.fasterxml.jackson.databind.ObjectMapper;
import org.springframework.context.annotation.Bean;
import org.springframework.context.annotation.Configuration;
import org.springframework.data.redis.connection.RedisConnectionFactory;
import org.springframework.data.redis.core.RedisTemplate;
import org.springframework.data.redis.serializer.Jackson2JsonRedisSerializer;
import org.springframework.data.redis.serializer.StringRedisSerializer;
@Configuration
public class RedisConfig {
@Bean
//抑制所有警告
@SuppressWarnings("all")
public RedisTemplate<String, Object> redisTemplate(RedisConnectionFactory redisConnectionFactory) {
//一般使用- 测试
    @Test
    public void test() throws JsonProcessingException {
        User user = new User("张三",23);
        //String jsonUser = new ObjectMapper().writeValueAsString(user);


        redisTemplate.opsForValue().set("user", user);


        System.out.println(redisTemplate.opsForValue().get("user"));
    }


}
十七、Redis配置文件详解
单位
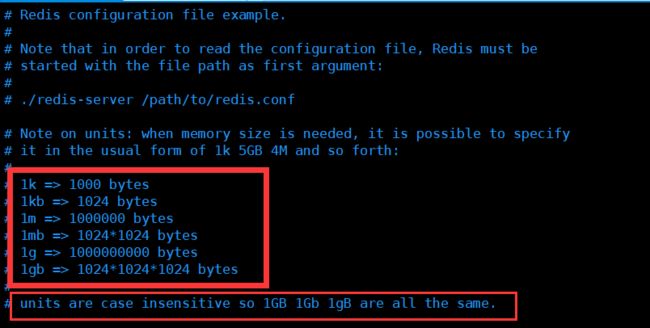
1.配置文件unit单位对大小写不敏感,只支持byte,不支持bit
包含
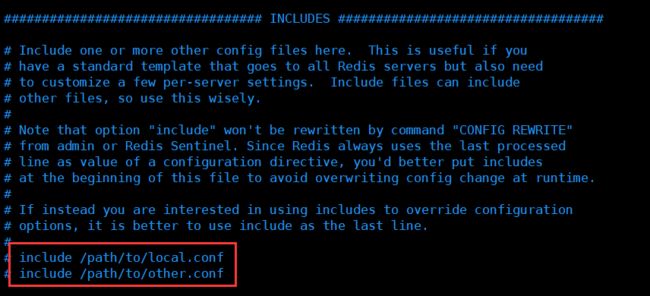
好比我们学习Spring、Import、include
网络
bind 127.0.0.1 # 绑定的id
protected-mode yes # 保护模式
port 6379 # 端口设置
通用GENERAL
daemonize yes # 以守护进程的方式进行,默认是no,我们需要自己开启为yes
pidfile /var/run/redis_6379.pid #如果以后台的方式运行,我们需要指定一个pid文件
# 日志
# Specify the server verbosity level.
# This can be one of:
# debug (a lot of information, useful for development/testing)
# verbose (many rarely useful info, but not a mess like the debug level)
# notice (moderately verbose, what you want in production probably) 生产模式
# warning (only very important / critical messages are logged)
loglevel notice # 日志文件的通知等级
logfile "/usr/local/bin/klog" # 日志的文件位置名
databases 16 # 数据库的数量, 默认是16个数据库
always-show-logo no # 是否总显示logo
快照
持久化,在规定时间内,执行了多少次操作,则会持久化到文件,rdb.aof
redis是内存数据库,如果没有持久化,那么数据数据断电及失
# 如果900s内,如果至少有1 key进行了修改,我们及进行持久化操作
save 900 1
# 如果300s内,如果至少有10 key进行了修改,我们及进行持久化操作
save 300 10
# 如果60s内,如果至少有10000 key进行了修改,我们及进行持久化操作
save 60 10000
stop-writes-on-bgsave-error yes # 持久化如果出错,是否需要继续工作
rdbcompression yes # 是否压缩rdb文件,需要消耗一些cpu
rdbchecksum yes # 保存rdb文件的时候,进行错误的检查校验
#dir ./ # rdb 文件保存的目录,默认为启动服务时的当前路径,最好改成绝对路径
 dir /usr/local/bin/krdb
REPLICATION复制,主从复制
详见十九篇:Redis主从复制
SECURITY 安全
可以在这里设置redis的密码,默认是没有密码
# root
127.0.0.1:6379> ping
PONG
127.0.0.1:6379> config get requirepass # 获取redis的密码
1) "requirepass"
2) ""
127.0.0.1:6379> config set requirepass "123456" # 设置redis的密码
OK
127.0.0.1:6379> config get requirepass
1) "requirepass"
2) "123456"
# localhost
127.0.0.1:6379> config get requirepass
(error) NOAUTH Authentication required.
127.0.0.1:6379> ping
(error) NOAUTH Authentication required.
127.0.0.1:6379> auth 123456 # 使用密码进行登录
OK
127.0.0.1:6379> config get requirepass
1) "requirepass"
2) "123456"
限制CLIENTS
maxclients 10000MEMORY MANAGEMENT 内存处理策略
maxmemory <bytes> # redis配置最大内存容量
maxmemory-policy noeviction # 内存到达上限后的处理策略
1、volatile-lru -> Evict using approximated LRU(Least Recently Used), only keys with an expire set.
  # 只对设置了过期时间的key 进行LRU(默认值)
2、allkeys-lru -> Evict any key using approximated LRU.
  # 删除LRU算法的key
3、volatile-lfu -> Evict using approximated LFU(Least Frequently Used), only keys with an expire set.
  # 只对设置了过期时间的key 进行LFU
4、allkeys-lfu -> Evict any key using approximated LFU.
  # 删除LFU算法的key
5、volatile-random -> Remove a random key having an expire set.
  # 随机删除即将过期的key
6、allkeys-random -> Remove a random key, any key.
  # 随机删除
7、volatile-ttl -> Remove the key with the nearest expire time (minor TTL)
  # 删除即将过期的
8、noeviction -> Don't evict anything, just return an error on write operations.
  # 永不过期,返回错误


# LRU means Least Recently Used
# LFU means Least Frequently Used
APPEND ONLY MODE aof模式
appendonly no # 默认是不开启aof模式,默认是是rdb方式持久化,在大部分所有的情况下,rdb够用
appendfilename "appendonly.aof" # 持久化的文件的名字


# appendfsync always # 每次修改都会sync,消耗性能
appendfsync everysec # 每秒执行 sync, 可能会丢失1s的数据
# appendfsync no # 不执行 sync, 这个时候操作系统自己同步数据,速度更快
十八、持久化-RDB操作
什么是RDB?
查找文件名:root@hadoop102 bin# find / -name dump.rdb
查找配置文件中的配置,命令:config get dir
save 和 bgsave
save:save时只管保存,其他不管,全部阻塞,手动保存,不建议
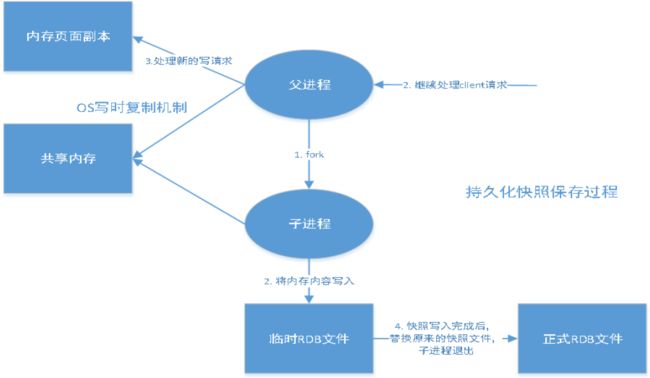
bgsave:Redis会在后台异步进行快照操作,快照同时还可以响应客户端请求
生成RDB的方式:
- 满足save规则,会自动触发rdb规则
- FLUSHALL命令,触发rdb规则
- shutdown,退出redis,产生rdb文件
恢复RDB文件
- 步骤
- 只需将rdb文件放在redis启动目录,即配置文件中指定的dir路径:
127.0.0.1:6379> config get dir
1) "dir"
2) "/usr/local/bin" # 如果在该目录下存在dump.rdb,启动redis会自动恢复其中的数据,放到内存中
- redis启动后会自动检查demp.rdb恢复其中的数据
- 优点
- 适合大规模的数据恢复
- 对数据的完整性要求不高
- 节省磁盘空间
- 恢复速度快
- 缺点
- 需要一定的时间间隔进程操作,如果redis意外死机了,这个最后一次修改的数据就没有了。(因为rdb持久化操作是先保存在了临时文件中,这是宕机那临时文件也就不能替换原来的rdb文件,导致最后一次持久化操作数据丢失)
- fork进程的时候,会占用一定的内容空间,内存中的数据被克隆了一份,大致2倍的膨胀性需要考虑
- 虽然Redis在fork时使用了写时拷贝技术,但是如果数据庞大时还是比较消耗性能
其他配置
- stop-writes-on-bgsave-error
当Redis无法写入磁盘的话,直接关掉Redis的写操作,推荐yes
- rdbcompression压缩文件
对于存储到磁盘中的快照,可以设置是否进行压缩存储,如果是的话,redis会采用LZF算法进行压缩,默认是yes
- rdbchecksum检查完整性
在存储快照后,还可以让redis使用CRC64算法来进行数据校验
十九、持久化-AOF操作
什么是AOF?(Append Only File)
aof保存的是 appendonly.aof文件
默认是不开启的,我们需要手动配置,我们只需将 appendonly 改为 yes 就开启了 aof
如果这个aof文件有错误,这时候redis是启动不起来的,我们需要修复这个aof文件
redis给我们提供了一个工具 redis-check-aof
appendonly no # 默认是不开启aof模式,默认使用rdb方式持久化,在大部分情况下,有rdb就够了
appendfilename "appendonly.aof" # 持久化的文件名


appendfsync always # 每次修改都会sync ,消耗性能
appendfsync everysec # 每秒执行一次 sync,可能会丢失1s的数据
appendfsync no # 不执行sync,这个时候操作系统自己同步数据,速度更快
AOF和RDB同时开启,系统默认取AOF的数据(数据不会存在丢失)
AOF和RDB所在的目录在同一个位置
开启AOF进行备份时要先关闭redis或开启后重启redis,配置才会生效
重启redis便会加载aof文件进行恢复,文件损坏会启动失败
修复AOF文件
redis-check-aof --fix krdb/appendonly.aof
重写规则说明
aof默认就是文件的无限追加,文件会越来越大
no-appendfsync-on-rewrite no


auto-aof-rewrite-percentage 100
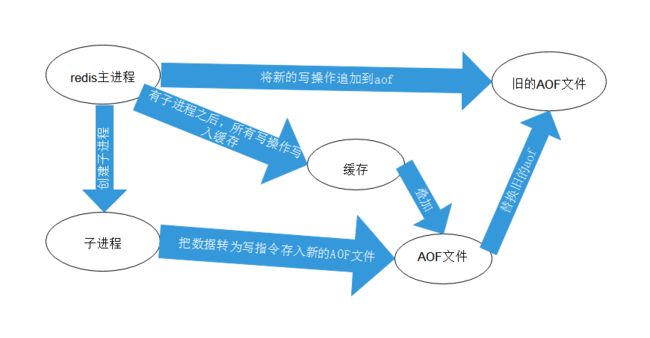
auto-aof-rewrite-min-size 64mb # 如果aof文件大于64m,太大了,fork一个新的进程来将我们的文件进行重写
优点和缺点
- 优点
- 每一次修改都同步,文件的完整性会更加好
- 每秒同步一次,可能会丢失一秒的数据
- 从不同步,效率最高
- 缺点
- 相对于数据文件来说,aof远远大于rdb,恢复的速度比rdb慢
- aof运行效率要比rdb慢,所以我们redis默认的配置就是rdb持久化
二十、Redis主从复制
概念
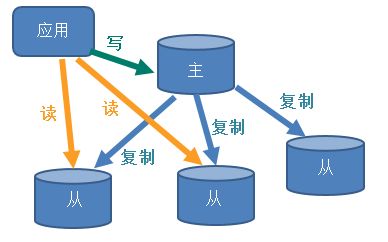
主从复制,是指将一台redis服务器的数据,复制到其他Redis服务器,前者称为主节点(master/leader),后者称为从节点(slaver/follower),数据的复制是单向的,只能从主节点到从节点,Master以写为主,Slaver以读为主。
默认情况下,每套Redis服务器都是主节点,且一个主节点可以有多个从节点(或没有从节点),但一个从节点只能有一个主节点。
三种实现方式:
- 一主二仆
- 薪火相传
- 反客为主
主从复制的作用主要包括:
- 数据冗余:主从复制实现了数据的热备份,是持久化之外的一种数据冗余方式;
- 故障恢复:当主节点出现问题时,可以由从节点提供服务,实现快速的故障恢复;实际上是一种服务的冗余;
- 负载均衡:在主从复制的基础上,配合读写分离,可以由主节点提供写服务,从节点提供度服务(即写Redis数据是应用连接主节点,读Redis数据是应用连接从节点),分担服务器负载;尤其是在写少读多的场景下,通过多个从节点分担负载,可以大大提高Redis服务器的并发量。
- 高可用基石:除了上述作用以外,主从复制还是哨兵和集群能够实施的基础,因此说主从复制是Redis高可用的基础。
一般来说,要将Redis运用于工程项目中,只使用一台Redis是万万不能的,原因如下:
- 从结构上,单个Redis服务器会发生单点故障,并且一台服务器需要处理所有的请求负载,压力较大;
- 从容量上,单个Redis服务器内存容量有限,就算一台Redis服务器内存容量为256G,也不能将所有内存用作Redis存储内存,一般来说,单台Redis最大使用内存不应该超过20G。
电商网站上的商品,一般都是一次上传,无数次浏览的,说专业点就算“多读少写”
对于这种场景,我们可以使用如下这种结构
主从复制、读写分离!
查看主从复制中主机的角色
info replication
认定主机
- 是需要在需要作为从机上命令:
127.0.0.1:6381> SLAVEOF 127.0.0.1 6379 # 这种方式是暂时性的
- 永久配置在从机配置文件redis.conf中配置:
replicaof 127.0.0.1 6379 # 配置认定主机ip 地址和 port端口号
复制原理
Slaver启动成功连接到master后会发送一个sync同步命令
master街道命令,启动后台的存盘进程,同时手机所有接收到的用于修改数据集命令,在后台进程执行完毕之后,master将传送整个数据文件到slave,并完成一次完全同步。
全量复制:而slave服务在接收到数据库数据文件后,将其存盘并加载在内存中。
增量复制:master继续将新的所有收集到的修改命令依次传给slave,完成1同步
但是只要是重新连接master,一次完成同步(全量复制)将自动执行,我们的数据可以在从机中看到
二十一、Redis发布订阅
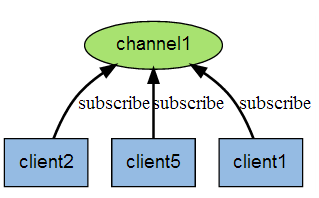
Redsi发布订阅(pub/sub)是一种消息通信模式,发送者(pub)发送消息,订阅者(sub)接收信息,微信、微博、关注系统
Redis客户端可以订阅任意数量的频道
第一个:消息发送者,第二个:频道,第三个:消息订阅者
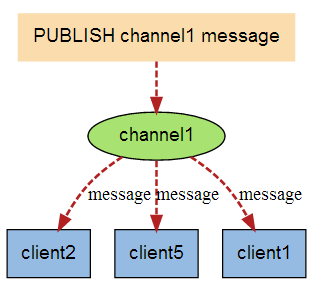
下图展示了频道channel1,以及订阅这个频道的三个客户端–client2、client5、client1之间的关系
当有新消息通过PUBLISH命令发送给频道channel1时,这个消息就会被发送给订阅它的三个客户端
命令
这些命令广泛用于构建即时通讯应用,比如网络聊天室(chatroom)和实时广播、实时提醒等
| 序号 | 命令及描述 |
|---|---|
| 1 | [PSUBSCRIBE pattern pattern …] 订阅一个或多个符合给定模式的频道。 |
| 2 | [PUBSUB subcommand argument [argument …]] 查看订阅与发布系统状态。 |
| 3 | PUBLISH channel message 将信息发送到指定的频道。 |
| 4 | [PUNSUBSCRIBE pattern [pattern …]] 退订所有给定模式的频道。 |
| 5 | [SUBSCRIBE channel channel …] 订阅给定的一个或多个频道的信息。 |
| 6 | [UNSUBSCRIBE channel [channel …]] 指退订给定的频道。 |
测试
发送端:
127.0.0.1:6379> PUBLISH kuangshenshuo "hello,kuangshen" # 发布者发布消息到频道
(integer) 1
127.0.0.1:6379> PUBLISH kuangshenshuo "hello,redis" # 发布者发布消息到频道
(integer) 1
订阅端:
127.0.0.1:6379> SUBSCRIBE kuangshenshuo # 订阅一个频道 kuangshenshuo
Reading messages... (press Ctrl-C to quit)
1) "subscribe"
2) "kuangshenshuo"
3) (integer) 1
# 等待读取推送的消息
1) "message" # 消息
2) "kuangshenshuo" # 哪个频道的消息
3) "hello,kuangshen" # 消息的具体内容
1) "message"
2) "kuangshenshuo"
3) "hello,redis"
原理
Redis是实验C实现的,通过分析Redis源码里的pubsub.c文件,了解了发布和订阅机制的底层实现,借此加深对Redis的理解。
Redis通过PUBLISH、SUBSCRIBE和PSUBSCRIBE实现发布和订阅功能。
微信:
通过SUBSCRIBE命令订阅某频道后,redis-server里维护了一个字典,字典的键就是一个个频道,而字典的值则是一个链表,链表中保存了所有订阅这个channel的客户端。SUBSCRIBE命令的关键,就是将客户端添加到给定channel的订阅链表中。
通过PUBLISH命令向订阅者发送消息,redis-server会使用给定的频道作为键,在她所维护的channel字典中查找记录了订阅这个频道的所有客户端的链表,遍历这个链表,将消息发布给所有订阅者。
Pub/Sub从字面上理解就是发布(Publish)与订阅(Subcribe),在Redis中,你可以设定对某一个key值进行消息发布及消息订阅,当一个key值上进行了消息发布后,所有订阅它的客户端会收到相应的消息,这一功能最明显的用法就是用作实时消息系统,比如普通的即时聊天,群聊等功能。
二十二、集群环境搭建
环境配置
- 只配置从库,不配置主库
复制3个配置文件,然后修改对应的信息
- include /usr/local/bin/kconfig/redis.conf #包含默认配置,下面的配置会覆盖
- 端口
- pid名
- log文件名
- dump.rdb名
- cluster-enabled yes 打开集群模式
- cluster-config-file nodes-6379.conf 设定节点配置文件名
- cluster-node-timeout 15000 设定节点失联时间,超过该时间(毫秒),集群自动进行主从切换
- vim全局替换脚本
:%s/6379/6380
什么是插槽
插槽是Redis对Key进行分片的单元。在Redis的集群实现中,内置了数据自动分片机
制,集群内部会将所有的key映射到16384个插槽中,集群中的每个数据库实例负责其中部
分的插槽的读写。
合体(初始集群主从节点)
cd /opt/module/redis-6.2.4/src
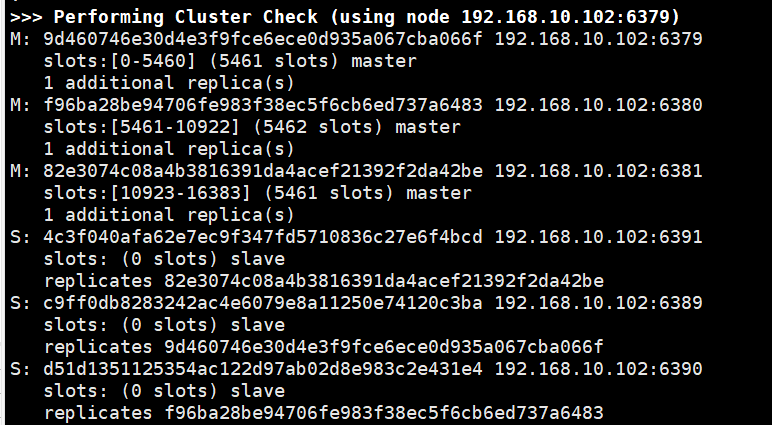
redis-cli --cluster create --cluster-replicas 1 192.168.10.102:6379 192.168.10.102:6380 192.168.10.102:6381 192.168.10.102:6389 192.168.10.102:6390 192.168.10.102:6391
此处不要用127.0.0.1,请用真实ip地址
–replicas 1 采用最简单的方式配置集群 一台主机,一台从机,正好三组
一个Redis集群包含16384个插槽(hash slot),数据库中的每个键都属于这16384个插槽的其中一个
集群使用公式CRC16(key) % 16384 来计算键 key 属于哪个槽,其中CRC16(key) 语句用于计算键key的CRC16校验和
集群中的每个节点负责处理一部分插槽,举个例子,如果一个集群可以有主节点,其中
节点A负责处理0-5460号插槽
节点B负责处理5461-10922号插槽
节点C负责处理 10923-16383号插槽
- 查看集群状态:
cluster nodes
- 集群客户端连接加上属性-c,表示以集群(cluster)模式连接
redis-cli -c -h yourhost -p yourpost
- 计算key的插槽值
cluster keyslot k1
- 计算在某个插槽中key的个数(只能在本客户端所在的插槽范围查询到)
cluster countkeysinslot 7629
- 取出在具体插槽值的key
cluster getkeysinslot 7629 1
如果某一段插槽的主从都挂掉,而cluster-require-full-coverage为yes,那么,整个集群都挂掉,也就是该集群要求完整性
如果某一段插槽的主从都挂掉,二cluster-require-full-converage为no,那么,该插槽数据全都不能使用,也无法存储,其他的插槽可以正常使用
Redis集群的不足
多键操作是不被支持的
多键的Redis事务是不被支持的,lua脚本不被支持
由于集群方案出现较晚,很多公司已经采用了其他的集群方案,而代理或者客户端分片的方案想要迁移至redis cluster,需要整体迁移而不是逐步过渡,复杂度较大
二十三、Redis的Jedis开发
代码:
public class RedisClusterDemo {
    public static void main(String[] args) {
        //创建对象
        HostAndPort hostAndPort = new HostAndPort("192.168.10.102", 6379);
        JedisCluster jedisCluster = new JedisCluster(hostAndPort);


        //进行操作
        jedisCluster.set("b1", "value1");


        String value = jedisCluster.get("b1");
        System.out.println(value);


    }
}
二十四、宕机后手动配置主机
如果出现master断开了连接,这个时候能不能选择一个老大处理呢?手动配置
如果主机断开连接,我们可以使用 slaveof no one 来让自己变成主机,其他节点就可以手动连接到最新的这个主节点·
不管之前是通过配置文件认主或者是手动命令认主,都是可以的
主机宕机后,切换主机步骤:
- 找一个想成为主机的,将之设置为master,使用 slaveof no one
- 在其他端口节点上 认主slaveof id地址 端口号
注意:
- 原来的主机恢复后,将是一个独立的master,不会再与其他节点连接
- 手动配置后,再次启动Redis还会生效
二十五、哨兵模式
概述(自动选举老大)
主从切换技术的方法是:当主服务器宕机后,需要手动把一台服务器切换为主服务器,这就需要人工干预,费时费力,还会造成一段时间内服务不可用,这不是一种推荐方式,更多时候,我们优先考虑哨兵模式,Redis从2…8开始正式提供了Senntinel(哨兵)架构来解决这个问题。
优先级在redis.conf中默认:replica-priority 100 值越小优先级越高
哨兵模式是一种特殊的模式,首先Redsi提供了哨兵的命令,哨兵是一个独立的进程,作为进程,他会独立运行,其原理是哨兵通过发送命令,等待Redis服务器响应,从而监控运行多个Redis实例。
假设主服务宕机,哨兵1先监测到这个结果,系统并不会马上进行failover过程,仅仅是哨兵1主观的认为服务不可用,这个现象称为主观下线,当后面的哨兵也检测到主服务器不可用,并且数量达到一定值时,那么哨兵之间就会进行一次投票,投票的结果由一个哨兵发起,进行failover故障转移操作,切换成功后,就会通过发布订阅模式,让各个哨兵把自己监控的从服务器实现切换主机,这个过程称为客观下线。
优点
- 能够后台监控主机是否故障,如果故障根据投票数自动将从库转换为主库
- 哨兵集群,基于主从复制模式,所有的主从配置优点,它全有
- 主从可以切换,故障可以转移,系统的可用性就会更好
- 哨兵模式就是主从模式的升级,手动到自动,更加健壮
缺点
- Redis 不好在线扩容的,集群容量一旦到达上限,在线扩容就十分麻烦
- 实现哨兵模式的配置其实是很麻烦的,里面有很多选择
哨兵模式的全部配置
# Example sentinel.conf

# 哨兵sentinel实例运行的端口 默认26379
port 26379

# 哨兵sentinel的工作目录
dir /tmp

# 哨兵sentinel监控的redis主节点的 ip port
# master-name  可以自己命名的主节点名字 只能由字母A-z、数字0-9 、这三个字符".-_"组成。
# quorum 当这些quorum个数sentinel哨兵认为master主节点失联 那么这时 客观上认为主节点失联了
# sentinel monitor <master-name> <ip> <redis-port> <quorum>
  sentinel monitor mymaster 127.0.0.1 6379 2

# 当在Redis实例中开启了requirepass foobared 授权密码 这样所有连接Redis实例的客户端都要提供密码
# 设置哨兵sentinel 连接主从的密码 注意必须为主从设置一样的验证密码
# sentinel auth-pass <master-name> <password>
sentinel auth-pass mymaster MySUPER--secret-0123passw0rd


# 指定多少毫秒之后 主节点没有应答哨兵sentinel 此时 哨兵主观上认为主节点下线 默认30秒
# sentinel down-after-milliseconds <master-name> <milliseconds>
sentinel down-after-milliseconds mymaster 30000

# 这个配置项指定了在发生failover主备切换时最多可以有多少个slave同时对新的master进行 同步,这个数字越小,完成failover所需的时间就越长,  但是如果这个数字越大,就意味着越 多的slave因为replication而不可用。可以通过将这个值设为 1 来保证每次只有一个slave 处于不能处理命令请求的状态。
# sentinel parallel-syncs <master-name> <numslaves>
sentinel parallel-syncs mymaster 1


# 故障转移的超时时间 failover-timeout 可以用在以下这些方面:
#1. 同一个sentinel对同一个master两次failover之间的间隔时间。
#2. 当一个slave从一个错误的master那里同步数据开始计算时间。直到slave被纠正为向正确的master那里同步数据时。
#3.当想要取消一个正在进行的failover所需要的时间。
#4.当进行failover时,配置所有slaves指向新的master所需的最大时间。不过,即使过了这个超时,slaves依然会被正确配置为指向master,但是就不按parallel-syncs所配置的规则来了
# 默认三分钟
# sentinel failover-timeout <master-name> <milliseconds>
sentinel failover-timeout mymaster 180000

# SCRIPTS EXECUTION

#配置当某一事件发生时所需要执行的脚本,可以通过脚本来通知管理员,例如当系统运行不正常时发邮件通知相关人员。
#对于脚本的运行结果有以下规则:
#若脚本执行后返回1,那么该脚本稍后将会被再次执行,重复次数目前默认为10
#若脚本执行后返回2,或者比2更高的一个返回值,脚本将不会重复执行。
#如果脚本在执行过程中由于收到系统中断信号被终止了,则同返回值为1时的行为相同。
#一个脚本的最大执行时间为60s,如果超过这个时间,脚本将会被一个SIGKILL信号终止,之后重新执行。

#通知型脚本:当sentinel有任何警告级别的事件发生时(比如说redis实例的主观失效和客观失效等等),将会去调用这个脚本,  这时这个脚本应该通过邮件,SMS等方式去通知系统管理员关于系统不正常运行的信息。调用该脚本时,将传给脚本两个参数,  一个是事件的类型,  一个是事件的描述。  如果sentinel.conf配置文件中配置了这个脚本路径,那么必须保证这个脚本存在于这个路径,并且是可执行的,否则sentinel无法正常启动成功。
#通知脚本
# sentinel notification-script <master-name> <script-path>
  sentinel notification-script mymaster /var/redis/notify.sh

# 客户端重新配置主节点参数脚本
# 当一个master由于failover而发生改变时,这个脚本将会被调用,通知相关的客户端关于master地址已经发生改变的信息。
# 以下参数将会在调用脚本时传给脚本:
# <master-name> <role> <state> <from-ip> <from-port> <to-ip> <to-port>
# 目前<state>总是“failover”,
# <role>是“leader”或者“observer”中的一个。
# 参数 from-ip, from-port, to-ip, to-port是用来和旧的master和新的master(即旧的slave)通信的
# 这个脚本应该是通用的,能被多次调用,不是针对性的。
# sentinel client-reconfig-script <master-name> <script-path>
 sentinel client-reconfig-script mymaster /var/redis/reconfig.sh
# Example sentinel.conf


# *** IMPORTANT ***
#
# By default Sentinel will not be reachable from interfaces different than
# localhost, either use the 'bind' directive to bind to a list of network
# interfaces, or disable protected mode with "protected-mode no" by
# adding it to this configuration file.
#
# Before doing that MAKE SURE the instance is protected from the outside
# world via firewalling or other means.
#
# For example you may use one of the following:
#
# bind 127.0.0.1 192.168.1.1
#
# protected-mode no


# port <sentinel-port>
# The port that this sentinel instance will run on
# 哨兵 sentimel 实例运行的端口 默认 26379
port 26379


# By default Redis Sentinel does not run as a daemon. Use 'yes' if you need it.
# Note that Redis will write a pid file in /var/run/redis-sentinel.pid when
# daemonized.
daemonize no


# When running daemonized, Redis Sentinel writes a pid file in
# /var/run/redis-sentinel.pid by default. You can specify a custom pid file
# location here.
pidfile /var/run/redis-sentinel.pid


# Specify the log file name. Also the empty string can be used to force
# Sentinel to log on the standard output. Note that if you use standard
# output for logging but daemonize, logs will be sent to /dev/null
logfile ""


# sentinel announce-ip <ip>
# sentinel announce-port <port>
#
# The above two configuration directives are useful in environments where,
# because of NAT, Sentinel is reachable from outside via a non-local address.
#
# When announce-ip is provided, the Sentinel will claim the specified IP address
# in HELLO messages used to gossip its presence, instead of auto-detecting the
# local address as it usually does.
#
# Similarly when announce-port is provided and is valid and non-zero, Sentinel
# will announce the specified TCP port.
#
# The two options don't need to be used together, if only announce-ip is
# provided, the Sentinel will announce the specified IP and the server port
# as specified by the "port" option. If only announce-port is provided, the
# Sentinel will announce the auto-detected local IP and the specified port.
#
# Example:
#
# sentinel announce-ip 1.2.3.4


# dir <working-directory>
# Every long running process should have a well-defined working directory.
# For Redis Sentinel to chdir to /tmp at startup is the simplest thing
# for the process to don't interfere with administrative tasks such as
# unmounting filesystems.
# 哨兵 sentinel的工作目录
dir /tmp


# sentinel monitor <master-name> <ip> <redis-port> <quorum>
#
# Tells Sentinel to monitor this master, and to consider it in O_DOWN
# (Objectively Down) state only if at least <quorum> sentinels agree.
#
# Note that whatever is the ODOWN quorum, a Sentinel will require to
# be elected by the majority of the known Sentinels in order to
# start a failover, so no failover can be performed in minority.
#
# Replicas are auto-discovered, so you don't need to specify replicas in
# any way. Sentinel itself will rewrite this configuration file adding
# the replicas using additional configuration options.
# Also note that the configuration file is rewritten when a
# replica is promoted to master.
#
# Note: master name should not include special characters or spaces.
# The valid charset is A-z 0-9 and the three characters ".-_".
sentinel monitor mymaster 127.0.0.1 6379 2


# sentinel auth-pass <master-name> <password>
#
# Set the password to use to authenticate with the master and replicas.
# Useful if there is a password set in the Redis instances to monitor.
#
# Note that the master password is also used for replicas, so it is not
# possible to set a different password in masters and replicas instances
# if you want to be able to monitor these instances with Sentinel.
#
# However you can have Redis instances without the authentication enabled
# mixed with Redis instances requiring the authentication (as long as the
# password set is the same for all the instances requiring the password) as
# the AUTH command will have no effect in Redis instances with authentication
# switched off.
#
# Example:
#
# sentinel auth-pass mymaster MySUPER--secret-0123passw0rd


# sentinel auth-user <master-name> <username>
#
# This is useful in order to authenticate to instances having ACL capabilities,
# that is, running Redis 6.0 or greater. When just auth-pass is provided the
# Sentinel instance will authenticate to Redis using the old "AUTH <pass>"
# method. When also an username is provided, it will use "AUTH <user> <pass>".
# In the Redis servers side, the ACL to provide just minimal access to
# Sentinel instances, should be configured along the following lines:
#
#     user sentinel-user >somepassword +client +subscribe +publish \
#                        +ping +info +multi +slaveof +config +client +exec on


# sentinel down-after-milliseconds <master-name> <milliseconds>
#
# Number of milliseconds the master (or any attached replica or sentinel) should
# be unreachable (as in, not acceptable reply to PING, continuously, for the
# specified period) in order to consider it in S_DOWN state (Subjectively
# Down).
#
# Default is 30 seconds.
sentinel down-after-milliseconds mymaster 30000


# IMPORTANT NOTE: starting with Redis 6.2 ACL capability is supported for
# Sentinel mode, please refer to the Redis website https://redis.io/topics/acl
# for more details.


# Sentinel's ACL users are defined in the following format:
#
#   user <username> ... acl rules ...
#
# For example:
#
#   user worker +@admin +@connection ~* on >ffa9203c493aa99
#
# For more information about ACL configuration please refer to the Redis
# website at https://redis.io/topics/acl and redis server configuration
# template redis.conf.


# ACL LOG
#
# The ACL Log tracks failed commands and authentication events associated
# with ACLs. The ACL Log is useful to troubleshoot failed commands blocked
# by ACLs. The ACL Log is stored in memory. You can reclaim memory with
# ACL LOG RESET. Define the maximum entry length of the ACL Log below.
acllog-max-len 128


# Using an external ACL file
#
# Instead of configuring users here in this file, it is possible to use
# a stand-alone file just listing users. The two methods cannot be mixed:
# if you configure users here and at the same time you activate the external
# ACL file, the server will refuse to start.
#
# The format of the external ACL user file is exactly the same as the
# format that is used inside redis.conf to describe users.
#
# aclfile /etc/redis/sentinel-users.acl


# requirepass <password>
#
# You can configure Sentinel itself to require a password, however when doing
# so Sentinel will try to authenticate with the same password to all the
# other Sentinels. So you need to configure all your Sentinels in a given
# group with the same "requirepass" password. Check the following documentation
# for more info: https://redis.io/topics/sentinel
#
# IMPORTANT NOTE: starting with Redis 6.2 "requirepass" is a compatibility
# layer on top of the ACL system. The option effect will be just setting
# the password for the default user. Clients will still authenticate using
# AUTH <password> as usually, or more explicitly with AUTH default <password>
# if they follow the new protocol: both will work.
#
# New config files are advised to use separate authentication control for
# incoming connections (via ACL), and for outgoing connections (via
# sentinel-user and sentinel-pass)
#
# The requirepass is not compatable with aclfile option and the ACL LOAD
# command, these will cause requirepass to be ignored.


# sentinel sentinel-user <username>
#
# You can configure Sentinel to authenticate with other Sentinels with specific
# user name.


# sentinel sentinel-pass <password>
#
# The password for Sentinel to authenticate with other Sentinels. If sentinel-user
# is not configured, Sentinel will use 'default' user with sentinel-pass to authenticate.


# sentinel parallel-syncs <master-name> <numreplicas>
#
# How many replicas we can reconfigure to point to the new replica simultaneously
# during the failover. Use a low number if you use the replicas to serve query
# to avoid that all the replicas will be unreachable at about the same
# time while performing the synchronization with the master.
sentinel parallel-syncs mymaster 1


# sentinel failover-timeout <master-name> <milliseconds>
#
# Specifies the failover timeout in milliseconds. It is used in many ways:
#
# - The time needed to re-start a failover after a previous failover was
#   already tried against the same master by a given Sentinel, is two
#   times the failover timeout.
#
# - The time needed for a replica replicating to a wrong master according
#   to a Sentinel current configuration, to be forced to replicate
#   with the right master, is exactly the failover timeout (counting since
#   the moment a Sentinel detected the misconfiguration).
#
# - The time needed to cancel a failover that is already in progress but
#   did not produced any configuration change (SLAVEOF NO ONE yet not
#   acknowledged by the promoted replica).
#
# - The maximum time a failover in progress waits for all the replicas to be
#   reconfigured as replicas of the new master. However even after this time
#   the replicas will be reconfigured by the Sentinels anyway, but not with
#   the exact parallel-syncs progression as specified.
#
# Default is 3 minutes.
sentinel failover-timeout mymaster 180000


# SCRIPTS EXECUTION
#
# sentinel notification-script and sentinel reconfig-script are used in order
# to configure scripts that are called to notify the system administrator
# or to reconfigure clients after a failover. The scripts are executed
# with the following rules for error handling:
#
# If script exits with "1" the execution is retried later (up to a maximum
# number of times currently set to 10).
#
# If script exits with "2" (or an higher value) the script execution is
# not retried.
#
# If script terminates because it receives a signal the behavior is the same
# as exit code 1.
#
# A script has a maximum running time of 60 seconds. After this limit is
# reached the script is terminated with a SIGKILL and the execution retried.


# NOTIFICATION SCRIPT
#
# sentinel notification-script <master-name> <script-path>
#
# Call the specified notification script for any sentinel event that is
# generated in the WARNING level (for instance -sdown, -odown, and so forth).
# This script should notify the system administrator via email, SMS, or any
# other messaging system, that there is something wrong with the monitored
# Redis systems.
#
# The script is called with just two arguments: the first is the event type
# and the second the event description.
#
# The script must exist and be executable in order for sentinel to start if
# this option is provided.
#
# Example:
#
# sentinel notification-script mymaster /var/redis/notify.sh


# CLIENTS RECONFIGURATION SCRIPT
#
# sentinel client-reconfig-script <master-name> <script-path>
#
# When the master changed because of a failover a script can be called in
# order to perform application-specific tasks to notify the clients that the
# configuration has changed and the master is at a different address.
#
# The following arguments are passed to the script:
#
# <master-name> <role> <state> <from-ip> <from-port> <to-ip> <to-port>
#
# <state> is currently always "failover"
# <role> is either "leader" or "observer"
#
# The arguments from-ip, from-port, to-ip, to-port are used to communicate
# the old address of the master and the new address of the elected replica
# (now a master).
#
# This script should be resistant to multiple invocations.
#
# Example:
#
# sentinel client-reconfig-script mymaster /var/redis/reconfig.sh


# SECURITY
#
# By default SENTINEL SET will not be able to change the notification-script
# and client-reconfig-script at runtime. This avoids a trivial security issue
# where clients can set the script to anything and trigger a failover in order
# to get the program executed.


sentinel deny-scripts-reconfig yes


# REDIS COMMANDS RENAMING
#
# Sometimes the Redis server has certain commands, that are needed for Sentinel
# to work correctly, renamed to unguessable strings. This is often the case
# of CONFIG and SLAVEOF in the context of providers that provide Redis as
# a service, and don't want the customers to reconfigure the instances outside
# of the administration console.
#
# In such case it is possible to tell Sentinel to use different command names
# instead of the normal ones. For example if the master "mymaster", and the
# associated replicas, have "CONFIG" all renamed to "GUESSME", I could use:
#
# SENTINEL rename-command mymaster CONFIG GUESSME
#
# After such configuration is set, every time Sentinel would use CONFIG it will
# use GUESSME instead. Note that there is no actual need to respect the command
# case, so writing "config guessme" is the same in the example above.
#
# SENTINEL SET can also be used in order to perform this configuration at runtime.
#
# In order to set a command back to its original name (undo the renaming), it
# is possible to just rename a command to itself:
#
# SENTINEL rename-command mymaster CONFIG CONFIG


# HOSTNAMES SUPPORT
#
# Normally Sentinel uses only IP addresses and requires SENTINEL MONITOR
# to specify an IP address. Also, it requires the Redis replica-announce-ip
# keyword to specify only IP addresses.
#
# You may enable hostnames support by enabling resolve-hostnames. Note
# that you must make sure your DNS is configured properly and that DNS
# resolution does not introduce very long delays.
#
SENTINEL resolve-hostnames no


# When resolve-hostnames is enabled, Sentinel still uses IP addresses
# when exposing instances to users, configuration files, etc. If you want
# to retain the hostnames when announced, enable announce-hostnames below.
#
SENTINEL announce-hostnames no
测试
我们目前状态是一主二从
- 在/use/local/bin/kconf/中配置哨兵配置文件 sentinel.conf
# sentinel monitor 被监控的名称 host port 1
sentinel monitor myredis 192.168.10.102 6379 1
# 后面的数字1,代表主机挂了,slave投票看让谁接替成为主机,票数最多的,就会成为主机
- 启动哨兵
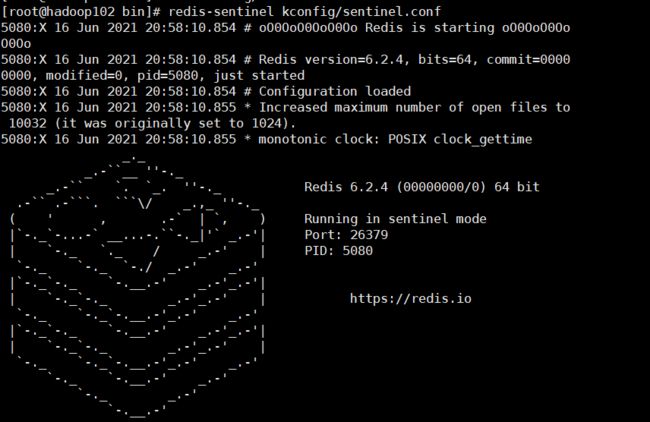
启动成功哨兵进程监听,它会监听所有redis端口
redis-sentinel /usr/local/bin/kconfig/sentinel.conf
监听端口,发现master端口挂了,自动切换从机为主机
将原master恢复,切换原master为新master的从机
从机自动选举成为主机后,sentinel/conf中对主机的监听端口也会从原主机转成新主机
二十六、Redis缓存穿透和雪崩
Redis缓存的使用,极大的提高了应用程序的性能和效率,特别是数据查询方面,但同时,它也带来了一些问题,其中,最要害的问题,就是数据的一致性问题,从严格意义上上讲,这个问题无解,如果对数据的一致性要求很高,那么就不能使用缓存。
另外的一些典型问题就是,缓存穿透、缓存雪崩和缓存击穿。目前业界有都有比较流行的解决方案。
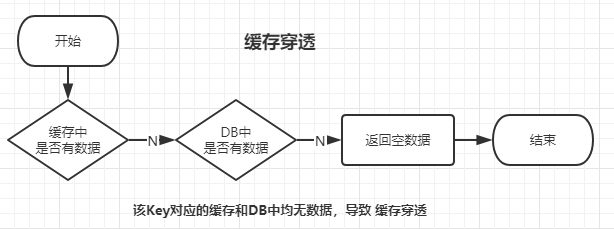
缓存穿透(缓存、DB无数据)
- 概念
缓存穿透的概念很简单,用户想要查询一个数据,发现redis内存数据库没有,也就是缓存没有命中,于是向持久层数据库查询,发现也没有,于是本次查询失败,当用户很多的时候,缓存都没有命中,于是都去请求了持久层数据库,这会给持久层数据库造成很大的压力,这时候就相当于出现了缓存穿透。
- 解决方案
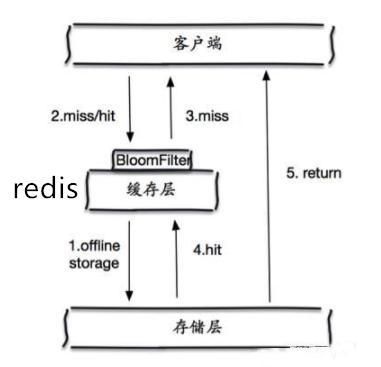
布隆过滤器
布隆过滤器是一种数据结构,对所有可能查询的参数以hash形式存储,在控制层先进行校验,不符合则丢弃,从而避免了对底层存储系统的查询压力;
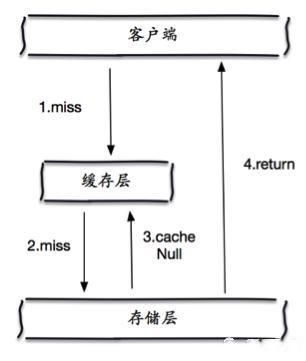
缓存空对象
当存储层不命中后,即使返回的空对象也将其缓存起来,同时会设置一个过期时间,之后再访问这个数据将会从缓存中获取,保护了后端数据源;
但是这种方法存在两个问题
- 如果空值 能够被缓存起来,这就意味着缓存需要更多的空间存储更多的键,因为这当中可能会有很多空值的键;
- 即使对空值设置了过期时间,还是会存在缓存层和存储层的数据会有一段时间窗口的不一致,这对于需要保持一致性的业务会有影响。
设置可访问名单(白名单)
使用bitmaps类型定义一个可以访问额名单,名单id作为bitmaps的偏移量,每次访问和bitmaps里面的id进行比较,如果访问id不在bitmaps里面,进行拦截,不允许访问。
进行实时监控
当发现Redis的命中率开始急速降低,需要排查访问对象和访问的数据,和运维人员配合,可以设置给名单限制服务
缓存击穿(量太大,缓存过期)
- 概述
这里需要注意和缓存击穿的区别,缓存击穿,是指一个key非常热点,在不停的扛着大并发,大并发集中对这一点进行访问,当这个key在失效的瞬间,持续的大并发就穿透缓存,直接请求数据库,就像在一个屏障上凿开了一个洞;
当某个key在过期的瞬间,有大量的请求并发访问,这类数据一般是热点数据,由于缓存过期,会同时访问数据库来查询最新数据,并且会写缓存,会导致数据库瞬间压力过大。
- 解决方案
- 设置热点数据永不过期
从缓存层来看,没有设置过期时间,所有不会出现热点key过期后产生的问题。
- 加互斥锁
分布式锁:使用分布式锁,保证对于每个key同时只有一个线程去查询后端服务,其他线程没有获得分布式锁的权限,因此只需要等待即可,这种方式将高并发的压力转移到了分布式锁,因此对分布式锁的考验很大。
缓存雪崩
- 概念
缓存雪崩,是指在某一个时间段,缓存集中过期失效
产生雪崩的原因之一,比如在写文本的时候,马上就要到双十一零点,很快就会迎来一波抢购,这波商品时间比较集中的放入了缓存,假设缓存一个小时,到了凌晨一点的时候,这批商品的缓存就要过期了,二队这批商品的访问查询,都落到了数据库上,对于数据库而言,就会产生周期性的压力峰值,于是所有的请求都好到达存储层,存储层的调用量会暴增,造成存储层也会挂掉的情况。
其实集中过期,倒不是非常致命的,比较致命的缓存雪崩,是缓存服务器某个节点宕机或断网,因而自然形成的缓存雪崩,一定是在某个时间段集中创建缓存,这个时候,数据库也是可以顶住压力的,无非就是对数据库产生周期性的压力,而缓存服务节点的宕机,对数据库服务器造成的压力是不可预知的,很有可能瞬间就把数据库压垮。
- 解决方案
redis高可用
这个思想的含义是,既然redis有可能挂掉,那我多增设几台redis,这样一台挂掉之后其他的还可以继续工作,其实就是搭建的集群。
限流降级
这个解决方案的思想是,在缓存失效后,通过加锁或者队列来控制读数据库写缓存的线程数量。比如对某个key只允许一个线程查询数据和写缓存,其他线程等待。
数据预热
数据加热的含义就是在正式部署之前,我先把可能的数据先预先访问一遍,这样部分可能大量访问的数据就会加载到缓存中。在即将发生大并发访问前手动触发加载缓存不同的key,设置不同的过期时间,让缓存失效的时间点尽量均匀。
设置过期标志更新缓存
记录缓存数据是否过期(设置提前量),如果过期会触发通知另外的线程在后台去更新实际key的缓存
将缓存失效时间分散开
比如我们可以在原有的失效时间基础上增加一个随机值,比如1-5分钟随机,这样每一个缓存的过期时间的重复率就会降低,就很难引发集体失效的事件
二十七、分布式锁
使用setnx来实现
setnx users 20 # 上锁
expire users 10 # 设置过期时间,防止用户没有释放锁导致出现死锁
- 如果上锁之后突然出现异常,无法设置过期时间
解决:上锁同时设置过期时间
set users 10 nx ex 12
- 测试
public String testLock(){
    //获取锁
    Boolean lock = redisTemplate.opsForValue().setIfAbsent("lock","111",3,TimeUnit.SECONDS);
    //获取锁成功,查询num的值
    if(lock){
        Object value = redisTemplate.opsForValue().get("num");
        //判断num为空return
        if(StringUtils.isEmpty(value)){
            return null;
        }
        //有键值就转成int
        int num = Integer.parseInt(value + "");
        //把redis的num加1
        redisTemplate.opsForValue().set("num", ++num);
        //释放锁,del
        redisTemplate.delete("lock");
        return num + "";


    }else{
        try {
            Thread.sleep(100);
            testLock();
        } catch (InterruptedException e) {
            e.printStackTrace();
        }
        return null;
    }
}
其中:
redisTemplate.opsForValue().setIfAbsent("lock","111",3,TimeUnit.SECONDS);
参数值的过期设置不宜过短,至少要比手动释放锁所花费的时间长,也不宜过长,会导致长时间阻塞,严重影响性能
- 使用并发性能测试工具ab并发访问
[root@localhost]# ab -n 1000 -c 100 http://192.168.56.1:8080/testLock
- 这种锁机制存在的问题(优化uuid防误删)
比如a方先上锁,b方等待a方释放,a上完锁未释放时,出现服务器卡顿导致锁自动释放,此时在等待的b会获取到锁,而a代码未执行完,会手动再去释放b的锁,可能导致不可预料的后果
- 解决方案
获取锁的时候设置锁的value值为uuid,每次释放锁之前先判断是否是自己的锁,避免出现释放别人锁的情况
String uuid = UUID.randomUUID().toString();


Boolean lock = redisTemplate.opsForValue().setIfAbsent("lock",uuid,3,TimeUnit.SECONDS);


//.....


//判断uuid值是否一样
Object lockUuid = redisTemplate.opsForValue().get("lock");
if(lockUuid.equals(uuid)){
    redisTemplate.delete("lock");
}
该方案还是不能做到原子性,即仍然存在隐患:即当a释放锁的时候,这时刚好锁过期,这时b获取到了锁,但a恰好也把b的锁也释放了,所以要彻底解决事件隔离,需要内嵌使用lua 来释放锁,因为lua 具有原子性操作
- 解决方案
String uuid = UUID.randomUUID().toString();
String skuId = "25";
String locKey = "lock" + skuId;
//获取锁
Boolean lock = redisTemplate.opsForValue().setIfAbsent(locKey,uuid,3,TimeUnit.SECONDS);


//....


//使用lua脚本释放锁
//定义lua脚本
String script = "if redis.call('get' , KEYS[1]) == ARGV[1] then return redis.call('del' , KEYS[1]) else " +
        "return 0 end";
//使用redis执行lua脚本
DefaultRedisScript<Long> redisScript = new DefaultRedisScript<>();
redisScript.setScriptText(script);
//设置一下返回值类型 为 Long
//因为删除判断的时候,返回的是0,给其封装为数据类型,如果不封装那么默认返回String类型,
//那么返回字符串与0 会有发生错误
redisScript.setResultType(Long.class);
//第一个要是script脚本,第二个需要判断的key,第三个就是key所对应的值
redisTemplate.execute(redisScript , Arrays.asList(locKey) , uuid);
- 完整代码
public String testLuaLock(){
    String uuid = UUID.randomUUID().toString();
    String skuId = "25";
    String locKey = "lock" + skuId;
    //获取锁
    Boolean lock = redisTemplate.opsForValue().setIfAbsent(locKey,uuid,3,TimeUnit.SECONDS);
    //获取锁成功,查询num的值
    if(lock){  Object value = redisTemplate.opsForValue().get("num");
        //判断num为空return
        if(StringUtils.isEmpty(value)){
            return null;
        }
        //有键值就转成int
        int num = Integer.parseInt(value + "");
        //把redis的num加1
        redisTemplate.opsForValue().set("num", ++num);
        //释放锁,del
       /* //判断uuid值是否一样
        Object lockUuid = redisTemplate.opsForValue().get("lock");
        if(lockUuid.equals(uuid)){
            redisTemplate.delete("lock");
        }*/
        //使用lua脚本释放锁
        //定义lua脚本
        String script = "if redis.call('get' , KEYS[1]) == ARGV[1] then return redis.call('del' , KEYS[1]) else " +
                "return 0 end";
        //使用redis执行lua脚本
        DefaultRedisScript<Long> redisScript = new DefaultRedisScript<>();
        redisScript.setScriptText(script);
        //设置一下返回值类型 为 Long
        //因为删除判断的时候,返回的是0,给其封装为数据类型,如果不封装那么默认返回String类型,
        //那么返回字符串与0 会有发生错误
        redisScript.setResultType(Long.class);
        //第一个要是script脚本,第二个需要判断的key,第三个就是key所对应的值
        redisTemplate.execute(redisScript , Arrays.asList(locKey) , uuid);


        return num + "";


    }else{
        try {
            //其他线程等待
            Thread.sleep(100);
            testLuaLock();
        } catch (InterruptedException e) {
            e.printStackTrace();
        }
        return null;
    }
}
二十八、RedisUtil工具类
package com.zhkucst.utils;


import org.springframework.beans.factory.annotation.Autowired;
import org.springframework.data.redis.core.RedisTemplate;
import org.springframework.stereotype.Component;
import org.springframework.util.CollectionUtils;


import java.util.Collection;
import java.util.List;
import java.util.Map;
import java.util.Set;
import java.util.concurrent.TimeUnit;


/**
 * Redis 工具类
 *
 * @author FYP
 *
 * @data 2021年6月13日
 */


@Component
public class RedisUtil {


    @Autowired
    private RedisTemplate<String, Object> redisTemplate;


    //======================common============================


    /**
     * 指定缓存失效时间
     * @param key 键
     * @param time 时间(秒)
     * @return
     */
    public boolean expire(String key, long time){
        try{
            if(time > 0){
                redisTemplate.expire(key, time, TimeUnit.SECONDS);
            }
            return true;
        }catch (Exception e) {
            e.printStackTrace();
            return  false;
        }
    }


    /**
     * 根据key 获取过期时间
     * @param key 键 不能为null
     * @return 时间(秒) 返回0 代表为永久有效
     */
    public long getExpire(String key){
        return redisTemplate.getExpire(key, TimeUnit.SECONDS);
    }


    /**
     * 判断key是否存在
     * @param key 键
     * @return true 存在 false 不存在
     */
    public boolean hasKey(String key){
        try{
            return redisTemplate.hasKey(key);
        }catch(Exception e){
            e.printStackTrace();
            return false;
        }
    }


    /**
     * 删除缓存
     * @param key 可以传一个值 或多个
     */
    @SuppressWarnings("unchecked")
    public void del(String... key){
        if(key != null && key.length > 0){
            if(key.length == 1){
                redisTemplate.delete(key[0]);
            }else{
                redisTemplate.delete((Collection<String>) CollectionUtils.arrayToList(key));
            }
        }
    }


    //======================String============================


    /**
     * 普通缓存获取
     * @param key 键
     * @return 值
     */
    public Object get(String key){
        return key == null ? null : redisTemplate.opsForValue().get(key);
    }


    /**
     *普通缓存放入
     * @param key 键
     * @param value 值
     * @return true 成功 false 失败
     */
    public boolean set(String key, Object value){
        try {
            redisTemplate.opsForValue().set(key, value);
            return true;
        } catch (Exception e) {
            e.printStackTrace();
            return false;
        }
    }


    /**
     * 普通缓存放入并设置时间
     * @param key 键
     * @param value 值
     * @param time 时间(秒) time 要大于 等于 0,将设置无限制
     * @return true 成功 false 失败
     */
    public boolean set(String key, Object value, long time){
        try {
            if(time > 0){
            redisTemplate.opsForValue().set(key, value, time, TimeUnit.SECONDS);
            }else{
                set(key, value);
            }
            return true;
        } catch (Exception e) {
            e.printStackTrace();
            return false;
        }
    }


    /**
     * 递增
     * @param key 键
     * @param delta △,增量(大于0)
     * @return 增量后的返回值
     */
     public long incr(String key, long delta){
        if(delta < 0){
            throw new RuntimeException("递增因子必须大于0");
        }
        return redisTemplate.opsForValue().increment(key, delta);
     }


    /**
     * 递增
     * @param key 键
     * @param delta △,减量(小于0)
     * @return 减量后的返回值
     */
     public long decr(String key, long delta){
         if(delta < 0){
             throw new RuntimeException("递减因子必须大于0");
         }
         return redisTemplate.opsForValue().increment(key, -delta);
     }


    //======================Map============================


    /**
     * HashGet
     * @param key 键 不能能null
     * @param item 值 不能能null
     * @return
     */
     public Object hget(String key, String item){
         return redisTemplate.opsForHash().get(key, item);
     }


    /**
     * 获取hashKey对应的所有键值
     * @param key 键
     * @return 对应的多个 k-v对
     */
     public Map<Object, Object> hmget(String key){
         return redisTemplate.opsForHash().entries(key);
     }


    /**
     * 向一张hash表中放入数据,如果不存在将创建
     * @param key 键
     * @param item 项
     * @param value 值
     * @return true 成功 false 失败
     */
    public boolean hset(String key, String item, Object value){
        try {
            redisTemplate.opsForHash().put(key, item, value);
            return true;
        } catch (Exception e) {
            e.printStackTrace();
            return false;
        }
    }


    /**
     * 向一张hash表中放入数据,如果不存在将创建
     * @param key 键
     * @param item 项
     * @param value 值
     * @param time 时间(秒)注意:如果已存在的hash表有时间,这里将会替换原有的时间
     * @return true 成功 false 失败
     */
    public boolean hset(String key, String item, Object value, long time){
        try {
            redisTemplate.opsForHash().put(key, item, value);
            if(time > 0){
                expire(key, time);
            }
            return true;
        } catch (Exception e) {
            e.printStackTrace();
            return false;
        }
    }


    /**
     * HashSet
     * @param key 键
     * @param map 对应多个k-v对
     * @return
     */
     public boolean hmset(String key, Map<String, Object> map){
         try {
             redisTemplate.opsForHash().putAll(key, map);
             return true;
         } catch (Exception e) {
             e.printStackTrace();
             return false;
         }
     }


    /**
     * HashSet 并设置时间
     * @param key 键
     * @param map 对应多个k-v对
     * @param time 时间(秒)
     * @return true 成功 false 失败
     */
    public boolean hmset(String key, Map<String, Object> map, long time ){
        try {
            redisTemplate.opsForHash().putAll(key, map);
            if(time > 0){
                expire(key, time);
            }
            return true;
        } catch (Exception e) {
            e.printStackTrace();
            return false;
        }
    }


    /**
     * 删除hash表中的值
     * @param key 键 不能为null
     * @param item 项 可以是多个 不能为 null
     */
    public void hdel(String key, Object item){
        redisTemplate.opsForHash().delete(key, item);
    }


    /**
     * 判断hash表中是否有该项的值
     * @param key 键 不能为null
     * @param item 值 不能为null
     * @return true 存在 false 不存在
     */
    public boolean hHasKey(String key, String item){
        return redisTemplate.opsForHash().hasKey(key, item);
    }


    /**
     * hash 递增 如果不存在,就会创建一个 并把新增后的值返回
     * @param key 键
     * @param item 值
     * @param by 要增加几(大于0)
     * @return
     */
    public double hincr(String key, String item, double by){
        return redisTemplate.opsForHash().increment(key, item, by);
    }


    /**
     * hash 递减 如果不存在,就会创建一个 并把新增后的值返回
     * @param key 键
     * @param item 值
     * @param by 要减少几(大于0)
     * @return
     */
    public double hdecr(String key, String item, double by){
        return redisTemplate.opsForHash().increment(key, item, -by);
    }


    //======================Set============================


    /**
     * 根据key 获取 Set 中的所有值
     * @param key 键
     * @return
     */
    public Set<Object> sGet(String key) {
        try {
            return redisTemplate.opsForSet().members(key);
        } catch (Exception e) {
            e.printStackTrace();
            return null;
        }
    }


    /**
     * 根据value从一个set中查询。是否存在
     * @param key 键
     * @param value 值
     * @return true 存在 false 不存在
     */
    public boolean sHasKey(String key, Object value){
        try {
            return redisTemplate.opsForSet().isMember(key, value);
        } catch (Exception e) {
            e.printStackTrace();
            return false;
        }
    }


    /**
     * 将数据放入set缓存
     * @param key 键
     * @param values 值 可以是多个
     * @return 成功个数
     */
    public long sSet(String key, Object... values){
        try {
            return redisTemplate.opsForSet().add(key, values);
        } catch (Exception e) {
            e.printStackTrace();
            return 0;
        }
    }


    /**
     * 将 set 数据放入缓存
     * @param key 键
     * @param time 时间(秒)
     * @param values 值 可以是多个
     * @return 成功个数
     */
    public long sSetAndTime(String key, long time, Object... values){
        try {
            Long count = redisTemplate.opsForSet().add(key, values);
            if(time > 0){
                expire(key, time);
            }
            return count;
        } catch (Exception e) {
            e.printStackTrace();
            return 0;
        }
    }


    /**
     * 获取set缓存的长度
     * @param key 键
     * @return
     */
    public long sGetSetSize(String key){
        try {
            return redisTemplate.opsForSet().size(key);
        } catch (Exception e) {
            e.printStackTrace();
            return 0;
        }
    }


    /**
     * 移除值为 value的 元素
     * @param key 键
     * @param values 值 可以是多个
     * @return
     */
    public long setRemove(String key, Object... values){
        try {
            Long count = redisTemplate.opsForSet().remove(key, values);
            return count;
        } catch (Exception e) {
            e.printStackTrace();
            return 0;
        }
    }


    //======================List============================


    /**
     * 获取llist缓存的内容
     * @param key 键
     * @param start 开始
     * @param end 结束,结束 0 到 -1 代表所有值
     * @return
     */
    public List<Object> lGet(String key, long start, long end){
        try {
            return redisTemplate.opsForList().range(key, start, end);
        } catch (Exception e) {
            e.printStackTrace();
            return null;
        }
    }


    /**
     * 获取list缓存的长度
     * @param key 键
     * @return 返回长度
     */
    public long lGetListSize(String key){
        try {
            return redisTemplate.opsForList().size(key);
        } catch (Exception e) {
            e.printStackTrace();
            return 0;
        }
    }


    /**
     * 通过索引 获取list 中的值
     * @param key 键
     * @param index 索引 index >= 0时, 表头,1 第二个元素,依次类推 index < 0时, -1 表尾, -2 倒数第二个元素, 依次类推
     * @return
     */
    public Object lGetIndex(String key, long index){
        try {
            return redisTemplate.opsForList().index(key, index);
        } catch (Exception e) {
            e.printStackTrace();
            return null;
        }
    }


    /**
     * 将list放入缓存
     * @param key 键
     * @param value 值
     * @return
     */
    public boolean lSet(String key, Object value){
        try {
            redisTemplate.opsForList().rightPush(key, value);
            return true;
        } catch (Exception e) {
            e.printStackTrace();
            return false;
        }
    }


    /**
     * 将list放入缓存
     * @param key 键
     * @param value 值
     * @param time 时间(秒)
     * @return
     */
    public boolean lSet(String key, Object value,long time){
        try {
            redisTemplate.opsForList().rightPush(key, value);
            if(time > 0){
                expire(key, time);
            }
            return true;
        } catch (Exception e) {
            e.printStackTrace();
            return false;
        }
    }


    /**
     * 将list放入缓存
     * @param key 键
     * @param values 值
     * @return
     */
    public boolean lSet(String key, List<Object> values){
        try {
            redisTemplate.opsForList().rightPushAll(key, values);
            return true;
        } catch (Exception e) {
            e.printStackTrace();
            return false;
        }
    }


    /**
     * 将list放入缓存
     * @param key 键
     * @param values 值
     * @param time 时间(秒)
     * @return
     */
    public boolean lSet(String key, List<Object> values, long time){
        try {
            redisTemplate.opsForList().rightPushAll(key, values);
            return true;
        } catch (Exception e) {
            e.printStackTrace();
            return false;
        }
    }


    /**
     * 根据索引修改list中的某条数据
     * @param key 键
     * @param index 索引
     * @param value 值
     * @return
     */
    public boolean lUpdateIndex(String key, long index, Object value){
        try {
            redisTemplate.opsForList().set(key, index, value);
            return true;
        } catch (Exception e) {
            e.printStackTrace();
            return false;
        }
    }


    /**
     * 移除N个值为value
     * @param key 键
     * @param count 移除个数
     * @param value 值
     * @return 真正移除的个数
     */
    public long lRemove(String key, long count, Object value){
        try {
            Long remove = redisTemplate.opsForList().remove(key, count, value);
            return remove;
        } catch (Exception e) {
            e.printStackTrace();
            return 0;
        }
    }
}
二十九、存数据转义符问题
Redis客户端格式:
从客户端存放key值时
# 存值
set k1 v1
# 取值
get k1
"v1" # 非字符串格式
k1是字符串类型,v1(非字符串类型、非json格式)
需使用以下格式,才可以与jedis连通
# 存值
set k1 '"v1"'
# 取值
get k1
"\"v1\"" #字符串格式
redisConfig标准配置json格式:
三十、Redis新功能
新功能推出用户权限,更高的安全机制
acl list # 查看用户操作权限
hacl cat string # 查看添加指令类别
acl setuser user1 # 添加用户
IO多线程
Redis终于支持多线程了,告别单线程了吗?
IO多线程其实指客户端交互部分的网络 IO 交互处理模块多线程,而非执行命令多线程,Redis执行命令依然是单线程
原理架构
Redos 6 加入多线程,但跟Memcached 这种从 IO 处理到数据访问多线程的实现模式有些差异。Redis的多线程部分只是用来处理网络数据的读写和解析,执行命令仍然是单线程。之所以这么设计是不想因为多线程而变得复杂,需要去控制key、lua、事务,LPUSH、LPOP等等的并发问题。
io-threads-do-reads yes # 默认关闭
io-threads 4\
工具支持cluster
之前的老版本Redis需要搭建集群需要单独安装ruby环境,Redis5将redis-trib.rb的功能集成到redis-cli。另外官方redis-benchmark工具也开始支持cluster模式了,通过多线程的方式对多个分片进行压测
三十一、springboot整合Redis集群
引入依赖
        <dependency>
            <groupId>org.springframework.bootgroupId>
            <artifactId>spring-boot-starter-data-redisartifactId>
        dependency>

        <dependency>
            <groupId>redis.clientsgroupId>
            <artifactId>jedisartifactId>
            <version>2.9.0version>
        dependency>


        <dependency>
            <groupId>org.springframework.datagroupId>
            <artifactId>spring-data-redisartifactId>
            <version>1.8.7.RELEASEversion>
        dependency>
redis.properties
# 单机
# Redis数据库索引(默认为0)
# redis.database=1


# Redis服务器地址
# redis.host=localhost
# Redis服务器连接端口
# redis.port=6379


#集群
# Redis服务器集群配置
redis.nodes=localhost:6379,localhost:6380,localhost:6381,localhost:6389,localhost:6390,localhost:6391


# Redis服务器连接密码(默认为空)
redis.password=redis


#连接池的最大数据库连接数。设为0表示无限制,如果是jedis 2.4以后用redis.maxTotal
#redis.maxActive=600
#控制一个pool可分配多少个jedis实例,用来替换上面的redis.maxActive,如果是jedis 2.4以后用该属性
redis.maxTotal=2000
# 出现配置不能反射Total是因为springboot版本


# 连接池最大阻塞等待时间(使用负值表示没有限制)
redis.maxWaitMillis=1000


# 连接池中的最大空闲连接
redis.maxIdle=100


# 连接池中的最小空闲连接
redis.minIdle=2


# 连接超时时间(毫秒)
redis.timeout=0
redis配置类
package com.tony.config;
import com.fasterxml.jackson.annotation.JsonAutoDetect;
import com.fasterxml.jackson.annotation.PropertyAccessor;
import com.fasterxml.jackson.databind.ObjectMapper;
import org.springframework.beans.factory.annotation.Qualifier;
import org.springframework.beans.factory.annotation.Value;
import org.springframework.context.annotation.Bean;
import org.springframework.context.annotation.Configuration;
import org.springframework.context.annotation.PropertySource;
import org.springframework.data.redis.connection.RedisClusterConfiguration;
import org.springframework.data.redis.connection.RedisConnectionFactory;
import org.springframework.data.redis.connection.RedisNode;
import org.springframework.data.redis.connection.jedis.JedisConnectionFactory;
import org.springframework.data.redis.core.RedisTemplate;
import org.springframework.data.redis.serializer.Jackson2JsonRedisSerializer;
import org.springframework.data.redis.serializer.StringRedisSerializer;
import redis.clients.jedis.JedisPoolConfig;
import java.util.HashSet;
@Configuration
@PropertySource("classpath:onf/redis.properties")
public class RedisConfig {
@Value("${redis.password}")
private String password;
@Value("${redis.maxTotal}")
private Integer maxTotal;
@Value("${redis.maxWaitMillis}")
private Integer maxWaitMillis;
@Value("redis.maxIdle")
private Integer maxIdle;
@Value("${redis.minIdle}")
private Integer minIdle;
@Value("${redis.timeout}")
private Integer timeout;
@Value("${redis.nodes}")
private String clusterNodes;
@Bean
public RedisClusterConfiguration redisClusterConfiguration(){
RedisClusterConfiguration redisClusterConfiguration = new RedisClusterConfiguration();
String[] cNodes = clusterNodes.split(",");
HashSet<RedisNode> nodes = new HashSet<>();
//分配集群节点
for(String node : cNodes){
String[] hp = node.split(":");//host:port
nodes.add(new RedisNode(hp[0], Integer.parseInt(hp[1])));
}
redisClusterConfiguration.setClusterNodes(nodes);
return redisClusterConfiguration;
}
@Bean
public JedisPoolConfig jedisPoolConfig(){
JedisPoolConfig jedisPoolConfig = new JedisPoolConfig();
jedisPoolConfig.setMaxTotal(maxTotal);
jedisPoolConfig.setMaxWaitMillis(maxWaitMillis);
jedisPoolConfig.setMaxIdle(maxIdle);
jedisPoolConfig.setMinIdle(minIdle);
jedisPoolConfig.setTestOnCreate(true);
jedisPoolConfig.setTestOnBorrow(true);
jedisPoolConfig.setTestOnReturn(true);
jedisPoolConfig.setTestWhileIdle(true);
//创建集群对象
return jedisPoolConfig;
}
@Bean("myJedisConnectionFactory")
public JedisConnectionFactory jedisConnectionFactory(RedisClusterConfiguration redisClusterConfiguration,
JedisPoolConfig jedisPoolConfig){
JedisConnectionFactory jedisConnectionFactory = new JedisConnectionFactory((redisClusterConfiguration, jedisPoolConfig);
jedisConnectionFactory.setTimeout(timeout);
jedisConnectionFactory.setPassword(password);
return jedisConnectionFactory;
@Bean
public RedisTemplate<String, Object> redisTemplate(@Qualifier("myJedisConnectionFactory") RedisConnectionFactory redisConnectionFactory) {
//一般使用特别鸣谢两位大佬:
Redis6-尚硅谷
狂神说Redis
