SpringBoot+SpringSecurity+MybatisPlus+Vue3小项目摘录(二)
文章目录
-
- SpringSecurity框架引入以及几个常用工具类
-
- 几个常用的工具类介绍
-
- jwt相关
-
- 1)最常使用的 JWT
-
- 这种方案有一些缺点:
- JWT 正好可以解决这些问题:
- 可以看出 JWT 以不同颜色区分,两个小数点隔开,分为了三部分:
- 也可以参考hutool.com中的工具类哦
- 我之前已经封装过一些工具了类,在这里就直接拿来使用了
-
- JWT的工具类:
- String常用字符串操作的工具类:
- 后台跨域处理的配置类:
- 编写基本的请求测试一下
- 使用postman工具进行基本的测试
- 前端处理流程
-
-
-
- 编写一个基本封装的axios的请求的js文件以便于之后使用
- 接下来进行改写App.vue进行基础的逻辑测试
-
- App.vue
- store目录下的index.js中改写:
- 分别启动前端和后台服务器,进行测试:
-
-
- 前端登录页面的实现
-
-
-
- 也可以指令安装依赖:
-
- 安装sass-loader【可以安装指定的版本】
- 安装sass
- 或者可以同时安装
- 在assets目录下新建styles文件夹并将登录对应的css样式导入
- 代码如下:==border.css==
- 记得在main.js中进行导入:
- 添加路由:【在router目录下的index.js中】
-
- Login.vue的代码如下:
- 然后打开浏览器进行访问即可:
- 可以先把页面中的@语法糖的函数先注释掉即可
- 此时存在一个==问题==就是高度没有占一屏,需要修改App.vue中样式进行处理
-
- 代码如下:
- 重新访问后:
- 输入框前的icon的图标定义【扩展篇】
-
- 可以使用element-plus中的图标也可以自定义图标
-
- 安装必须的依赖【webpack、svg-sprite-loader】
- 在components目录下新建一个目录SvgIcon并新建文件index.vue
- index.vue代码如下:
- 将常用的svg图标放置在【src/icons/svg目录下】,并在icons目录下新建一个index.js文件
- index.js代码如下:
- 在vue.config.js文件中引入webpack打包工具配置:
- 修改main.js的引入
- 在vue中使用模板:
- 模板语法:
- 密码框的图标同理实现即可:
- 访问登录页面效果如下:
-
-
- 小结
SpringSecurity框架引入以及几个常用工具类
提示:这里需要一些SpringSecurity的基础以及JWT的前置知识哦
几个常用的工具类介绍
jwt相关
开发一个统一认证服务,涉及到 OIDC 协议,其中授权码模式所颁发的 id_token 使用的是 JWT ( JSON Web Token ) ,因为这次使用的库的默认签名算法和以往不同,所以特地去翻阅了 JWT 的 RFC 文档( RFC 7519 ),一番阅读后发现原来对JWT 的认知只停留在表面,还有更多深层的内容是不知道的。
1)最常使用的 JWT
每次提到无状态的 JWT 时相信都会看到另一种基于 Session 的用户认证方案介绍,这里也不例外,Session 的认证流程通常会像这样:
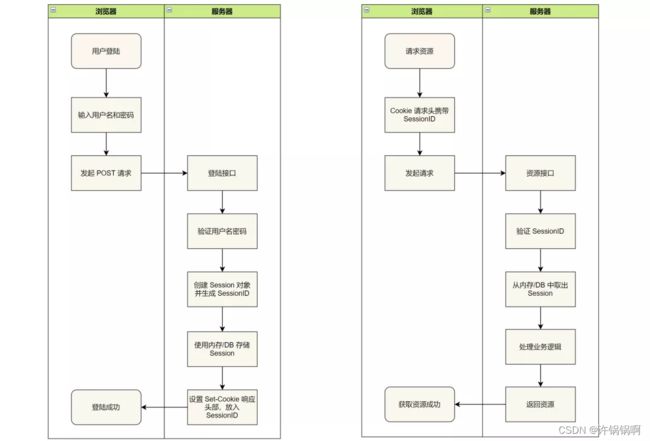
这种方案有一些缺点:
- 需要从内存或数据库里存取 session 数据
- 扩展性差,对于分布式应用,需要实现 session 数据共享
JWT 正好可以解决这些问题:

JWT 的魔法很简单,将需要使用到的用户数据等信息放入 JWT 里面,每次请求都会携带上,只要保证密钥不泄露,JWT 就无法伪造。
一个简单的 JWT 示例如下:
eyJhbGciOiJIUzI1NiIsInR5cCI6IkpXVCJ9.eyJleHAiOiIyMDIxLTEwLTI0IDAwOjAwOjAwIiwibmFtZSI6InRvZ2V0dG95b3UifQ.XdF46NflSUjnt-adAc6rNZEXI1OD6nxtwGuhz9qkxUA
jwt.io 这个网站相信没有人不知道了,把上面的 JWT 复制粘贴到网站中
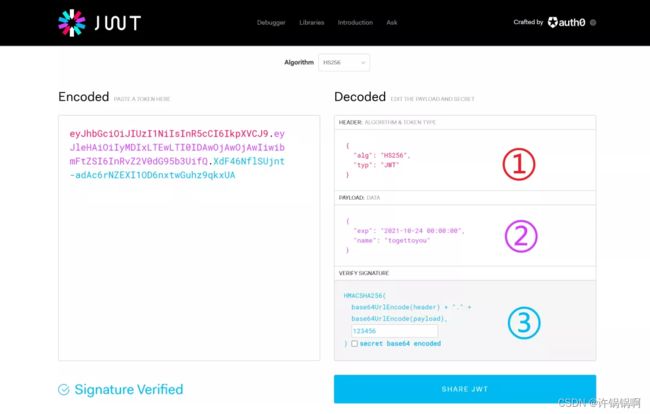
可以看出 JWT 以不同颜色区分,两个小数点隔开,分为了三部分:
- ① Header(头部):JSON 对象,描述 JWT 的元数据。其中 alg 属性表示签名的算法(algorithm),默认是 HMAC SHA256(写成 HS256);typ 属性表示这个令牌(token)的类型(type),统一写为 JWT
- ② Payload(载荷):JSON 对象,存放实际需要传递的数据,支持自定义字段
- ③ Signature(签名):这部分就是 JWT 防篡改的精髓,其值是对前两部分 base64UrlEncode 后使用指定算法签名生成,以默认 HS256 为例,指定一个密钥(secret),就会按照如下公式生成:
也可以参考hutool.com中的工具类哦
官网:https://hutool.cn/

我之前已经封装过一些工具了类,在这里就直接拿来使用了
JWT的工具类:
package com.xuguoguo.utils;

import io.jsonwebtoken.Claims;
import io.jsonwebtoken.JwtBuilder;
import io.jsonwebtoken.Jwts;
import io.jsonwebtoken.SignatureAlgorithm;

import javax.crypto.SecretKey;
import javax.crypto.spec.SecretKeySpec;
import java.util.Base64;
import java.util.Date;
import java.util.UUID;

/**
 @Package: com.xuguoguo.util
 @ClassName: JwtUtils
 @Author: XuGuoGuo
 @CreateTime: 2022/10/31-19:52
 @Description:
 */
public class JwtUtils {

    //有效期为
    public static final Long JWT_TTL = 60 * 60 *1000L;// 60 * 60 *1000  一个小时
    //设置秘钥明文, 注意长度必须大于等于6位
    public static final String JWT_KEY = "xuguoguo";

    public static String getUUID(){
        String token = UUID.randomUUID().toString().replaceAll("-", "");
        return token;
    }

    /**
     * 生成jtw
     * @param subject token中要存放的数据(json格式)
     * @return
     */
    public static String createJWT(String subject) {
        JwtBuilder builder = getJwtBuilder(subject, null, getUUID());// 设置过期时间
        return builder.compact();
    }

    /**
     * 生成jtw
     * @param subject token中要存放的数据(json格式)
     * @param ttlMillis token超时时间
     * @return
     */
    public static String createJWT(String subject, Long ttlMillis) {
        JwtBuilder builder = getJwtBuilder(subject, ttlMillis, getUUID());// 设置过期时间
        return builder.compact();
    }

    private static JwtBuilder getJwtBuilder(String subject, Long ttlMillis, String uuid) {
        SignatureAlgorithm signatureAlgorithm = SignatureAlgorithm.HS256;//RS256
        SecretKey secretKey = generalKey();
        long nowMillis = System.currentTimeMillis();
        Date now = new Date(nowMillis);
        if(ttlMillis==null){
            ttlMillis= JwtUtils.JWT_TTL;
        }
        long expMillis = nowMillis + ttlMillis;
        Date expDate = new Date(expMillis);
        return Jwts.builder()
                .setId(uuid)              //唯一的ID
                .setSubject(subject)   // 主题  可以是JSON数据
                .setIssuer("XuGuoGuo")     // 签发者
                .setIssuedAt(now)      // 签发时间
                .signWith(signatureAlgorithm, secretKey) //使用HS256对称加密算法签名, 第二个参数为秘钥
                .setExpiration(expDate);
    }

    /**
     * 创建token
     * @param id
     * @param subject
     * @param ttlMillis
     * @return
     */
    public static String createJWT(String id, String subject, Long ttlMillis) {
        JwtBuilder builder = getJwtBuilder(subject, ttlMillis, id);// 设置过期时间
        return builder.compact();
    }

    public static void main(String[] args) throws Exception {
        //加密指定的字符串
        String jwt = createJWT("1234");
//        对明文1234加密之后的密文
//        eyJhbGciOiJIUzI1NiJ9.eyJqdGkiOiJlZWY5MDlhYWIwYmQ0N2E1OWNiNzY2ZjQxZTg3N2MwNCIsInN1YiI6IjEyMzQiLCJpc3MiOiJ4dWd1b2d1byIsImlhdCI6MTY5ODg0MDQwMCwiZXhwIjoxNjk4ODQ0MDAwfQ.enfTdo_7RAbCYekOXAUYepfxbSSkj0qv1XkT7zaYD5A
        System.out.println(jwt);

        //解析加密后的密文是否与铭文一致
        Claims claims = parseJWT("eyJhbGciOiJIUzI1NiJ9.eyJqdGkiOiJkNGZjNjMxYWExNTE0Zjk2YjY2YWE5NDAxYzYwYWYzNyIsInN1YiI6IjEyMzQiLCJpc3MiOiJYdUd1b0d1byIsImlhdCI6MTcwMjAwMDQ1NCwiZXhwIjoxNzAyMDA0MDU0fQ.0sBG_uTMFdT3qS56eYkrrD3rcCleJ_XNnEl6nSBCWGo");
        //将上面的密文进行解密【获取原文】
        String subject = claims.getSubject();
        //输出解密后的原文
        System.out.println(subject);

    }

    /**
     * 生成加密后的秘钥 secretKey
     * @return
     */
    public static SecretKey generalKey() {
        byte[] encodedKey = Base64.getDecoder().decode(JwtUtils.JWT_KEY);
        SecretKey key = new SecretKeySpec(encodedKey, 0, encodedKey.length, "AES");
        return key;
    }

    /**
     * 解析
     *
     * @param jwt
     * @return
     * @throws Exception
     */
    public static Claims parseJWT(String jwt) throws Exception {
        SecretKey secretKey = generalKey();
        return Jwts.parser()
                .setSigningKey(secretKey)
                .parseClaimsJws(jwt)
                .getBody();
    }
}
String常用字符串操作的工具类:
package com.xuguoguo.utils;
import java.util.ArrayList;
import java.util.List;
import java.util.Random;
/**
* 字符串工具类
* @author xuguoguo
*
*/
public class StringUtil {
/**
* 判断是否是空
* @param str
* @return
*/
public static boolean isEmpty(String str){
if(str==null||"".equals(str.trim())){
return true;
}else{
return false;
}
}
/**
* 判断是否不是空
* @param str
* @return
*/
public static boolean isNotEmpty(String str){
if((str!=null)&&!"".equals(str.trim())){
return true;
}else{
return false;
}
}
/**
* 格式化模糊查询
* @param str
* @return
*/
public static String formatLike(String str){
if(isNotEmpty(str)){
return "%"+str+"%";
}else{
return null;
}
}
/**
* 过滤掉集合里的空格
* @param list
* @return
*/
public static List<String> filterWhite(List<String> list){
List<String> resultList=new ArrayList<String>();
for(String l:list){
if(isNotEmpty(l)){
resultList.add(l);
}
}
return resultList;
}
/**
* 去除html标签
*/
public static String stripHtml(String content) {
// 段落替换为换行
content = content.replaceAll(""
, "\r\n");
//
替换为换行
content = content.replaceAll("" , "\r\n");
// 去掉其它的<>之间的东西
content = content.replaceAll("\\<.*?>", "");
// 去掉空格
content = content.replaceAll(" ", "");
return content;
}
/**
* 生成六位随机数
* @return
*/
public static String genSixRandomNum(){
Random random = new Random();
String result="";
for (int i=0;i<6;i++)
{
result+=random.nextInt(10);
}
return result;
}
/**
* 生成由[A-Z,0-9]生成的随机字符串
* @param length 生成的字符串长度
* @return
*/
public static String getRandomString(int length){
Random random = new Random();
StringBuffer sb = new StringBuffer();
for(int i = 0; i < length; ++i){
int number = random.nextInt(2);
long result = 0;
switch(number){
case 0:
result = Math.round(Math.random() * 25 + 65);
sb.append(String.valueOf((char)result));
break;
case 1:
sb.append(String.valueOf(new Random().nextInt(10)));
break;
}
}
return sb.toString();
}
}
后台跨域处理的配置类:
package com.xuguoguo.config;

import org.springframework.context.annotation.Configuration;
import org.springframework.web.servlet.config.annotation.CorsRegistry;
import org.springframework.web.servlet.config.annotation.WebMvcConfigurer;

/**
 @Package: com.xuguoguo.config
 @ClassName: CorsConfig
 @Author: XuGuoGuo
 @CreateTime: 2022/12/5-16:09
 @Description:
 */
@Configuration
public class CorsConfig implements WebMvcConfigurer {


    @Override
    public void addCorsMappings(CorsRegistry registry) {
        //设置允许跨域的路径
        registry.addMapping("/**")
                //设置允许跨域请求的域名
                .allowedOriginPatterns("*")
                //是否允许cookie
                .allowCredentials(true)
                //设置允许请求的方式
                .allowedMethods("*")
//                .allowedMethods("GET","POST","DELETE","PUT");
                //设置允许的header请求头的属性
                .allowedHeaders("*")
                //设置允许跨域的时间
                .maxAge(3600);

    }
}
编写基本的请求测试一下
@RequestMapping("/getUser")
public Result get(@RequestHeader(required = false)String token){
    if (StringUtil.isNotEmpty(token)) {
        List<SysUser> list = sysUserService.list();
        return Result.of(list);
    } else {
        return Result.error("请求异常【无权限访问!】",false,"操作失败!");
    }
}

@RequestMapping("/login")
public Result login(){
    String jwt = JwtUtils.createJWT("xuguoguo");
    return Result.of(jwt);
}
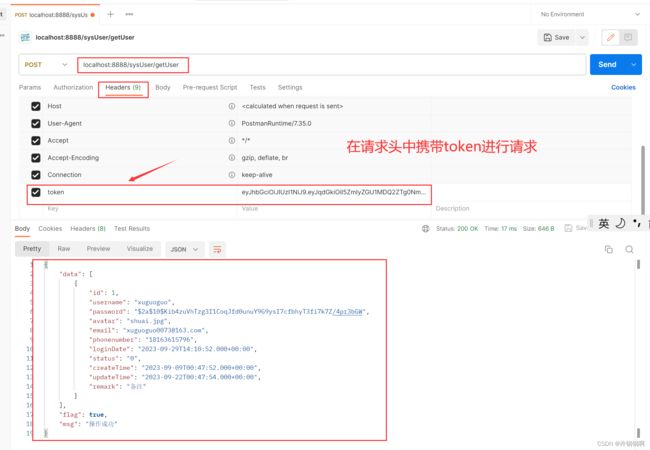
使用postman工具进行基本的测试

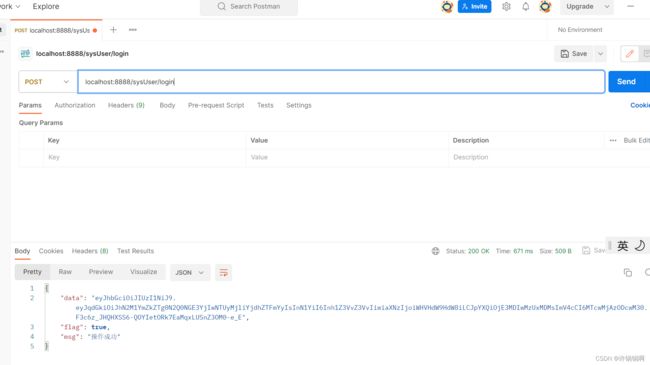
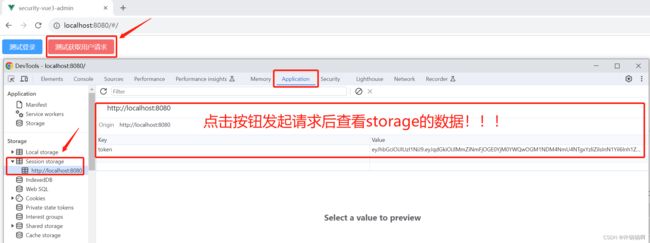
login这个请求就是模拟登录的时候创建了一个token值,并返回给前端,
getUser这个请求就用户的一个请求, 必须要携带token值才能请求进来的模拟测试
前端处理流程
提示:多写一下前端的代码也是后端程序员的必修之课哦!!!
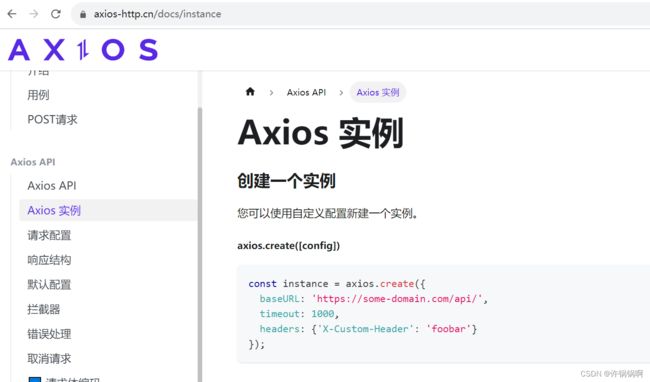
编写一个基本封装的axios的请求的js文件以便于之后使用
可以参考axios的官网哦https://www.axios-http.cn/

// Created By XuGuoGuo
// 引入axios
import axios from 'axios';
import store from '@/store'

let baseUrl="http://localhost:8888/";
// 创建axios实例
const httpService = axios.create({
    // url前缀-'http:xxx.xxx'
    // baseURL: process.env.BASE_API, // 需自定义
    baseURL:baseUrl,
    // 请求超时时间
    timeout: 3000 // 需自定义
});

//添加请求和响应拦截器
// 添加请求拦截器
httpService.interceptors.request.use(function (config) {
    // 在发送请求之前做些什么
    //config.headers.token=window.sessionStorage.getItem('token');
    console.log("store="+store.getters.GET_TOKEN)
    config.headers.token=store.getters.GET_TOKEN
    return config;
}, function (error) {
    // 对请求错误做些什么
    return Promise.reject(error);
});

// 添加响应拦截器
httpService.interceptors.response.use(function (response) {
    // 对响应数据做点什么
    return response;
}, function (error) {
    // 对响应错误做点什么
    return Promise.reject(error);
});

/*网络请求部分*/

/*
 *  get请求
 *  url:请求地址
 *  params:参数
 * */
export function get(url, params = {}) {
    return new Promise((resolve, reject) => {
        httpService({
            url: url,
            method: 'get',
            params: params
        }).then(response => {
            resolve(response);
        }).catch(error => {
            reject(error);
        });
    });
}

/*
 *  post请求
 *  url:请求地址
 *  params:参数
 * */
export function post(url, params = {}) {
    return new Promise((resolve, reject) => {
        httpService({
            url: url,
            method: 'post',
            data: params
        }).then(response => {
            console.log(response)
            resolve(response);
        }).catch(error => {
            console.log(error)
            reject(error);
        });
    });
}

/*
 *  文件上传
 *  url:请求地址
 *  params:参数
 * */
export function fileUpload(url, params = {}) {
    return new Promise((resolve, reject) => {
        httpService({
            url: url,
            method: 'post',
            data: params,
            headers: { 'Content-Type': 'multipart/form-data' }
        }).then(response => {
            resolve(response);
        }).catch(error => {
            reject(error);
        });
    });
}

export function getServerUrl(){
    return baseUrl;
}

export default {
    get,
    post,
    fileUpload,
    getServerUrl
}
接下来进行改写App.vue进行基础的逻辑测试
App.vue
<template>
  <el-button type="primary" @click="handleLogin">测试登录el-button>

     <el-button type="danger" @click="handleGetUser">测试获取用户请求el-button>
 template>
 <script setup>
 import requestUtil from '@/util/request'
 import store from '@/store'

 const handleLogin=async ()=>{
   let result=await requestUtil.get("sysUser/login");
   let data=result.data;
   if(data.code=200){
     const token=data.data;
     console.log("登录成功:token="+token);
     store.commit('SET_TOKEN',token);
   }else{
     console.log("登录出错!");
   }
 }

 const handleGetUser=async ()=>{
   let result=await requestUtil.get("sysUser/getUser");
   let data=result.data;
   if(data.flag){
     const userInfo=data.data;
     console.log("用户列表信息:userInfo=");
     console.log(userInfo);
   }
 }


 script>
 <style>
 style>
store目录下的index.js中改写:
import { createStore } from 'vuex'

export default createStore({
  state: {
  },
  getters: {
    GET_TOKEN:state => {
      return sessionStorage.getItem("token")
    }
  },
  mutations: {
    SET_TOKEN:(state,token)=>{
      sessionStorage.setItem("token",token);
    }
  },
  actions: {
  },
  modules: {
  }
})
分别启动前端和后台服务器,进行测试:


前端登录页面的实现
提示:html操作搞起来啊!!!

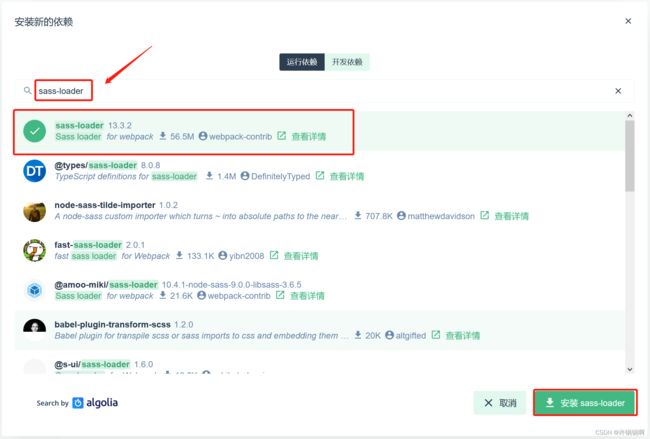
也可以指令安装依赖:
安装sass-loader【可以安装指定的版本】
npm install sass-loader --save-dev npm install sass-loader@xxx
安装sass
npm install sass --save-dev npm install sass@xxx
或者可以同时安装
npm i sass sass-loader -D
在assets目录下新建styles文件夹并将登录对应的css样式导入
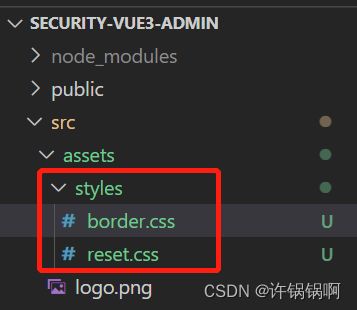
代码如下:border.css
@charset "utf-8";
.border,
.border-top,
.border-right,
.border-bottom,
.border-left,
.border-topbottom,
.border-rightleft,
.border-topleft,
.border-rightbottom,
.border-topright,
.border-bottomleft {
    position: relative;
}
.border::before,
.border-top::before,
.border-right::before,
.border-bottom::before,
.border-left::before,
.border-topbottom::before,
.border-topbottom::after,
.border-rightleft::before,
.border-rightleft::after,
.border-topleft::before,
.border-topleft::after,
.border-rightbottom::before,
.border-rightbottom::after,
.border-topright::before,
.border-topright::after,
.border-bottomleft::before,
.border-bottomleft::after {
    content: "\0020";
    overflow: hidden;
    position: absolute;
}
/* border
 * 因,边框是由伪元素区域遮盖在父级
 * 故,子级若有交互,需要对子级设置
 * 定位 及 z轴
 */
.border::before {
    box-sizing: border-box;
    top: 0;
    left: 0;
    height: 100%;
    width: 100%;
    border: 1px solid #eaeaea;
    transform-origin: 0 0;
}
.border-top::before,
.border-bottom::before,
.border-topbottom::before,
.border-topbottom::after,
.border-topleft::before,
.border-rightbottom::after,
.border-topright::before,
.border-bottomleft::before {
    left: 0;
    width: 100%;
    height: 1px;
}
.border-right::before,
.border-left::before,
.border-rightleft::before,
.border-rightleft::after,
.border-topleft::after,
.border-rightbottom::before,
.border-topright::after,
.border-bottomleft::after {
    top: 0;
    width: 1px;
    height: 100%;
}
.border-top::before,
.border-topbottom::before,
.border-topleft::before,
.border-topright::before {
    border-top: 1px solid #eaeaea;
    transform-origin: 0 0;
}
.border-right::before,
.border-rightbottom::before,
.border-rightleft::before,
.border-topright::after {
    border-right: 1px solid #eaeaea;
    transform-origin: 100% 0;
}
.border-bottom::before,
.border-topbottom::after,
.border-rightbottom::after,
.border-bottomleft::before {
    border-bottom: 1px solid #eaeaea;
    transform-origin: 0 100%;
}
.border-left::before,
.border-topleft::after,
.border-rightleft::after,
.border-bottomleft::after {
    border-left: 1px solid #eaeaea;
    transform-origin: 0 0;
}
.border-top::before,
.border-topbottom::before,
.border-topleft::before,
.border-topright::before {
    top: 0;
}
.border-right::before,
.border-rightleft::after,
.border-rightbottom::before,
.border-topright::after {
    right: 0;
}
.border-bottom::before,
.border-topbottom::after,
.border-rightbottom::after,
.border-bottomleft::after {
    bottom: 0;
}
.border-left::before,
.border-rightleft::before,
.border-topleft::after,
.border-bottomleft::before {
    left: 0;
}
@media (max--moz-device-pixel-ratio: 1.49), (-webkit-max-device-pixel-ratio: 1.49), (max-device-pixel-ratio: 1.49), (max-resolution: 143dpi), (max-resolution: 1.49dppx) {
    /* 默认值,无需重置 */
}
@media (min--moz-device-pixel-ratio: 1.5) and (max--moz-device-pixel-ratio: 2.49), (-webkit-min-device-pixel-ratio: 1.5) and (-webkit-max-device-pixel-ratio: 2.49), (min-device-pixel-ratio: 1.5) and (max-device-pixel-ratio: 2.49), (min-resolution: 144dpi) and (max-resolution: 239dpi), (min-resolution: 1.5dppx) and (max-resolution: 2.49dppx) {
    .border::before {
        width: 200%;
        height: 200%;
        transform: scale(.5);
    }
    .border-top::before,
    .border-bottom::before,
    .border-topbottom::before,
    .border-topbottom::after,
    .border-topleft::before,
    .border-rightbottom::after,
    .border-topright::before,
    .border-bottomleft::before {
        transform: scaleY(.5);
    }
    .border-right::before,
    .border-left::before,
    .border-rightleft::before,
    .border-rightleft::after,
    .border-topleft::after,
    .border-rightbottom::before,
    .border-topright::after,
    .border-bottomleft::after {
        transform: scaleX(.5);
    }
}
@media (min--moz-device-pixel-ratio: 2.5), (-webkit-min-device-pixel-ratio: 2.5), (min-device-pixel-ratio: 2.5), (min-resolution: 240dpi), (min-resolution: 2.5dppx) {
    .border::before {
        width: 300%;
        height: 300%;
        transform: scale(.33333);
    }
    .border-top::before,
    .border-bottom::before,
    .border-topbottom::before,
    .border-topbottom::after,
    .border-topleft::before,
    .border-rightbottom::after,
    .border-topright::before,
    .border-bottomleft::before {
        transform: scaleY(.33333);
    }
    .border-right::before,
    .border-left::before,
    .border-rightleft::before,
    .border-rightleft::after,
    .border-topleft::after,
    .border-rightbottom::before,
    .border-topright::after,
    .border-bottomleft::after {
        transform: scaleX(.33333);
    }
}
reset.css
@charset "utf-8";
html{font-size:12px}
body,ul,ol,dl,dd,h1,h2,h3,h4,h5,h6,figure,form,fieldset,legend,input,textarea,button,p,blockquote,th,td,pre,xmp{margin:0;padding:0}
body,input,textarea,button,select,pre,xmp,tt,code,kbd,samp{line-height:1.5;font-family:tahoma,arial,"Hiragino Sans GB",simsun,sans-serif}
h1,h2,h3,h4,h5,h6,small,big,input,textarea,button,select{font-size:100%}
h1,h2,h3,h4,h5,h6{font-family:tahoma,arial,"Hiragino Sans GB","微软雅黑",simsun,sans-serif}
h1,h2,h3,h4,h5,h6,b,strong{font-weight:normal}
address,cite,dfn,em,i,optgroup,var{font-style:normal}
table{border-collapse:collapse;border-spacing:0;text-align:left}
caption,th{text-align:inherit}
ul,ol,menu{list-style:none}
fieldset,img{border:0}
img,object,input,textarea,button,select{vertical-align:middle}
article,aside,footer,header,section,nav,figure,figcaption,hgroup,details,menu{display:block}
audio,canvas,video{display:inline-block;*display:inline;*zoom:1}
blockquote:before,blockquote:after,q:before,q:after{content:"\0020"}
textarea{overflow:auto;resize:vertical}
input,textarea,button,select,a{outline:0 none;border: none;}
button::-moz-focus-inner,input::-moz-focus-inner{padding:0;border:0}
mark{background-color:transparent}
a,ins,s,u,del{text-decoration:none}
sup,sub{vertical-align:baseline}
html {overflow-x: hidden;height: 100%;font-size: 50px;-webkit-tap-highlight-color: transparent;}
body {font-family: Arial, "Microsoft Yahei", "Helvetica Neue", Helvetica, sans-serif;color: #333;font-size: .28em;line-height: 1;-webkit-text-size-adjust: none;}
hr {height: .02rem;margin: .1rem 0;border: medium none;border-top: .02rem solid #cacaca;}
a {color: #25a4bb;text-decoration: none;}
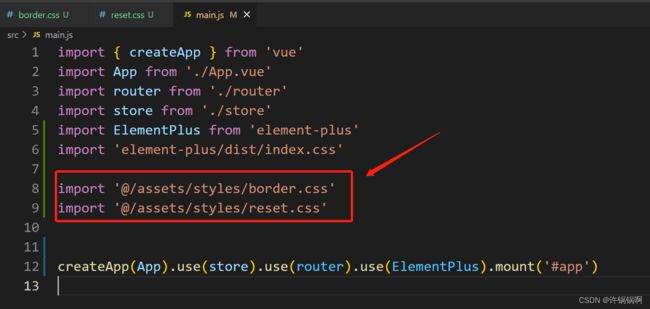
记得在main.js中进行导入:
import '@/assets/styles/border.css'
import '@/assets/styles/reset.css'

添加路由:【在router目录下的index.js中】

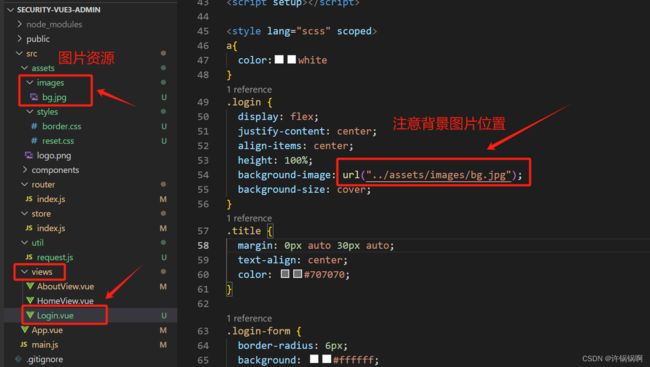
Login.vue的代码如下:
<template>
  <div class="login">
    <el-form ref="loginRef" :model="loginForm" :rules="loginRules" class="login-form">
      <h3 class="title">Spring系列+MP+Vue3后台管理系统h3>
      <el-form-item prop="username">
        <el-input
            type="text"
            size="large"
            auto-complete="off"
            placeholder="账号"
        >

        el-input>
      el-form-item>
      <el-form-item prop="password">
        <el-input
            type="password"
            size="large"
            auto-complete="off"
            placeholder="密码"
            @keyup.enter="handleLogin"
        >
        el-input>
      el-form-item>
      <el-checkbox  style="margin:0px 0px 25px 0px;">记住密码el-checkbox>
      <el-form-item style="width:100%;">
        <el-button
            size="large"
            type="primary"
            style="width:100%;"
            @click.prevent="handleLogin"
        >
          <span>登 录span>

        el-button>

      el-form-item>
    el-form>

     <div class="el-login-footer">
      <span>Copyright © 2022-2024 <a href="https://mp.weixin.qq.com/s/9gdrxvehbjzfWsdg6pQtcw" target="_blank">锅锅编程生活a> 版权所有.span>
    div>
  div>
template>

<script setup>script>

<style lang="scss" scoped>
a{
  color:white
}
.login {
  display: flex;
  justify-content: center;
  align-items: center;
  height: 100%;
  background-image: url("../assets/images/bg.jpg");
  background-size: cover;
}
.title {
  margin: 0px auto 30px auto;
  text-align: center;
  color: #707070;
}

.login-form {
  border-radius: 6px;
  background: #ffffff;
  width: 400px;
  padding: 25px 25px 5px 25px;

  .el-input {
    height: 40px;


    input {
      display: inline-block;
      height: 40px;
    }
  }
  .input-icon {
    height: 39px;
    width: 14px;
    margin-left: 0px;
  }

}
.login-tip {
  font-size: 13px;
  text-align: center;
  color: #bfbfbf;
}
.login-code {
  width: 33%;
  height: 40px;
  float: right;
  img {
    cursor: pointer;
    vertical-align: middle;
  }
}
.el-login-footer {
  height: 40px;
  line-height: 40px;
  position: fixed;
  bottom: 0;
  width: 100%;
  text-align: center;
  color: #fff;
  font-family: Arial;
  font-size: 12px;
  letter-spacing: 1px;
}
.login-code-img {
  height: 40px;
  padding-left: 12px;
}
style>
然后打开浏览器进行访问即可:
- 如果出现了以下情况

可以先把页面中的@语法糖的函数先注释掉即可


此时存在一个问题就是高度没有占一屏,需要修改App.vue中样式进行处理
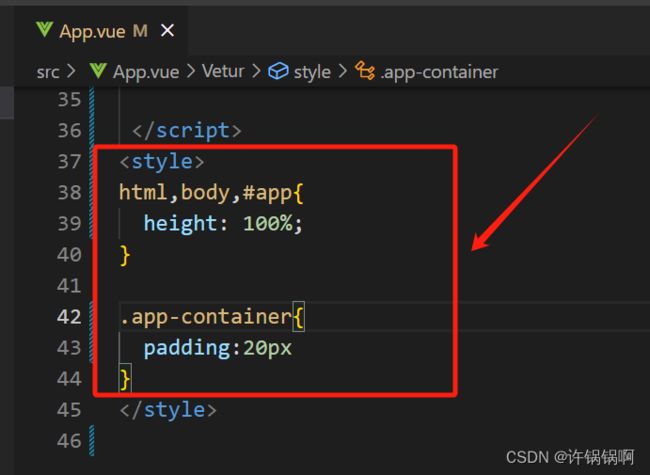
代码如下:
<style>
html,body,#app{
  height: 100%;
}

.app-container{
  padding:20px
}
</style>
重新访问后:
如果有更加界面要求的朋友们,可以多去找找vue版本也不错,有很多可以借鉴的登录等一些常用的界面哦
输入框前的icon的图标定义【扩展篇】
可以使用element-plus中的图标也可以自定义图标
安装必须的依赖【webpack、svg-sprite-loader】


在components目录下新建一个目录SvgIcon并新建文件index.vue

index.vue代码如下:
<template>
  <svg class="svg-icon" aria-hidden="true">
    <use :xlink:href="iconName"></use>
  </svg>
</template>

<script setup>
import { defineProps, computed } from 'vue'
const props = defineProps({
  icon: {
    type: String,
    required: true
  }
})

const iconName = computed(() => {
  return `#icon-${props.icon}`
})
</script>

<style lang="scss" scoped>
.svg-icon {
  width: 1em;
  height: 1em;
  vertical-align: -0.15em;
  fill: currentColor;
  overflow: hidden;
}
</style>
将常用的svg图标放置在【src/icons/svg目录下】,并在icons目录下新建一个index.js文件

index.js代码如下:
import SvgIcon from '@/components/SvgIcon'

const svgRequired = require.context('./svg', false, /\.svg$/)
svgRequired.keys().forEach((item) => svgRequired(item))

export default (app) => {
    app.component('svg-icon', SvgIcon)
}
在vue.config.js文件中引入webpack打包工具配置:
// const { defineConfig } = require('@vue/cli-service')
// module.exports = defineConfig({
//   transpileDependencies: true
// })
const webpack = require('webpack');

const path = require('path')
function resolve(dir) {
    return path.join(__dirname, dir)
}

module.exports = {
    lintOnSave: false,

    chainWebpack(config) {
        // 设置 svg-sprite-loader
        // config 为 webpack 配置对象
        // config.module 表示创建一个具名规则,以后用来修改规则
        config.module
            // 规则
            .rule('svg')
            // 忽略
            .exclude.add(resolve('src/icons'))
            // 结束
            .end()
        // config.module 表示创建一个具名规则,以后用来修改规则
        config.module
            // 规则
            .rule('icons')
            // 正则,解析 .svg 格式文件
            .test(/\.svg$/)
            // 解析的文件
            .include.add(resolve('src/icons'))
            // 结束
            .end()
            // 新增了一个解析的loader
            .use('svg-sprite-loader')
            // 具体的loader
            .loader('svg-sprite-loader')
            // loader 的配置
            .options({
                symbolId: 'icon-[name]'
            })
            // 结束
            .end()
        config
            .plugin('ignore')
            .use(
                new webpack.ContextReplacementPlugin(/moment[/\\]locale$/, /zh-cn$/)
            )
        config.module
            .rule('icons')
            .test(/\.svg$/)
            .include.add(resolve('src/icons'))
            .end()
            .use('svg-sprite-loader')
            .loader('svg-sprite-loader')
            .options({
                symbolId: 'icon-[name]'
            })
            .end()
    }
}
修改main.js的引入
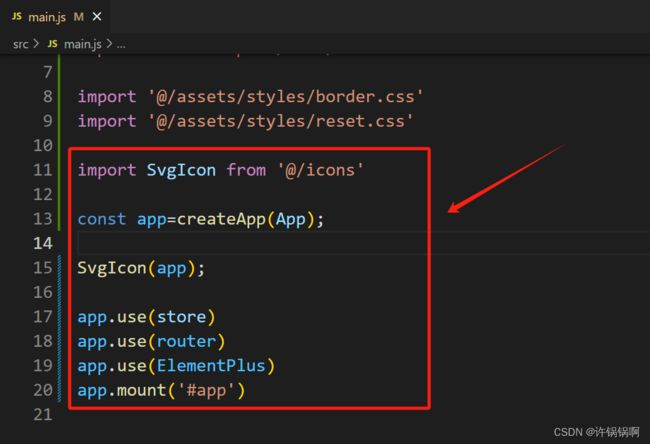
import { createApp } from 'vue'
import App from './App.vue'
import router from './router'
import store from './store'
import ElementPlus from 'element-plus'
import 'element-plus/dist/index.css'

import '@/assets/styles/border.css'
import '@/assets/styles/reset.css'

import SvgIcon from '@/icons'

const app=createApp(App);

SvgIcon(app);

app.use(store)
app.use(router)
app.use(ElementPlus)
app.mount('#app')
在vue中使用模板:

模板语法:
<template #prefix><svg-icon icon="user"></svg-icon></template>
密码框的图标同理实现即可:

访问登录页面效果如下:
小结
提示:第二小节是基本的SpringSecurity中的引入基础理论知识,前端Vue一些内容(多写两次基本上就会了),后端的话还是需要一些框架的基本,这样才能更好的入手哦!
本章的第二小节完毕,敬请期待后续更新(可留言需要学习哪方面的内容哈)!如果需要源码或者工具的朋友们可关注微信公众号"锅锅编程生活"或者扫描二维码关注回复关键字/后台留言获取即可!
