阿里云短信服务详细说明与实战开发后端代码
文章目录
- 1.短信服务背景
- 2.短信发送流程
- 3.阿里云短信服务基本说明
-
- 3.1 开通阿里云短信服务与购买短信套餐包
- 3.2 短信服务帮助文档
- 3.3 手机短信模板介绍
-
- 3.3.1 基本说明
- 3.3.2 公共内容规范
- 3.3.3 验证码模板规范
-
- 内容规范
- 变量规范
- 3.3.4 短信签名规范
- 3.3.5 验证码模板示例
- 3.4 国内短信服务定价
-
- 3.4.1 按量付费
- 3.4.2 国内短信套餐包
- 3.5 短信发送规则
-
- 3.5.1 国内短信内容长度计算规则
- 3.5.2 短信发送频率限制
- 4.用户与用户组权限管理
-
- 4.1 进入管理控制台
- 4.2 创建用户组
- 4.3 创建子用户
- 4.4 添加子用户到用户组
- 4.5 用户组权限管理
- 5.添加签名
- 6.添加模板
- 7.绑定测试手机号
- 8.在线测试签名模板API
- 9.自主测试Java SDK
- 10.⭐前后端实战开发-发送短信验证码
-
- 10.1 流程分析
- 10.2 配置参数说明
-
- 10.2.1 访问键与密钥
- 10.2.2 签名名称
- 10.2.3 登录短信模板code
- 10.3 后端代码
- 10.4 补充说明
-
- 10.4.1 调用 api 后响应的返回数据
- 10.4.2 application.yml 文件中的配置需要进行修改。
- 10.4.3 ubuntu安装docker的步骤
- 10.4.4 使用 docker 安装redis并设置密码的步骤
- 10.4.5 其它注意事项
1.短信服务背景
目前在很多项目中都出现使用短信验证码来实现注册、登录、购买、支付、转账等功能,发短信功能几乎已经成为项目中不可或缺的技术之一。
2.短信发送流程
短信平台与运营商之间协同合作,利益分成。
短信发送流程通常涉及以下步骤:
- Java程序调用短信平台提供的API接口,将短信内容、接收手机号等参数发送给短信平台。
- 短信平台接收到请求后,进行身份验证和参数校验,验证通过后将短信内容提交给运营商的短信网关。
- 运营商的短信网关接收到短信内容后,进行短信内容的编码和协议转换,将短信内容转换为符合运营商要求的协议格式。
- 短信网关将短信发送到接收方手机所在的基站,再由基站转发到手机上。
- 接收方手机接收到短信后进行解码和显示。
需要注意的是,由于短信平台和运营商之间的协议和接口是不透明的,因此在实际使用中,需要根据具体的短信平台和运营商提供的文档和接口规范来实现短信发送功能。同时,也需要根据运营商的要求和规定进行短信内容的审核和审核通过后的定时发送等操作。
3.阿里云短信服务基本说明
这里只针对于
国内短信验证码进行说明。
3.1 开通阿里云短信服务与购买短信套餐包
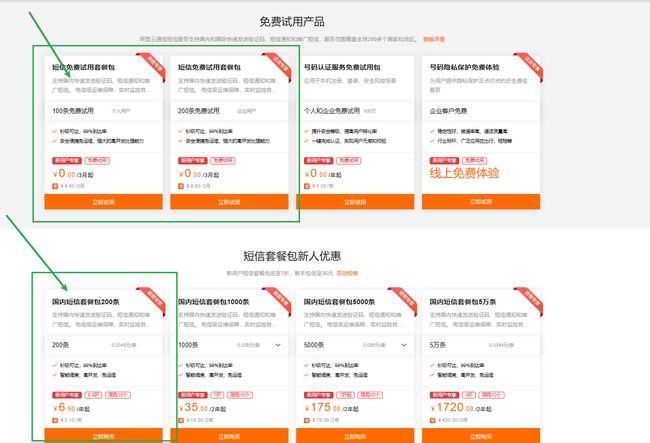
开通服务是免费的,短信套餐包可购买也可选择试用。
新用户试用地址:阿里云通信产品免费试用 (aliyun.com)
普通用户购买地址:短信服务_企业短信营销推广_验证码通知-阿里云 (aliyun.com)
3.2 短信服务帮助文档
短信服务 (aliyun.com)
3.3 手机短信模板介绍
3.3.1 基本说明
短信模版内容是由国家工信部制定,模版内容必须得有国家工信部进行审核,短信模版包含两部分:
- 短信签名:【XXXX】,例如:【逐浪教育】
- 短信正文,例如 “您正在进行登录校验,验证码为 ${code} ,该验证码5分钟内有效,请勿泄露于他人。”
3.3.2 公共内容规范
公共内容规范 (aliyun.com)
3.3.3 验证码模板规范
内容规范
- 国内短信模板必须包含“验证码、注册码、校验码、动态码(动态密码)”中的任意一个。
- 模板必须体现和说明“使用平台、用途、失效时间”中的任意一种。
- 为提升发送成功率,建议在模板中去除退订方式、与验证码无关的电话号码等信息。
变量规范
- 验证码模板的变量属性建议选择仅数字。
- 验证码模板仅支持添加一个变量。
- 自定义测试类模板仅支持数字变量。
- 变量长度限制为4~6个字符,仅数字、数字+字母组合或仅字母,例如:12CDE。
3.3.4 短信签名规范
短信签名规范 (aliyun.com)
说明几个重要通知:
- 签名名称不区分大小写字母,如【Aliyun通信】和【aliyun通信】视为名称相同。
- 国内短信签名暂不支持繁体字;不支持中文、英文以外的其它语言。
- 短信签名来源如果选择了
公众号或小程序,暂不支持以个人名义认证的小程序或公众号。 - 短信签名来源如果选择了
测试或学习,发送会有限制,指的是不能申请带变量的通知模板,不能申请推广模板,且只能给绑定的手机号发送短信。
3.3.5 验证码模板示例
您可以参考下表示例,并根据实际业务需求创建符合规范的短信模板。
| 应用场景 | 模板示例 |
|---|---|
| 登录/验证 | 您的验证码${code},该验证码5分钟内有效,请勿泄漏于他人!您的验证码: ${code},您正进行身份验证,打死不告诉别人!验证码为: ${code},您正在登录,若非本人操作,请勿泄露。 |
| 注册 | 您正在申请手机注册,验证码为:${code},5分钟内有效!尊敬的用户,您的注册会员动态密码为: ${code},请勿泄漏于他人!您的注册码: ${code},如非本人操作,请忽略本短信!您的校验码: ${code},您正在注册成为会员,感谢您的支持!验证码为: ${code},您正在注册成为平台会员,感谢您的支持! |
| 重置密码 | 您的动态码为:${code},您正在进行密码重置操作,如非本人操作,请忽略本短信! |
| 变更信息 | 验证码为:${code},您正在尝试变更重要信息,请妥善保管账户信息。 |
3.4 国内短信服务定价
3.4.1 按量付费
根据短信的发送条数和短信模板类型进行实时梯度计费。即实时计费,自动跨档,跨档后当月所有发送量按新阶梯价重新计算。
- 若用户当月验证码短信+通知短信使用量为N条,N>300万,则当月费用=N * 0.036。
- 若用户当月推广短信使用量为N条,50万<N≤100万,则当月费用=N * 0.048。
3.4.2 国内短信套餐包
- 为了降低用户的使用成本,阿里云短信服务提供国内短信套餐包,支持发送
验证码、短信通知、推广短信三种类型。个人认证用户仅可使用验证码、短信通知,不可使用推广短信。您可以升级为企业认证用户体验相关功能。更多信息,请参见使用须知。 - 国内短信套餐包仅可用于国内文本短信服务,不可用于国际/港澳台短信服务。
- 如果购买了套餐包,使用短信服务时优先抵用套餐包中的数量,超出部分自动按量付费。
- 购买套餐包之前产生的短信发送量,自动按量付费。
- 套餐包在账户欠费时不可使用,已使用套餐包剩余资源不支持退订或延期。其它退款内容,请参见退款说明。
套餐包的具体计费,请参见国内通用短信套餐包。
3.5 短信发送规则
3.5.1 国内短信内容长度计算规则
**短信长度(字数)=短信签名字数+短信模板内容字数。**其中,短信模板字数上限为500字。
-
简体中文、字母、数字、标点符号(不区分全角和半角),都按照一个字计算。
为避免与签名混淆,在模板内容任意位置均不能使用【】,在模板内容首尾不能使用[ ]。
-
短信长度不超过70个字,按照一条短信计费;超过70个字,即为长短信,按照67字/条拆分成多条计费。
-
示例:短信长度为160个字,按照67字、67字、26字分隔成三条短信进行计费。
3.5.2 短信发送频率限制
在实际业务场景中,例如App或网站登录时,可能会有用户频繁获取短信验证码或者通过短信通知方式找回密码的操作。为了限制平台短信被恶意调用、在短时间内大量发起短信发送请求,阿里云对短信发送验证码的行为进行了流控限制。
- 使用同一个签名,默认情况下对同一个手机号码发送验证码,最多支持1条/分钟,5条/小时,10条/天。仅企业认证用户可设置验证码短信发送频率。具体操作指引,请参见设置短信发送频率和频率限制白名单。
- 企业用户通过阿里云短信服务平台对同一个手机号码发送验证码,最多支持40条/天。此天级流控限制是针对手机号码这一维度进行的,即使短信发送方有多个,只要发送方使用阿里云短信服务平台,同一个手机号码一天只能接收40条验证码。
4.用户与用户组权限管理
4.1 进入管理控制台
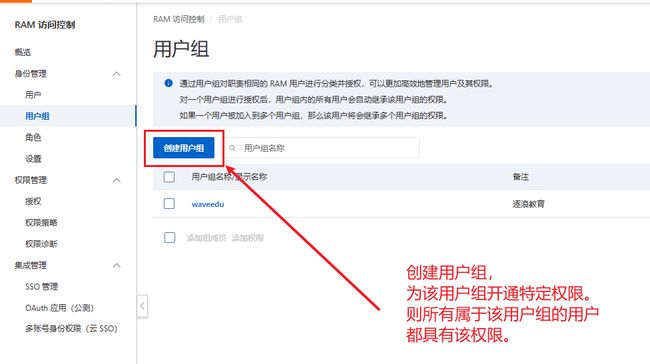
4.2 创建用户组
4.3 创建子用户
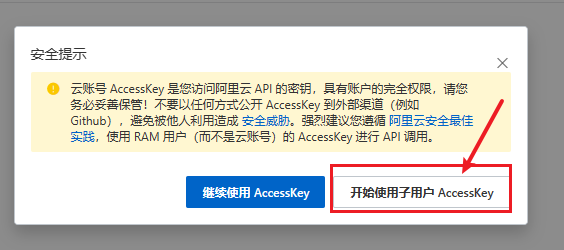
注意这个 AccessKey ID 和 AccessKey Secret 一定要保存下来,后面需要使用并且关闭该页面后无法再获取 AccessKey Secret。
4.4 添加子用户到用户组
4.5 用户组权限管理
我们在这里只添加 短信服务 的权限。
5.添加签名
前提条件:
- 完成阿里云账号注册和实名认证。
- 开通短信服务。
这里以签名来源为测试或学习进行演示,并注意 个人认证用户限申请一个验证码签名,一个自然日只能申请一个通用签名。如需申请多个签名,建议升级为企业认证用户。
通着这个需要两三小时左右,因此等这一步被通过了再进行接下来的操作。
6.添加模板
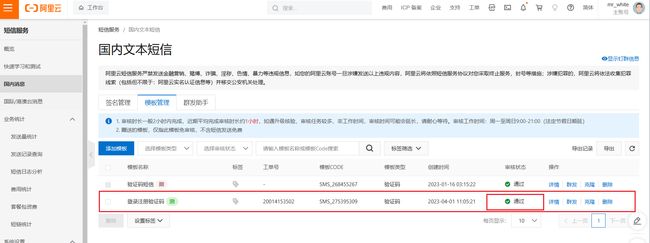
通着这个需要两三小时左右,因此等这一步被通过了再进行接下来的操作。
7.绑定测试手机号
由于我们这里指定的短信签名来源是测试或学习,因此只有绑定了的手机号才能收到短信消息。
8.在线测试签名模板API
查看绑定的手机,可以接受到消息:
9.自主测试Java SDK
将 8.在线测试签名模板API 中屏幕右边的代码进行拷贝自己运行即可:
<dependency>
  <groupId>com.aliyungroupId>
  <artifactId>alibabacloud-dysmsapi20170525artifactId>
  <version>2.0.23version>
dependency>
// This file is auto-generated, don't edit it. Thanks.
package demo;
import com.aliyun.auth.credentials.Credential;
import com.aliyun.auth.credentials.provider.StaticCredentialProvider;
import com.aliyun.core.http.HttpClient;
import com.aliyun.core.http.HttpMethod;
import com.aliyun.core.http.ProxyOptions;
import com.aliyun.httpcomponent.httpclient.ApacheAsyncHttpClientBuilder;
import com.aliyun.sdk.service.dysmsapi20170525.models.*;
import com.aliyun.sdk.service.dysmsapi20170525.*;
import com.google.gson.Gson;
import darabonba.core.RequestConfiguration;
import darabonba.core.client.ClientOverrideConfiguration;
import darabonba.core.utils.CommonUtil;
import darabonba.core.TeaPair;
//import javax.net.ssl.KeyManager;
//import javax.net.ssl.X509TrustManager;
import java.net.InetSocketAddress;
import java.time.Duration;
import java.util.*;
import java.util.concurrent.CompletableFuture;
public class SendSms {
public static void main(String[] args) throws Exception {
// HttpClient Configuration
/*HttpClient httpClient = new ApacheAsyncHttpClientBuilder()
.connectionTimeout(Duration.ofSeconds(10)) // Set the connection timeout time, the default is 10 seconds
.responseTimeout(Duration.ofSeconds(10)) // Set the response timeout time, the default is 20 seconds
.maxConnections(128) // Set the connection pool size
.maxIdleTimeOut(Duration.ofSeconds(50)) // Set the connection pool timeout, the default is 30 seconds
// Configure the proxy
.proxy(new ProxyOptions(ProxyOptions.Type.HTTP, new InetSocketAddress("", 9001))
.setCredentials("", ""))
// If it is an https connection, you need to configure the certificate, or ignore the certificate(.ignoreSSL(true))
.x509TrustManagers(new X509TrustManager[]{})
.keyManagers(new KeyManager[]{})
.ignoreSSL(false)
.build();*/
// Configure Credentials authentication information, including ak, secret, token
StaticCredentialProvider provider = StaticCredentialProvider.create(Credential.builder()
.accessKeyId("" )
.accessKeySecret("" )
//.securityToken("") // use STS token
.build());
// Configure the Client
AsyncClient client = AsyncClient.builder()
.region("cn-wulanchabu") // Region ID
//.httpClient(httpClient) // Use the configured HttpClient, otherwise use the default HttpClient (Apache HttpClient)
.credentialsProvider(provider)
//.serviceConfiguration(Configuration.create()) // Service-level configuration
// Client-level configuration rewrite, can set Endpoint, Http request parameters, etc.
.overrideConfiguration(
ClientOverrideConfiguration.create()
.setEndpointOverride("dysmsapi.aliyuncs.com")
//.setConnectTimeout(Duration.ofSeconds(30))
)
.build();
// Parameter settings for API request
SendSmsRequest sendSmsRequest = SendSmsRequest.builder()
.signName("逐浪教育")
.templateCode("SMS_275395309")
.phoneNumbers("18670082846")
.templateParam("{\"code\":\"1234\"}")
// Request-level configuration rewrite, can set Http request parameters, etc.
// .requestConfiguration(RequestConfiguration.create().setHttpHeaders(new HttpHeaders()))
.build();
// Asynchronously get the return value of the API request
CompletableFuture<SendSmsResponse> response = client.sendSms(sendSmsRequest);
// Synchronously get the return value of the API request
SendSmsResponse resp = response.get();
System.out.println(new Gson().toJson(resp));
// Asynchronous processing of return values
/*response.thenAccept(resp -> {
System.out.println(new Gson().toJson(resp));
}).exceptionally(throwable -> { // Handling exceptions
System.out.println(throwable.getMessage());
return null;
});*/
// Finally, close the client
client.close();
}
}
10.⭐前后端实战开发-发送短信验证码
10.1 流程分析
10.2 配置参数说明
sms:
  ali:
    # 子用户的访问键
    accessKeyId: LTAI5tPBmf8y7ZoQSn9h****
    # 子用户的访问密钥
    accessKeySecret: cbd511ed24bd832d05af54f64c84****
    # 签名名称
    signName: 逐浪教育
    # 登录短信模板的code
    loginTemplateCode: SMS_27539****
10.2.1 访问键与密钥
就是在 4.3 创建子用户 中得到的 accessKeyId 与 accessKeySecret
10.2.2 签名名称
就是在 5.添加签名 中设置的签名内容。
10.2.3 登录短信模板code
10.3 后端代码
由于demo代码过多,这里不做展示。
实战demo源码地址:Mr-Write/SpringbootDemo: 各种demo案例 (github.com)
对应的是 sms-demo 包模块。
示例演示,用 Apipost7 进行测试:【POST】 http://127.0.0.1:10505/sms-ali/sendLoginCode
同时在我的手机上也接受到了验证码消息。
10.4 补充说明
10.4.1 调用 api 后响应的返回数据
| 名称 | 类型 | 描述 | 示例 |
|---|---|---|---|
| Code | String | 请求状态码。返回OK代表请求成功。其他错误码,请参见[API错误码](https://help.aliyun.com/document_detail/101346.html?spm=api-workbench.API Document.0.0.5be349a5PlzN8a)。 | OK |
| Message | String | 状态码的描述。 | OK |
| BizId | String | 发送回执ID。可根据发送回执ID在接口QuerySendDetails中查询具体的发送状态。 | 9006197469364984**** |
| RequestId | String | 请求ID。 | F655A8D5-B967-440B-8683-DAD6FF8DE990 |
正常返回的JSON格式示例
{
  "Code": "OK",
  "Message": "OK",
  "BizId": "9006197469364984****",
  "RequestId": "F655A8D5-B967-440B-8683-DAD6FF8DE990"
}
10.4.2 application.yml 文件中的配置需要进行修改。
- redis 地址
- redis 密码
- 短信平台信息
10.4.3 ubuntu安装docker的步骤
-
安装需要的包
sudo apt-get update -
安装依赖包
sudo apt-get install \ apt-transport-https \ ca-certificates \ curl \ gnupg-agent \ software-properties-common -
添加 Docker 的官方 GPG 密钥
curl -fsSL https://download.docker.com/linux/ubuntu/gpg | sudo apt-key add - -
设置远程仓库
sudo add-apt-repository \ "deb [arch=amd64] https://download.docker.com/linux/ubuntu \ $(lsb_release -cs) \ stable" -
安装 Docker-CE
sudo apt-get update sudo apt-get install docker-ce docker-ce-cli containerd.io -
验证是否成功
sudo docker run hello-world
10.4.4 使用 docker 安装redis并设置密码的步骤
# 拉取redis镜像
docker pull redis

# 启动容器的时候,并为其设置密码
docker run -d --name myredis -p 6379:6379 redis --requirepass "123456"
10.4.5 其它注意事项
注意需要将服务器防火墙6379端口打开。


