Python 基础:深入了解Python中的GIL(全局解释器锁)(下篇)
Python 进阶:深入 GIL(下篇)
简介
在上一篇 GIL 的文章中,感性的了解了 GIL,本篇文章尝试从源码层面来简单解析一下 GIL,这里使用 cpython 3.7 版本的源码 (其实这块没有太大的改变,所以你看 3.5、3.6 的 Python 源码都可以),你可以直接通过 github 浏览相关部分的源码。
GIL 的定义
因为 Python 线程使用了操作系统的原生线程,这导致了多个线程同时执行容易出现竞争状态等问题,为了方便 Python 语言层面开发者的开发,就使用了 GIL(Global Interpreter Lock) 这个大锁,一口气锁住,这样开发起来就方便了,但也造成了当下 Python 运行速度慢的问题。
有人感觉 GIL 锁其实就是一个互斥锁 (Mutex lock),其实不然,GIL 的目的是让多个线程按照一定的顺序并发执行,而不是简单的保证当下时刻只有一个线程运行,这点 CPython 中也有相应的注释,而且就是在 GIL 定义之上,具体如下:
源码路径:Python/thread_pthread.h
/* A pthread mutex isn't sufficient to model the Python lock type* because, according to Draft 5 of the docs (P1003.4a/D5), both of the* following are undefined:* -> a thread tries to lock a mutex it already has locked* -> a thread tries to unlock a mutex locked by a different thread* pthread mutexes are designed for serializing threads over short pieces* of code anyway, so wouldn't be an appropriate implementation of* Python's locks regardless.** The pthread_lock struct implements a Python lock as a "locked?" bit* and a* instantly, it is, else the pair is used to block the thread until the* bit is cleared. 9 May 1994 [email protected]*/# GIL的定义typedefstruct{char locked;/* 0=unlocked, 1=locked *//* apthread_cond_t lock_released;pthread_mutex_t mut;} pthread_lock;
从 GIL 的定义中可知,GIL 本质是一个条件互斥组 (),其使用条件变量 lock_released 与互斥锁 mut 来保护 locked 的状态,locked 为 0 时表示未上锁,为 1 时表示线程上锁,而条件变量的引用让 GIL 可以实现多个线程按一定条件并发执行的目的。
条件变量 (condition variable) 是利用线程间共享的全局变量来控制多个线程同步的一种机制,其主要包含两个动作:
- 一个线程等待「条件变量的条件成立」而挂起 2. 另一个线程则是「条件成功」(即发出条件成立的信号)
在很多系统中,条件变量通常与互斥锁一同使用,目的是确保多个操作的原子性从而避免死锁的发生。
GIL 的获取与释放
从 GIL 的定义结构可以看出,线程对 GIL 的操作其实就是修过 GIL 结构中的 locked 变量的状态来达到获取或释放 GIL 的目的,在 Python/thread_pthread.h 中以及提供了 PyThread_acquire_lock() 与 PyThread_release_lock() 方法来实现线程对锁的获取与释放,先来看一下获取,代码如下:
PyLockStatusPyThread_acquire_lock_timed(PyThread_type_lock lock, PY_TIMEOUT_T microseconds,int intr_flag){PyLockStatus success = PY_LOCK_FAILURE;// GILpthread_lock *thelock =(pthread_lock *)lock;int status, error =0;dprintf(("PyThread_acquire_lock_timed(%p, %lld, %d) called\n",lock, microseconds, intr_flag));if(microseconds ==0){// 获取互斥锁,从而让当前线程获得操作locked变量的权限status = pthread_mutex_trylock(&thelock->mut );if(status != EBUSY)CHECK_STATUS_PTHREAD("pthread_mutex_trylock[1]");}else{// 获取互斥锁,从而让当前线程获得操作locked变量的权限status = pthread_mutex_lock(&thelock->mut );CHECK_STATUS_PTHREAD("pthread_mutex_lock[1]");}if(status ==0){if(thelock->locked ==0){// 获得锁success = PY_LOCK_ACQUIRED;}elseif(microseconds !=0){struct timespec ts;// 时间if(microseconds >0)// 等待事件MICROSECONDS_TO_TIMESPEC(microseconds, ts);/* 继续尝试,直到我们获得锁定 *///mut(互斥锁) 必须被当前线程锁定// 获得互斥锁失败,则一直尝试while(success == PY_LOCK_FAILURE){if(microseconds >0){// 计时等待持有锁的线程释放锁status = pthread_cond_timedwait(&thelock->lock_released,&thelock->mut,&ts);if(status == ETIMEDOUT)break;CHECK_STATUS_PTHREAD("pthread_cond_timed_wait");}else{// 无条件等待持有锁的线程释放锁status = pthread_cond_wait(&thelock->lock_released,&thelock->mut);CHECK_STATUS_PTHREAD("pthread_cond_wait");}if(intr_flag && status ==0&& thelock->locked){// 被唤醒了,但没有锁,则设置状态为PY_LOCK_INTR 当做异常状态来处理success = PY_LOCK_INTR;break;}elseif(status ==0&&!thelock->locked){success = PY_LOCK_ACQUIRED;}}}// 获得锁,则当前线程上说if(success == PY_LOCK_ACQUIRED) thelock->locked =1;// 释放互斥锁,让其他线上有机会竞争获得锁status = pthread_mutex_unlock(&thelock->mut );CHECK_STATUS_PTHREAD("pthread_mutex_unlock[1]");}if(error) success = PY_LOCK_FAILURE;dprintf(("PyThread_acquire_lock_timed(%p, %lld, %d) -> %d\n",lock, microseconds, intr_flag, success));return success;}intPyThread_acquire_lock(PyThread_type_lock lock,int waitflag){returnPyThread_acquire_lock_timed(lock, waitflag ?-1:0,/*intr_flag=*/0);}
上述代码中使用了下面 3 个方法来操作互斥锁
// 获得互斥锁pthread_mutex_lock(pthread_mutex_t*mutex);// 获得互斥锁pthread_mutex_trylock(pthread_mutex_t*mutex);// 释放互斥锁pthread_mutex_unlock(pthread_mutex_t*mutex);
这些方法会操作 POSIX 线程 (POSIX thread,简称 Pthread) 去操作锁,在 Linux、MacOS 等类 Unix 操作系统中都会使用 Pthread 作为操作系统的线程,这 3 个方法具体的细节不是本章主题,不再细究。
从上诉代码中可以看出,获取 GIL 锁的逻辑主要在 PyThread_acquire_lock_timed() 方法中,其主要的逻辑为,如果没有获得锁,就等待,具体分为计算等待与无条件等待,与 Python2 不同,Python3 通过计时的方式来触发「检查间隔」(check interval) 机制,直到成功获取 GIL,具体逻辑可以看代码中注释。
接着来看是否 GIL 锁的逻辑,即 PyThread_release_lock() 方法,代码如下:
voidPyThread_release_lock(PyThread_type_locklock){pthread_lock *thelock =(pthread_lock *)lock;int status, error =0;(void) error;/* silence unused-but-set-variable warning */dprintf(("PyThread_release_lock(%p) called\n",lock));// 获取互斥锁,从而让当前线程操作locked变量的权限status = pthread_mutex_lock(&thelock->mut );CHECK_STATUS_PTHREAD("pthread_mutex_lock[3]");// 释放GIL,将locked置为0thelock->locked =0;/* wake up someone (anyone, if any) waiting on the lock */// 通知其他线程当前线程已经释放GILstatus = pthread_cond_signal(&thelock->lock_released );CHECK_STATUS_PTHREAD("pthread_cond_signal");// 释放互斥锁status = pthread_mutex_unlock(&thelock->mut );CHECK_STATUS_PTHREAD("pthread_mutex_unlock[3]");}
PyThread_release_lock() 方法的逻辑相对简洁,首先获取互斥锁,从而拥有操作 locked 的权限,然后就将 locked 置为 0,表示释放 GIL,接着通过 pthread_cond_signal() 方法通知其他线程「当前线程已经释放 GIL」,让其他线程去获取 GIL,其他线程其实就是在调用 pthread_cond_timedwait() 方法或 pthread_cond_wait() 方法等待的线程。
改进后 GIL 的优势
通过前面内容的讨论,已经知道 Python3.x 中并没有取消 GIL,而是将其改进,让它变得更好一些。(具体而言 Python3.2 中对 GIL 进行了改进),改进后的 GIL 相比旧 GIL(Python2.x) 会让线程对 GIL 的竞争更加平稳,下图是旧 GIL 在 2 个 CPU 下 2 个线程之间运行状态,可以发现旧 GIL 中存在着大量的 Failed GIL Acquire。

究其原因,是因为旧 GIL 基于 ticker 来决定是否释放 GIL(ticker 默认为 100),并且释放完后,释放的线程依旧会参与 GIL 争夺,这就使得某线程一释放 GIL 就立刻去获得它,而其他 CPU 核下的线程相当于白白被唤醒,没有抢到 GIL 后,继续挂起等待,这就造成了资源的浪费,形象如下图:

写一段简单的测试旧 GIL 造成的影响,在 双核 2Ghz Macbook OS-X 10.5.6 下运行
def count(n):while n >0:n -=1
顺序执行
count(100000000)count(100000000)
耗时 24.6s
多线程运行
t1 =Thread(target=count,args=(100000000,))t1.start()t2 =Thread(target=count,args=(100000000,))t2.start()
耗时 45.5s,满了接近 1.8 倍,如果你在单核上运行,则耗时 38.0s,依旧比顺序执行慢,造成这么大的差距,就是因为旧 GIL 本身的设计存在问题,在多线程争夺 GIL 时有大量的资源消耗。
而改进后的 GIL 不再使用 ticker,而改为使用时间,可以通过 sys.getswitchinterval()来查看 GIL 释放的时间,默认为 5 毫秒,此外虽然说新 GIL 使用了时间,但决定线程是否释放 GIL 并不取决于时间,而是取决于 gil_drop_request 这一全局变量,如果 gil_drop_request=0,则线程会在解释器中一直运行,直到 gil_drop_request=1,此时线程才会释放 GIL,下面同样以两个线程来解释新 GIL 在其中发挥的具体作用。
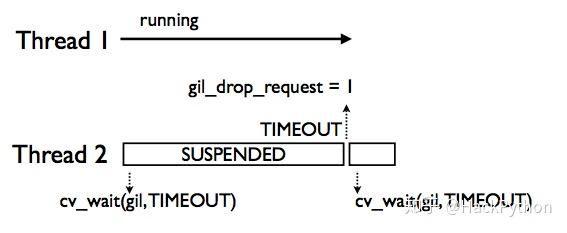
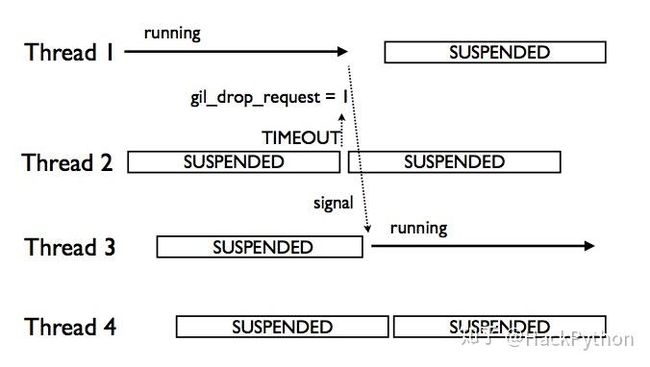
首先存在两个线程,Thread 1 是正在运行的状态,Thread 2 是挂起状态。

Thread 2 之所以挂起,是因为 Thread 2 没有获得 GIL,它会执行 cv_wait(gil,TIMEOUT) 定时等待方法,等待一段时间 (默认 5 毫秒),直到 Thread 1 主动释放 GIL(比如 Thread 1 执行 I/O 操作时会进入休眠状态,此时它会主动释放 GIL)。

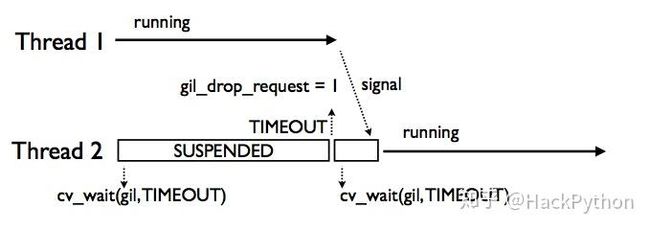
当 Thread 2 手动 signal 信号后,就知道 Thread 1 要休眠了,此时它就可以去获取 GIL 从而执行自身的逻辑。
另外一种情况就是,Thread 1 一直在执行,执行的时间超过了 Thread 2 cv_wait(gil,TIMEOUT) 方法等待的时间,此时 Thread 2 就会去修改全局变量 gil_drop_request,将其设置为 1,然后自己再次调用 cv_wait(gil,TIMEOUT) 挂起等待。
Thread 1 发现 gil_drop_request=1 会主动释放 GIL,并通过 signal 通知 Thread 2,让其获取 GIL 去运行。
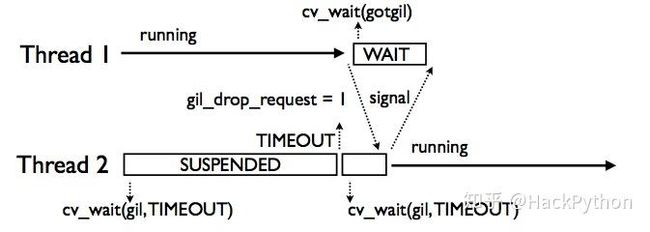
其中需要注意的细节如下图。当 Thread 1 因为 gil_drop_request=1 要主动释放 GIL 后,会调用 cv_wait(gotgil)方法进入等待状态,该状态下的 Thread 1 会等待 Thread 2 返回的 signal 信号,从而得知另一个线程 (Thread 2) 成功获得了 GIL 并在执行状态,这就避免了多个线程争夺 GIL 的情况,从而避免了额外资源的消耗。
然后相同的过程会重复的发生,直到线程执行结束
如果存在多个线程 (大于 2 个线程),此时多个线程出现等待时间超时,此时会不会发生多个线程争夺 GIL 的情况呢?答案是不会,如下图:
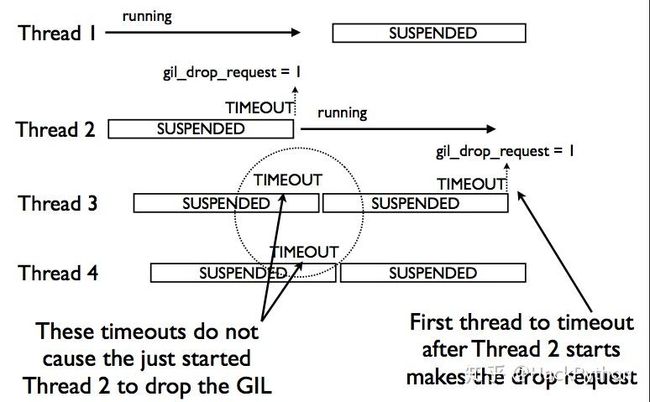
当 Thread 1 执行时,Thread 2 等待超时了,会设置 gil_drop_request = 1,从而让 Thread 2 获得运行权限,如果此时 Thread 3 或 Thread 4 一会后也超时了,此时是不会让 Thread 2 将获得的 GIL 立即释放的,Thread 3/4 会继续在挂起状态等待一段时间。
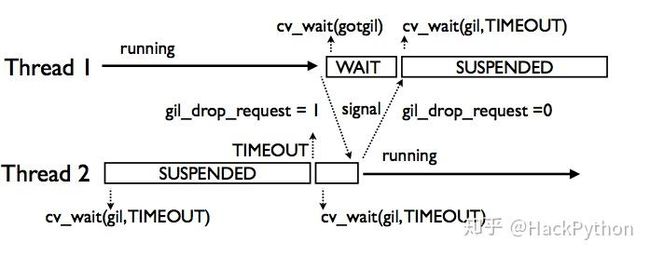
还需要注意的一点是,设置 gil_drop_request=1 的线程并不一定会是下一个要执行的线程,下一个要执行那个线程,这取决于操作系统,直观理解如下图:
图中,Thread 2 到了超时时间,将 gil_drop_request 设置为了 1,但 Thread 1 发送 signal 信号的线程是 Thread 3,这造成 Thread 2 继续挂起等待,而 Thread 3 获得 GIL 执行自身逻辑。
改进后的 GIL 使用上面相同的测试代码在四核 MacPro, OS-X 10.6.2 下运行,其顺序执行时间与多线程运行时间不会有太大差距
顺序执行耗时:23.5s 双线程执行耗时:24.0s
可以看出改进后的 GIL 相比旧 GIL 已经有了比较大的性能提升。
结尾
本节从源码层面简单的讨论了 GIL,感谢您的阅读与支持。
最后,Python官方宣布,在新版的CPython中,GIL锁将成为「可选择项」,各位pythoner终于不用再受到这一限制的困扰了。
量子位推文
参考文章:
- NewGIL
- GIL 的实现细节