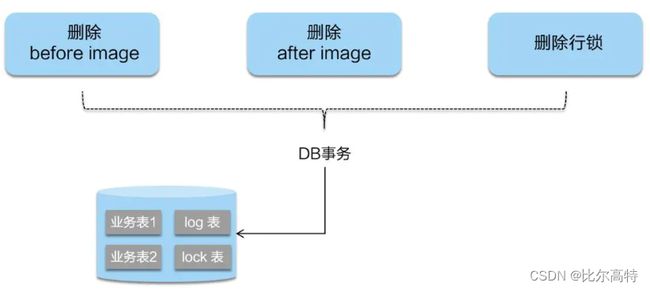
【微服务核心】Spring Cloud
文章目录
- 1. 简介
- 2. 微服务项目搭建
-
- 2.1 父工程
- 2.2 提供者子工程
- 2.3 热部署配置
- 2.4 消费者子工程
- 2.5 项目重构
- 3. 服务注册与发现
-
- 3.1 Eureka 服务注册与发现
-
- 3.1.1 单机版工程搭建
- 3.1.2 单机版改集群版
- 3.1.3 服务发现
- 3.1.4 保护模式
- 3.2 ZooKeeper 服务注册与发现
- 3.3 Consul 服务注册与发现
- 3.4 三个服务注册中心异同点
- 4. 负载均衡服务调用
-
- 4.1 手写负载均衡服务调用
- 4.2 Ribbon 服务调用负载均衡
- 4.3 OpenFeign-Ribbon版 服务调用
- 4.4 OpenFeign-LoadBalancer版 服务调用负载均衡
- 5. 服务降级熔断限流监控
-
- 5.1 Hystrix
- 6. 网关
-
- 6.1 Zuul
- 6.2 Gateway
-
- 6.2.1 路由配置
- 6.2.2 断言
- 6.2.3 过滤器
- 7. 配置中心+消息总线+消息驱动+链路跟踪
-
- 7.1 Spring Cloud Config
- 7.2 Spring Cloud Bus
- 7.3 Spring Cloud Stream
- 7.4 Spring Cloud Sleuth
- 8. Spring Cloud Alibaba
-
- 8.1 Nacos
-
- 8.1.1 下载、安装及使用
- 8.1.2 Nacos 服务注册中心使用
- 8.1.3 Nacos 配置中心使用
-
- 8.1.3.1 基础配置使用
- 8.1.3.2 分类配置
- 8.1.4 集群及持久化配置
- 8.2 Sentinel
-
- 8.2.1 工程搭建
- 8.2.2 实时监控、簇点链路、机器列表
- 8.2.3 流控规则
- 8.2.4 熔断规则
- 8.2.5 热点规则
- 8.2.6 系统规则
- 8.2.7 授权规则
- 8.2.8 @SentinelResource
- 8.2.9 规则持久化
- 8.3 Seata
-
- 8.3.1 理论知识
- 8.3.2 项目配置及使用
1. 简介
官网:https://spring.io/projects/spring-cloud/
2. 微服务项目搭建
搭建一个工程,包含一个消费者和提供者子工程,用户通过消费端访问,消费端通过 http 请求调用提供者模块。
2.1 父工程
创建父工程 SpringCloudStudy ,并添加工程依赖管理
<project xmlns="http://maven.apache.org/POM/4.0.0"
         xmlns:xsi="http://www.w3.org/2001/XMLSchema-instance"
         xsi:schemaLocation="http://maven.apache.org/POM/4.0.0 http://maven.apache.org/xsd/maven-4.0.0.xsd">
    <modelVersion>4.0.0modelVersion>

    <groupId>com.spring.springcloudgroupId>
    <artifactId>SpringCloudStudyartifactId>
    <version>1.0-SNAPSHOTversion>
    <packaging>pompackaging>
    <modules>
        <module>cloud-provider-payment8001module>
    modules>


    <properties>
        <maven.compiler.source>8maven.compiler.source>
        <maven.compiler.target>8maven.compiler.target>
        <project.build.sourceEncoding>UTF-8project.build.sourceEncoding>
        <junit.version>4.12junit.version>
        <log4j.version>1.2.17log4j.version>
        <lombok.version>1.16.18lombok.version>
        <mysql.version>8.0.33mysql.version>
        <druid.spring.boot.starter>1.2.16druid.spring.boot.starter>
        <mybatis.plus.boot.starter>3.5.3.1mybatis.plus.boot.starter>
    properties>


    <dependencyManagement>
        <dependencies>

            <dependency>
                <groupId>org.springframework.bootgroupId>
                <artifactId>spring-boot-dependenciesartifactId>
                <version>2.2.2.RELEASEversion>
                <type>pomtype>
                <scope>importscope>
            dependency>

            <dependency>
                <groupId>org.springframework.cloudgroupId>
                <artifactId>spring-cloud-dependenciesartifactId>
                <version>Hoxton.SR1version>
                <type>pomtype>
                <scope>importscope>
            dependency>

            <dependency>
                <groupId>com.alibaba.cloudgroupId>
                <artifactId>spring-cloud-alibaba-dependenciesartifactId>
                <version>2.1.0.RELEASEversion>
                <type>pomtype>
                <scope>importscope>
            dependency>
            <dependency>
                <groupId>mysqlgroupId>
                <artifactId>mysql-connector-javaartifactId>
                <version>${mysql.version}version>
            dependency>
            <dependency>
                <groupId>com.alibabagroupId>
                <artifactId>druid-spring-boot-starterartifactId>
                <version>${druid.spring.boot.starter}version>
            dependency>
            <dependency>
                <groupId>com.baomidougroupId>
                <artifactId>mybatis-plus-boot-starterartifactId>
                <version>${mybatis.plus.boot.starter}version>
            dependency>
            <dependency>
                <groupId>junitgroupId>
                <artifactId>junitartifactId>
                <version>${junit.version}version>
            dependency>
            <dependency>
                <groupId>log4jgroupId>
                <artifactId>log4jartifactId>
                <version>${log4j.version}version>
            dependency>
            <dependency>
                <groupId>org.projectlombokgroupId>
                <artifactId>lombokartifactId>
                <version>${lombok.version}version>
                <optional>trueoptional>
            dependency>
        dependencies>
    dependencyManagement>

    <build>
        <plugins>
            <plugin>
                <groupId>org.apache.maven.pluginsgroupId>
                <artifactId>maven-compiler-pluginartifactId>
                <version>3.5.1version>

                <configuration>
                    <source>8source>
                    <target>8target>
                configuration>
            plugin>
            <plugin>
                <groupId>org.springframework.bootgroupId>
                <artifactId>spring-boot-maven-pluginartifactId>
                <configuration>
                    <fork>truefork>
                    <addResources>trueaddResources>
                configuration>
            plugin>
        plugins>
    build>

project>
2.2 提供者子工程
- 建立微服务提供者子工程
cloud-provider-payment8001,并添加依赖
<project xmlns="http://maven.apache.org/POM/4.0.0" xmlns:xsi="http://www.w3.org/2001/XMLSchema-instance"
         xsi:schemaLocation="http://maven.apache.org/POM/4.0.0 http://maven.apache.org/maven-v4_0_0.xsd">
    <modelVersion>4.0.0modelVersion>
    <parent>
        <groupId>com.spring.springcloudgroupId>
        <artifactId>SpringCloudStudyartifactId>
        <version>1.0-SNAPSHOTversion>
    parent>

    <artifactId>cloud-provider-payment8001artifactId>

    <dependencies>
        <dependency>
            <groupId>org.springframework.bootgroupId>
            <artifactId>spring-boot-starter-webartifactId>
        dependency>
        <dependency>
            <groupId>org.springframework.bootgroupId>
            <artifactId>spring-boot-starter-actuatorartifactId>
        dependency>
        <dependency>
            <groupId>com.baomidougroupId>
            <artifactId>mybatis-plus-boot-starterartifactId>
        dependency>
        <dependency>
            <groupId>com.alibabagroupId>
            <artifactId>druid-spring-boot-starterartifactId>
        dependency>

        <dependency>
            <groupId>mysqlgroupId>
            <artifactId>mysql-connector-javaartifactId>
        dependency>

        <dependency>
            <groupId>org.springframework.bootgroupId>
            <artifactId>spring-boot-starter-jdbcartifactId>
        dependency>
        <dependency>
            <groupId>org.springframework.bootgroupId>
            <artifactId>spring-boot-devtoolsartifactId>
            <scope>runtimescope>
            <optional>trueoptional>
        dependency>
        <dependency>
            <groupId>org.projectlombokgroupId>
            <artifactId>lombokartifactId>
            <optional>trueoptional>
        dependency>
        <dependency>
            <groupId>org.springframework.bootgroupId>
            <artifactId>spring-boot-starter-testartifactId>
            <scope>testscope>
        dependency>
        <dependency>
            <groupId>log4jgroupId>
            <artifactId>log4jartifactId>
        dependency>
    dependencies>
project>
- 子工程配置文件
application.yml
server:
  port: 8001

spring:
  datasource:
    type: com.alibaba.druid.pool.DruidDataSource
    druid:
      username: root
      password: root
      url: jdbc:mysql:///springcloud
      driver-class-name: com.mysql.cj.jdbc.Driver
- sql 导入
CREATE TABLE `payment` (
  `id` bigint unsigned NOT NULL AUTO_INCREMENT,
  `serial_no` varchar(100) CHARACTER SET utf8mb4 COLLATE utf8mb4_general_ci NOT NULL,
  PRIMARY KEY (`id`)
) ENGINE=InnoDB DEFAULT CHARSET=utf8mb4 COLLATE=utf8mb4_general_ci
- 根据表,使用
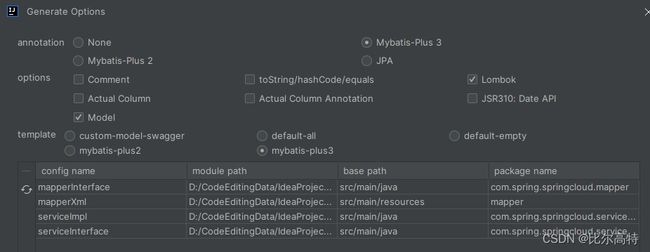
mybatis-X快速生成service层和mapper代码
- 启动类、
Controller和Result
@MapperScan("com.spring.springcloud.mapper")
@SpringBootApplication
public class PaymentMain8001 {

	public static void main(String[] args) {
		SpringApplication.run(PaymentMain8001.class, args);
	}
}
@RequestMapping("payment")
@RestController
public class PaymentController {

	@Autowired
	private PaymentService paymentService;

	@Value("${server.port}")
	private String port;

	@GetMapping("getById")
	public Result getById(Long id) {
		Result result = new Result(paymentService.getById(id));
		result.setMessage("port:" + port); // 方便后续负载均衡调用时知道调用的是哪个服务
		return result;
	}

	@PostMapping("create")
	public Result create(@RequestBody Payment payment) {
		if (paymentService.save(payment)){
			return new Result();
		}
		return new Result("新增失败");
	}
}
@Data
@NoArgsConstructor
@AllArgsConstructor
public class Result {

	private boolean flag = true;
	private Object data;
	private String message;

	public Result(Object data) {
		this(true, data, null);
	}

	public Result(String message) {
		this(false, null, message);
	}
}
2.3 热部署配置
至此,项目已完成搭建,接下来主要完成 热部署功能配置 ,配置完修改代码无需重启,需确保完成以下步骤
-
确保子工程添加依赖
<dependency> <groupId>org.springframework.bootgroupId> <artifactId>spring-boot-devtoolsartifactId> <scope>runtimescope> <optional>trueoptional> dependency> -
父工程添加插件
<plugin> <groupId>org.springframework.bootgroupId> <artifactId>spring-boot-maven-pluginartifactId> <configuration> <fork>truefork> <addResources>trueaddResources> configuration> plugin> -
设置中开启以下四项
-
同时按住
Ctrl + Shift + Alt + /键,选择1. Registry...,确保以下两项勾上compiler.automake.allow.when.app.running或者compiler.automake.allow.parallel(本人是idea 2023 版本,无前者,要求后者勾上)actionSystem.assertFocusAccessFromEdt
-
重启 idea,务必重启
2.4 消费者子工程
- 新建消费者子工程
cloud-consumer-order8080,先添加依赖
<project xmlns="http://maven.apache.org/POM/4.0.0" xmlns:xsi="http://www.w3.org/2001/XMLSchema-instance"
         xsi:schemaLocation="http://maven.apache.org/POM/4.0.0 http://maven.apache.org/xsd/maven-4.0.0.xsd">
    <modelVersion>4.0.0modelVersion>
    <parent>
        <groupId>com.spring.springcloudgroupId>
        <artifactId>SpringCloudStudyartifactId>
        <version>1.0-SNAPSHOTversion>
    parent>

    <artifactId>cloud-consumer-order8080artifactId>

    <properties>
        <project.build.sourceEncoding>UTF-8project.build.sourceEncoding>
    properties>

    <dependencies>
        <dependency>
            <groupId>org.springframework.bootgroupId>
            <artifactId>spring-boot-starter-webartifactId>
        dependency>
        <dependency>
            <groupId>org.springframework.bootgroupId>
            <artifactId>spring-boot-starter-actuatorartifactId>
        dependency>

        <dependency>
            <groupId>org.springframework.bootgroupId>
            <artifactId>spring-boot-devtoolsartifactId>
            <scope>runtimescope>
            <optional>trueoptional>
        dependency>
        <dependency>
            <groupId>org.projectlombokgroupId>
            <artifactId>lombokartifactId>
            <optional>trueoptional>
        dependency>
        <dependency>
            <groupId>org.springframework.bootgroupId>
            <artifactId>spring-boot-starter-testartifactId>
            <scope>testscope>
        dependency>
    dependencies>
project>
- 复制提供者模块中的
Result、Payment类,并新增启动类,启动类中添加如下注入RestTemplate配置
@Bean
public RestTemplate restTemplate() {
    return new RestTemplate();
}
- 业务类
Controller,调用提供者子工程的
@RequestMapping("consumer")
@RestController
public class OrderController {

	public static final String PAYMENT_SRV_URL = "http://localhost:8001";

	@Autowired
	private RestTemplate restTemplate;

	@GetMapping("getById")
	public Result getById(Long id)
	{
		return restTemplate.getForObject(PAYMENT_SRV_URL + "/payment/getById?id=" + id, Result.class);
	}

	@PostMapping("create")
	public Result create(@RequestBody Payment payment)
	{
		return restTemplate.postForObject(PAYMENT_SRV_URL + "/payment/create",payment,Result.class);
	}
}
2.5 项目重构
可注意到,上面有公共代码部分 Result 和 Payment 类,这里把公共部分抽取到一个公共模块
- 新建公共模块
cloud-api-common,并将公共类及部分依赖从子模块转移到该模块(子模块的公共类及对应依赖项可直接删除)
<project xmlns="http://maven.apache.org/POM/4.0.0" xmlns:xsi="http://www.w3.org/2001/XMLSchema-instance"
         xsi:schemaLocation="http://maven.apache.org/POM/4.0.0 http://maven.apache.org/xsd/maven-4.0.0.xsd">
    <modelVersion>4.0.0modelVersion>
    <parent>
        <groupId>com.spring.springcloudgroupId>
        <artifactId>SpringCloudStudyartifactId>
        <version>1.0-SNAPSHOTversion>
    parent>

    <artifactId>cloud-api-commonartifactId>

    <dependencies>
        <dependency>
            <groupId>org.springframework.bootgroupId>
            <artifactId>spring-boot-devtoolsartifactId>
            <scope>runtimescope>
            <optional>trueoptional>
        dependency>
        <dependency>
            <groupId>org.projectlombokgroupId>
            <artifactId>lombokartifactId>
            <optional>trueoptional>
        dependency>
        <dependency>
            <groupId>cn.hutoolgroupId>
            <artifactId>hutool-allartifactId>
            <version>5.1.0version>
        dependency>
    dependencies>
project>
- 之后对该模块执行
mvn install命令打包 - 为其他子模块添加该依赖
<dependency>
    <groupId>com.spring.springcloudgroupId>
    <artifactId>cloud-api-commonartifactId>
    <version>${project.version}version>
dependency>
3. 服务注册与发现
- 服务治理:在传统的rpc远程调用框架中,管理每个服务与服务之间依赖关系比较复杂,管理比较复杂,所以需要使用服务治理,管理服务于服务之间依赖关系,可以实现服务调用、负载均衡、容错等,实现服务发现与注册
- 服务注册与发现:在服务注册与发现中,有一个注册中心。当服务器启动的时候,会把当前自己服务器的信息 比如服务地址通讯地址等以别名方式注册到注册中心上。另一方(消费者|服务提供者),以该别名的方式去注册中心上获取到实际的服务通讯地址,然后再实现本地RPC调用。
- RPC远程调用框架核心设计思想在于注册中心,使用注册中心管理每个服务与服务之间的一个依赖关系(服务治理概念)。在任何rpc远程框架中,都会有一个注册中心(存放服务地址相关信息(接口地址))
3.1 Eureka 服务注册与发现
首先声明,eureka 已经停更,但可作为学习内容进行学习
Eureka包含两个组件:Eureka Server 和 Eureka Client
Eureka Server:提供服务注册服务。各个微服务节点通过配置启动后,会在EurekaServer中进行注册,这样EurekaServer中的服务注册表中将会存储所有可用服务节点的信息,服务节点的信息可以在界面中直观看到。EurekaClient:通过注册中心进行访问。是一个Java客户端,用于简化Eureka Server的交互,客户端同时也具备一个内置的、使用轮询(round-robin)负载算法的负载均衡器。在应用启动后,将会向Eureka Server发送心跳(默认周期为30秒)。如果Eureka Server在多个心跳周期内没有接收到某个节点的心跳,EurekaServer将会从服务注册表中把这个服务节点移除(默认90秒)
3.1.1 单机版工程搭建
Eureka Server 工程搭建:
- 新建
cloud-eureka-server7001工程,添加依赖,主要是spring-cloud-starter-netflix-eureka-server依赖
<project xmlns="http://maven.apache.org/POM/4.0.0" xmlns:xsi="http://www.w3.org/2001/XMLSchema-instance"
         xsi:schemaLocation="http://maven.apache.org/POM/4.0.0 http://maven.apache.org/xsd/maven-4.0.0.xsd">
    <modelVersion>4.0.0modelVersion>
    <parent>
        <groupId>com.spring.springcloudgroupId>
        <artifactId>SpringCloudStudyartifactId>
        <version>1.0-SNAPSHOTversion>
    parent>

    <artifactId>cloud-eureka-server7001artifactId>

    <properties>
        <project.build.sourceEncoding>UTF-8project.build.sourceEncoding>
    properties>

    <dependencies>

        <dependency>
            <groupId>org.springframework.cloudgroupId>
            <artifactId>spring-cloud-starter-netflix-eureka-serverartifactId>
        dependency>

        <dependency>
            <groupId>com.spring.springcloudgroupId>
            <artifactId>cloud-api-commonartifactId>
            <version>${project.version}version>
        dependency>

        <dependency>
            <groupId>org.springframework.bootgroupId>
            <artifactId>spring-boot-starter-webartifactId>
        dependency>
        <dependency>
            <groupId>org.springframework.bootgroupId>
            <artifactId>spring-boot-starter-actuatorartifactId>
        dependency>

        <dependency>
            <groupId>org.springframework.bootgroupId>
            <artifactId>spring-boot-devtoolsartifactId>
            <scope>runtimescope>
            <optional>trueoptional>
        dependency>
        <dependency>
            <groupId>org.projectlombokgroupId>
            <artifactId>lombokartifactId>
        dependency>
        <dependency>
            <groupId>org.springframework.bootgroupId>
            <artifactId>spring-boot-starter-testartifactId>
            <scope>testscope>
        dependency>
        <dependency>
            <groupId>junitgroupId>
            <artifactId>junitartifactId>
        dependency>
    dependencies>
project>
- 配置文件
application.yml
server:
  port: 7001

eureka:
  instance:
    hostname: localhost #eureka服务端的实例名称
  client:
    #false表示不向注册中心注册自己。
    register-with-eureka: false
    #false表示自己端就是注册中心,我的职责就是维护服务实例,并不需要去检索服务
    fetch-registry: false
    service-url:
      #设置与Eureka Server交互的地址查询服务和注册服务都需要依赖这个地址。
      defaultZone: http://${eureka.instance.hostname}:${server.port}/eureka/
- 主启动类名
EurekaMain7002开启@SpringBootApplication和@EnableEurekaServer注解 - 访问 http://localhost:7001/ 看到 spring eureka 页面即成功
Eureka Client 工程配置:提供者子工程配置
- 添加依赖
<dependency>
    <groupId>org.springframework.cloudgroupId>
    <artifactId>spring-cloud-starter-netflix-eureka-clientartifactId>
dependency>
- 配置文件添加 eureka 配置
spring:
  application:
    name: cloud-payment-service # 指定服务名称
eureka:
  instance:
    instance-id: payment8001	# 指定实例ID,影响Eureka首页 status列显示
    prefer-ip-address: true     # 访问路径可以显示IP地址
  client:
    service-url:
      defaultZone: http://localhost:7001/eureka
- 主启动类开启
@EnableEurekaClient注解
Eureka Client 工程配置:消费者子工程配置
- 首先按提供者的三步相同配置,但需要修改配置文件中
spring.application.name为cloud-order-service
server:
  port: 8080

spring:
  application:
    name: cloud-order-service

eureka:
  instance:
    instance-id: order8080
    prefer-ip-address: true     #访问路径可以显示IP地址
  client:
    service-url:
      defaultZone: http://localhost:7001/eureka
-
修改
Controller中提供者 URL,改为 eureka 中注册的服务名地址:http://CLOUD-PAYMENT-SERVICE即提供者配置的spring.application.name -
给
restTemplate增加@LoadBalanced注解,这样才能轮训服务中不同服务器
@Bean
@LoadBalanced
public RestTemplate restTemplate() {
    return new RestTemplate();
}
流程梳理:按以下流程启动后,看 http://localhost:7001/ 服务配置成功则会有对应服务名显示
- 先启动 eureka 注册中心
- 启动服务提供者 payment 支付服务,
- 支付服务启动后,会把自身信息比如服务地址以别名方式注册进 eureka
- 消费者 order 服务在需要调用接口时,使用服务别名区注册中心获取实际的 RPC 远程调用地址
- 消费者获得调用地址后,底层实际是利用 HttpClient 技术实现远程调用
- 消费者获得服务地址后会缓存在本地 jvm 内存中,默认每隔30s更新一次服务调用地址
3.1.2 单机版改集群版
上述搭建显然是单机版,接下来为详述如何改为集群版:
首先是注册中心集群
- 首先需要添加映射配置来模拟多台机器,修改
C:\Windows\System32\drivers\etc\hosts,添加以下两行
127.0.0.1       eureka7001.com
127.0.0.1       eureka7002.com
- 修改 Eureka Server 配置文件的
eureka.instance.hostname和eureka.client.service-url.defaultZone
server:
  port: 7001

eureka:
  instance:
    # hostname: localhost #eureka服务端的实例名称
    hostname: eureka7001.com #eureka服务端的实例名称
  client:
    #false表示不向注册中心注册自己。
    register-with-eureka: false
    #false表示自己端就是注册中心,我的职责就是维护服务实例,并不需要去检索服务
    fetch-registry: false
    service-url:
      #设置与Eureka Server交互的地址查询服务和注册服务都需要依赖这个地址。
      # defaultZone: http://${eureka.instance.hostname}:${server.port}/eureka/ # 单击版
      defaultZone: http://eureka7002.com:7002/eureka/ # 集群版,写的是别的服务器网址
- 新增 Eureka Server 工程
cloud-eureka-server7002,配置参考cloud-eureka-server7001- 需修改项:配置文件中
server.port、hostname和defaultZone配置;主启动类名EurekaMain7002
- 需修改项:配置文件中
- 修改两个子服务的配置文件中
defaultZone为http://eureka7001.com:7001/eureka,http://eureka7002.com:7002/eureka
配置 Eureka Client 集群:只需要将对应服务复制一份,修改 server.port 和 instance-id 配置及主启动类名即可。
可自行修改差异化,使得测试时可测出负载均衡调用不同服务器的效果,默认是轮训。
可使用 http://localhost:7001/ 和 http://localhost:7002/ 查看 eureka 首页
3.1.3 服务发现
通过服务发现可以获取到 eureka 中注册的所有服务的信息。
首先需要在主启动类开启 @EnableDiscoveryClient 注解,之后便可直接使用 DiscoveryClient 对象获取数据,如下,在消费端 Controller 中添加如下代码,用户通过访问该接口便可获取到服务注册的所有信息(不含注册中心服务)
@Resource
private DiscoveryClient discoveryClient;

@GetMapping("getDiscoveryClient")
public Result getDiscoveryClient() {
    Map<String, Object> map = new HashMap<>();
    map.put("services", discoveryClient.getServices());
    map.put("paymentInstance", discoveryClient.getInstances("CLOUD-PAYMENT-SERVICE"));
    map.put("orderInstance", discoveryClient.getInstances("CLOUD-ORDER-SERVICE"));
    return new Result(map);
}
3.1.4 保护模式
保护模式主要用于一组客户端和Eureka Server之间存在网络分区场景下的保护。一旦进入保护模式,Eureka Server将会尝试保护其服务注册表中的信息,不再删除服务注册表中的数据,也就是不会注销任何微服务。
如果在Eureka Server的首页看到以下这段提示,则说明Eureka进入了保护模式:
EMERGENCY! EUREKA MAY BE INCORRECTLY CLAIMING INSTANCES ARE UP WHEN THEY'RE NOT. RENEWALS ARE LESSER THAN THRESHOLD AND HENCE THE INSTANCES ARE NOT BEING EXPIRED JUST TO BE SAFE.
在注册中心端 Eureka Server 即上面的 cloud-eureka-server7001 和 cloud-eureka-server7002 配置参数:
eureka.server.enable-self-preservation:默认 true,表示自动开启保护模式,设置为 false 表示禁用保护模式
在客户端 Eureka Client 可配置服务心跳参数:
eureka.instance.lease-renewal-interval-in-seconds:默认 30 (秒) ,Eureka客户端向服务端发送心跳的时间间隔eureka.instance.lease-expiration-duration-in-seconds:默认 90 (秒),Eureka服务端在收到最后一次心跳后等待时间上限,超时将剔除服务(保护模式不会剔除)
3.2 ZooKeeper 服务注册与发现
本节主要介绍如何使用 ZooKeeper 替代 Eureka 作为服务注册中心,创建的节点是临时节点
这种服务注册与发现方案一般适用于老系统改造,老系统原来就使用了 ZooKeeper 的可以使用该方案,但新项目不推荐。
服务提供者子工程改造
- 新建
cloud-provider-payment8004工程,添加依赖,将8001工程的eureka-client依赖换成 ZooKeeper 依赖即可
<dependency>
    <groupId>org.springframework.cloudgroupId>
    <artifactId>spring-cloud-starter-zookeeper-discoveryartifactId>

    <exclusions>
        <exclusion>
            <groupId>org.apache.zookeepergroupId>
            <artifactId>zookeeperartifactId>
        exclusion>
    exclusions>
dependency>

<dependency>
    <groupId>org.apache.zookeepergroupId>
    <artifactId>zookeeperartifactId>
    <version>3.8.3version>
dependency>
- 配置,将
eureka配置改为ZooKeeper配置
server:
  port: 8004

spring:
  application:
    name: cloud-payment-service
  cloud:
    zookeeper:
      connect-string: 192.168.115.129:2181,192.168.115.131:2181,192.168.115.132:2181
  datasource:
    type: com.alibaba.druid.pool.DruidDataSource
    druid:
      username: root
      password: root
      url: jdbc:mysql:///springcloud
      driver-class-name: com.mysql.cj.jdbc.Driver
- 主启动类改为
@EnableDiscoveryClient注解
@EnableDiscoveryClient
@MapperScan("com.spring.springcloud.mapper")
@SpringBootApplication
public class PaymentMain8004 {
	public static void main(String[] args) {
		SpringApplication.run(PaymentMain8004.class, args);
	}
}
- 其他代码直接复制即可
服务消费者子工程改造
- 新建
cloud-consumerzk-order8080工程,参照cloud-consumer-order8080工程,但如上面一样,将依赖和配置改为ZooKeeper依赖和配置并且去掉主启动类处的eureka的注解只使用@EnableDiscoveryClient注解 Controller处的 url 需要调整,将http://CLOUD-PAYMENT-SERVICE改为小写字母http://cloud-payment-service这里的路径同Eureka一样,来源于spring.application.name
3.3 Consul 服务注册与发现
Consul 是一套开源的分布式服务发现和配置管理系统,由 HashiCorp 公司用 Go 语言开发。提供了微服务系统中的服务治理、配置中心、控制总线等功能。这些功能中的每一个都可以根据需要单独使用,也可以一起使用以构建全方位的服务网格,总之Consul提供了一种完整的服务网格解决方案。它具有很多优点。包括: 基于 raft 协议,比较简洁; 支持健康检查, 同时支持 HTTP 和 DNS 协议 支持跨数据中心的 WAN 集群 提供图形界面 跨平台,支持 Linux、Mac、Windows。
官网下载:https://www.consul.io/downloads.html
CentOS 下载及安装
sudo yum install -y yum-utils
sudo yum-config-manager --add-repo https://rpm.releases.hashicorp.com/RHEL/hashicorp.repo
sudo yum -y install consul
consul --version 查看版本信息
consul agent -dev -client=0.0.0.0 开发模式启动且允许任意主机访问,通过 http://本机ip:8500 可访问首页,本人 http://192.168.115.129:8500/
使用参考文档:https://www.springcloud.cc/spring-cloud-consul.html
服务提供者子工程改造
- 新建
cloud-provider-payment8006工程,步骤与 ZooKeeper 类似,代码可直接参考cloud-provider-payment8004,先替换依赖
<dependency>
    <groupId>org.springframework.cloudgroupId>
    <artifactId>spring-cloud-starter-consul-discoveryartifactId>
dependency>
- 配置改为
Consul配置
server:
  port: 8006

spring:
  application:
    name: cloud-payment-service
  datasource:
    type: com.alibaba.druid.pool.DruidDataSource
    druid:
      username: root
      password: root
      url: jdbc:mysql:///springcloud
      driver-class-name: com.mysql.cj.jdbc.Driver
  cloud:
    consul:
      host: 192.168.115.129
      discovery:
        heartbeat:
          enabled: true
服务消费者子工程改造
- 新建
cloud-consumerconsul-order8080工程,代码主要参考cloud-consumerzk-order8080,其余完成依赖替换,改主启动类名 - 配置改为
Consul配置
server:
  port: 8080

spring:
  application:
    name: cloud-order-service
  cloud:
    consul:
      host: 192.168.115.129
      discovery:
        heartbeat:
          enabled: true
3.4 三个服务注册中心异同点
| 组件名 | 语言 | CAP | 服务健康检查 | 对外暴露接口 |
|---|---|---|---|---|
| Eureka | Java | AP | 可配支持 | HTTP |
| ZooKeeper | Java | CP | 支持 | 客户端 |
| Consul | Go | CP | 支持 | HTTP/DNS |
4. 负载均衡服务调用
4.1 手写负载均衡服务调用
- 基于
cloud-consumer-order8080项目,去除 RestTemplate 方法上@LoadBalanced注解 - 自定义负载均衡
/**
 * 自定义负载均衡,轮询
 */
@Component
public class CustomLoadbalancer {

	@Autowired
	private RestTemplate restTemplate;

	@Resource
	private DiscoveryClient discoveryClient;

	public <T> T getForObject(String serviceId, String url, Class<T> responseType){
		List<ServiceInstance> instances = discoveryClient.getInstances(serviceId);
		int index = getAndIncrement() % instances.size();
		return restTemplate.getForObject(instances.get(index).getUri() + url, responseType);
	}

	private final AtomicInteger atomicInteger = new AtomicInteger(0);

	public final int getAndIncrement() {
		int current;
		int next;
		do
		{
			current = this.atomicInteger.get();
			next = current == Integer.MAX_VALUE ? 0 : current + 1;
		} while(!this.atomicInteger.compareAndSet(current, next));
		return next;
	}
}
- 在 Controller 里添加调用方法,访问
http://localhost:8080/consumer/getCustomById?id=1测试
@Autowired
private CustomLoadbalancer customLoadbalancer;

@GetMapping("getCustomById")
public Result getCustomById(Long id)
{
    return customLoadbalancer.getForObject("CLOUD-PAYMENT-SERVICE", "/payment/getById?id=" + id, Result.class);
}
4.2 Ribbon 服务调用负载均衡
Ribbon是Netflix发布的开源项目,主要功能是提供客户端的软件负载均衡算法和服务调用。Ribbon客户端组件提供一系列完善的配置项如连接超时,重试等。简单的说,就是在配置文件中列出Load Balancer(简称LB)后面所有的机器,Ribbon会自动的帮助你基于某种规则(如简单轮询,随机连接等)去连接这些机器。我们很容易使用Ribbon实现自定义的负载均衡算法。
该项目已进入维护,替代方案是 Spring Cloud Loadbalancer ,将在本小节最后部分介绍。
使用步骤:
- 依赖:
spring-cloud-starter-netflix-eureka-client自带了spring-cloud-starter-ribbon引用 - 默认负载均衡,在 RestTemplate 处添加
@LoadBalanced注解即可
@Bean
@LoadBalanced
public RestTemplate restTemplate() {
    return new RestTemplate();
}
- 默认含有的几种负载均衡算法:均实现了
IRule接口
| 类名 | 含义 |
|---|---|
| RoundRobinRule | 轮询 |
| RandomRule | 随机 |
| RetryRule | 先按照轮询的策略获取服务,如果获取服务失败则在指定时间内会进行重试,获取可用的服务 |
| WeightedResponseTimeRule | 对轮询的扩展,响应速度越快的实例选择权重越大,越容易被选择 |
| BestAvailableRule | 会先过滤掉由于多次访问故障而处于断路器跳闸状态的服务,然后选择一个并发量最小的服务 |
| AvailabilityFilteringRule | 先过滤掉故障实例,再选择并发较小的实例 |
| ZoneAvoidanceRule | 默认规则,复合判断server所在区域的性能和server的可用性选择服务器进行轮询 |
- 替换负载均衡算法:在不可被
@ComponentScan扫描到的地方创建配置类,并使用@Bean返回规则类,主启动类添加@RibbonClient注解
@Configuration
public class RuleConfig {

	@Bean
	public IRule rule() {
		return new RandomRule();
	}
}
4.3 OpenFeign-Ribbon版 服务调用
Feign是一个声明式的Web服务客户端,让编写Web服务客户端变得非常容易,只需创建一个接口并在接口上添加注解即可。
Feign集成了Ribbon利用Ribbon维护了服务列表信息,并且通过轮询实现了客户端的负载均衡。而与Ribbon不同的是,通过feign只需要定义服务绑定接口且以声明式的方法,优雅而简单的实现了服务调用。2020 之后版本的 OpenFeign 中的 Ribbon 已被 Spring Cloud LoadBalancer 所替代。这里先继续以 Ribbon 版本记录。
Feign 与 OpenFeign的区别:Feign 一般不再使用
spring-cloud-starter-feign:Feign是Spring Cloud组件中的一个轻量级RESTful的HTTP服务客户端。Feign内置了Ribbon,用来做客户端负载均衡,去调用服务注册中心的服务。Feign的使用方式是:使用Feign的注解定义接口,调用这个接口,就可以调用服务注册中心的服务spring-cloud-starter-openfeign:OpenFeign是Spring Cloud 在Feign的基础上支持了SpringMVC的注解,如@RequesMapping等等。OpenFeign的@FeignClient可以解析SpringMVC的@RequestMapping注解下的接口,并通过动态代理的方式产生实现类,实现类中做负载均衡并调用其他服务
Feign在消费端使用
- 新建工程
cloud-consumer-feign-order8080工程,添加依赖
<dependencies>

    <dependency>
        <groupId>org.springframework.cloudgroupId>
        <artifactId>spring-cloud-starter-openfeignartifactId>
    dependency>

    <dependency>
        <groupId>org.springframework.cloudgroupId>
        <artifactId>spring-cloud-starter-netflix-eureka-clientartifactId>
    dependency>
    <dependency>
        <groupId>com.spring.springcloudgroupId>
        <artifactId>cloud-api-commonartifactId>
        <version>${project.version}version>
    dependency>
    <dependency>
        <groupId>org.springframework.bootgroupId>
        <artifactId>spring-boot-starter-webartifactId>
    dependency>
    <dependency>
        <groupId>org.springframework.bootgroupId>
        <artifactId>spring-boot-starter-actuatorartifactId>
    dependency>
    <dependency>
        <groupId>org.springframework.bootgroupId>
        <artifactId>spring-boot-starter-testartifactId>
        <scope>testscope>
    dependency>
dependencies>
- 主启动类开启注解
@EnableFeignClients
@EnableFeignClients
@SpringBootApplication
public class ConsumerFeignMain8080 {

	public static void main(String[] args) {
		SpringApplication.run(ConsumerFeignMain8080.class);
	}
}
- 新建接口类供调用
PaymentService
@Component
@FeignClient(value = "CLOUD-PAYMENT-SERVICE")
public interface PaymentService {

	/**
	 * 注意路径:payment
	 * 注意参数使用 @RequestParam
	 */
	@GetMapping(value = "payment/getById")
	Result getById(@RequestParam("id") Long id);

	@PostMapping(value = "payment/create")
	Result create(@RequestBody Payment payment);
}
- Controller 直接改用 PaymentService 无需使用 RestTemplate
@RequestMapping("consumer")
@RestController
public class OrderController {

	@Autowired
	private PaymentService paymentService;

	@GetMapping("getById")
	public Result getById(@RequestParam Long id) {
		return paymentService.getById(id);
	}

	@PostMapping("create")
	public Result create(@RequestBody Payment payment) {
		return paymentService.create(payment);
	}
}
超时配置:默认1秒
#设置feign客户端超时时间(OpenFeign默认支持ribbon)
ribbon:
  #指的是建立连接所用的时间,适用于网络状况正常的情况下,两端连接所用的时间
  ReadTimeout: 5000
  #指的是建立连接后从服务器读取到可用资源所用的时间
  ConnectTimeout: 5000
日志配置:
@Bean
Logger.Level feignLoggerLevel()
{
    return Logger.Level.FULL;
}
logging:
  level:
    # feign日志以什么级别监控哪个接口
    com.spring.springcloud.service.PaymentService: debug
4.4 OpenFeign-LoadBalancer版 服务调用负载均衡
因为 LoadBalancer 与 Ribbon 用法类似,故不对 LoadBalancer 的使用进行赘述,且 LoadBalancer 一般结合 OpenFeign 使用,故这里着重讲二者结合使用。
Spring Cloud 2020版本以后,默认移除了对Netflix的依赖,其中就包括Ribbon,官方默认推荐使用Spring Cloud Loadbalancer正式替换Ribbon,并成为了Spring Cloud负载均衡器的唯一实现。
- 新建工程
cloud-consumer-loadbalancer-order8080,依赖:
<dependencyManagement>
    <dependencies>
        <dependency>
            <groupId>org.springframework.bootgroupId>
            <artifactId>spring-boot-dependenciesartifactId>
            <version>2.5.15version>
            <type>pomtype>
            <scope>importscope>
        dependency>
        <dependency>
            <groupId>org.springframework.cloudgroupId>
            <artifactId>spring-cloud-dependenciesartifactId>
            <version>2020.0.2version>
            <type>pomtype>
            <scope>importscope>
        dependency>
    dependencies>
dependencyManagement>

<dependencies>

    <dependency>
        <groupId>org.springframework.cloudgroupId>
        <artifactId>spring-cloud-starter-openfeignartifactId>
    dependency>

    <dependency>
        <groupId>org.springframework.cloudgroupId>
        <artifactId>spring-cloud-starter-netflix-eureka-clientartifactId>
    dependency>
    <dependency>
        <groupId>com.spring.springcloudgroupId>
        <artifactId>cloud-api-commonartifactId>
        <version>${project.version}version>
    dependency>
    <dependency>
        <groupId>org.springframework.bootgroupId>
        <artifactId>spring-boot-starter-webartifactId>
    dependency>
    <dependency>
        <groupId>org.springframework.bootgroupId>
        <artifactId>spring-boot-starter-actuatorartifactId>
    dependency>
    <dependency>
        <groupId>org.springframework.bootgroupId>
        <artifactId>spring-boot-starter-testartifactId>
        <scope>testscope>
    dependency>
dependencies>
- 主启动类、Controller、Service 与 Ribbon 版本一致
- 配置项:超时配置及日志配置
feign:
  client:
    config:
      default:
        # 日志级别
        loggerLevel: full
        # 超时设置 5 秒超时,connectTimeout和readTimeout同时设置才会生效
        connectTimeout: 5000
        readTimeout: 5000

logging:
  level:
    # feign日志以什么级别监控哪个接口
    com.spring.springcloud.service.PaymentService: debug
自定义负载均衡策略及使用
负载均衡默认是轮询调用 使用的是 RoundRobinLoadBalancer ,这里参考 RoundRobinLoadBalancer 自定义负载均衡类并使用
- 创建类
CustomLoadbalancer,复制RoundRobinLoadBalancer去掉一些代码,对getInstanceResponse方法内代码进行修改
/**
 * 代码复制自轮询实现类后经过部分改造:RoundRobinLoadBalancer
 */
public class CustomLoadbalancer implements ReactorServiceInstanceLoadBalancer {

	ObjectProvider<ServiceInstanceListSupplier> serviceInstanceListSupplierProvider;

	public CustomLoadbalancer(ObjectProvider<ServiceInstanceListSupplier> serviceInstanceListSupplierProvider) {
		this.serviceInstanceListSupplierProvider = serviceInstanceListSupplierProvider;
	}

	@SuppressWarnings("rawtypes")
	@Override
	// see original
	// https://github.com/Netflix/ocelli/blob/master/ocelli-core/
	// src/main/java/netflix/ocelli/loadbalancer/RoundRobinLoadBalancer.java
	public Mono<Response<ServiceInstance>> choose(Request request) {
		ServiceInstanceListSupplier supplier = serviceInstanceListSupplierProvider
				.getIfAvailable(NoopServiceInstanceListSupplier::new);
		return supplier.get(request).next()
				.map(serviceInstances -> processInstanceResponse(supplier, serviceInstances));
	}

	private Response<ServiceInstance> processInstanceResponse(ServiceInstanceListSupplier supplier,
	                                                          List<ServiceInstance> serviceInstances) {
		Response<ServiceInstance> serviceInstanceResponse = getInstanceResponse(serviceInstances);
		if (supplier instanceof SelectedInstanceCallback && serviceInstanceResponse.hasServer()) {
			((SelectedInstanceCallback) supplier).selectedServiceInstance(serviceInstanceResponse.getServer());
		}
		return serviceInstanceResponse;
	}

	/**
	 * 关键是这里,对于 service 的选择,这里本人改成 必定是 8001
	 */
	private Response<ServiceInstance> getInstanceResponse(List<ServiceInstance> instances) {
		if (instances.isEmpty()) {
			return new EmptyResponse();
		}

//		ServiceInstance instance = instances.get(pos % instances.size());
		ServiceInstance instance = null;
		for (ServiceInstance ins : instances) {
			if (ins.getPort() == 8001) {
				instance = ins;
			}
		}

		return new DefaultResponse(instance);
	}
}
- 主启动类添加
@LoadBalancerClient注解,并注入RoundRobinLoadBalancer对象到容器中,经过这些配置,消费者访问时将只访问 8001 端口的提供者
@EnableFeignClients
@SpringBootApplication
@LoadBalancerClient(value = "CLOUD-PAYMENT-SERVICE", configuration = CustomLoadbalancer.class)
public class ConsumerLoadbalancerMain8080 {

	public static void main(String[] args) {
		SpringApplication.run(ConsumerLoadbalancerMain8080.class);
	}

	// 配置负载均衡策略
	@Bean
	public ReactorLoadBalancer<ServiceInstance> customLoadbalancer(Environment environment, LoadBalancerClientFactory loadBalancerClientFactory) {
		String name = environment.getProperty(LoadBalancerClientFactory.PROPERTY_NAME);
		return new CustomLoadbalancer(loadBalancerClientFactory.getLazyProvider(name, ServiceInstanceListSupplier.class));
	}
}
5. 服务降级熔断限流监控
服务雪崩:多个微服务之间调用的时候,假设微服务A调用微服务B和微服务C,微服务B和微服务C又调用其它的微服务,这就是所谓的“扇出”。如果扇出的链路上某个微服务的调用响应时间过长或者不可用,对微服务A的调用就会占用越来越多的系统资源,进而引起系统崩溃,所谓的“雪崩效应”。
服务降级:系统有限的资源的合理协调。服务降级一般是指在服务器压力剧增的时候,根据实际业务使用情况以及流量,对一些服务和页面有策略的不处理或者用一种简单的方式进行处理,从而释放服务器资源的资源以保证核心业务的正常高效运行。程序运行异常,超时,服务熔断,线程池/信号量打满等都可以使用服务降级来处理。
服务熔断:应对雪崩效应的链路自我保护机制。可看作降级的特殊情况。服务熔断的作用类似于我们家用的保险丝,当某服务出现不可用或响应超时的情况时,为了防止整个系统出现雪崩,暂时停止对该服务的调用。
- 限流:限制并发的请求访问量,超过阈值则拒绝;
- 降级:服务分优先级,牺牲非核心服务(不可用),保证核心服务稳定;从整体负荷考虑
- 熔断:依赖的下游服务故障触发熔断,避免引发本系统崩溃;系统自动执行和恢复
5.1 Hystrix
注意:该项目已进入维护,但其思想十分值得学习。升级版是 Sentinel 将在后面章节介绍。
Hystrix能够保证在一个依赖出问题的情况下,不会导致整体服务失败,避免级联故障,以提高分布式系统的弹性。断路器本身是一种开关装置,当某个服务单元发生故障之后,通过断路器的故障监控(类似熔断保险丝),向调用方返回一个符合预期的、可处理的备选响应(FallBack),而不是长时间的等待或者抛出调用方无法处理的异常,这样就保证了服务调用方的线程不会被长时间、不必要地占用,从而避免了故障在分布式系统中的蔓延,乃至雪崩。
Hystrix 具备服务降级、服务熔断、服务限流及服务监控等一系列功能,本节将针对这些内容的使用进行讲解。
Hystrix 服务降级
一般服务降级及熔断用在消费端,服务端一般不使用。
这里先演示服务端使用方式:
- 复制项目
cloud-provider-payment8001新建为cloud-provider-hystrix-payment8001,引入新依赖
<dependency>
    <groupId>org.springframework.cloudgroupId>
    <artifactId>spring-cloud-starter-netflix-hystrixartifactId>
dependency>
- 主启动类添加
@EnableHystrix注解 - 业务类添加
@HystrixCommand注解配置服务降级指定回调方法,并配置超时属性,当被注解的方法执行超时或报错都会调用回调方法(同一线程)
@GetMapping("getByIdTimeOut")
@HystrixCommand(fallbackMethod = "timeOutHandler",commandProperties = {
    @HystrixProperty(name="execution.isolation.thread.timeoutInMilliseconds",value="3000")
})
public Result getByIdTimeOut(Long id) throws InterruptedException {
    Result result = new Result(paymentService.getById(id));
//		TimeUnit.SECONDS.sleep(5);
    System.out.println(1/0);
    result.setMessage("port:" + port);
    return result;
}

public Result timeOutHandler(Long id) throws InterruptedException {
    Result result = new Result();
    result.setMessage("port:" + port + ":超时或运行异常");
    return result;
}
消费端使用方式 :与服务端类似,但多了一些功能,甚至可以结合 feign 使用
- 复制项目
cloud-consumer-feign-order8080新建为cloud-consumerhystrix-order8080同服务端一样,需引入依赖并在主启动类处添加注解 - 服务端已经演示了一一对应回调函数的使用方式,实际上还可使用
@DefaultProperties统一指定回调方法,但回调方法不能有参数,如下
/**
 * DefaultProperties 指定回调方法(回调方法不能有参数),该类中的 @HystrixCommand 无需声明回调方法
 */
@RequestMapping("consumer")
@RestController
@DefaultProperties(defaultFallback = "failHandler")
public class OrderController {

	@Autowired
	private PaymentService paymentService;

	@GetMapping("getById")
	public Result getById(@RequestParam Long id) {
		return paymentService.getById(id);
	}

	@GetMapping("getByIdTimeOut")
	@HystrixCommand // 默认超时时间是1秒
	public Result getByIdTimeOut(@RequestParam Long id) {
		return paymentService.getByIdTimeOut(id);
	}

	public Result failHandler(){
		Result result = new Result();
		result.setMessage("消费者超时或运行异常");
		return result;
	}

	@PostMapping("create")
	public Result create(@RequestBody Payment payment) {
		return paymentService.create(payment);
	}
}
除了上述使用方式,消费端还可结合 feign 使用,进行服务降级
- 首先需要在配置文件中添加属性:
feign.hystrix.enabled=true
feign:
  hystrix:
    enabled: true
- 新建一个类实现 feign 对应接口并使用
@Component注解将对应类纳入 spring 容器管理
@Component
public class PaymentServiceFallback implements PaymentService{
	@Override
	public Result getById(Long id) {
		return null;
	}

	@Override
	public Result getByIdTimeOut(Long id) {
		Result result = new Result();
		result.setMessage("通过 feign 调用服务失败");
		return result;
	}

	@Override
	public Result create(Payment payment) {
		return null;
	}
}
- 给 feign 接口的
@FeignClient注解指定fallback属性即 PaymentServiceFallback.class,关于超时时间:这种方式 feign 和 hystrix 谁指定的超时时间短谁生效,默认 hystrix 为 1 秒,feign 连接超时时间为10秒,读超时时间为 60秒
@Component
@FeignClient(value = "CLOUD-PAYMENT-SERVICE", fallback = PaymentServiceFallback.class)
public interface PaymentService {

	/**
	 * 注意路径:payment
	 * 注意参数使用 @RequestParam
	 */
	@GetMapping(value = "payment/getById")
	Result getById(@RequestParam("id") Long id);

	@GetMapping(value = "payment/getByIdTimeOut")
	Result getByIdTimeOut(@RequestParam("id")Long id);

	@PostMapping(value = "payment/create")
	Result create(@RequestBody Payment payment);
}
Hystrix 服务熔断
首先需要明白:断路器有 开启 、半开 、关闭 三种状态,断路器处于半开状态时会尝试接收请求,看能否正常执行;处于开启状态时,所有请求会直接调用回调方法;处于关闭状态,则请求正常执行
	@GetMapping("getByIdTimeOut")
	@HystrixCommand(fallbackMethod = "failHandler",commandProperties = {
			@HystrixProperty(name = "circuitBreaker.enabled",value = "true"),
			@HystrixProperty(name = "circuitBreaker.requestVolumeThreshold",value = "10"),
			@HystrixProperty(name = "circuitBreaker.sleepWindowInMilliseconds",value = "10000"),
			@HystrixProperty(name = "circuitBreaker.errorThresholdPercentage",value = "20")
	})
	public Result getByIdTimeOut(@RequestParam Long id) {
		Result result = paymentService.getByIdTimeOut(id);
		if (id > 0) {
			result.setMessage("结果正确");
		} else {
			throw new RuntimeException("不能为负数" + id);
		}
		return result;
	}

	public Result failHandler(Long id){
		Result result = new Result();
		result.setMessage("服务异常" + id);
		return result;
	}
sleepWindowInMilliseconds:窗口期,默认 5 秒,在这个时间内发生了对应请求数则会判断是否开启断路器;如果发生了熔断,那么在这个时间后会成为半开状态requestVolumeThreshold:窗口期内触发断路的请求阈值,默认 20,当一个窗口期内发生该请求数,则再看下面可容忍的错误百分比errorThresholdPercentage:窗口期内能够容忍的错误百分比阈值,默认 50(即容忍50%的错误率),超过该值则会打开断路器,即使请求的是正确的值也将直接执行回调函数
Hystrix 服务限流:Hystrix默认使用线程隔离模式,可以通过线程数+队列大小进行限流,通过以下参数进行控制:
hystrix.threadpool.default.coreSize:线程池核心线程大小,默认 10hystrix.threadpool.default.maximumSize:线程池最大线程数量hystrix.threadpool.default.maxQueueSize:该参数指定工作队列的最大值,默认 -1hystrix.threadpool.default.queueSizeRejectionThreshold:Hystrix默认只配置了5个,因此就算我们把maxQueueSize的值设置再大,也是不起作用的。两个属性必须同时配置。设计这个参数的原因在于BlockingQueue的大小不能动弹调整,因此使用这个参数来满足动弹调整的需求。
Hystrix服务监控 :hystrix-dashboard
Hystrix Dashboard是一个通过收集actuator端点提供的Hystrix流数据,并将其图表化的客户端。如果需要通过图表化的界面查看被断路器保护的方法相关调用信息、或者实时监控这些被断路器保护的应用的健康情况,就可以使用Hystrix Dashboard。
Hystrix Dashboard监控的是使用了 Hystrix 熔断服务的方法/API,不是随便一个服务提供者中controller中的方法都可以进行监控的
- 新建工程
cloud-consumer-hystrix-dashboard9001,引入依赖,主要是hystrix-dashboard
<dependencies>
    <dependency>
        <groupId>org.springframework.cloudgroupId>
        <artifactId>spring-cloud-starter-netflix-hystrix-dashboardartifactId>
    dependency>
    <dependency>
        <groupId>org.springframework.bootgroupId>
        <artifactId>spring-boot-starter-actuatorartifactId>
    dependency>
    <dependency>
        <groupId>org.springframework.bootgroupId>
        <artifactId>spring-boot-devtoolsartifactId>
        <scope>runtimescope>
        <optional>trueoptional>
    dependency>
    <dependency>
        <groupId>org.projectlombokgroupId>
        <artifactId>lombokartifactId>
        <optional>trueoptional>
    dependency>
    <dependency>
        <groupId>org.springframework.bootgroupId>
        <artifactId>spring-boot-starter-testartifactId>
        <scope>testscope>
    dependency>
dependencies>
- 主启动类添加
@EnableHystrixDashboard注解,配置文件配置端口server.port=9001则访问路径为:http://localhost:9001/hystrix
@EnableHystrixDashboard
@SpringBootApplication
public class HystrixDashboardMain9001 {

	public static void main(String[] args) {
		SpringApplication.run(HystrixDashboardMain9001.class);
	}
}
- 被监控服务配置,如
cloud-provider-hystrix-payment8001,要求必须有如下两个依赖
<dependency>
    <groupId>org.springframework.cloudgroupId>
    <artifactId>spring-cloud-starter-netflix-hystrixartifactId>
dependency>
<dependency>
    <groupId>org.springframework.bootgroupId>
    <artifactId>spring-boot-starter-actuatorartifactId>
dependency>
- 配置文件配置
management:
  endpoints:
    web:
      exposure:
        include: 'hystrix.stream'
- 启动 8001 服务后,访问 http://localhost:9001/hystrix 填入
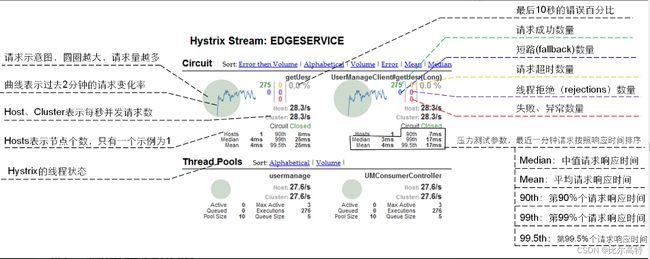
http://localhost:8001/actuator/hystrix.stream,Delay 可以设置为 200,再点击监控,再通过访问一次存在服务降级注解的接口,首页将可以看到对应请求情况如下
具体含义:
- 7色数字:对应含义如右边字母颜色
- 实心圆:共有两种含义。它通过颜色的变化代表了实例的健康程度,它的健康度从绿色<黄色<橙色<红色递减。大小根据实例的请求流量发生变化,流量越大该实心圆就越大。所以通过该实心圆的展示,就可以在大量的实例中快速的发现故障实例和高压力实例。
- 曲线:用来记录2分钟内流量的相对变化,可以通过它来观察到流量的上升和下降趋势。
6. 网关
API Gateway 和 Load Balancer 是分别用于解决不同层面问题的基础设施。API Gateway 主要用于作为后端的 API 接口代理,提供对外访问不同种类 API 的一个单独入口,并且可以提供独立于后端服务的限流、认证、监控等功能;而 Load Balancer 则主要用于四层流量分发,它可以将请求分摊到多台后端服务器上,平衡后端的请求负载,以提高系统的整体可用性和容错性。
Load Balancer 通常采用流量直接分发的形式做负载均衡,它通过算法将流量数据直接发向某个后端服务器节点。这意味着后端等待接收流量的每一个服务实例行为都必须是一致的,这减少了一定的灵活性。而 API Gateway 则是以 URL Path 、Domain、Header 等维度进行流量分发,后端等待接收流量的服务实例可以多种多样,可以是某个 Private API,也可以是某个 gRPC 的 API。这就使流量分发变得十分地灵活。
对于需要大流量、极高稳定性的网络出入口的场景,工作在四层的 Load Balancer 显然更为适用。它可以把网络原始四层流量直接分发到各个后端服务中,不存在中间层多次解析应用层协议的影响,具有更强的吞吐能力。而工作在七层的 API Gateway 作为统一的入口,会由于需要解析协议,存在一定的吞吐量限制。即使是使用四层的 API Gateway 来做网络出入口也不太有优势,因为这一层不是 API Gateway 的侧重点,相比于 Load Balancer 多年在这一层的技术累计,API Gateway 优势也不明显。
在合理的架构设计下,一般都将 API Gateway 和 Load Balancer 配合使用,使用 Load Balancer 作为整个系统的网络出入口,将流量分发到多个 API Gateway 实例,然后每个 API Gateway 实例分别对请求进行路由、认证、鉴权等操作,这样可以使得整个网络更加稳健、可靠、可扩展。
6.1 Zuul
由于 Zuul 已停止维护,且 Gateway 使用了一些新的技术如 netty、webflux 等,强烈建议不要研究 Zuul ,直接看 Gateway。
6.2 Gateway
SpringCloud Gateway 使用的Webflux中的reactor-netty响应式编程组件,底层使用了Netty通讯框架。动态路由:能够匹配任何请求属性;可以对路由指定 Predicate(断言)和 Filter(过滤器);集成Hystrix的断路器功能;集成 Spring Cloud 服务发现功能;易于编写的 Predicate(断言)和 Filter(过滤器);请求限流功能;支持路径重写。
3大核心概念:
- Route(路由):路由是构建网关的基本模块,它由ID,目标URI,一系列的断言和过滤器组成,如果断言为true则匹配该路由
- Predicate(断言):参考的是Java8的Predicate,开发人员可以匹配HTTP请求中的所有内容(例如请求头或请求参数),如果请求与断言相匹配则进行路由
- Filter(过滤):指的是Spring框架中GatewayFilter的实例,使用过滤器,可以在请求被路由前或者之后对请求进行修改
工作流程:路由转发+执行过滤器链
- 客户端向 Spring Cloud Gateway 发出请求。然后在 Gateway Handler Mapping 中找到与请求相匹配的路由,将其发送到 Gateway Web Handler
- Handler 再通过指定的过滤器链来将请求发送到我们实际的服务执行业务逻辑,然后返回。过滤器之间用虚线分开是因为过滤器可能会在发送代理请求之前(“pre”)或之后(“post”)执行业务逻辑。
- Filter在“pre”类型的过滤器可以做参数校验、权限校验、流量监控、日志输出、协议转换等,在“post”类型的过滤器中可以做响应内容、响应头的修改,日志的输出,流量监控等有着非常重要的作用。
使用步骤:
- 新建工程
cloud-gateway-gateway9527,添加依赖:
<dependencies>

    <dependency>
        <groupId>org.springframework.cloudgroupId>
        <artifactId>spring-cloud-starter-gatewayartifactId>
    dependency>

    <dependency>
        <groupId>org.springframework.cloudgroupId>
        <artifactId>spring-cloud-starter-netflix-eureka-clientartifactId>
    dependency>

    <dependency>
        <groupId>com.spring.springcloudgroupId>
        <artifactId>cloud-api-commonartifactId>
        <version>1.0-SNAPSHOTversion>
    dependency>

    <dependency>
        <groupId>org.springframework.bootgroupId>
        <artifactId>spring-boot-devtoolsartifactId>
        <scope>runtimescope>
        <optional>trueoptional>
    dependency>
    <dependency>
        <groupId>org.projectlombokgroupId>
        <artifactId>lombokartifactId>
        <optional>trueoptional>
    dependency>
    <dependency>
        <groupId>org.springframework.bootgroupId>
        <artifactId>spring-boot-starter-testartifactId>
        <scope>testscope>
    dependency>
dependencies>
- 主启动类
@EnableEurekaClient
@SpringBootApplication
public class GateWayMain9527 {

	public static void main(String[] args) {
		SpringApplication.run(GateWayMain9527.class);
	}
}
- 配置文件
spring.cloud.gateway.routes配置路由及断言,此时即可通过localhost:9527/payment/getById直接访问 8001 端口对应 API
server:
  port: 9527

spring:
  application:
    name: cloud-gateway
  cloud:
    gateway:
      routes:
        - id: payment_routh #payment_route    #路由的ID,没有固定规则但要求唯一,建议配合服务名
          uri: http://localhost:8001          #匹配后提供服务的路由地址
          predicates:
            - Path=/payment/**         # 断言,路径相匹配的进行路由

        - id: consumer_routh #payment_route    #路由的ID,没有固定规则但要求唯一,建议配合服务名
          uri: http://localhost:8080          #匹配后提供服务的路由地址
          predicates:
            - Path=/consumer/**         # 断言,路径相匹配的进行路由

eureka:
  instance:
    instance-id: cloud-gateway-service
    prefer-ip-address: true     #访问路径可以显示IP地址
  client:
    service-url:
      # defaultZone: http://localhost:7001/eureka # 单机版
      defaultZone: http://eureka7001.com:7001/eureka,http://eureka7002.com:7002/eureka  # 集群版
6.2.1 路由配置
共有两种方式配置路由,一是如上面yaml配置,另外还可结合注册中心完成动态路由配置,如下:
- uri的协议为lb,表示启用Gateway的负载均衡功能
server:
  port: 9527

spring:
  application:
    name: cloud-gateway
  cloud:
    gateway:
      discovery:
        locator:
          enabled: true #开启从注册中心动态创建路由的功能,利用微服务名进行路由
      routes:
        - id: payment_routh #payment_route    #路由的ID,没有固定规则但要求唯一,建议配合服务名
          # uri: http://localhost:8001          #匹配后提供服务的路由地址
          uri: lb://cloud-payment-service     #匹配后提供服务的路由地址
          predicates:
            - Path=/payment/**         # 断言,路径相匹配的进行路由

        - id: consumer_routh #payment_route    #路由的ID,没有固定规则但要求唯一,建议配合服务名
          #  uri: http://localhost:8080          #匹配后提供服务的路由地址
          uri: lb://cloud-order-service       #匹配后提供服务的路由地址
          predicates:
            - Path=/consumer/**         # 断言,路径相匹配的进行路由

eureka:
  instance:
    instance-id: cloud-gateway-service
    prefer-ip-address: true     #访问路径可以显示IP地址
  client:
    service-url:
      # defaultZone: http://localhost:7001/eureka # 单机版
      defaultZone: http://eureka7001.com:7001/eureka,http://eureka7002.com:7002/eureka  # 集群版
配置路由还有种方式,就是编码方式,如下:访问 http://localhost:9527/guonei 即可直接跳转到 http://news.baidu.com/guonei
@Bean
public RouteLocator customRouteLocator(RouteLocatorBuilder builder)
{
    RouteLocatorBuilder.Builder routes = builder.routes();
    routes.route("path_route_1", r -> r.path("/guonei").uri("http://news.baidu.com/guonei")).build();
    return routes.build();

}
@Bean
public RouteLocator customRouteLocator2(RouteLocatorBuilder builder)
{
    RouteLocatorBuilder.Builder routes = builder.routes();
    routes.route("path_route_2", r -> r.path("/guoji").uri("http://news.baidu.com/guoji")).build();
    return routes.build();
}
6.2.2 断言
前面已经使用了 Path Route Predicate Factory 即配置文件中 predicates: - Path=/payment/** ,还有其他各种方式配置,常用的如下:
predicates:
  - Path=/payment/lb/**         # 断言,路径相匹配的进行路由
  - After=2020-02-05T15:10:03.685+08:00[Asia/Shanghai]         # 断言,路径相匹配的进行路由
  #- Before=2020-02-05T15:10:03.685+08:00[Asia/Shanghai]         # 断言,路径相匹配的进行路由
  #- Between=2020-02-02T17:45:06.206+08:00[Asia/Shanghai],2020-03-25T18:59:06.206+08:00[Asia/Shanghai]
  #- Cookie=username,zzyy
  #- Header=X-Request-Id, \d+  # 请求头要有X-Request-Id属性并且值为整数的正则表达式
  #- Host=**.atguigu.com
  - Method=GET
  - Query=username, \d+  # 要有参数名username并且值还要是整数才能路由
6.2.3 过滤器
路由过滤器可用于修改进入的HTTP请求和返回的HTTP响应,路由过滤器只能指定路由进行使用。Spring Cloud Gateway 内置了多种路由过滤器,他们都由GatewayFilter的工厂类来产生
官方提供了很多过滤器,具体使用可参考官方:
https://docs.spring.io/spring-cloud-gateway/reference/spring-cloud-gateway/gatewayfilter-factories/addrequestheader-factory.html
这里只演示其中一种 AddRequestParameter GatewayFilter 的使用方式:这将添加 red=blue 到所有匹配请求的下游请求的查询字符串中。
spring:
  cloud:
    gateway:
      routes:
      - id: add_request_parameter_route
        uri: https://example.org
        filters:
        - AddRequestParameter=red, blue
虽然官方过滤器很多,但项目中一般比较常使用的是自定义过滤器:
过滤器有 pre 和 post 两个逻辑执行阶段,具有最高优先级的过滤器将最先执行 pre 阶段,而最后执行 post 阶段
按作用域区分过滤器分为两类:GlobalFilter 和 GatewayFilter ,前者对所有路由生效,后者必须指定路由才会生效,这里仅演示前者的使用
- GlobalFilter:全局过滤器示例,只有带有 username 参数的请求才能通过
@Component
public class CustomGlobalFilter implements GlobalFilter, Ordered {

	@Override
	public Mono<Void> filter(ServerWebExchange exchange, GatewayFilterChain chain) {
		if (exchange.getRequest().getQueryParams().get("username") == null) {
			System.out.println("用户未登陆");
			exchange.getResponse().setStatusCode(HttpStatus.NOT_ACCEPTABLE);
			return exchange.getResponse().setComplete();
		}
		return chain.filter(exchange);
	}

	@Override
	public int getOrder() {
		return 0;
	}
}
7. 配置中心+消息总线+消息驱动+链路跟踪
介于使用量及本节内容的一些使用限制,个人建议并不深入学习本章内容,因为本章内容主要可用 Nacos 做替代,故本章主要对知识进行介绍,而不深入研究使用。
官网学习:https://spring.io/projects/spring-cloud/
7.1 Spring Cloud Config
Spring Cloud Config为微服务架构中的微服务提供集中化的外部配置支持,配置服务器为各个不同微服务应用的所有环境提供了一个中心化的外部配置。除了 Spring Cloud Config 还有 Apollo 及 Nacos,使用 Spring Cloud Config 一般要结合其他平台或框架使用。比如结合 github 进行配置文件的管理。
| Nacos | Apollo | Spring Cloud Config | |
|---|---|---|---|
| 灰度发布 | 支持 | 支持IP级别的灰度发布 | 第三方框架支持 |
| 权限管理 | 支持 | 支持 | 第三方平台支持 |
| 版本管理&回滚 | 支持 | 支持 | 第三方平台支持 |
| 配置实时推送(动态刷新) | 支持 | 支持 | 第三方框架支持 |
| 敏感加密 | 引入Jasypt | 引入Jasypt | 原生支持 |
| 多环境 | 支持 | 支持 | 支持 |
| 高可用 | 支持 | 支持 | 支持 |
| 社区支持 | 高 | 中 | 低 |
7.2 Spring Cloud Bus
Spring Cloud Bus 主要用来结合 Spring Cloud Config 完成动态刷新配置的功能,需要使用 RabbitMQ 或 Kafka 。
消息总线 :在微服务架构的系统中,通常会使用轻量级的消息代理来构建一个共用的消息主题,并让系统中所有微服务实例都连接上来。由于该主题中产生的消息会被所有实例监听和消费,所以称它为消息总线。在总线上的各个实例,都可以方便地广播一些需要让其他连接在该主题上的实例都知道的消息。
基本原理:ConfigClient实例都监听MQ中同一个topic(默认是springCloudBus)。当一个服务刷新数据的时候,它会把这个信息放入到Topic中,这样其它监听同一Topic的服务就能得到通知,然后去更新自身的配置。
7.3 Spring Cloud Stream
Spring Cloud Stream 用于屏蔽底层消息中间件的差异,降低切换成本,统一消息的编程模型。即可以通过这个统一 MQ 的使用,而无需学习各种MQ,只需了解一种即可通过这个使用多种 MQ。RocketMQ 、RabbitMQ 和 Kafka 目前均已支持。
7.4 Spring Cloud Sleuth
分布式请求链路跟踪,Spring Cloud Sleuth提供了一套完整的服务跟踪的解决方案。Spring Cloud Sleuth 的最后一个小版本是 3.1。Spring Cloud Sleuth 不适用于 Spring Boot 3.x 及以上版本。Sleuth 支持的最后一个 Spring Boot 主要版本是 2.x。
该项目的核心已转移到 Micrometer Tracing 项目。Micrometer Tracing官网文档:https://docs.micrometer.io/tracing/reference/
8. Spring Cloud Alibaba
官网:https://sca.aliyun.com/zh-cn/ 强烈建议看看
Spring Cloud 本身并不是一个开箱即用的框架,它是一套微服务规范,共有两代实现。
- Spring Cloud Netflix 是 Spring Cloud 的第一代实现,主要由 Eureka、Ribbon、Feign、Hystrix 等组件组成。
- Spring Cloud Alibaba 是 Spring Cloud 的第二代实现,主要由 Nacos、Sentinel、Seata 等组件组成。
Spring Cloud Alibaba主要功能:
- 服务限流降级:默认支持 WebServlet、WebFlux、OpenFeign、RestTemplate、Spring Cloud Gateway、Zuul、Dubbo 和 RocketMQ 限流降级功能的接入,可以在运行时通过控制台实时修改限流降级规则,还支持查看限流降级 Metrics 监控。
- 服务注册与发现:适配 Spring Cloud 服务注册与发现标准,默认集成了 Ribbon 的支持。
- 分布式配置管理:支持分布式系统中的外部化配置,配置更改时自动刷新。
- 消息驱动能力:基于 Spring Cloud Stream 为微服务应用构建消息驱动能力。
- 分布式事务:使用 @GlobalTransactional 注解, 高效并且对业务零侵入地解决分布式事务问题。
- 阿里云对象存储:阿里云提供的海量、安全、低成本、高可靠的云存储服务。支持在任何应用、任何时间、任何地点存储和访问任意类型的数据。
- 分布式任务调度:提供秒级、精准、高可靠、高可用的定时(基于 Cron 表达式)任务调度服务。同时提供分布式的任务执行模型,如网格任务。网格任务支持海量子任务均匀分配到所有 Worker(schedulerx-client)上执行。
- 阿里云短信服务:覆盖全球的短信服务,友好、高效、智能的互联化通讯能力,帮助企业迅速搭建客户触达通道。
Spring Cloud Alibaba组件:
Nacos:一个更易于构建云原生应用的动态服务发现、配置管理和服务管理平台。
Sentinel:把流量作为切入点,从流量控制、熔断降级、系统负载保护等多个维度保护服务的稳定性。
Seata:阿里巴巴开源产品,一个易于使用的高性能微服务分布式事务解决方案。
RocketMQ:一款开源的分布式消息系统,基于高可用分布式集群技术,提供低延时的、高可靠的消息发布与订阅服务。
Alibaba Cloud OSS: 阿里云对象存储服务(Object Storage Service,简称 OSS),是阿里云提供的海量、安全、低成本、高可靠的云存储服务。您可以在任何应用、任何时间、任何地点存储和访问任意类型的数据。
Alibaba Cloud SchedulerX: 阿里中间件团队开发的一款分布式任务调度产品,提供秒级、精准、高可靠、高可用的定时(基于 Cron 表达式)任务调度服务。
Alibaba Cloud SMS: 覆盖全球的短信服务,友好、高效、智能的互联化通讯能力,帮助企业迅速搭建客户触达通道
Spring Cloud Alibaba 的组件有多个,但这里先只选取部分进行深入研究。
版本依赖参考:https://github.com/alibaba/spring-cloud-alibaba/wiki/版本说明 ,这里将以 2021.x 分支示例
8.1 Nacos
8.1.1 下载、安装及使用
官网下载:https://nacos.io/download/nacos-server/
Nacos就是注册中心 + 配置中心的组合,可以替代Eureka做服务注册中心,替代Config做服务配置中心。
首先本次先以 windows 版演示使用,后续改集群使用再使用 linux 演示。
下载解压后,在 \bin 目录下
- 启动命令:
startup.cmd -m standalone,首页地址 http://localhost:8848/nacos ,默认用户名和密码都是nacos - 关闭:
shutdown.cmd
8.1.2 Nacos 服务注册中心使用
这里先提一点,对于CAP模型,Nacos 默认是支持 AP 的,如果有需要也可通过下面命令切换成 CP 。将下列 CP 改为 AP 即可切回 AP 模式
curl -X PUT "http://localhost:8848/nacos/v1/ns/operator/switches?entry=serverMode&value=CP"
- 新建服务提供者
cloudalibaba-provider-payment9001,添加依赖
<dependencyManagement>
    <dependencies>

        <dependency>
            <groupId>org.springframework.bootgroupId>
            <artifactId>spring-boot-dependenciesartifactId>
            <version>2.6.13version>
            <type>pomtype>
            <scope>importscope>
        dependency>

        <dependency>
            <groupId>org.springframework.cloudgroupId>
            <artifactId>spring-cloud-dependenciesartifactId>
            <version>2021.0.5version>
            <type>pomtype>
            <scope>importscope>
        dependency>

        <dependency>
            <groupId>com.alibaba.cloudgroupId>
            <artifactId>spring-cloud-alibaba-dependenciesartifactId>
            <version>2021.0.5.0version>
            <type>pomtype>
            <scope>importscope>
        dependency>
        <dependency>
            <groupId>mysqlgroupId>
            <artifactId>mysql-connector-javaartifactId>
            <version>${mysql.version}version>
        dependency>
        <dependency>
            <groupId>com.alibabagroupId>
            <artifactId>druid-spring-boot-starterartifactId>
            <version>${druid.spring.boot.starter}version>
        dependency>
        <dependency>
            <groupId>com.baomidougroupId>
            <artifactId>mybatis-plus-boot-starterartifactId>
            <version>${mybatis.plus.boot.starter}version>
        dependency>
        <dependency>
            <groupId>junitgroupId>
            <artifactId>junitartifactId>
            <version>${junit.version}version>
        dependency>
        <dependency>
            <groupId>log4jgroupId>
            <artifactId>log4jartifactId>
            <version>${log4j.version}version>
        dependency>
        <dependency>
            <groupId>org.projectlombokgroupId>
            <artifactId>lombokartifactId>
            <version>${lombok.version}version>
            <optional>trueoptional>
        dependency>
    dependencies>
dependencyManagement>

<dependencies>

    <dependency>
        <groupId>com.alibaba.cloudgroupId>
        <artifactId>spring-cloud-starter-alibaba-nacos-discoveryartifactId>
    dependency>

    <dependency>
        <groupId>org.springframework.bootgroupId>
        <artifactId>spring-boot-starter-webartifactId>
    dependency>
    <dependency>
        <groupId>org.springframework.bootgroupId>
        <artifactId>spring-boot-starter-actuatorartifactId>
    dependency>
    <dependency>
        <groupId>com.spring.springcloudgroupId>
        <artifactId>cloud-api-commonartifactId>
        <version>${project.version}version>
    dependency>

    <dependency>
        <groupId>org.springframework.bootgroupId>
        <artifactId>spring-boot-devtoolsartifactId>
        <scope>runtimescope>
        <optional>trueoptional>
    dependency>
    <dependency>
        <groupId>org.projectlombokgroupId>
        <artifactId>lombokartifactId>
        <optional>trueoptional>
    dependency>
    <dependency>
        <groupId>org.springframework.bootgroupId>
        <artifactId>spring-boot-starter-testartifactId>
        <scope>testscope>
    dependency>
dependencies>
- 主启动类
@EnableDiscoveryClient
@SpringBootApplication
public class PaymentMain9001 {
	public static void main(String[] args) {
		SpringApplication.run(PaymentMain9001.class, args);
	}
}
- 配置文件
application.yml
server:
  port: 9001

spring:
  application:
    name: nacos-payment-provider
  cloud:
    nacos:
      discovery:
        server-addr: localhost:8848 #配置Nacos地址

management:
  endpoints:
    web:
      exposure:
        include: '*'
- 业务类 PaymentController
@GetMapping("getById")
public Result getById(Long id) {
    Result result = new Result(id);
    result.setMessage("port:" + port);
    return result;
}
- 进入首页地址 http://localhost:8848/nacos 账户及密码:
nacos,进入后看服务列表有nacos-payment-provider服务说明成功
为后续演示nacos的负载均衡,参照9001新建9002
新建服务消费者 cloudalibaba-consumer-nacos-order83
- 添加提供者相同依赖,并新增依赖
<dependency>
    <groupId>org.springframework.cloudgroupId>
    <artifactId>spring-cloud-starter-loadbalancerartifactId>
dependency>

<dependency>
    <groupId>org.springframework.cloudgroupId>
    <artifactId>spring-cloud-starter-openfeignartifactId>
dependency>
- 主启动类
@EnableFeignClients
@EnableDiscoveryClient
@SpringBootApplication
public class ConsumerMain83 {
	public static void main(String[] args) {
		SpringApplication.run(ConsumerMain83.class, args);
	}

	@Bean
	@LoadBalanced
	public RestTemplate restTemplate() {
		return new RestTemplate();
	}
}
- 业务类:
nacos中新版本不再默认包含服务负载均衡依赖 Ribbon,这里加入了 loadbalancer 依赖,同时openfeign中也不再默认包含服务负载均衡依赖
Service
@Component
@FeignClient(value = "nacos-payment-provider")
public interface PaymentService {

	/**
	 * 注意路径:payment
	 * 注意参数使用 @RequestParam
	 */
	@GetMapping(value = "payment/getById")
	Result getById(@RequestParam("id") Long id);
}
Controller
@RequestMapping("consumer")
@RestController
public class OrderController {

	public static final String PAYMENT_SRV_URL = "http://nacos-payment-provider";

	@Autowired
	private RestTemplate restTemplate;

	@Autowired
	private PaymentService paymentService;

	@GetMapping("getById")
	public Result getById(Long id) {
		return restTemplate.getForObject(PAYMENT_SRV_URL + "/payment/getById?id=" + id, Result.class);
	}

	@GetMapping("getByIdService")
	public Result getByIdService(Long id) {
		return paymentService.getById(id);
	}

	@Resource
	private DiscoveryClient discoveryClient;

	@GetMapping("getDiscoveryClient")
	public Result getDiscoveryClient() {
		Map<String, Object> map = new HashMap<>();
		map.put("services", discoveryClient.getServices());
		map.put("paymentInstance", discoveryClient.getInstances("nacos-payment-provider"));
		map.put("orderInstance", discoveryClient.getInstances("nacos-order-consumer"));
		return new Result(map);
	}
}
- 配置文件
application.yml
server:
  port: 83

spring:
  application:
    name: nacos-order-consumer
  cloud:
    nacos:
      discovery:
        server-addr: localhost:8848 #配置Nacos地址

management:
  endpoints:
    web:
      exposure:
        include: '*'
8.1.3 Nacos 配置中心使用
8.1.3.1 基础配置使用
首先需明白一些概念:在 Nacos Spring Cloud 中,dataId 的完整格式如下:
${prefix}-${spring.profiles.active}.${file-extension}
prefix默认为spring.application.name的值,也可以通过配置项spring.cloud.nacos.config.prefix来配置。spring.profiles.active即为当前环境对应的 profile。 注意:当spring.profiles.active为空时,对应的连接符-也将不存在,dataId 的拼接格式变成${prefix}.${file-extension}file-exetension为配置内容的数据格式,可以通过配置项spring.cloud.nacos.config.file-extension来配置。目前只支持properties和yaml类型
在 http://localhost:8848/nacos ,配置列表新建配置 nacos-config-client-dev.yaml 后续配置文件将与该 dataID 对应,内容如下:
config:
    info: dev 环境配置文件
- 新建项目
cloudalibaba-config-nacos-client3377,引入上面提供者的依赖,并新增以下依赖,新版 cloud bootstrap 配置文件默认被禁用,所以必须引入spring-cloud-starter-bootstrap依赖
<dependency>
    <groupId>com.alibaba.cloudgroupId>
    <artifactId>spring-cloud-starter-alibaba-nacos-configartifactId>
dependency>

<dependency>
    <groupId>org.springframework.cloudgroupId>
    <artifactId>spring-cloud-starter-bootstrapartifactId>
dependency>
- 新建
bootstrap.yml配置文件,Nacos同springcloud-config一样,在项目初始化时,要保证先从配置中心进行配置拉取,拉取配置之后,才能保证项目的正常启动。且springboot中配置文件的加载是存在优先级顺序的,bootstrap优先级高于application
# nacos配置
server:
  port: 3377

spring:
  application:
    name: nacos-config-client
  cloud:
    nacos:
      discovery:
        server-addr: localhost:8848 #Nacos服务注册中心地址
      config:
        server-addr: localhost:8848 #Nacos作为配置中心地址
        file-extension: yaml #指定yaml格式的配置

# dataId = ${spring.application.name}-${spring.profile.active}.${spring.cloud.nacos.config.file-extension}
- 新建
application.yml配置文件。结合bootstrap.yml配置文件可以得到要加载的配置文件 dataId =nacos-config-client-dev.yaml
spring:
  profiles:
    active: dev # 表示开发环境
- 主启动类
@EnableDiscoveryClient
@SpringBootApplication
public class ConfigMain3377 {
	public static void main(String[] args) {
		SpringApplication.run(ConfigMain3377.class, args);
	}
}
- 业务类:
@RefreshScope:Spring Cloud 的原生注解,加了该注解即可实现配置自动更新
@RestController
@RefreshScope //在控制器类加入@RefreshScope注解使当前类下的配置支持Nacos的动态刷新功能。
public class ConfigClientController
{
	@Value("${config.info}")
	private String configInfo;

	@GetMapping("/config/info")
	public String getConfigInfo() {
		return configInfo;
	}
}
- 启动项目并访问 http://localhost:3377/config/info 即可测试结果。5中加了
@RefreshScope注解后自带配置动态刷新
另外,Nacos会记录配置文件的历史版本默认保留30天,此外还有一键回滚功能,回滚操作将会触发配置更新,同时也会动态刷新项目中配置
8.1.3.2 分类配置
Nacos 使用 Namespace+Group+Data ID 来确定配置文件,namespace用于区分部署环境的,Group和DataID逻辑上区分两个目标对象。
默认情况:Namespace=public,Group=DEFAULT_GROUP, 默认Cluster是DEFAULT
- Namespace:默认的命名空间是public,Namespace主要用来实现隔离。比如有三个环境:开发、测试、生产环境,就可以创建三个Namespace,不同的Namespace之间是隔离的。
- Group :默认是DEFAULT_GROUP,可以把不同的微服务划分到同一个分组里面去
- Service :一个Service可以包含多个Cluster(集群),Nacos默认Cluster是DEFAULT,Cluster是对指定微服务的一个虚拟划分。比如为了容灾,将Service微服务分别部署在了杭州机房和广州机房,这时就可以给杭州机房的Service微服务起一个集群名称(HZ),给广州机房的Service微服务起一个集群名称(GZ),还可以尽量让同一个机房的微服务互相调用,以提升性能
- Instance,就是微服务的实例
http://localhost:8848/nacos 中新建命名空间 test ,在 test 中新建配置文件 nacos-config-client-test.yaml 分组定为 nacos-config-client 读取配置如下,首先是 application.yml
spring:
  profiles:
    active: test
bootstrap.yml 中配置 spring.cloud.nacos.config.namespace 和 spring.cloud.nacos.config.group
# nacos配置
server:
  port: 3377

spring:
  application:
    name: nacos-config-client
  cloud:
    nacos:
      discovery:
        server-addr: localhost:8848 #Nacos服务注册中心地址
      config:
        server-addr: localhost:8848 #Nacos作为配置中心地址
        namespace: d5a4be6d-7147-4885-aefc-92eb83b0e1dd
        group: nacos-config-client
        file-extension: yaml #指定yaml格式的配置
8.1.4 集群及持久化配置
持久化:Nacos默认自带的是嵌入式数据库derby,需切换到 mysql ,生产上要切换成主备模式
集群:前面使用的是单击 Nacos ,不具备高可用,需使用集群模式
尝试搭建配置:3台 nacos 分布在3台服务器上:192.168.115.129 、192.168.115.131 、192.168.115.132
另外安装 nginx 和 mysql 在 192.168.115.129 上
如果是新安装的 nginx ,请在 ./configure 阶段务必增加 --stream 参数即使用 ./configure --with-stream ,后续将会用到 stream 模块
nacos下载:https://github.com/alibaba/nacos/releases?page=2
- 先配置 nginx ,修改
/usr/local/nginx/conf/nginx.conf内容#gzip on;下面- 添加
upstream nacos以及 location 中proxy_pass http://nacos;
- 添加
    #gzip  on;
    # 设定负载均衡的服务器列表
    upstream nacos{
        server 192.168.115.129:8848;
        server 192.168.115.131:8848;
        server 192.168.115.132:8848;
    }

    server {
        listen       1111;
        server_name  localhost;

        #charset koi8-r;

        #access_log  logs/host.access.log  main;

        location / {
            #root   html;
            #index  index.html index.htm;
            proxy_pass http://nacos;
        }

	...省略
- 配置 mysql ,先将下载的
nacos-server-2.2.0.tar.gz解压后的nacos/conf/mysql-schema.sql到数据库中执行,再修改nacos/conf/application.properties配置,添加以下内容(请按自己电脑配置)
spring.datasource.platform=mysql
db.num=1
db.url.0=jdbc:mysql://192.168.115.129:3306/nacos_config?characterEncoding=utf8&connectTimeout=1000&socketTimeout=3000&autoReconnect=true
db.user.0=root
db.password.0=Aa199810.
- 集群配置文件:
nacos/conf/目录下复制cp cluster.conf.sample cluster.conf,添加以下配置,端口如果是8848可以不填,这里只是为了演示
192.168.115.129:8848
192.168.115.131
192.168.115.132
- 启动 nacos :
nacos/bin/startup.sh。如报错找不到 javac 环境,安装 javac 环境,yum -y install java-1.8.0-openjdk-devel.x86_64 - 测试及日志:可访问 http://localhost:8848/nacos 则表示成功。将上述配置好的文件夹打包发给另外两台机器并启动 nacos,未成功可以到
nacos/los/目录查看nacos.log和nacos-cluster.log排查问题
当上面都配置好了,即可通过 nginx 直接访问 nacos 首页 http://192.168.115.129:1111/nacos ,查看节点数据
工程gRPC配置:注意,Nacos2.0版本相比1.X新增了gRPC的通信方式如下表,因此需要增加2个端口。新增端口是在配置的主端口(server.port)基础上,进行一定偏移量自动生成。故 nginx 使用 http 是无法完成转发的,由此如果使用工程去连接 nginx 时需要通过 9848 这个端口去访问,故还需配置 nginx。
| 端口 | 与主端口的偏移量 | 描述 |
|---|---|---|
| 9848 | 1000 | 客户端gRPC请求服务端端口,用于客户端向服务端发起连接和请求 |
| 9849 | 1001 | 服务端gRPC请求服务端端口,用于服务间同步等 |
修改 /usr/local/nginx/conf/nginx.conf 加入如下内容,stream 要与 http 平级,前面安装时 ./configure --with-stream 要加上此模块才能使用
stream {
    upstream nacos-tcp{
        server 192.168.115.129:9848;
        server 192.168.115.131:9848;
        server 192.168.115.132:9848;
    }
    server {
        listen 9847;
        proxy_pass nacos-tcp;
    }
}
工程测试分析:先访问 http://localhost:8848/nacos 根据 cloudalibaba-config-nacos-client3377 工程新建命名空间,配置文件,再调整 bootstrap.yml 的 server-addr ,访问 http://localhost:3377/config/info 看结果是否是集群新建的配置文件内容
# nacos配置
server:
  port: 3377

spring:
  application:
    name: nacos-config-client
  cloud:
    nacos:
      server-addr: 192.168.115.129:8847 # 8847是 nginx 中配置的流监听端口 9847-1000(偏移量) 得到的,实际上这里连接的是 nginx 的 9847 端口
#      discovery:
#        server-addr: 192.168.115.129:8848 #Nacos服务注册中心地址,默认值 ${spring.cloud.nacos.server-addr}
      config:
#        server-addr: 192.168.115.129:8848 #Nacos作为配置中心地址,默认值 ${spring.cloud.nacos.server-addr}
        namespace: 941f2d1c-195c-40a6-bba8-1211b14ce58d
        group: nacos-config-client
        file-extension: yaml #指定yaml格式的配置
8.2 Sentinel
Sentinel 主要用于限流和降级。在微服务系统中,一个对外的业务功能可能会涉及很长的服务调用链路。当其中某个服务出现异常,如果没有服务调用保护 机制可能会造成该服务调用链路上大量相关服务直接或间接调用的服务器仍然持续不断发起请求,最终导致相关的所有服务资源耗尽产生异常发生雪崩效应。限流和降级分别作为在流量控制和服务保护方面的两个重要手段,可以有效地应对此类问题。
简而言之,Sentinel 即升级版的 Hystrix。可用来做服务降级,服务熔断,服务限流,防止服务雪崩。
官网下载:https://github.com/alibaba/Sentinel/releases/download/1.8.6/sentinel-dashboard-1.8.6.jar ,所选版本是为了配合官方推荐的版本搭配
启动:java -jar sentinel-dashboard-1.8.6.jar --server.port=9999 ,要求有 java环境,默认8080端口,可用 --server.port 修改端口
首页:http://localhost:9999 ,账号密码均为 sentinel ,sentinel 采用的是懒加载模式,需要访问请求才能看到对应服务
sentinel 规则配置既可以使用代码配置,也可以使用网页版页面配置,这里只介绍使用网页版页面配置的方式。
8.2.1 工程搭建
- 启动本地 nacos 和 sentinel,新建工程
cloudalibaba-sentinel-service8401,添加依赖
<dependencyManagement>
    <dependencies>

        <dependency>
            <groupId>org.springframework.bootgroupId>
            <artifactId>spring-boot-dependenciesartifactId>
            <version>2.6.13version>
            <type>pomtype>
            <scope>importscope>
        dependency>

        <dependency>
            <groupId>org.springframework.cloudgroupId>
            <artifactId>spring-cloud-dependenciesartifactId>
            <version>2021.0.5version>
            <type>pomtype>
            <scope>importscope>
        dependency>

        <dependency>
            <groupId>com.alibaba.cloudgroupId>
            <artifactId>spring-cloud-alibaba-dependenciesartifactId>
            <version>2021.0.5.0version>
            <type>pomtype>
            <scope>importscope>
        dependency>
        <dependency>
            <groupId>mysqlgroupId>
            <artifactId>mysql-connector-javaartifactId>
            <version>${mysql.version}version>
        dependency>
        <dependency>
            <groupId>com.alibabagroupId>
            <artifactId>druid-spring-boot-starterartifactId>
            <version>${druid.spring.boot.starter}version>
        dependency>
        <dependency>
            <groupId>com.baomidougroupId>
            <artifactId>mybatis-plus-boot-starterartifactId>
            <version>${mybatis.plus.boot.starter}version>
        dependency>
        <dependency>
            <groupId>junitgroupId>
            <artifactId>junitartifactId>
            <version>${junit.version}version>
        dependency>
        <dependency>
            <groupId>log4jgroupId>
            <artifactId>log4jartifactId>
            <version>${log4j.version}version>
        dependency>
        <dependency>
            <groupId>org.projectlombokgroupId>
            <artifactId>lombokartifactId>
            <version>${lombok.version}version>
            <optional>trueoptional>
        dependency>
    dependencies>
dependencyManagement>

<dependencies>

    <dependency>
        <groupId>com.alibaba.cspgroupId>
        <artifactId>sentinel-datasource-nacosartifactId>
    dependency>

    <dependency>
        <groupId>com.alibaba.cloudgroupId>
        <artifactId>spring-cloud-starter-alibaba-sentinelartifactId>
    dependency>

    <dependency>
        <groupId>org.springframework.cloudgroupId>
        <artifactId>spring-cloud-starter-loadbalancerartifactId>
    dependency>

    <dependency>
        <groupId>org.springframework.cloudgroupId>
        <artifactId>spring-cloud-starter-openfeignartifactId>
    dependency>

    <dependency>
        <groupId>com.alibaba.cloudgroupId>
        <artifactId>spring-cloud-starter-alibaba-nacos-discoveryartifactId>
    dependency>

    <dependency>
        <groupId>org.springframework.bootgroupId>
        <artifactId>spring-boot-starter-webartifactId>
    dependency>
    <dependency>
        <groupId>org.springframework.bootgroupId>
        <artifactId>spring-boot-starter-actuatorartifactId>
    dependency>
    <dependency>
        <groupId>com.spring.springcloudgroupId>
        <artifactId>cloud-api-commonartifactId>
        <version>${project.version}version>
    dependency>

    <dependency>
        <groupId>org.springframework.bootgroupId>
        <artifactId>spring-boot-devtoolsartifactId>
        <scope>runtimescope>
        <optional>trueoptional>
    dependency>
    <dependency>
        <groupId>org.projectlombokgroupId>
        <artifactId>lombokartifactId>
        <optional>trueoptional>
    dependency>
    <dependency>
        <groupId>org.springframework.bootgroupId>
        <artifactId>spring-boot-starter-testartifactId>
        <scope>testscope>
    dependency>
dependencies>
- 主启动类
@EnableFeignClients
@EnableDiscoveryClient
@SpringBootApplication
public class SentinelMainApp8401 {

	public static void main(String[] args) {
		SpringApplication.run(SentinelMainApp8401.class, args);
	}
}
- 配置文件
server:
  port: 8401

spring:
  application:
    name: nacos-order-consumer
  cloud:
    nacos:
      server-addr: localhost:8848
    sentinel:
      transport:
        dashboard: localhost:9999
        port: 8719 # 默认8719端口,假如被占用会自动从8719开始依次+1扫描,直至找到未被占用的端口
# 激活Sentinel对Feign的支持
feign:
  sentinel:
    enabled: true
management:
  endpoints:
    web:
      exposure:
        include: '*'
- 业务类:这里
PaymentService调用之前写的cloudalibaba-provider-payment9001和cloudalibaba-provider-payment9002工程的接口,对应接口返回的主要内容即端口号
@Component
@FeignClient(value = "nacos-payment-provider")
public interface PaymentService {

	/**
	 * 注意路径:payment
	 * 注意参数使用 @RequestParam
	 */
	@GetMapping(value = "payment/getById")
	Result getById(@RequestParam("id") Long id);
}
@RequestMapping("consumer")
@RestController
public class OrderController {

	@Autowired
	private PaymentService paymentService;

	@GetMapping("getById")
	public Result getById(Long id) {
		return paymentService.getById(id);
	}
}
8.2.2 实时监控、簇点链路、机器列表
实时监控:同一个服务下的所有机器的簇点信息会被汇总,并且秒级地展示在"实时监控"下。注意:默认实时监控仅存储 5 分钟以内的数据
簇点链路(单机调用链路):实时的去拉取指定客户端资源的运行情况。它一共提供两种展示模式:一种用树状结构展示资源的调用链路,另外一种则不区分调用链路展示资源的实时情况。注意:簇点链路监控是内存态的信息,它仅展示启动后调用过的资源。
机器列表:当您在机器列表中看到您的机器,就代表着您已经成功接入控制台;如果没有看到您的机器,请检查配置,并通过 ${user.home}/logs/csp/sentinel-record.log.xxx 日志来排查原因
8.2.3 流控规则
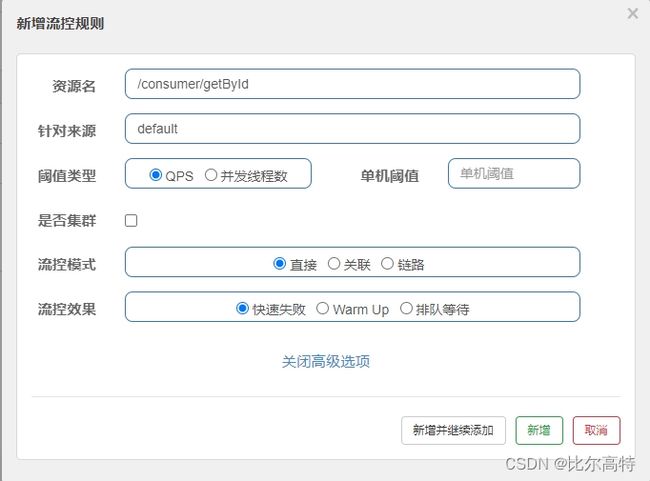
可以在 簇点链路 中添加,也可以在 流控规则 中添加
- 资源名:唯一名称,默认请求路径
- 针对来源:Sentine可以针对调用者进行限流,填写微服务名,默认default (不区分来源)
- 阈值类型/单机阈值:
- QPS:每秒钟的请求数量,当调用该api的QPS达到阈值的时候,进行限流
- 线程数:当调用该api的线程数达到阈值的时候,进行限流
- 是否集群:如实填写
- 流控模式:
- 直接:api达到限流条件时,直接限流
- 关联:当关联的资源达到闻值时,就限流自己
- 链路:只记录指定链路上的流量(指定资源从入口资源进来的流量,如果达到阈值,就进行限流) 【api级别的针对来源】
- 流控效果:QPS 情况下才支持修改
- 快速失败:直接失败,抛异常
- Warm Up:根据codeFactor (冷加载因子,默认3)的值,从阈值/codeFactor,经过预热时长,才达到设置的QPS阈值
- 案例:如 QPS 设置为 10 ,预热时长为 5 秒。则初始阈值为 10 / 3 = 3,后阈值将慢慢上升,直到5秒后才变为 10
- 秒杀系统在开启的瞬间,会有很多流量上来,很有可能把系统打死,预热方式就是把为了保护系统,可慢慢的把流量放进来,慢慢的把阀值增长到设置的阀值
- 排队等待:匀速排队,让请求以匀速的速度通过,使得QPS更加平滑
- 案例:QPS=1,超时时间 1000ms。当有5个请求同时进行时,第1个请求直接执行,第2个请求预计等待时间为 1000ms,第 n 个请求预计等待时间为 (n-1) * 1000 ms,则后面3个请求均会被拒绝
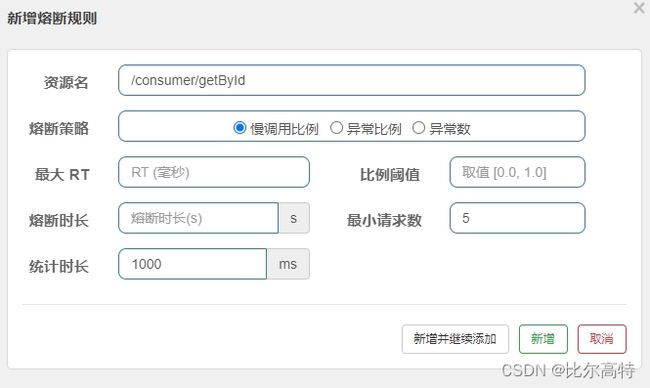
8.2.4 熔断规则
可以在 簇点链路 中添加,也可以在 熔断规则 中添加
- 熔断策略
- 慢调用比例:当慢调用超过慢调用比例最大值时会进行熔断
- 最大RT:最大响应时间,低于该响应时间的请求会被统计为慢调用
- 比例阈值:满调用比例最大值
- 异常比例:统计时长周期时间内异常比例超过设置值会进行熔断
- 异常数:统计时长周期时间内异常数超过数量进行熔断
- 慢调用比例:当慢调用超过慢调用比例最大值时会进行熔断
当 统计时长 内,符合 最小请求数,则进行熔断判断,如符合熔断策略,则进行熔断,时长为 熔断时长 ,时长过后服务恢复,熔断器关闭。
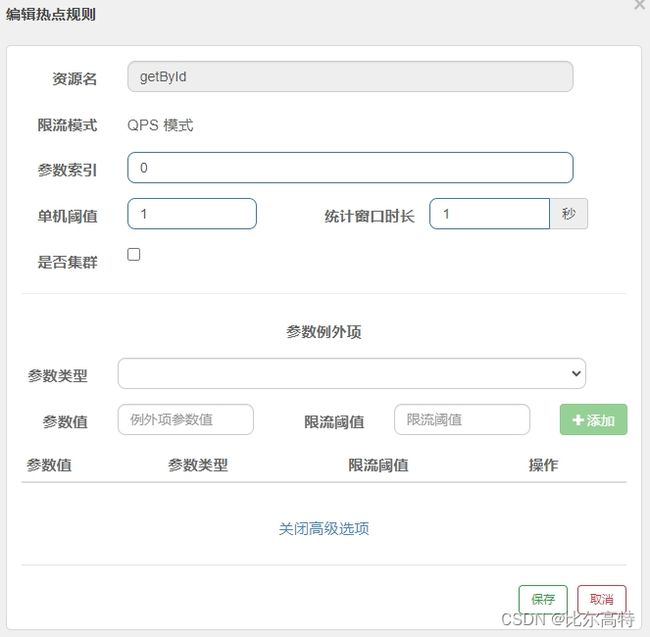
8.2.5 热点规则
热点即经常访问的数据,很多时候我们希望统计或者限制某个热点数据中访问频次最高的TopN数据,并对其访问进行限流或者其它操作
可以在 簇点链路 中添加,也可以在 热点规则 中添加,但必须结合 @SentinelResource 一起使用(该注解后续会详细介绍),如果在代码中指定 @SentinelResource("XXX") 则簇点链路中会增加对应资源名,可通过对应资源名点击 +热点 配置热点规则,代码如下:
@GetMapping("getById")
@SentinelResource(value = "getById", blockHandler = "handleException") // blockHandler指定自定义回调函数
public Result getById(Long id) throws InterruptedException {
    return paymentService.getById(id);
}

public Result handleException(Long id, BlockException e) {
    return new Result(e.getClass().getCanonicalName()+"\t 服务不可用");
}
参数索引即指定对指定参数的热点进行限制,0则表示第1位,即上面代码中的第一个参数 id ,当 id 有值时则会进行限制,无值则不会。
另外点击高级选项中还可以配置参数例外项
参数例外项 :可以更细粒度针对参数值进行限制,比如限制 id=2 的QPS为2,这样当 id=2 的请求QPS达到2才会限流,而 id!=null && !=2 的则 QPS 达到1就会进行限流。
8.2.6 系统规则
系统保护规则是应用整体维度的,而不是资源维度的,并且仅对入口流量生效。
系统规则支持以下模式:
- LOAD:自适应(仅对 Linux/Unix-like 机器生效),系统的 load1 作为启发指标,进行自适应系统保护。当系统 load1 超过设定的启发值,且系统当前的并发线程数超过估算的系统容量时才会触发系统保护 (BBR 阶段)。系统容量由系统的
maxQps * minRt估算得出。设定参考值一般是CPU cores * 2.5 - RT:平均相应时间,当单台机器上所有入口流量的平均 RT 达到闻值即触发系统保护,单位是毫秒
- 线程数:当单台机器上所有入口流量的并发线程数达到阈值即触发系统保护
- 入口 QPS:当单台机器上所有入口流量的 QPS 达到阈值即触发系统保护
- CPU使用率:当系统 CPU 使用超过值即触发系统保护 (取值范围 [0,1]) ,比较灵敏
8.2.7 授权规则
可以在 簇点链路 中添加,也可以在 授权规则 中添加,内容较简单,即白名单黑名单机制
8.2.8 @SentinelResource
@SentinelResource 用来指定对应请求的资源名,同时有属性可以用来指定兜底方法
value:指定请求的资源名blockHandler:用于指定限流后的处理逻辑的函数名,如果不指定则默认会返回Blocked by Sentinel (flow limiting)blockHandlerClass:用于指定限流后的处理逻辑的类名,搭配blockHandler一起使用fallback:指定抛出异常时的函数名fallbackClass:指定抛出异常时的类,搭配fallback一起使用exceptionsToIgnore:指定fallback忽略的异常类型,当抛出的异常类型在这些类型中时将不会触发fallback指定的函数
上述 blockHandler 主管配置违规,fallback 则管运行异常
自定义限流降级逻辑处理示例:当请求该接口突破了前面定义的规则时,均会调用 blockHandler 指定的函数
- 注意:被指定的限流处理逻辑函数必须具备与请求方法相同的参数并且最后要加上参数 BlockException,否则限流处理时将无法定位到该函数
@RestController
public class OrderController {

	@Autowired
	private PaymentService paymentService;

	@GetMapping("getById")
	@SentinelResource(value = "getById", blockHandlerClass = CustomBlockHandler.class, blockHandler = "blockHandle")
	public Result getById(Long id) throws InterruptedException {
		return paymentService.getById(id);
	}
}
public class CustomBlockHandler {

	/**
	 * 被指定的限流处理逻辑函数必须具备与请求方法相同的参数并且最后要加上参数 BlockException,否则限流处理时将无法定位到该函数
	 */
	public static Result blockHandle(Long id, BlockException e){
		return new Result("自定义的限流处理信息......CustomerBlockHandler");
	}

}
自定义运行异常逻辑处理示例:当请求服务发生异常时,会调用 fallback 指定的函数
@GetMapping("getById")
@SentinelResource(value = "getById", fallbackClass = CustomFallback.class, fallback = "fallbackHandle")
public Result getById(Long id) throws InterruptedException {
    System.out.println(1/0);
    return paymentService.getById(id);
}
public class CustomFallback {
	/**
	 * 被指定的限流处理逻辑函数必须具备与请求方法相同的参数并且最后要加上参数 Throwable
	 */
	public static Result fallbackHandle(Long id, Throwable e){
		System.out.println(id);
		System.out.println("blockHandle:" + e.getMessage());
		return new Result("全局异常处理");
	}
}
若 blockHandler 和 fallback 都进行了配置,则被限流降级而抛出 BlockException 时只会进入 blockHandler 处理逻辑。另外即使进入 fallback 对应异常数也还是会被统计用于进行异常相关的限流。
8.2.9 规则持久化
一旦我们重启应用,sentinel规则将消失,生产环境需要将配置规则进行持久化,这里只提供单向持久化,即修改 Nacos 配置文件,同步生效到 sentinel,如果需要修改 sentinel 配置同步到 nacos 则需要改 sentinel 源码,这里就不演示了,请自行了解。
- 首先在
cloudalibaba-sentinel-service8401需添加依赖sentinel-datasource-nacos,这里搭建项目时已经添加 - 在 Nacos 新建命名空间
test,并在新建的命名空间增加配置文件cloudalibaba-sentinel-service,配置格式选JSON内容填图片下面内容,后续会讲如何填写
[
    {
        "resource": "/getById",
        "limitApp": "default",
        "grade": 1,
        "count": 1,
        "strategy": 0,
        "controlBehavior": 0,
        "clusterMode": false
    }
]
- 配置
application.yml,spring.cloud.sentinel.datasource.XXX.nacos,这里的XXX可以自定义nacos.rule-type可以指定数据源指定的规则
server:
  port: 8401

spring:
  application:
    name: nacos-order-consumer
  cloud:
    nacos:
      server-addr: localhost:8848
    sentinel:
      datasource:
        flow-rule: # 流控规则管理(这个名称可以自定义)
          nacos: # 数据源
            server-addr: ${spring.cloud.nacos.server-addr}
            namespace: 6765505a-51b1-42af-93bf-dd3b07cbf726
            groupId: DEFAULT_GROUP
            dataId: cloudalibaba-sentinel-service
            data-type: json
            rule-type: flow #指定文件配置规则 flow-流控,degrade-熔断,param-flow热点参数,system-系统保护,authority-授权,gw-flow gateway网关流控,gw-api-group
      transport:
        dashboard: localhost:9999
        port: 8719 # 默认8719端口,假如被占用会自动从8719开始依次+1扫描,直至找到未被占用的端口
# 激活Sentinel对Feign的支持
feign:
  sentinel:
    enabled: true
management:
  endpoints:
    web:
      exposure:
        include: '*'
做了以上3步配置, sentinel 会自动加载 nacos 中的配置 ,注意只是单向的,再修改 sentinel 规则并不会同步修改 nacos 中配置文件。
首先在项目配置文件中,spring.cloud.sentinel.datasource.XXX.nacos ,XXX 可以改为不同数表示多数据源,如:
    sentinel:
      datasource:
        flow-rule: # 流控规则管理(这个名称可以自定义)
          nacos: # 数据源
            server-addr: ${spring.cloud.nacos.server-addr}
            namespace: 6765505a-51b1-42af-93bf-dd3b07cbf726
            groupId: DEFAULT_GROUP
            dataId: cloudalibaba-sentinel-service
            data-type: json
            rule-type: flow #指定文件配置的是哪种规则 flow-流控,degrade-熔断,param-flow热点参数,system-系统保护,authority-授权,gw-flow gateway网关流控,gw-api-group
        degrade-rule: # 熔断规则管理(这个名称可以自定义)
          nacos: # 数据源
            server-addr: ${spring.cloud.nacos.server-addr}
            namespace: 6765505a-51b1-42af-93bf-dd3b07cbf726
            groupId: DEFAULT_GROUP
            dataId: cloudalibaba-sentinel-service
            data-type: json
            rule-type: degrade
上面 rule-type 可指定对应数据源配置的规则对应什么类型的规则,有如下对应关系:
| 配置 | 对应规则 |
|---|---|
| flow | 流控规则 |
| degrade | 熔断规则 |
| param-flow | 热点规则 |
| system | 系统规则 |
| authority | 授权规则 |
| gw-flow | 网关流控规则 |
| gw-api-group | 自定义api |
在 Nacos 写规则配置文件时,有如下对应,第一个写充实些,后续的可参考第一个填写
- 流控规则配置
[
    {
        "resource": "/getById",
        "limitApp": "default",
        "grade": 1,
        "count": 1,
        "clusterMode": false,
        "strategy": 0,
        "controlBehavior": 0,
        "refResource": "test",
        "warmUpPeriodSec": 10,
        "maxQueueingTimeMs": 500
    }
]
| key | 含义 |
|---|---|
| resource | 资源名 |
| limitApp | 针对来源 |
| grade | 阈值类型,0表示并发线程数,1表示QPS |
| count | 单机阈值 |
| clusterMode | 是否集群 |
| strategy | 流控模式,0-表示直接,1-表示关联,2-表示链路 |
| controlBehavior | 流控效果,0-表示快速失败,1-表示Warm Up(预热模式),2-表示排队等待 |
| refResource | 关联资源/入口资源,(流控模式为关联或链路需要此参数) |
| warmUpPeriodSec | 预热时长,(秒,预热模式需要此参数) |
| maxQueueingTimeMs | 超时时间(排队等待模式需要此参数) |
- 熔断规则配置
[{
"resource": "getFlow1", // 资源名
"grade": 1, // 熔断策略,0-慢调用比例,1-异常比例,2-异常数
"count": 1, // 慢调用比例下为最大RT,单位ms;异常比例下为比例阈值,异常数下为异常数
"slowRatioThreshold": 0.1, // 慢调用比例阈值,仅慢调用比例有效
"minRequestAmount": 10, // 最小请求数,请求数小于该值时,即便异常比率超出阈值也不会熔断
"timeWindow": 10, // 熔断时长,单位:s
"statIntervalMs": 1000 // 统计时长,单位ms
}]
- 热点规则配置
[{
"resource": "getFlow1", // 资源名
"grade": 1, // 限流模式 QPS模式,固定值
"paramIdx": 1, // 参数索引
"count": 1, // 单机阈值
"durationInSec": 4, // 统计窗口时长
"clusterMode": false // 是否集群 默认为false
}]
- 系统规则配置
[{
"avgRt": 1, // RT
"highestCpuUsage": -1, // CPU使用率
"highestSystemLoad": -1, // LOAD
"maxThread": -1, // 线程数
"qps": -1, // QPS 入口
"count": 1 // 阈值,在CPU使用率中是百分比
}]
- 授权规则配置
[{
"resource": "getFlow1", // 资源名
"limitApp": "/get", // 调用方,多个用逗号分隔
"strategy": 0 // 授权类型 0-白名单;1-黑名单
}]
8.3 Seata
Seata 是一款开源的分布式事务解决方案,致力于提供高性能和简单易用的分布式事务服务。Seata 将为用户提供了 AT、TCC、SAGA 和 XA 事务模式,为用户打造一站式的分布式解决方案。这里将主要讲解及演示 AT 事务模式。
官网:http://seata.io/zh-cn/ ,各种事务模式的工作机制可参考官网,有较为详细的工作机制介绍
下载地址:https://github.com/apache/incubator-seata/releases ,为迎合工程依赖版本,本人下载的是 1.6.1 版本
8.3.1 理论知识
因为 Seata 项目中使用较为简单,使用 @GlobalTransactional ,故本节花较多篇幅介绍理论知识,后续再展开实战
分布式事务处理过程的一ID+三组件模型
- 全局唯一事务ID:Transaction ID XID
- 三组件模型:
- Transaction Coordinator (TC):事务协调器,维护全局和分支事务的状态,驱动全局事务提交或回滚。
- Transaction Manager ™:事务管理器,定义全局事务的范围:开始全局事务、提交或回滚全局事务。
- Resource Manager (RM):资源管理器,管理分支事务处理的资源,与TC交谈以注册分支事务和报告分支事务的状态,并驱动分支事务提交或回滚。
Seata 管理的分布式事务的典型生命周期:
- TM 要求 TC 开始新的全局事务。TC 生成代表全局事务的 XID。
- XID 通过微服务的调用链传播。
- RM将本地事务作为XID对应的全局事务的分支注册到TC。
- TM请求TC提交或回滚XID对应的全局事务。
- TC驱动XID对应的全局事务下的所有分支事务完成分支提交或回滚。
AT模式整体机制:
两阶段提交协议的演变:
- 一阶段:业务数据和回滚日志记录在同一个本地事务中提交,释放本地锁和连接资源。
- 二阶段:
- 提交异步化,非常快速地完成。
- 回滚通过一阶段的回滚日志进行反向补偿。
一阶段加载:
在一阶段,Seata 会拦截“业务 SQL”,
- 解析 SQL 语义,找到“业务 SQL”要更新的业务数据,在业务数据被更新前,将其保存成“before image”
- 执行“业务 SQL”更新业务数据,在业务数据更新之后,
- 其保存成“after image”,最后生成行锁。
以上操作全部在一个数据库事务内完成,这样保证了一阶段操作的原子性。
二阶段提交:
二阶段如是顺利提交的话,因为“业务 SQL”在一阶段已经提交至数据库,所以Seata框架只需将一阶段保存的快照数据和行锁删掉,完成数据清理即可。
二阶段回滚:
二阶段如果是回滚的话,Seata 就需要回滚一阶段已经执行的“业务 SQL”,还原业务数据。回滚方式便是用“before image”还原业务数据;但在还原前要首先要校验脏写,对比“数据库当前业务数据”和 “after image”,如果两份数据完全一致就说明没有脏写,可以还原业务数据,如果不一致就说明有脏写,出现脏写就需要转人工处理。
图示:
8.3.2 项目配置及使用
下载地址:https://github.com/apache/incubator-seata/releases/download/v1.6.1/seata-server-1.6.1.zip
- 修改配置文件
seata/conf/application.yml,配置信息:https://seata.apache.org/zh-cn/docs/v1.6/user/configurations ,官网中还介绍了如何将配置文件同步到 nacos 的方法。这里仅贴出本人修改的配置,修改了 seata 标签的内容,供参考:
seata:
  config:
    # support: nacos, consul, apollo, zk, etcd3
    type: nacos
    nacos:
      server-addr: 127.0.0.1:8848
      group: DEFAULT_GROUP
      data-id: seataServerConfig.yml
  registry:
    # support: nacos, eureka, redis, zk, consul, etcd3, sofa
    type: nacos
    nacos:
      server-addr: ${seata.config.nacos.server-addr}
  store:
    # support: file 、 db 、 redis
    mode: db
    db:
      datasource: druid
      db-type: mysql
      driver-class-name: com.mysql.cj.jdbc.Driver
      url: jdbc:mysql://127.0.0.1:3306/seata?rewriteBatchedStatements=true
      user: root
      password: root
      min-conn: 10
      max-conn: 100
      global-table: global_table
      branch-table: branch_table
      lock-table: lock_table
      distributed-lock-table: distributed_lock
      query-limit: 1000
      max-wait: 5000
  #  server:
  #    service-port: 8091 #If not configured, the default is '${server.port} + 1000'
- 创建
seata数据库,执行seata/script/server/db/mysql.sql文件,创建对应表 - 先启动 nacos 再 cmd 启动 seata:
seata-server.bat
环境及逻辑介绍:这里准备搭建3个微服务 A,B,C,建立表 aa,bb,cc。当调用微服务 A 项目接口时,A项目接口会新增一条 aa 表数据,并调用 B 项目接口,B接口中新增一条 bb 表数据,并调用 C 项目接口,C 项目接口中新增一条 cc 表数据,并在新增后抛出异常,如所有表数据异常回滚则分布式事务控制成功。即如下逻辑
A:insert aa; -> B
B:insert bb; -> C
C:insert cc; throw Exception

if count(aa) == 0 && count(bb) == 0 && count(cc) == 0
	分布式事务回滚成功
else
	分布式事务回滚失败
下面为 aa,bb,cc 表的执行 sql,生产上一般是用不同数据库做隔离,这里我仅以表为粒度区分,不多建数据库了。
CREATE TABLE `aa` (
  `id` bigint unsigned NOT NULL AUTO_INCREMENT,
  PRIMARY KEY (`id`)
) ENGINE=InnoDB DEFAULT CHARSET=utf8mb4 COLLATE=utf8mb4_general_ci;
CREATE TABLE `bb` (
  `id` bigint unsigned NOT NULL AUTO_INCREMENT,
  PRIMARY KEY (`id`)
) ENGINE=InnoDB DEFAULT CHARSET=utf8mb4 COLLATE=utf8mb4_general_ci;
CREATE TABLE `cc` (
  `id` bigint unsigned NOT NULL AUTO_INCREMENT,
  PRIMARY KEY (`id`)
) ENGINE=InnoDB DEFAULT CHARSET=utf8mb4 COLLATE=utf8mb4_general_ci;
SEATA AT 模式需要 UNDO_LOG 表,这个来源于官网 https://seata.apache.org/zh-cn/docs/v1.6/user/quickstart ,如果有多个数据库,需要在每个数据库创建一下这个表
-- 注意此处0.3.0+ 增加唯一索引 ux_undo_log
CREATE TABLE `undo_log` (
  `id` bigint(20) NOT NULL AUTO_INCREMENT,
  `branch_id` bigint(20) NOT NULL,
  `xid` varchar(100) NOT NULL,
  `context` varchar(128) NOT NULL,
  `rollback_info` longblob NOT NULL,
  `log_status` int(11) NOT NULL,
  `log_created` datetime NOT NULL,
  `log_modified` datetime NOT NULL,
  `ext` varchar(100) DEFAULT NULL,
  PRIMARY KEY (`id`),
  UNIQUE KEY `ux_undo_log` (`xid`,`branch_id`)
) ENGINE=InnoDB AUTO_INCREMENT=1 DEFAULT CHARSET=utf8mb4;
工程搭建:
- 创建项目
A,引入依赖
<dependencyManagement>
    <dependencies>

        <dependency>
            <groupId>org.springframework.bootgroupId>
            <artifactId>spring-boot-dependenciesartifactId>
            <version>2.6.13version>
            <type>pomtype>
            <scope>importscope>
        dependency>

        <dependency>
            <groupId>org.springframework.cloudgroupId>
            <artifactId>spring-cloud-dependenciesartifactId>
            <version>2021.0.5version>
            <type>pomtype>
            <scope>importscope>
        dependency>

        <dependency>
            <groupId>com.alibaba.cloudgroupId>
            <artifactId>spring-cloud-alibaba-dependenciesartifactId>
            <version>2021.0.5.0version>
            <type>pomtype>
            <scope>importscope>
        dependency>
        <dependency>
            <groupId>mysqlgroupId>
            <artifactId>mysql-connector-javaartifactId>
            <version>${mysql.version}version>
        dependency>
        <dependency>
            <groupId>com.alibabagroupId>
            <artifactId>druid-spring-boot-starterartifactId>
            <version>${druid.spring.boot.starter}version>
        dependency>
        <dependency>
            <groupId>com.baomidougroupId>
            <artifactId>mybatis-plus-boot-starterartifactId>
            <version>${mybatis.plus.boot.starter}version>
        dependency>
        <dependency>
            <groupId>junitgroupId>
            <artifactId>junitartifactId>
            <version>${junit.version}version>
        dependency>
        <dependency>
            <groupId>log4jgroupId>
            <artifactId>log4jartifactId>
            <version>${log4j.version}version>
        dependency>
        <dependency>
            <groupId>org.projectlombokgroupId>
            <artifactId>lombokartifactId>
            <version>${lombok.version}version>
            <optional>trueoptional>
        dependency>
    dependencies>
dependencyManagement>

<dependencies>
    <dependency>
        <groupId>com.spring.springcloudgroupId>
        <artifactId>cloud-api-commonartifactId>
        <version>${project.version}version>
    dependency>

    <dependency>
        <groupId>org.springframework.cloudgroupId>
        <artifactId>spring-cloud-starter-loadbalancerartifactId>
    dependency>

    <dependency>
        <groupId>org.springframework.cloudgroupId>
        <artifactId>spring-cloud-starter-openfeignartifactId>
    dependency>

    <dependency>
        <groupId>com.alibaba.cloudgroupId>
        <artifactId>spring-cloud-starter-alibaba-nacos-discoveryartifactId>
    dependency>

    <dependency>
        <groupId>com.alibaba.cloudgroupId>
        <artifactId>spring-cloud-starter-alibaba-seataartifactId>
    dependency>

    <dependency>
        <groupId>org.springframework.bootgroupId>
        <artifactId>spring-boot-starter-webartifactId>
    dependency>
    <dependency>
        <groupId>org.springframework.bootgroupId>
        <artifactId>spring-boot-starter-actuatorartifactId>
    dependency>
    <dependency>
        <groupId>com.baomidougroupId>
        <artifactId>mybatis-plus-boot-starterartifactId>
    dependency>
    <dependency>
        <groupId>com.alibabagroupId>
        <artifactId>druid-spring-boot-starterartifactId>
    dependency>

    <dependency>
        <groupId>mysqlgroupId>
        <artifactId>mysql-connector-javaartifactId>
    dependency>

    <dependency>
        <groupId>org.springframework.bootgroupId>
        <artifactId>spring-boot-starter-jdbcartifactId>
    dependency>

    <dependency>
        <groupId>org.springframework.bootgroupId>
        <artifactId>spring-boot-devtoolsartifactId>
        <scope>runtimescope>
        <optional>trueoptional>
    dependency>
    <dependency>
        <groupId>org.projectlombokgroupId>
        <artifactId>lombokartifactId>
        <optional>trueoptional>
    dependency>
    <dependency>
        <groupId>org.springframework.bootgroupId>
        <artifactId>spring-boot-starter-testartifactId>
        <scope>testscope>
    dependency>
dependencies>
- 配置文件
application.yml
server:
  port: 8001

spring:
  application:
    name: a
  datasource:
    type: com.alibaba.druid.pool.DruidDataSource
    druid:
      username: root
      password: root
      url: jdbc:mysql:///springcloud
      driver-class-name: com.mysql.cj.jdbc.Driver
  cloud:
    nacos:
      server-addr: localhost:8848
seata:
  registry:
    nacos:
      server-addr: localhost:8848
- 主启动类
@EnableFeignClients
@MapperScan("com.spring.springcloud.mapper")
@SpringBootApplication
public class AMain8001 {

	public static void main(String[] args) {
		SpringApplication.run(AMain8001.class, args);
	}
}
- 使用 MybatisX 插件生成表
aa的实体类,service 层和 dao 层
- 业务类:调用 http://localhost:8001/insert 接口,
aa表没插入数据则表示本地事务成功
@RestController
public class MainController {

	@Value("${server.port}")
	private String port;

	@Autowired
	private AaService aaService;

	@GetMapping("insert")
	@GlobalTransactional(rollbackFor = Throwable.class)
	public Result insert(){
		boolean save = aaService.save(new Aa());
		Result result = new Result(port);
		result.setMessage("port:" + port);
		System.out.println(1/0);
		return result;
	}
}
后续需要尝试分布式事务,依照项目 A 搭建项目 B 和 C ,并在 A 中使用 feign 调用 B,在 B 中使用 feign 调用 C
- 项目 A 中添加如下接口
@FeignClient("b")
public interface BbService {

	@GetMapping("b/insert")
	Result insert();
}
业务类改为如下
@RestController
public class MainController {

	@Value("${server.port}")
	private String port;

	@Autowired
	private AaService aaService;

	@Autowired
	private BbService bbService;

	@GetMapping("insert")
	@GlobalTransactional(rollbackFor = Throwable.class)
	public Result insert(){
		boolean save = aaService.save(new Aa());
		Result result = new Result(bbService.insert());
		result.setMessage("port:" + port);
		return result;
	}
}
- 在 B 中用相同方式调用 C
@RestController
public class MainController {

	@Autowired
	private BbService bbService;

	@Autowired
	private CcService ccService;

	@GetMapping("b/insert")
	public Result insert(){
		boolean save = bbService.save(new Bb());
		return ccService.insert();
	}
}
- C中做
insert Cc操作,并抛出异常
@RestController
public class MainController {

	@Autowired
	private CcService ccService;

	@GetMapping("c/insert")
	public Result insert(){
		boolean save = ccService.save(new Cc());
		Result result = new Result(port);
		System.out.println(1/0);
		return result;
	}
}
最后调用 http://:8001/insert ,看结果,3个表均未添加数据,分布式事务回滚成功


