Softmax分类器
文章目录
- 回顾
-
- 使用Sigmoid构建多分类器?
- SoftMax函数
- 交叉熵损失函数
-
- 例子
- MINIST多分类器
-
- 数据集
- 步骤
- 实现
-
- 1.数据集
- 2.构建模型
- 3.构建损失函数和优化器
- 4. 训练和测试
- 完整代码
回顾
上节课利用糖尿病数据集做了二分类任务

MNIST数据集有10个类别我们又该如何进行分类呢?

使用Sigmoid构建多分类器?
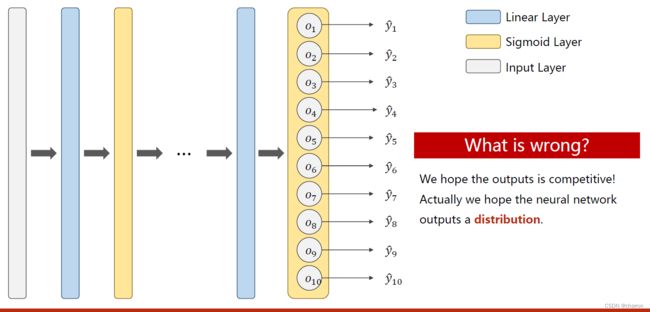
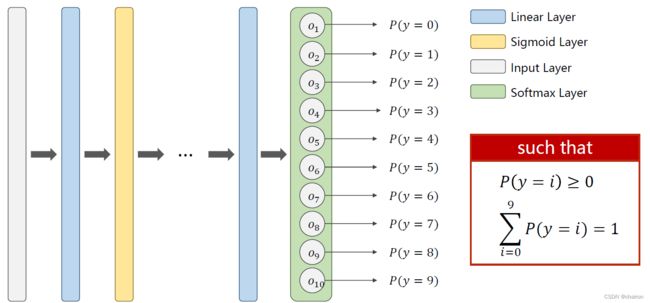
之前二分类使用的是sigmoid函数进行分类,它可以把输出归一化到[0,1]之间。如果使用Sigmoid激活函数进行多分类,会出现一个问题:每个类别的概率都是[0,1]之间,他们加起来的概率和可能就不为1.我们想要的结果是满足一个分布:概率P>=0;并且概率之和=1.


SoftMax函数
交叉熵损失函数
标签采用One-hot编码,与预测的概率值计算损失。
例子
MINIST多分类器
数据集
MINIST数据是一个28*28像素的矩阵,如果把它线性隐射到[0,1]之间

步骤
实现
1.数据集
transforms.ToTensor()
- transform进行图像变换,将PIL图像变换为C*W *H大小的的Tensor。
- PIL库会将图片像素由[0,255]映射到[0,1]之间,方便pytorch进行运算。
transform=transforms.Compose([transforms.ToTensor(),#Convert the PIL Image to Tensor.
                              transforms.Normalize((0.1307,),(0.3081,))])#The parameters are mean and std respectively.

图像我们通常会有通道这个概念,可以理解为一个通道就是一个图像的矩阵。
- 灰度图片只有一个通道;
- 彩色图片:R、G、B三个通道;
- 所以一张图片其实可以表示成WHC,在Pytorch中我们需要转换为CWH,即通道数C要放在最前面。


transforms.Normalize((0.1307,),(0.3081,)) - 归一化,参数分别是均值和标准差

2.构建模型
class Net(torch.nn.Module):
    def __init__(self):
        super(Net,self).__init__()
        self.linear1=torch.nn.Linear(784,512)
        self.linear2=torch.nn.Linear(512,256)
        self.linear3=torch.nn.Linear(256,128)
        self.linear4=torch.nn.Linear(128,64)
        self.linear5=torch.nn.Linear(64,10)

    def forward(self, x):
        x=x.view(-1,784)#把每一张图片的像素都拼接起来,然后变成二维(N,748)(748=28*28)
        x=F.relu(self.linear1(x))
        x=F.relu(self.linear2(x))
        x=F.relu(self.linear3(x))
        x=F.relu(self.linear4(x))
        x=self.linear5(x)#注意由于后续交叉熵损失函数包含激活函数,所以这一层不需要激活函数
        return x

model=Net()
3.构建损失函数和优化器
- 采用交叉熵损失函数
- 采用SGDM优化器
criterion=torch.nn.CrossEntropyLoss()#损失函数
optimizer=torch.optim.SGD(model.parameters(),lr=0.01,momentum=0.5)#SGD with momentum
4. 训练和测试
- 训练:forward + backward + update(记得梯度清零)
- 测试:不计算梯度
with torch.no_grad():
def train(epoch):
    running_loss=0.0
    for batch_idex,data in enumerate(train_loader,0):
        inputs,target=data
        optimizer.zero_grad()#梯度清零

        #forward + backward + update
        outputs=model(inputs)
        loss=criterion(outputs,target)
        loss.backward()
        optimizer.step()

        running_loss+=loss.item()
        if batch_idex%300==299:#每300epoch输出一次loss信息
            print('[%d,%5d loss:%.3f]' % (epoch+1,batch_idex+1,running_loss/300))
            running_loss=0.0

def test():
    correct=0
    total=0
    with torch.no_grad():#不需要计算梯度
        for data in test_loader:
            images,labels=data
            outputs=model(images)
           # predicted=torch.max(outputs.data,dim=1)
            predicted=torch.argmax(outputs.data,dim=1)#求预测数据最大值的下标(指定沿着维度1进行计算)
            total+=labels.size(0)#size(0)是样本个数N,计算总共预测数据的样本总数
            correct += (predicted == labels).sum().item()#计算预测正确的数目

    print('Accuracy on test set: %d %%' % (100 * correct / total))
    #print(correct)
完整代码
import numpy as np
import torch
from torch.utils.data import DataLoader #For constructing DataLoader
from torchvision import transforms #For constructing DataLoader 对图像进行处理
from torchvision import datasets #For constructing DataLoader
import torch.nn.functional as F #For using function relu()
import torch.optim as optim #For constructing Optimizer

batch_size=64
transform=transforms.Compose([transforms.ToTensor(),#Convert the PIL Image to Tensor.
                              transforms.Normalize((0.1307,),(0.3081,))])#The parameters are mean and std respectively.

train_dataset = datasets.MNIST(root='../dataset/mnist',train=True,transform=transform,download=True)
test_dataset = datasets.MNIST(root='../dataset/mnist',train=False,transform=transform,download=True)
train_loader = DataLoader(dataset=train_dataset,batch_size=batch_size,shuffle=True)
test_loader = DataLoader(dataset=test_dataset,batch_size=batch_size,shuffle=False)

class Net(torch.nn.Module):
    def __init__(self):
        super(Net,self).__init__()
        self.linear1=torch.nn.Linear(784,512)
        self.linear2=torch.nn.Linear(512,256)
        self.linear3=torch.nn.Linear(256,128)
        self.linear4=torch.nn.Linear(128,64)
        self.linear5=torch.nn.Linear(64,10)

    def forward(self, x):
        x=x.view(-1,784)#把每一张图片的像素都拼接起来,然后变成二维(N,748)(748=28*28)
        x=F.relu(self.linear1(x))
        x=F.relu(self.linear2(x))
        x=F.relu(self.linear3(x))
        x=F.relu(self.linear4(x))
        x=self.linear5(x)#注意由于后续交叉熵损失函数包含激活函数,所以这一层不需要激活函数
        return x

model=Net()

criterion=torch.nn.CrossEntropyLoss()#损失函数
optimizer=torch.optim.SGD(model.parameters(),lr=0.01,momentum=0.5)#SGD with momentum

def train(epoch):
    running_loss=0.0
    for batch_idex,data in enumerate(train_loader,0):
        inputs,target=data
        optimizer.zero_grad()#梯度清零

        #forward + backward + update
        outputs=model(inputs)
        loss=criterion(outputs,target)
        loss.backward()
        optimizer.step()

        running_loss+=loss.item()
        if batch_idex%300==299:#每300epoch输出一次loss信息
            print('[%d,%5d loss:%.3f]' % (epoch+1,batch_idex+1,running_loss/300))
            running_loss=0.0

def test():
    correct=0
    total=0
    with torch.no_grad():#不需要计算梯度
        for data in test_loader:
            images,labels=data
            outputs=model(images)
           # predicted=torch.max(outputs.data,dim=1)
            predicted=torch.argmax(outputs.data,dim=1)#求预测数据最大值的下标(指定沿着维度1进行计算)
            total+=labels.size(0)#size(0)是样本个数N,计算总共预测数据的样本总数
            correct += (predicted == labels).sum().item()#计算预测正确的数目

    print('Accuracy on test set: %d %%' % (100 * correct / total))
    #print(correct)

if __name__ == '__main__':
    for epoch in range(10):#epoch=10,训练一轮,测试一轮
        train(epoch)
        test()
结果:
Accuracy on test set: 96 %
[5,  300 loss:0.104]
[5,  600 loss:0.096]
[5,  900 loss:0.101]
Accuracy on test set: 96 %
[6,  300 loss:0.078]
[6,  600 loss:0.078]
[6,  900 loss:0.086]
Accuracy on test set: 97 %
[7,  300 loss:0.066]
[7,  600 loss:0.064]
[7,  900 loss:0.067]
Accuracy on test set: 97 %
[8,  300 loss:0.052]
[8,  600 loss:0.054]
[8,  900 loss:0.051]
Accuracy on test set: 97 %
[9,  300 loss:0.042]
[9,  600 loss:0.044]
[9,  900 loss:0.046]
Accuracy on test set: 97 %
[10,  300 loss:0.031]
[10,  600 loss:0.038]
[10,  900 loss:0.036]
Accuracy on test set: 97 %
- 可以看到准确度在97%就上不去了,这是因为线性模型对于图片数据的特征提取不是很友好。
- 有很多方法可以对图像进行自动的特征提取,不需要人工设计。(CNN)


