How to set up XMLA HTTP Access for SQL Server Analysis Service 2008 and access the Adventure Works 2008 from an DV
引自:http://blogs.infragistics.com/blogs/atanas_dyulgerov/archive/2010/01/27/how-to-set-up-xmla-http-access-for-sql-server-analysis-service-2008-and-access-the-adventure-works-2008-from-an-infragistics-pivotgrid-application.aspx
SQL Server Analysis Service 2008
Let us start off with installing the SQL Server. The installation is very straightforward. You just need to follow the on-screen instructions and everything should be fine. There are just a few key points that will require attention (the italics text) and I will tell you what they are as I describe how the setup should go.
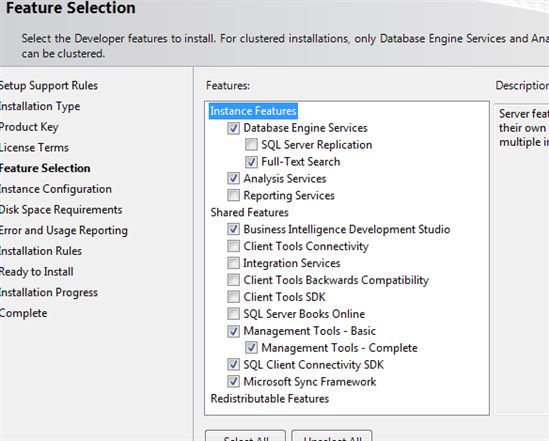
After those are finished you will be asked to enter your product key and agree to the license terms. Then you will be presented with feature selection choices. We only need a few now to support the basic scenario for this tutorial, but you might want to install more or all of them if you plan to develop more advanced applications or want to combine this installation with other services. The least set of features you must install is this: Database engine services, Full-text search, Analysis Services, Business Intelligence Development Studio, Management Tools Basic and Complete.
Normal 0 false false false false EN-US X-NONE X-NONE
BI Development Studio is needed as it is the easiest way to deploy the Adventure Works sample database package. The management tools are needed in order to be able to verify the installation of the server and the sample databases and also you might want to manipulate the data, the databases and settings of the SQL server.
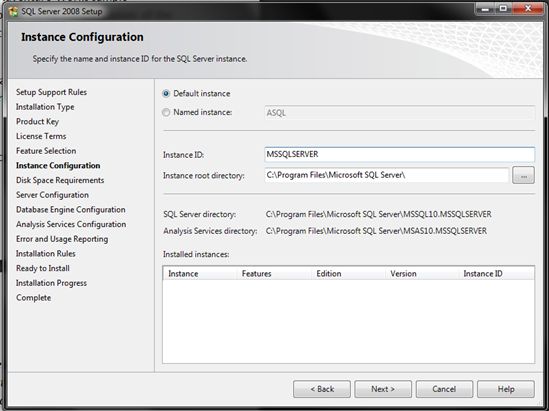
When you are ready with the features, you will need to choose whether you want a default or named instance for the SQL server. If you do not plan to have more than one instance the default is just fine.
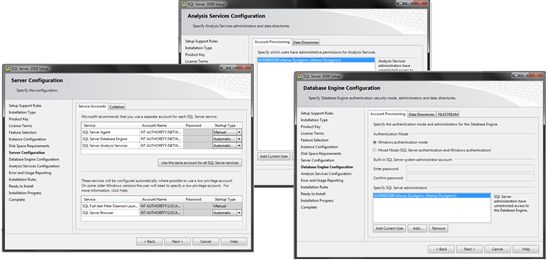
Normal 0 false false false EN-US X-NONE X-NONE Then you will be asked about user account configurations. You can safely select NT AUTHORITY\NETWORK SERVICE user for all services and add the current user to have administrative permissions wherever that is asked (database engine and analysis services configuration). Note that the user that you add for Analysis provisioning will have to be the one to run the web application, so if you want some other account to serve this admin function you need to create it before you add it here or add it later to the admin role in the management studio (will be discussed later in the article).
Normal 0 false false false EN-US X-NONE X-NONE
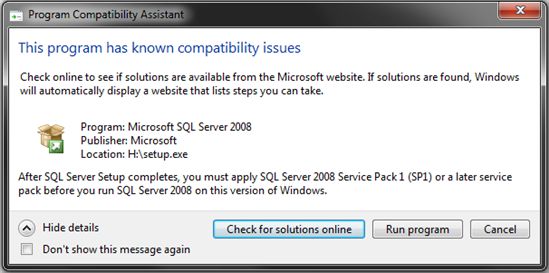
Once you are past the user selection, Error and Usage Reporting choice and the installation rules are checked you will be presented with a summary and you press Install. When the installation process is complete you have just one other issue to consider if you use Windows 7 – the software has a known issue and you must install SP1 before you will be able to use the SQL server.
Normal 0 false false false EN-US X-NONE X-NONE
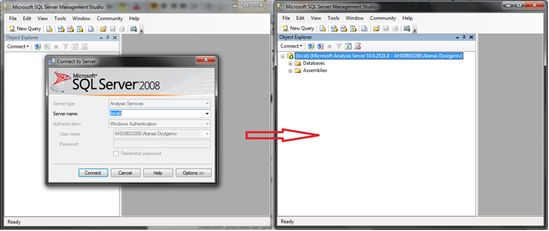
To verify that the installation has been successful, go to the start menu and find the SQL Management Studio. Open it and try to connect to the local instance of the Analysis Server you just installed. If you don’t get any errors we are good to go.
Normal 0 false false false EN-US X-NONE X-NONE
XMLA HTTP Access
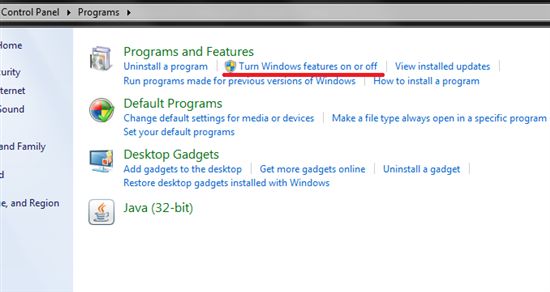
After we install the SQL server with analysis services we can continue with the XMLA HTTP access. We need a web server and for the purpose of this tutorial we will use IIS 7. The easiest way to install IIS is to start the Add/Remove Windows Components module of Add/Remove Programs or Turn Windows features on or off from Programs if you are using Windows Vista or 7.
Normal 0 false false false EN-US X-NONE X-NONE
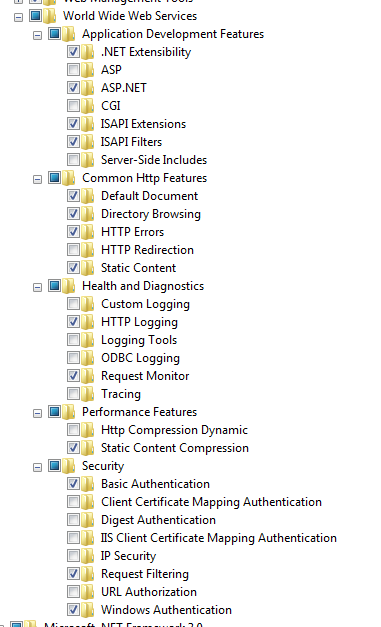
The features that we need to install are located in the folder Internet Information Services. You can easily go with just a few of the sub-features, but installing everything will get you out of trouble if you want to do advanced applications that might depend on a specific feature of IIS. Mandatory features for our case are the Web Management Tools, .NET Extensibility, ASP.NET, ISAPI Extensions, Basic Authentication and Windows Authentication. However I just installed everything.
Normal 0 false false false EN-US X-NONE X-NONE
When you press OK the IIS will be installed and started.
In order to configure IIS we need to start the IIS Manager Console. You could either right-click My Computer, press Manage and then look for Internet Information Services or just start the InetMgr.exe from the start menu’s Run.
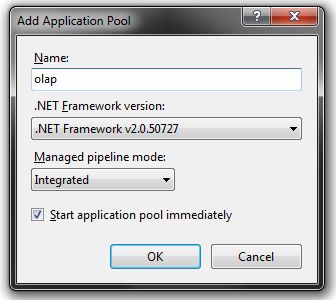
We start the IIS configuration by creating an Application Pool for our application. Right-click the Application pools and press Add Application Pool.
Normal 0 false false false EN-US X-NONE X-NONE
In the window that opened give a name to the application pool.
Normal 0 false false false EN-US X-NONE X-NONE
Press OK.
Now we will need to copy some files that will be the base of the website that provides the XMLA HTTP access. They are located under <wherever you installed the SQL server >\OLAP\bin\isapi. In my case that folder is: C:\Program Files\Microsoft SQL Server\MSAS10.ASQL\OLAP\bin\isapi. Copy all the files in this folder and paste them in a new one under the root of the Default Web Site. You can go to this folder by right-clicking the name of the site in the configuration manager and pressing Explore. Create a new folder named olap and paste the copied files there. You also need to make sure the user that runs the IIS service has permission to read the files in the folder. Check that by going to the Security section of the Properties on the parent folder (the web root). If the permissions are not correct you will get an error message when you point the browser to that website, saying that the files may not be found or there is no access to the files you are looking for.
The dll file that we copied is the engine that provides the XMLA and the ini is the file that points the engine to the SQL server. If you installed the SQL on a different machine than the IIS machine you will need to modify this file accordingly.
When you have created the olap folder go to the IIS manager again, expand the Default Web Site and locate the olap folder under it. You might need to press refresh for it to show up. When it does, right-click it and press Convert to Application.
In the newly opened window change the application pool to olap.
Normal 0 false false false EN-US X-NONE X-NONE
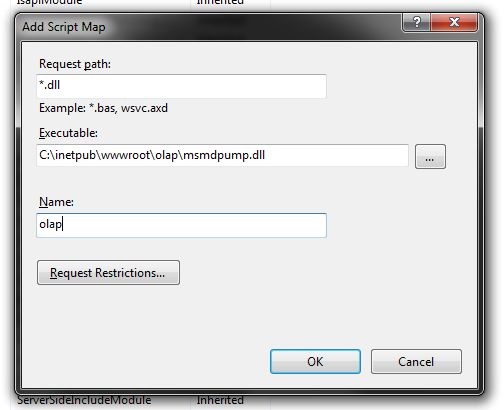
Once you’ve done that, there are only three steps you need to do to finish this section of the process. The first of these is to add a handler for *.dll to the website. Select the olap folder and from IIS Settings press Handler Mappings.
Normal 0 false false false EN-US X-NONE X-NONE At the right side of the screen you will find a link Add script map. Press it. In the Request path type *.dll. Then for the executable, give the path to the msmdpump.dll file in the olap folder and name it olap.
Normal 0 false false false EN-US X-NONE X-NONE
When you press the OK button you will be prompted to add an ISAPI extension and you need to press Yes.
Now, the second step is to go to the Authentication setting of IIS in the olap folder. By default only Anonymous Authentication is enabled. For the purposes of this tutorial we will use only anonymous, but bear in mind that there are more advanced authentication mechanisms available. Now right-click the anonymous auth and click edit. In the box that opens click the Set button and enter the credentials of the user account you added as Analysis provisional account in the SQL installation step. It might be the user you are currently logged on with, or another one if you have created such specially dedicated for the job. This is the user that will create all connections to the SQL Analysis service.
If you haven’t added the administrative role in the SQL Analysis Service yet as mentioned before you could add access permissions for the default user that starts the olap application and not bother with creating a special service user. To do that you will need to leave the default user (IUSR) in the Authentication page and wait till we install the Adventure Works database. There will be a paragraph instructing you how to grant the needed permissions.
The last step is to go to the IIS global settings (not the olap folder’s settings) and select the ISAPI and SGI restrictions. You will see that the restriction that we were prompted to create for the msmdpump dll has no name. We need to double click on it and then name it olap.
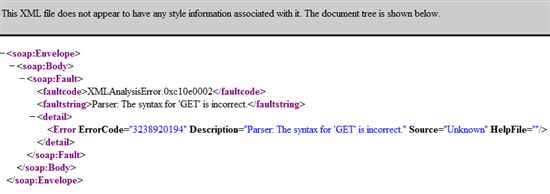
To verify that we have done well we need to point a browser to http://localhost/olap/msmdpump.dll and observe the result. Firefox will show you something similar to this:
Normal 0 false false false EN-US X-NONE X-NONE
Adventure Works 2008
Now that we have set up the XMLA access to the SQL server, we need data to be able to access from our demo. A very popular set of sample data is the Adventure Works package, and we are going to install just that now.
The files that you need are located here: http://codeplex.com/MSFTDBProdSamples/Release/ProjectReleases.aspx
After you download them start the installation and accept the license agreement.
The next step is to select where to install the samples. After you select the Installation Instance of the SQL Server you can leave everything else to the defaults. Press Install.
Normal 0 false false false EN-US X-NONE X-NONE
After the process is complete you will have an Analysis Services database installed. Now you have to set up the Analysis Services database. To do that go to C:\Program Files\Microsoft SQL Server\100\Tools\Samples\AdventureWorks 2008 Analysis Services Project. Depending on the version of your SQL server, you need either the enterprise (for enterprise or developer versions) or the standard folder. There is an Adventure Works.sln file in those and you should open it. Note that you need to be with elevated user rights when you do that.
When the project is opened with the Business Intelligence Development Studio you just need to right-click the solution and press Deploy. That concludes the sample database installation.
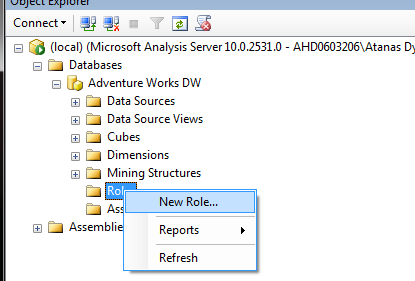
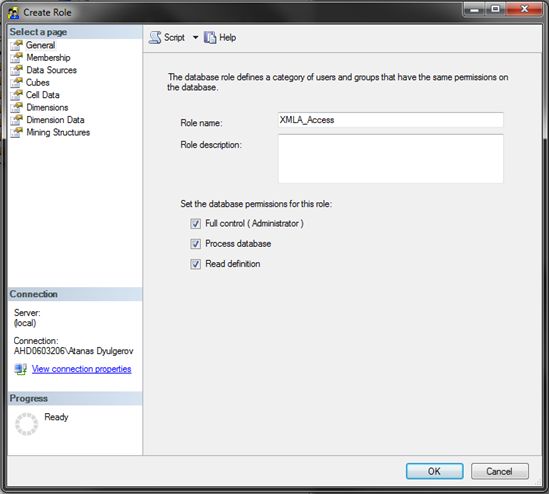
If you haven’t changed the default user that starts the olap application in IIS or you have selected account that is different from the provisioning account (the one that you chose when you installed the SQL server), then you need to grant the right permissions at this point. To do that open the SQL Management Studio and connect to the analysis database. Go to the Adventure Works DW database and right-click the Roles folder. Select new role, give it a name and set the level of access you want to provide through the XMLA HTTP Access.
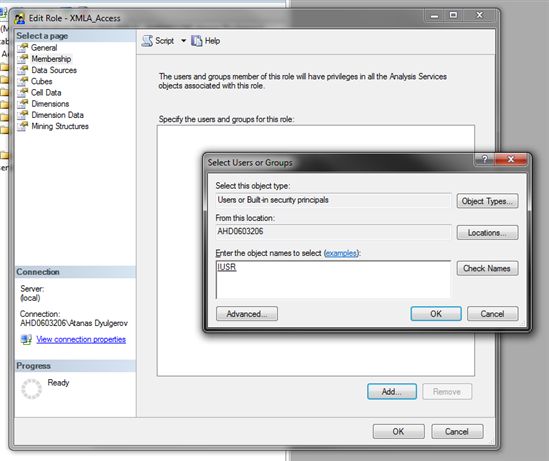
Normal 0 false false false EN-US X-NONE X-NONE After you select the permissions for this role click on Membership and add the user you want to be able to connect to the Analysis service. In the default case the user that runs the olap application in IIS is called IUSR. Adding it should be sufficient if you have not changed it in the Authentication section that was described earlier in this tutorial.
Normal 0 false false false EN-US X-NONE X-NONE
Infragistics PivotGrid demo
Before we start to build our basic application with the Infragistics PivotGrid we need to make sure that the Silverlight application will be able to communicate with the XMLA interface we have created (the cross-domain problem). This is ensured by the so-called client access policy. You can read more about the network security access restrictions in Silverlight here: http://msdn.microsoft.com/en-us/library/cc645032%28VS.95%29.aspx
The solution to the cross-domain problem is simply creating a text file named clientaccesspolicy.xml in the root of the web server. Note that this is not the folder where the XMLA engine is, but the / (root) folder of the whole web server. Example of its contents is the following:
<?xml version="1.0" encoding="utf-8"?>
<access-policy>
<cross-domain-access>
<policy>
<allow-from http-request-headers="*">
<domain uri="http://*"/>
</allow-from>
<grant-to>
<resource path="/" include-subpaths="true"/>
</grant-to>
</policy>
</cross-domain-access>
</access-policy>
Finally when we have data and means to access it we can start building our Infragistics PivotGrid demo.
Create a Silverlight project. Don’t even create a host ASP project, just Silverlight. Before I show you the code you need to add three assembly references.
Infragistics.Silverlight.DataVisualization.Olap.Preview.v10.1
Infragistics.Silverlight.DataVisualization.Olap.Xmla.Preview.v10.1
Infragistics.Silverlight.DataVisualization.PivotGrid.Preview.v10.1
Infragistics.Silverlight.DataVisualization.v10.1
Infragistics.Silverlight.DataVisualization.XamWebTree.Preview.v10.1
If you don’t already have them you can download the CTP version from this address: http://www.infragistics.com/dotnet/netadvantage/silverlight/data-visualization.aspx#Downloads Look for the Betas section and “NetAdvantage for Silverlight Data Visualization CTP (November 2009)”. The downloaded file is a zip and you can find the assemblies under the NetAdvantage_DataVisualization_2010.1\Bin folder.
When we have done that we should add the namespace references in our XAML.
xmlns:igPivot="clr-namespace:Infragistics.Silverlight.Controls;assembly=Infragistics.Silverlight.DataVisualization.PivotGrid.Preview.v10.1"
xmlns:Olap="clr-namespace:Infragistics.Olap;assembly=Infragistics.Silverlight.DataVisualization.Olap.Preview.v10.1"
xmlns:Xmla="clr-namespace:Infragistics.Olap.Xmla;assembly=Infragistics.Silverlight.DataVisualization.Olap.Xmla.Preview.v10.1"
Finally we are ready to code the body of our sample.
<StackPanel x:Name="LayoutRoot" Orientation="Horizontal" >
<StackPanel.DataContext>
<Olap:OlapViewModelCreator>
<Xmla:XmlaConnectionSettings
ServerUrl="http://localhost/olap/msmdpump.dll"
CatalogName="Adventure Works DW" />
</Olap:OlapViewModelCreator>
</StackPanel.DataContext>
<igPivot:XamWebPivotGrid x:Name="pivotGrid"
ViewModel="{Binding ViewModel}"
LayoutData="{Binding ViewModel.Result}" />
<igPivot:XamWebPivotDataSelector Grid.Column="1" ViewModel="{Binding ViewModel}" />
</StackPanel>
We need to add one line to the constructor in order to load the data as soon as the application is loaded. I am using lambda expression just to make the code shorter.
this.Loaded += (sender, e) => { pivotGrid.ViewModel.LoadCubesAsync(); };
The four key parts of this code are the following:
1. We specify the connection settings in the DataContext of our LayoutRoot.
2. The PivotGrid main control. Its ViewModel and LayoutData are drawn from the DataContext.
3. A PivotDataSelector allows us to choose what data the PivotGrid should display.
4. The LoadCubes method loads data from the server we have specified in the connection settings.
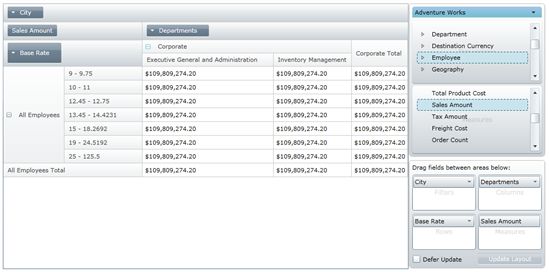
All that is left now is to test our creation. Hit F5, select a cube to begin, drag and drop columns, rows, measures and filters and play with the PivotGrid :)
Normal 0 false false false EN-US X-NONE X-NONE
I hope that you have found this article useful and you have enjoyed reading it. If you have any questions or just want to leave comments, please feel free to ask or give feedback. Best of luck with your PivotGrid experiences and have a great day!
