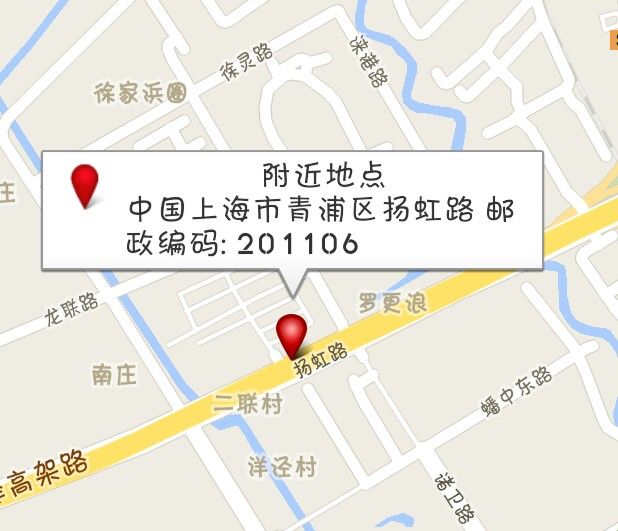
Google Map API v2 (三)----- 地图上添加标记(Marker),标记info窗口,即指定经纬度获取地址字符串
接上篇 http://www.cnblogs.com/inkheart0124/p/3536322.html
1,在地图上打个标记
 1 private MarkerOptions mMarkOption;
 2
 3 mMarkOption = new MarkerOptions().icon(BitmapDescriptorFactory.fromAsset("target.png"));
 4 mMarkOption.draggable(true);
 5
 6 double dLat = mLocation.getLatitude();
 7 double dLong = mLocation.getLongitude();
 8
 9 LatLng latlng = new LatLng(dLat, dLong);
10
11 mMarkOption.position(latlng);
12 mMarkOption.title("title");
13 mMarkOption.snippet("snippet");
14 Marker mMarker = mMapView.addMarker(mMarkOption);
3行,MarkerOptions对象,自己设置一个icon( target.png )
)
4行,设置为可拖动
6~9行,构造当前经纬度的LatLng
11~13行,设置标记的位置,info window的标题title、详细snippet
14行,GoogleMap的 addMarker(MarkerOptions) 方法,把标记添加到地图上,返回Marker对象mMarker。
2,拖动标记
设置标记可拖动:
方法一、先设置mMarkOption.draggable(true);,再addMarker;
方法二、Marker的setDraggable(boolean)方法;
Google Map 默认长按标记开始拖动,开发者只需要注册监听。注册拖动事件监听
mMapView.setOnMarkerDragListener(this);
acitiviy实现OnMarkerDragListener接口如下:
 1 /* OnMarkerDragListener start */
 2 @Override
 3 public void onMarkerDrag(Marker marker) {
 4 }
 5
 6 @Override
 7 public void onMarkerDragEnd(Marker marker) {
 8 }
 9
10 @Override
11 public void onMarkerDragStart(Marker marker) {
12     if(marker.isInfoWindowShown())
13         marker.hideInfoWindow();
14         mMarkerLoaded = false;
15     }
16 /* OnMarkerDragListener  end */
3行,public void onMarkerDrag(Marker marker),当Marker拖动的过程中会不断调用此函数,拖动中marker的位置marker.getPosition()可以得到经纬度。
7行,public void onMarkerDragEnd(Marker marker),拖动结束
11行,public void onMarkerDragStart(Marker marker),开始拖动
11~15行,开始拖动的时候,判断如果正在显示info window,则隐藏info window。
3,点击标记弹出info window
点击marker的default动作就是显示info window,之前设置的title和snippet会显示在infowindow中。
我们对info window做一点小改造,让他显示一个小图标和标记地点的地址
代码:
activity 实现InfoWindowAdapter接口(implements InfoWindowAdapter)
调用GoogleMap的方法setInfoWindowAdapter()方法
mMapView.setInfoWindowAdapter(this);
activity中实现InfoWindowAdapter的两个方法:
public View getInfoWindow(Marker marker);返回的View将用于构造整个info window的窗口
public View getInfoContents(Marker marker);返回的View将用于构造info window的显示内容,保留原来的窗口背景和框架
首先需要定义一个View的布局
res/layout/map_info.xml
 1 <?xml version="1.0" encoding="utf-8"?>
 2
 3 <RelativeLayout xmlns:android="http://schemas.android.com/apk/res/android"
 4     android:layout_width="wrap_content"
 5     android:layout_height="wrap_content"
 6     >
 7
 8     <ImageView
 9         android:id="@+id/map_info_image"
10         android:layout_width="wrap_content"
11         android:layout_height="wrap_content"
12         android:layout_alignParentLeft="true"
13         android:layout_marginLeft="0dip"
14         android:layout_marginTop="0dip"
15         />
16
17     <LinearLayout
18         android:layout_toRightOf="@id/map_info_image"
19         android:layout_width="200dip"
20         android:layout_height="wrap_content"
21         android:layout_marginLeft="5dip"
22         android:layout_marginTop="0dip"
23         android:orientation="vertical"
24         >
25         <TextView
26             android:id="@+id/map_info_title"
27             android:layout_width="wrap_content"
28             android:layout_height="wrap_content"
29             android:text="map_info_title"
30             android:layout_gravity="center"
31             />
32
33        <TextView
34             android:id="@+id/map_info_snippet"
35             android:layout_width="wrap_content"
36             android:layout_height="wrap_content"
37             android:text="map_info_snippet"
38             android:layout_gravity="center"
39             />
40
41     </LinearLayout>
42
43 </RelativeLayout>
实现getInfoContents函数:
 1 /* GoogleMap.InfoWindowAdapter begin */
 2 private View mInfoWindowContent = null;
 3 @Override
 4 public View getInfoContents(Marker marker) {
 5
 6     if(mInfoWindowContent == null){
 7         mInfoWindowContent = mInflater.inflate(R.layout.map_info, null);
 8     }
 9
10     ImageView infoImage = (ImageView)mInfoWindowContent.findViewById(R.id.map_info_image);
11     infoImage.setImageResource(R.drawable.address);
12     TextView infoTitle = (TextView)mInfoWindowContent.findViewById(R.id.map_info_title);
13     infoTitle.setText(marker.getTitle());
14
15     TextView infoSnippet = (TextView)mInfoWindowContent.findViewById(R.id.map_info_snippet);
16     infoSnippet.setText(marker.getSnippet());
17     return mInfoWindowContent;
18 }
19
20 @Override
21 public View getInfoWindow(Marker marker) {
22     return null;
23 }
6~8行,根据布局文件 res/layout/map_info.xml 填充一个View的布局
LayoutInflater mInflater = LayoutInflater.from(this); //this即activity的context
10~11行,设置图标
12~13行,设置title,marker.getTitle()取出marker中保存的title字符串
15~16行,设置snippet,marker.getSnippet()取出marker的snippet字符串
当点击标记弹出info window时,首先会跑到getInfoWindow(),如果返回null,就会跑到getInfoContents(),返回的View就显示到info window中。
4,根据经纬度发查地址,用snippet字段显示地址信息
首先监听marker点击事件
mMapView.setOnMarkerClickListener(this);
activity实现OnMarkerClickListener接口:
/* OnMarkerClickListener start */
@Override
public boolean onMarkerClick(Marker marker) {
    if(mMarkerLoaded == false)
        getAddressOfMarker();
        return false;
}
/* OnMarkerClickListener end */
即,点击marker,在弹出info窗口前先去查询marker所在的经纬度的地理地址。
这个函数要返回false。如果返回true,则表示click事件被消费掉了,就不会再触发默认动作(即弹出info窗口)。
看下google的geocoder反解地址的过程:
private GetAddressTask mGetAddTack = null;

private void getAddressOfMarker(){
    if(mGetAddTack != null){
        mGetAddTack.cancel(true);
    }
    mGetAddTack = new GetAddressTask(this);
    mGetAddTack.execute(mCarMarker.getPosition());
}
getAddressOfMarker函数中执行了一个异步小任务GetAddressTask,代码如下:
 1 private class GetAddressTask extends AsyncTask<LatLng, Void, String[]>{
 2     Context mContext;
 3
 4     public GetAddressTask(Context context) {
 5         super();
 6         mContext = context;
 7     }
 8
 9     @Override
10     protected void onPreExecute(){
11         mMarker.setTitle(getResources().getString(R.string.mapAddrLoading));
12         mMarker.setSnippet(" ");
13         if(mMarker.isInfoWindowShown())
14             mMarker.showInfoWindow();
15     }
16
17     @Override
18     protected void onPostExecute(String[] result){
19         if(result == null)
20             return;
21
22         if(mMarker != null){
23             if((result[1] != null) && (result[0] != null)){
24                 mMarker.setTitle(result[0]);
25                 mMarker.setSnippet(result[1]);
26                 if(mMarker.isInfoWindowShown())
27                     mMarker.showInfoWindow();
28                 }
29                 else{
30                     mMarker.setTitle(getResources().getString(R.string.mapAddrTitle));
31                     mMarker.setSnippet(getResources().getString(R.string.mapAddrUnknown));
32                     if(mMarker.isInfoWindowShown())
33                         mMarker.showInfoWindow();
34                     }35                 }
36             }
37             mMarkerLoaded = true;
38         }
39
40         @Override
41         protected String[] doInBackground(LatLng... params) {
42             LatLng latlng = params[0];
43             String[] result = new String[2];
44
45             String urlString = "http://maps.google.com/maps/api/geocode/xml?language=zh-CN&sensor=true&latlng=";//31.1601,121.3962";
46             HttpGet httpGet = new HttpGet(urlString + latlng.latitude + "," + latlng.longitude);
47             HttpClient httpClient = new DefaultHttpClient();
48
49             InputStream inputStream = null;
50             HttpResponse mHttpResponse = null;
51             HttpEntity mHttpEntity = null;
52             try{
53                 mHttpResponse = httpClient.execute(httpGet);
54                 mHttpEntity = mHttpResponse.getEntity();
55                 inputStream = mHttpEntity.getContent();
56                 BufferedReader bufferedReader = new BufferedReader(new InputStreamReader(inputStream));
57
58                 String line = "";
59                 String startTag = "<formatted_address>";
60                 String endTag = "</formatted_address>";
61                 while (null != (line = bufferedReader.readLine())){
62                     if(isCancelled())
63                         break;
64                     line = line.trim();
65                     String low = line.toLowerCase(Locale.getDefault());
66                     if(low.startsWith(startTag)){
67                         int endIndex = low.indexOf(endTag);
68                         String addr = line.substring(startTag.length(), endIndex);
69                         if((addr != null) && (addr.length() >0)){
70                             result[1] = addr;
71                             result[0] = getResources().getString(R.string.mapAddrTitle);
72                             break;
73                         }
74                     }
75                 }
76             }
77             catch (Exception e){
78                 log("Exception in GetAddressTask doInBackground():" + e);
79             }
80             finally{
81                 try{
82                     if(inputStream != null)
83                         inputStream.close();
84                 }
85                 catch (IOException e){
86                     log("IOException in GetAddressTask doInBackground():" + e);
87                 }
88             }
89             return result;
90         }
91     }
重点是41行开始的 doInBackground 函数,向google的geocoder发起一个http请求,请求格式如下:
http://maps.google.com/maps/api/geocode/xml?language=zh-CN&sensor=true&latlng=30.1601,121.3922
返回数据可以是JSON或XML,我这里用的是XML,语言中文zh-CN,latlng=纬度,经度
返回的XML脚本,是指定经纬度附近的有效地址,可能不只一个。我们只取第一个<formatted_address></formatted_address>标签中的字符串,保存在result中。
18行,在任务执行结束的onPostExcute函数中,调用marker.setSnippet(result[1])保存到snippet中,title则根据任务执行情况设置成合适的String。
26~28行,由于这是一个异步任务,地址取回的时候,info窗口可能已经显示出来了,这时调用showInfoWindow(),getInfoContents函数会重新跑一次,让窗口显示最新取到的title和snippet。

