ubuntu ffmpeg的学习历程 -- chapter 1
学习目标:在ubuntu18.04 系统上面使用ffmpeg完成视频的采集与H.264硬件编码,抽帧。
学习历程:
一、ffmpeg安装(非源码安装)
直接使用指令进行安装,考虑系统与版本的匹配性,暂不用源码安装,直接apt-get安装编译好的版本。
// 安装指令
sudo apt-get install ffmpeg
// 安装好后查询版本信息
sudo ffmpeg -version
// 查询编码器
sudo ffmpeg -encoders
// 查询解码器
sudo ffmpeg -decoders
// 查询硬件加速设备
sudo ffmpeg -hwaccels
// 查询Nvidia编码器
sudo ffmpeg -codecs | grep -i nv
二、ffmpeg的使用
1. 使用ffmpeg录制桌面,并保存为视频文件(如下方法拷贝自ffmpeg wiki)
/*
 Use the x11grab device:
    ffmpeg -video_size 1024x768 -framerate 25 -f x11grab -i :0.0+100,200 output.mp4

This will grab the image from desktop, starting with the upper-left corner at x=100, y=200 with a width and height of 1024⨉768.

If you need audio too, you can use ALSA (see Capture/ALSA for more info):
    ffmpeg -video_size 1024x768 -framerate 25 -f x11grab -i :0.0+100,200 -f alsa -ac 2 -i hw:0 output.mkv

Or the pulse input device (see Capture/PulseAudio for more info):
    ffmpeg -video_size 1024x768 -framerate 25 -f x11grab -i :0.0+100,200 -f pulse -ac 2 -i default output.mkv
*/
ffmpeg -video_size 1024x768 -framerate 25 -f x11grab -i :0.0+00,00 output.mp4
遇到错误
Invalid MIT-MAGIC-COOKIE-1 key[x11grab @ 0x564cdb043960] Cannot open display :0.0+00,00, error 1.
:0.0+00,00: Input/output error
解决方案:因当前的默认运行级别为multi-user.target,系统初始化时没有调用起来图形界面,修改为graphic.target后OK
/*
设置运行级别
命令格式:
systemctl [command] [unit.target]
command参数:
get-default :取得当前的target
set-default :设置指定的target为默认的运行级别
isolate :切换到指定的运行级别

systemctl get-default 获得当前的运行级别
systemctl set-default multi-user.target 设置默认的运行级别为mulit-user
systemctl isolate multi-user.target 在不重启的情况下,切换到运行级别mulit-user下
systemctl isolate graphical.target 在不重启的情况下,切换到图形界面下
*/
2. 使用ffplay播放
ffplay output.mp4三、使用Nvidia完成硬件加速
1. 检查GPU是否兼容ffmpeg的GPU加速特征,ffmpeg支持CUDA加速(Nvidia)和OpenCL加速(AMD)。cuvid for NVIDIA GPUs & vaapi for AMD GPUs
ffmpeg -hwaccels
/*
Hardware acceleration methods:
vdpau
vaapi
cuvid
*/
2. 安装GPU驱动和相应的库
当前系统用的是英伟达的显卡(GTX 750Ti),所以就需要安装英伟达的显卡驱动和CUDA Toolkit
// 查看显卡型号
xy@xy-B85M-D2V:~/screen$ lspci | grep VGA
00:02.0 VGA compatible controller: Intel Corporation Xeon E3-1200 v3/4th Gen Core Processor Integrated Graphics Controller (rev 06)
01:00.0 VGA compatible controller: NVIDIA Corporation GM107 [GeForce GTX 750 Ti] (rev a2)
2.1 安装Nvidia驱动
官网搜索对应型号驱动并下载,不用安装最新驱动
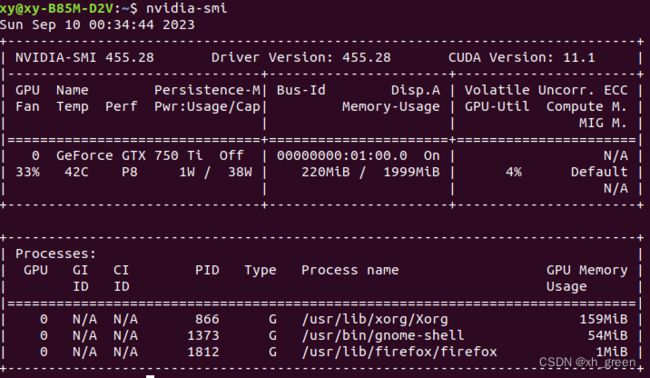
NVIDIA GeForce 驱动程序 - N 卡驱动 | NVIDIANVIDIA GeForce 驱动程序官方提供下载最新版的 Geforce 驱动程序,可提升 PC 游戏体验和应用程序速度。更多关于更新显卡驱动程序以及显卡驱动程序下载的信息,请访问 NVIDIA 官网。 https://www.nvidia.cn/geforce/drivers/安装完成后运行nvidia-smi,查看所用最高版本CUDA,所需最高版本CUDA为11.1
安装前先卸载之前的驱动,网上找的指令,卸载完成后查看/var/log/nvidia-uninstall.log,如果有Fail项,手动处理。
sudo apt-get purge nvidia*
sudo apt-get autoremove
然后执行驱动安装
sudo ./NVIDIA-Linux-x86_64-455.28.run
// 如果有提醒X window仍然在运行的错误,可以加入-no-x-check选项
// 如果提醒nvidia-drm相关错误,使用如下治疗解决
sudo systemctl isolate multi-user.target
// 如上指令会杀掉X Window,在Ctrl + Alt + F1进入终端指令模式,执行如下指令后,在进行run安装
sudo modprobe -r nvidia-drm
2.2 CUDA Toolkit安装
安装前先卸载之前的CUDA Toolkit
cd /usr/local/cuda-11.0/bin/
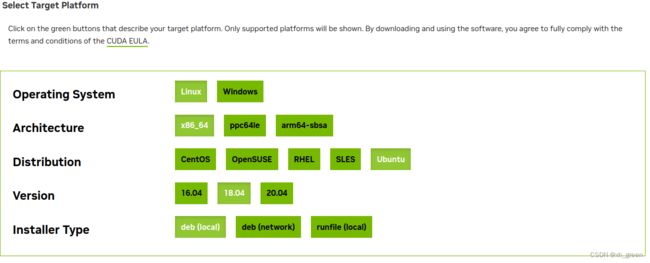
sudo ./cuda-uninstaller 进入英伟达开发者社区,根据平台选择对应的CUDA Toolkit按照官方指引进行下载安装
CUDA Toolkit Archive | NVIDIA 开发者Previous releases of the CUDA Toolkit, GPU Computing SDK, documentation and developer drivers can be found using the links below. Please select the release you want from the list below, and be sure to check www.nvidia.com/drivers for more recent production drivers appropriate for your hardware configuration.https://developer.nvidia.cn/cuda-toolkit-archive
$ wget https://developer.download.nvidia.com/compute/cuda/repos/ubuntu1804/x86_64/cuda-ubuntu1804.pin
$ sudo mv cuda-ubuntu1804.pin /etc/apt/preferences.d/cuda-repository-pin-600
$ wget https://developer.download.nvidia.com/compute/cuda/11.0.3/local_installers/cuda-repo-ubuntu1804-11-0-local_11.0.3-450.51.06-1_amd64.deb
$ sudo dpkg -i cuda-repo-ubuntu1804-11-0-local_11.0.3-450.51.06-1_amd64.deb
$ sudo apt-key add /var/cuda-repo-ubuntu1804-11-0-local/7fa2af80.pub
$ sudo apt-get update
$ sudo apt-get -y install cuda
安装完成,通过nvcc指令查看版本信息
xy@xy-B85M-D2V:/usr/local/cuda-11.0/bin$ nvcc --version
nvcc: NVIDIA (R) Cuda compiler driver
Copyright (c) 2005-2020 NVIDIA Corporation
Built on Wed_Jul_22_19:09:09_PDT_2020
Cuda compilation tools, release 11.0, V11.0.221
Build cuda_11.0_bu.TC445_37.28845127_0
2.3 检测ffmpeg功能
安装Nvidia驱动和库文件后,又进行了一次ffmpeg的录制和ffplay播放,发现报了错误:
X Error of failed request: BadValue (integer parameter out of range for operation)
Major opcode of failed request: 151 (GLX)
Minor opcode of failed request: 3 (X_GLXCreateContext)
Value in failed request: 0x0
Serial number of failed request: 92
Current serial number in output stream: 93
xy@xy-B85M-D2V:~$ ffplay ~/screen/output.mp4
ffplay version 3.4.11-0ubuntu0.1 Copyright (c) 2003-2022 the FFmpeg developers
  built with gcc 7 (Ubuntu 7.5.0-3ubuntu1~18.04)
  configuration: --prefix=/usr --extra-version=0ubuntu0.1 --toolchain=hardened --libdir=/usr/lib/x86_64-linux-gnu --incdir=/usr/include/x86_64-linux-gnu --enable-gpl --disable-stripping --enable-avresample --enable-avisynth --enable-gnutls --enable-ladspa --enable-libass --enable-libbluray --enable-libbs2b --enable-libcaca --enable-libcdio --enable-libflite --enable-libfontconfig --enable-libfreetype --enable-libfribidi --enable-libgme --enable-libgsm --enable-libmp3lame --enable-libmysofa --enable-libopenjpeg --enable-libopenmpt --enable-libopus --enable-libpulse --enable-librubberband --enable-librsvg --enable-libshine --enable-libsnappy --enable-libsoxr --enable-libspeex --enable-libssh --enable-libtheora --enable-libtwolame --enable-libvorbis --enable-libvpx --enable-libwavpack --enable-libwebp --enable-libx265 --enable-libxml2 --enable-libxvid --enable-libzmq --enable-libzvbi --enable-omx --enable-openal --enable-opengl --enable-sdl2 --enable-libdc1394 --enable-libdrm --enable-libiec61883 --enable-chromaprint --enable-frei0r --enable-libopencv --enable-libx264 --enable-shared
  libavutil      55. 78.100 / 55. 78.100
  libavcodec     57.107.100 / 57.107.100
  libavformat    57. 83.100 / 57. 83.100
  libavdevice    57. 10.100 / 57. 10.100
  libavfilter     6.107.100 /  6.107.100
  libavresample   3.  7.  0 /  3.  7.  0
  libswscale      4.  8.100 /  4.  8.100
  libswresample   2.  9.100 /  2.  9.100
  libpostproc    54.  7.100 / 54.  7.100
X Error of failed request:  BadValue (integer parameter out of range for operation)
  Major opcode of failed request:  151 (GLX)
  Minor opcode of failed request:  3 (X_GLXCreateContext)
  Value in failed request:  0x0
  Serial number of failed request:  92
  Current serial number in output stream:  93
X_GLXCreateContext应该是OpenGL的函数 ,结合晚上搜索的问题答案,隐约感觉是安装了驱动后libGL.so库冲突导致的。
[SOLVED] glxgears fails with "X Error of failed request" / Multimedia and Games / Arch Linux Forumshttps://bbs.archlinux.org/viewtopic.php?id=236486
遂搜索了当前系统的ligGL库,果然有几个不同的版本,果断替换为nvidia驱动目录的ligGL.so库文件,后再运行ffplay,问题消失。
xy@xy-B85M-D2V:~$ sudo find / -iname libgl.*
find: ‘/tmp/.mount_Pigchas3fF4P’: 权限不够
/opt/nvidia/nsight-systems/2020.3.2/host-linux-x64/Mesa/libGL.so
/opt/nvidia/nsight-systems/2020.3.2/host-linux-x64/Mesa/libGL.so.1
/opt/nvidia/nsight-systems/2020.3.2/host-linux-x64/Mesa/libGL.so.1.5.0
/usr/lib/x86_64-linux-gnu/libGL.so
/usr/lib/x86_64-linux-gnu/libGL.so.1.0.0
/usr/lib/x86_64-linux-gnu/libGL.so.1
经过后面的验证,如上的解决方案会带入新的问题,会造成compiz的使用内存蹭蹭的往上长,或或者进不了GNOME界面。
2.4 安装libx264编码器,如果不安装会报错,Unknown decoder 'libx264'
// 查询支持的libx264资源
sudo apt-get install libx264-dev
sudo apt-get install x264

// 可以使用apt-cache查询本地缓存
sudo apt-cache search x264
3. 使能GPU硬件加速
ffmpeg通过-hwaccel选项开启硬件加速功能
ffmpeg -hwaccel cuvid -i input.mp4 -c:v h264_nvenc -preset slow output.mp4
/*
This command uses the cuvid hardware acceleration method and the h264_nvenc encoder, which is optimized for NVIDIA GPUs.
The preset slow option specifies a slower but higher quality encoding process.
*/
使用GPU硬件加速录屏
ffmpeg -hwaccel cuvid -f x11grab -i :0.0+00,00 -c:v h264_nvenc -preset slow output_h264_nvenc.mp4
// -f 输入/输出文件格式
可以通过nvidia-smi -l 1查看编码的时候是否有占用GPU
可以通过top查看编码的时候是否有占用CPU
第一阶段算是完成了,下一阶段,通过ffmpeg api代码的方式完成硬件加速转码。