Android中GridView的使用——使用自带的SimpleAdapter(简单适配器)
GridView一直是一个系统登录后以九宫格方式展现功能子模块的最佳选择,经过试验和网上资料的查阅,现把实现方式总结一下:
一直是通过自定义Adapter方式,在getView()方法中设置图片的显示方式,这种方式资料比较多;
另一种方式是使用Android系统自带的Adapter:
具体步骤如下:
1.新建一个安卓工程:
2.定义一个布局文件,可以命名为gridview.xml,用于显示主界面。
代码如下:
<?xml version="1.0" encoding="utf-8"?>

<LinearLayout xmlns:android="http://schemas.android.com/apk/res/android"

    android:layout_width="match_parent"

    android:layout_height="match_parent"

    android:orientation="vertical" >

<GridView

    android:id="@+id/GridView1"

    android:layout_width="fill_parent"

    android:layout_height="wrap_content"

    android:numColumns="4"

    />


</LinearLayout>
3.定义一个项布局文件items.xml,目的是为了展现GridView中具体子项item的显示方式
代码如下:
<?xml version="1.0" encoding="utf-8"?>

<LinearLayout xmlns:android="http://schemas.android.com/apk/res/android"

    android:layout_width="match_parent"

    android:layout_height="match_parent"

    android:orientation="vertical" >


    <ImageView

        android:id="@+id/image"

        android:layout_width="wrap_content"

        android:layout_height="wrap_content"

        android:paddingLeft="10px"

        android:scaleType="fitCenter" />


    <TextView

        android:id="@+id/title"

        android:layout_width="wrap_content"

        android:layout_height="wrap_content"

        android:layout_gravity="center"

        android:padding="5px" />


</LinearLayout>
3.好了,定义好了界面,我们就可以写程序代码了~
在主Activity中定义一个数组,数组类型为HashMap<String,Object>,为的是存储资源的名称(key)和资源的值(value),这里假设资源就是图片
然后,将资源加入到这个类型为HashMap的数组中去,并使用SimpleAdapter来实现数据的展现即可,下面上代码:
具体代码如下:
package com.flysnow.sina.weibo;


import java.util.ArrayList;

import java.util.HashMap;


import android.app.Activity;

import android.os.Bundle;

import android.widget.GridView;

import android.widget.SimpleAdapter;


import com.flysnow.sina.weibo.R;


public class MyListActivity extends Activity {

	private int[] image = { R.drawable.bc2, R.drawable.bc2, R.drawable.bc2,

			R.drawable.bc2, R.drawable.bc2, R.drawable.bc2, R.drawable.bc2,

			R.drawable.bc2 };

	private String[] text = { "a", "b", "c", "d", "e", "f", "g", "h" };


	@Override

	protected void onCreate(Bundle savedInstanceState) {

		// TODO Auto-generated method stub

		super.onCreate(savedInstanceState);

		this.setContentView(R.layout.main1);

		//显示GridView的界面

		GridView gridview = (GridView) findViewById(R.id.GridView1);

		ArrayList<HashMap<String, Object>> imagelist = new ArrayList<HashMap<String, Object>>();

		// 使用HashMap将图片添加到一个数组中,注意一定要是HashMap<String,Object>类型的,因为装到map中的图片要是资源ID,而不是图片本身

		  // 如果是用findViewById(R.drawable.image)这样把真正的图片取出来了,放到map中是无法正常显示的

		for (int i = 0; i < 8; i++) {

			HashMap<String, Object> map = new HashMap<String, Object>();

			map.put("image", image[i]);

			map.put("text", text[i]);

			imagelist.add(map);

		}

		// 使用simpleAdapter封装数据,将图片显示出来

		  // 参数一是当前上下文Context对象

		  // 参数二是图片数据列表,要显示数据都在其中

		  // 参数三是界面的XML文件,注意,不是整体界面,而是要显示在GridView中的单个Item的界面XML

		  // 参数四是动态数组中与map中图片对应的项,也就是map中存储进去的相对应于图片value的key

		  // 参数五是单个Item界面XML中的图片ID

		SimpleAdapter simpleAdapter = new SimpleAdapter(this, imagelist,

				R.layout.items, new String[] { "image", "text" }, new int[] {

						R.id.image, R.id.title });

		  // 设置GridView的适配器为新建的simpleAdapter

		gridview.setAdapter(simpleAdapter);

	}

}
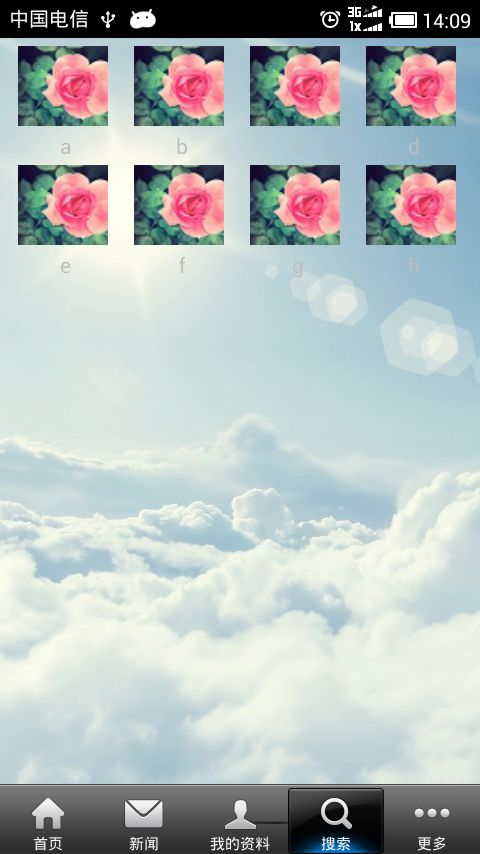
效果图: