Apache2.2+fastCGI+(多版本)PHP配置
最近因为项目需要(项目主管希望能让项目在多版本PHP【5.1.0以上】中都能保证正常运行,实话说,要在一个Apache(我用的是Apache)中加载多个版本的Php 进行测试,还真的没有试过,也不知道到底怎么样,也担心把自己ubuntu环境给搞坏了(修复麻烦啊),所以就在虚拟机xp里做测试,所以,以下都是我在XP系统下的配置情况。
思考:拿到这个任务我首先思考的问题是,我要怎么样将apache中装上多个版本的php而又让自己使用的时候方便,而不用每次使用都去更改配置之后重启apache;其次我想,我肯定不愿意通过多装几种服务器(比如Apache,IIS等)来完成我的任务,如果通过这种情况才能解决问题,我觉得是非常不能容忍的事,更何况我需要在测试完成之后将ubuntu也安装上多版本php;最后,众所周知php在apache中的加载方式可以是fastcgi和模块加载(loadmodule)两种方式,loadmodule这种方式是我一直在用的方式,我也不知道这种方式能否支持多版本的php,但是经过网上的搜索发现其也是可以为之,不过我选择的是fastcgi,来完成,一来想试试一直未用过的方式,二来想看看fastcgi和loadmodule两者到底在使用上给我带来什么不一样的感受。
fastcgi的安装方式我goole了下,出来很多,但是仔细看完之后发现,这些可以总结为如下模式:
#下载fastcgi(http://www.fastcgi.com/dist)将mod_fastcig.xxx.dll放到apache安装目录下的#modules文件夹下
#加载mod_fastcgi模块
LoadModule fastcgi_module modules/mod_fastcgi-2.4.6-AP22.dll
#设置FastCGI运行路径和进程数量,前面路径为php安装路径
FastCgiServer "E:/PHP/PHP5/php-cgi.exe" -processes 3
#将php-cgi.exe所在的路径定义别名为fcgi-php5,
ScriptAlias /fcgi-php5/ "E:/PHP/PHP5/"
#将以php后缀的文件定义类型为application/x-httpd-php
AddType application/x-httpd-php .php
#使用php-cgi.exe来执行php文件
Action application/x-httpd-php "/fcgi-php5/php-cgi.exe"
经过我的测试(apache版本为2.2.14和2.2.18)按照以上方法配置,完全不行,查看启动日志发现fastcgi没有起来:FastCGI: server "E:/PHP/PHP5/php-cgi.exe" (pid 1600) terminated with exit with status '0' ,后来继续google发现,和apache版本有关(http://blog.csdn.net/networkwx/article/details/5970604 该文也有说到这点)。
既然fastcgi不行,难道就没有别的办法了么,果然在下载apache2.2.14的时候(http://www.apache.org/dist/httpd/ 习惯性先去官网查找apache版本),发现mod_fcgid/ 这个东西,于是搜索之,才知道,原来可以用这个来配置fastcgi,并且发现此文(http://www.javatang.com/archives/2010/01/07/3629356.html),详细描述了众多fastcgi版本的区别。一下是我用mod_fcgid安装的全过程:
1、下载mod_fcgid, http://httpd.apache.org/download.cgi 我这里下载的是2.3.6
2、解压之,得到mod_fcgid.so,将它移至apache安装目录下的modules下,我这里是(C:\Program Files\Apache Software Foundation\Apache2.2\modules)
3、打开httpd.conf 添加如下:
#load
LoadModule fcgid_module modules/mod_fcgid.so
AddHandler fcgid-script .fcgi .php
# Set PHP_FCGI_MAX_REQUESTS to greater than or equal to FcgidMaxRequestsPerProcess
# to prevent php-cgi process from exiting before all requests completed
FcgidInitialEnv PHP_FCGI_MAX_REQUESTS 1000
# Maximum requests a process should handle before it is terminated
FcgidMaxRequestsPerProcess 1000
# Maximum number of PHP processes
FcgidMaxProcesses 15
# Number of seconds of idle time before a php-cgi process is terminated
FcgidIOTimeout  120
FcgidIdleTimeout  120
# Define the MIME-Type for ".php" files
AddType application/x-httpd-php .php


# Where to look for the php.ini file?
FcgidInitialEnv PHPRC "C:/php/php-5.3.8"
#Path to php-cgi
FcgidWrapper "D:/Server/php5/php-cgi.exe" .php
4、配置好fcgid模块之后,还需要做一个处理: 找到配置运行目录属性的地方,在option中添加一个属性ExecCGI
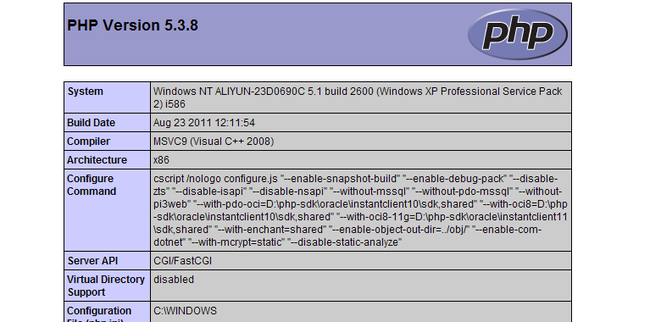
5、重启apache,运行localhost,就能看到刚刚配置的信息(我在php运行目录下设置了一个index.php中输出phpinfo【需要apache认的index.php这样的默认执行文件,需要同样配置DirectoryIndex】):
第二点:配置多版本支持
为了解决使用方便的问题,我打算采用虚拟机的配置来分别配置,每个虚拟机一个php版本,这样我使用的时候只要访问需要的php版本的虚拟机即可,而不需要设置配置文件。同时也为了减少代码拷贝上的问题,我将所有的虚拟机都配置在同一个目录下,每个虚拟机都配置一个监听端口,这样也解决了代码在不同目录的共享问题。
1和2如上面一致,就不说了。不一样从第三步开始
3、在httpd.conf中,我加载fastcgi并且配置项只有如下:
#load
LoadModule fcgid_module modules/mod_fcgid.so
AddHandler fcgid-script .fcgi .php
# Set PHP_FCGI_MAX_REQUESTS to greater than or equal to FcgidMaxRequestsPerProcess
# to prevent php-cgi process from exiting before all requests completed
FcgidInitialEnv PHP_FCGI_MAX_REQUESTS 1000
# Maximum requests a process should handle before it is terminated
FcgidMaxRequestsPerProcess 1000
# Maximum number of PHP processes
FcgidMaxProcesses 15
# Number of seconds of idle time before a php-cgi process is terminated
FcgidIOTimeout  120
FcgidIdleTimeout  120
# Define the MIME-Type for ".php" files
AddType application/x-httpd-php .php
同时查找该文件中的:
# Virtual hosts
#Include conf/extra/httpd-vhosts.conf
将Include ....一行前面的#号去掉,同时,打开conf/extra/httpd-vhosts.conf文件进行虚拟主机配置(当然如果不使用该文件,也可以将虚拟主机的配置直接放置在httpd.conf文件的末尾)
4、虚拟主机的配置:
打开的文件中有一份默认的配置,我们更改如下:
NameVirtualHost *:80
<VirtualHost *:80>
#load php.ini
FcgidInitialEnv PHPRC "C:/php/php-5.3.8/"
FcgidWrapper "C:/php/php-5.3.8/php-cgi.exe" .php
ServerAdmin [email protected]
DocumentRoot "C:/www"
ServerName localhost
ServerAlias www.dummy-host.hz.ali.com
ErrorLog "logs/localhost"
CustomLog "logs/localhost.log" common
</VirtualHost>
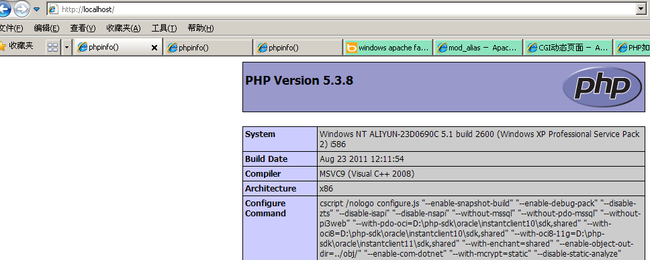
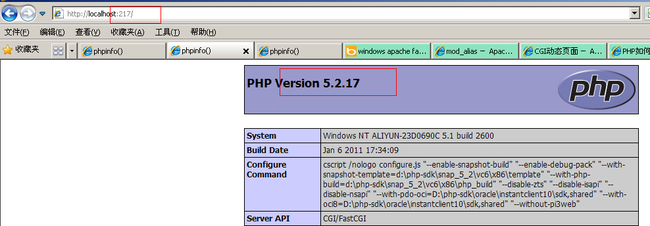
对了,就是将FcgidInitialEnv 和FcgidWrapper两个的配置转移到虚拟机中,这样每个虚拟机都有自己的配置,我这里默认是执行5.3.8版本,所以给他的端口号是80,如下,我还配置了5.2.17和5.2.4两个版本分别给的端口号是217和24:
Listen localhost:217
NameVirtualHost *:217
<VirtualHost *:217>
    #load php.ini
    FcgidInitialEnv PHPRC "C:/php/php-5.2.17"
    FcgidWrapper "C:/php/php-5.2.17/php-cgi.exe" .php
    ServerAdmin [email protected]
    DocumentRoot "C:/www"
    ServerName localhost
    ServerAlias www.dummy-host.hz.ali.com
    ErrorLog "logs/217"
    CustomLog "logs/217.log" common
</VirtualHost>

Listen localhost:24
NameVirtualHost *:24
<VirtualHost *:24>
    #load php.ini
    FcgidInitialEnv PHPRC "C:/php/php-5.2.4"
    FcgidWrapper "C:/php/php-5.2.4/php-cgi.exe" .php
    ServerAdmin [email protected]
    DocumentRoot "C:/www"
    ServerName localhost
    ServerAlias www.dummy-host.hz.ali.com
    ErrorLog "logs/24"
    CustomLog "logs/24.log" common
</VirtualHost>
由配置可以看见,我给每一个虚拟主机都配置了不同的php版本,及各自的log文件,同时我将所有的虚拟主机目录都设置在了c:\www下,访问如下:
图1:默认的80端口访问的是我的5.3.8版本
图2:端口217访问的是我的5.2.17版本
图3:端口24访问的是我的5.2.4版本。
这样就可以了,我测试的时候只需要将我的待测试代码放到c:\www目录下,就可以通过端口的不同分别测试各个版本下的差异了。
总结:
fastcgi的方式配置起来了,但是不知道真实情况是否如此,总感觉用这种方式运行的php程序比loadModule方式慢了些。呵呵,关于fastcgi的相关文档http://httpd.apache.org/mod_fcgid/mod/mod_fcgid.html官网给了,英文的~,特此纪念


