nexus 环境搭建 以及项目上传
1、Nexus下载
2、Nexus启动
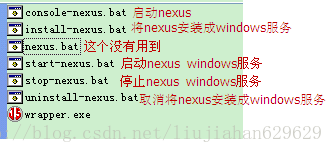
解压后进入\nexus-2.1.2-bundle\nexus-2.1.2\bin\jsw\,根据操作系统类型选择文件夹,我选的是windows-x86-32文件夹,进入后可看到如下所示bat文件。
双击console-nexus.bat运行。游览器中输入http://127.0.0.1:8081/nexus/,出现如下图所示就代表nexus已经启动成功。
8081为默认的端口号,要修改端口号可进入nexus-2.1.2-bundle\nexus-2.1.2\conf\打开nexus.properties文件,修改application-port属性值就可以了。
默认的用户名和密码:admin/admin123
点击Central,并切换到Configuration选项卡。
将Download Remote Indexes项设为True!这将打开nexus的下载远程索引的功能,便于使用nexus的搜索功能。
配置Maven使用Nexus私服
修改Maven的settings.xml 文件。
在<settings></settings>之间添加:
<profiles>
    <profile>
      <id>nexus</id>
      <repositories>
        <repository>
          <id>nexus</id>
          <name>Nexus</name>
          <url>
          <releases><enabled>true</enabled></releases>
          <snapshots><enabled>true</enabled></snapshots>
        </repository>
      </repositories>
      <pluginRepositories>
        <pluginRepository>
          <id>nexus</id>
            <name>Nexus</name>
            <url>
            <releases><enabled>true</enabled></releases>
            <snapshots><enabled>true</enabled></snapshots>
        </pluginRepository>
      </pluginRepositories>
    </profile>
  </profiles>
注意原settings.xml 文件中,已经存在profiles、activeProfiles的节点。
3、Nexus仓库
nexus的仓库类型分为以下四种:
group: 仓库组
hosted:宿主 本地库
proxy:代理
virtual:虚拟
proxy是远程仓库的代理。比如说在nexus中配置了一个central repository的proxy,当用户向这个proxy请求一个artifact,这个proxy就会先在本地查找,如果找不到的话,就会从远程仓库下载,然后返回给用户,相当于起到一个中转的作用
hosted是宿主仓库,用户可以把自己的一些构件,deploy到hosted中,也可以手工上传构件到hosted里。比如说oracle的驱动程序,ojdbc6.jar,在central repository是获取不到的,就需要手工上传到hosted里
group是仓库组,在maven里没有这个概念,是nexus特有的。目的是将上述多个仓库聚合,对用户暴露统一的地址,这样用户就不需要在pom中配置多个地址,只要统一配置group的地址就可以了 .这里要注意的是,放到左边的仓库,才是会被聚合的仓库。我昨天一直搞错了,把仓库都放到右边,结果group什么都没有聚合到,是一个空的仓库。。。
PublicRepositories: 仓库组
3rd party: 无法从公共仓库获得的第三方发布版本的构件仓库
Apache Snapshots: 用了代理ApacheMaven仓库快照版本的构件仓库
Central: 用来代理maven中央仓库中发布版本构件的仓库
Central M1 shadow: 用于提供中央仓库中M1格式的发布版本的构件镜像仓库
Codehaus Snapshots: 用来代理CodehausMaven 仓库的快照版本构件的仓库
Releases: 用来部署管理内部的发布版本构件的宿主类型仓库
Snapshots:用来部署管理内部的快照版本构件的宿主类型仓库
1.
maven默认的官方资源库http://repo1.maven.org/maven2/,很多第三方的jar包没有,所以我再添加一个jboss的资源库
点击左侧的Repositories,然后再点击右侧的Add,会弹出下拉菜单,选择Proxy Repository
Respository ID这里填写:jboss-public-repository-group (可以自已改名字)
Respository Name这里填写:JBoss Public Maven Repository Group (可以自已改名字)
其它项保持默认
Remote Storage Location这里填写:https://repository.jboss.org/nexus/content/groups/public-jboss/ (这是jboss公布的公开资源库)
2.下载jboss eap 6.x的离线资源包
首次使用nexus时,私服服务器上实质上没有任何jar包的缓存,所以第一次使用时,其实跟直接到互联网上下载没啥区别,只有后面再请求相同的jar包,服务器上才会有jar文件缓存,为了加快速度,我们可以直接上jboss官网下载离线资源包
下载地址: http://www.jboss.org/jbossas/downloads
nexus 上传骨架如下
1. maven/conf/setting.xml 添加servers 节点
<servers>
<server>
<id>releases</id>
<username>admin</username>
<password>admin123</password>
</server>
<server>
<id>snapshots</id>
<username>admin</username>
<password>admin123</password>
</server>
</servers>
2.修改项目,添加上传地址
<distributionManagement>
<repository>
<id>releases</id>
<url>http://localhost:8081/nexus/content/repositories/releases</url>
</repository>
<snapshotRepository>
<id>snapshots</id>
<url>http://localhost:8081/nexus/content/repositories/snapshots</url>
</snapshotRepository>
</distributionManagement>
3. run deploy
如何创建自己的骨架
1.先自己创建一个SSH的模板项目,能够跑起来没问题,注意不能有多余的文件以及pom.xml中的版本号是否有snapshots。
2.执行命令:mvn archetype:create-from-project 报错 ,不管
3.cd target/generated-sources/archetype/archetype
mvn deploy部署到私服上去
设置eclipse
windows->perferences ->maven->archetypes->add remote catalog-->
http://localhost:8081/nexus/service/local/repo_groups/public/content/archetype-catalog.xml
新建项目的时候就能看到自己的骨架列表了
有问题,联系我 91559999或者[email protected]
