Ganglia监控扩展实现机制
默认情况下,ganglia通过gmond守护进程收集cpu、memory、disk、I/O、process、network六大方面的数据,然后汇总到gmetad守护进程下,使用rrdtools存储数据,最后将历史数据以曲线方式通过php页面呈现,但是很多情况下,这些基础数据还不足以满足我们的监控需要,我们还需要根据应用的不同,扩展ganglia的监控范围,下面我们就介绍下通过开发ganglia插件扩展ganglia监控功能的实现方法。
一、扩展ganglia监控功能的方法
默认安装完成的Ganglia仅给我们提供了基础的系统监控信息,通过Ganglia插件可以给我们提供两种扩展ganglia监控功能的方法:
1、通过添加带内(in-band)插件,主要是通过gmetric命令来实现。
这是通常使用的一种方法,主要是通过cronjob方法并调用Ganglia的gmetric命令来向gmond输入数据,进而实现统一监控,这种方法简单,对于少量的监控可以采用,但是对于大规模自定义监控时,监控数据难以统一管理。
2、通过添加一些其他来源的带外(out-of-band)欺骗,主要是通过C或者python接口来实现。
在Ganglia3.1.x版本以后,增加了C或者Python接口,通过这个接口可以自定义数据收集模块,并且这些模块可以被直接插入到gmond中以监控用户自定义的应用。
二、通过gmetric接口扩展Ganglia监控
在ganglia安装完成后,会在bin目录下生成gmetric命令,gmetric使用语法如下:
[root@cloud1 bin]# ./gmetric --help
gmetric 3.4.0
The Ganglia Metric Client (gmetric) announces a metric
on the list of defined send channels defined in a configuration file
Usage: gmetric [OPTIONS]...
-h, --help Print help and exit
-V, --version Print version and exit
-c, --conf=STRING The configuration file to use for finding send channels
(default=`/opt/app/ganglia/etc/gmond.conf')
-n, --name=STRING Name of the metric
-v, --value=STRING Value of the metric
-t, --type=STRING Either
string|int8|uint8|int16|uint16|int32|uint32|float|double
-u, --units=STRING Unit of measure for the value e.g. Kilobytes, Celcius
(default=`')
-s, --slope=STRING Either zero|positive|negative|both (default=`both')
-x, --tmax=INT The maximum time in seconds between gmetric calls
(default=`60')
-d, --dmax=INT The lifetime in seconds of this metric (default=`0')
-g, --group=STRING Group of the metric
-C, --cluster=STRING Cluster of the metric
-D, --desc=STRING Description of the metric
-T, --title=STRING Title of the metric
-S, --spoof=STRING IP address and name of host/device (colon separated) we
are spoofing (default=`')
-H, --heartbeat spoof a heartbeat message (use with spoof option)
[root@cloud1 bin]#
1、实例一
[root@cloud1 bin]# gmetric -n test_string -v 'hello value' -t string -d 10 -c /etc/ganglia/gmond.conf.bak -S '123.11.1.119:web'
其中:
-n '指标名'
-v 指标值
-t 数据类型
-u '单位'
-d 指标的存活时间
-c 指定ganglia配置文件
-S 伪装客户端信息,123.11.1.119代表ip地址,web代表主机名。
下图是一个输出截图:
2、实例二
[root@cloud1 bin]#gmetric -n bkeepUse -v 10 -t int32 -u '% test' -d 10 -S '2.2.2.2:web'
下图是一个输出截图:
3、以cron的形式运行gmetric
可以将上面的命令写成一个shell脚本文件,然后将脚本文件放入cron运行,例如生成的脚本文件是/opt/ganglia/bin/ganglia.sh,运行crontab -e,将此脚本每隔10分钟运行一次:
10 * * * * /opt/ganglia/bin/ganglia.sh
最后,打开Ganglia Web进行浏览,即可看到通过gmetric命令收集到的数据报表。
三、通过python插件扩展ganglia监控
要通过python插件扩展ganglia监控,必须满足如下条件:
Ganglia 3.1.x以后版本
Python2.6.6或者更高版本
Python开发头文件(通常在python-devel这个软件包中)
在安装ganglia客户端(gmond)的时候,需要加上“--with-python”参数,这样在安装完成后,会生成modpython.so文件,这个文件是ganglia调用python的动态链接库,要通过python接口开发ganglia插件,必须要编译安装此模块。
这里假如ganglia的安装版本是ganglia3.4.0,安装目录是/opt/app/ganglia,要编写一个基于python的ganglia插件,需要进行如下操作:
1、修改modpython.conf文件(ganglia客户端)
ganglia安装完成后,modpython.conf文件位于/opt/app/ganglia/etc/conf.d目录下,此文件内容如下:
modules {
module {
name = "python_module" #python主模块名称
path = "modpython.so" #ganglia调用python的动态链接库。这个文件应该在ganglia的安装目录的lib64/ganglia下面。
params = "/etc/ganglia/python_modules" #指定我们编写的python脚本放置路径
}
}
include ("/etc/ganglia/conf.d/*.pyconf") #python脚本配置文件存放路径
2、重启gmond服务
在客户端的所有配置修改完成后,重启gmod服务即可完成python接口环境的搭建。
四、实战之利用python接口监控Nginx运行状态
对于nginx的监控,需要借助with-http_stub_status_module模块,此模块默认是没有开启的,所以需要指定开启,进行编译nginx。关于安装与编译nginx,这里不进行介绍。
1、配置nginx,开启状态监控
在nginx配置文件nginx.conf中添加如下配置:
server {
listen 8000; #监听的端口
server_name IP地址; #当前机器的IP或域名
location /nginx_status {
stub_status on;
access_log off;
# allow xx.xx.xx.xx;#允许访问的IP地址
# deny all;
allow all;
}
}
接着,重启nginx,可以到http://IP:8000/nginx_status下看到结果:
2、配置ganglia客户端,收集nginx_status数据
根据前面对modpython.conf文件的配置,我们在/etc/ganglia下创建了python_modules和conf.d两个目录,将编写好的nginx_status.py和nginx_status.pyconf两个文件分别放入这两个目录中。 两个文件下面提供附件下载。
3、绘图展示的PHP文件(ganglia数据收集端)
数据收集完成后,还需要将数据已图表的形式展示在Ganglia web界面中,所以还需要编写前台展示文件,由于Ganglia web界面是有PHP编写,所以这里也采用PHP,进行数据绘图展示。
编写的两个文件nginx_accepts_ratio_report.php、nginx_scoreboard_report.php这里不在列出,文件会附在此文档中。
这里假定Ganglia web的安装目录是/var/www/html/ganglia,将上面这两个php文件放到graph.d目录下即可。
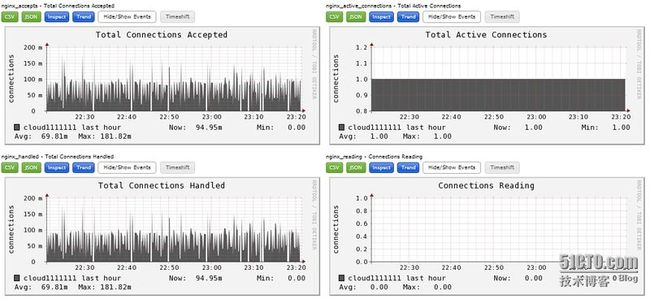
4、nginx_status.py输出效果图
完成上面的所有步骤后,重启ganglia客户端gmond服务,就可以在Ganglia web界面查看Nginx的运行状态图:
本文出自 “技术成就梦想” 博客,转载请与作者联系!


