走进Run Loop的世界 (二):如何配置Run Loop Sources
走进Run Loop的世界 (二):如何配置Run Loop Sources
上一章中给大家分享了Run Loop的基本概念,一些使用方法和注意事项。本章节将分享一下学习配置Run Loop sources的收获。
Run Loop Source概念总结: Run Loop本质是一个处理事件的Loop,我们可以在这个Loop中添加Input source或者Timer等各种事件源。Run Loop会在事件源发生时唤醒处于睡眠状态的线程执行任务。Run Loop的事件源分为两大类:
- Timer Source
- Input Source
perfermSelector系列方法,port-based Input Source和自定义的Input Source
如何配置Timer Source
Timer Source就是添加Timer到指定的Run Loop中,上一章有说到。例如使用Cocoa如下的API可以创建Timer:
scheduledTimerWithTimeInterval:target:selector:userInfo:repeats:
scheduledTimerWithTimeInterval:invocation:repeats:
上述两个方法创建Timer,并以NSDefaultRunLoopMode加入到当前Run Loop中。
如何自定义Input Source
示例代码可以在GitHub上查看:https://github.com/yechunjun/RunLoopDemo
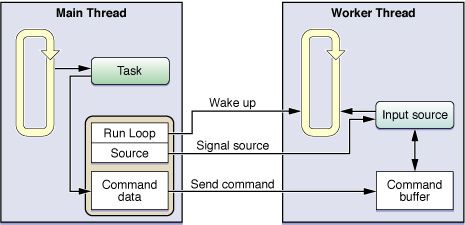
下图展示了自定义Input Source使用模式,图片来源于:https://developer.apple.com
主线程持有一个包含Run Loop,Source和Command data的context对象。主线程想要激活子线程时,首先将需要处理的数据添加到command buffer中,然后通知自定义的source唤醒子线程的Run Loop进行对应的工作,(CFRunLoopWakeUp可以唤醒当前Run Loop)。主线程和工作线程都访问共同的数据buffer,需要确保访问时的同步。
定义一个容器类,Context对象:
//保存当前的Run Loop对象和Input source对象。
@interface CCRunLoopContext : NSObject

@property (nonatomic, readonly) CFRunLoopRef runLoop;
@property (nonatomic, readonly) CCRunLoopInputSource *runLoopInputSource;

- (instancetype)initWithSource:(CCRunLoopInputSource *)runLoopInputSource runLoop:(CFRunLoopRef)runLoop;

@end
定义Input Source用来管理命令缓冲区和来自其它线程的消息:
@interface CCRunLoopInputSource : NSObject

// 初始化和销毁
- (instancetype)init;
- (void)addToCurrentRunLoop;
- (void)invalidate;

// 处理事件
- (void)inputSourceFired;

// 其他线程注册事件
- (void)addCommand:(NSInteger)command data:(NSData *)data;
- (void)fireAllCommandsOnRunLoop:(CFRunLoopRef)runLoop;

@end
初始化Input Source:
- (instancetype)init
{
    self = [super init];
    if (self) {
        CFRunLoopSourceContext context = {0, (__bridge void *)(self), NULL, NULL, NULL, NULL, NULL,
            &runLoopSourceScheduleRoutine,
            &runLoopSourceCancelRoutine,
            &runLoopSourcePerformRoutine};

        _runLoopSource = CFRunLoopSourceCreate(kCFAllocatorDefault, 0, &context);

        _commands = [NSMutableArray array];
    }
    return self;
}
其中RunLoopConext对象创建时包含了8个回调方法,我们设置了最后3个回调方法:
// 当把当前的Run Loop Source添加到Run Loop中时,会回调这个方法。主线程管理该Input source,所以使用performSelectorOnMainThread通知主线程。主线程和当前线程的通信使用CCRunLoopContext对象来完成。
void runLoopSourceScheduleRoutine (void *info, CFRunLoopRef runLoopRef, CFStringRef mode)
{
    CCRunLoopInputSource *runLoopInputSource = (__bridge CCRunLoopInputSource *)info;
    CCAppDelegate *appDelegate = [UIApplication sharedApplication].delegate;

    CCRunLoopContext *runLoopContext = [[CCRunLoopContext alloc] initWithSource:runLoopInputSource runLoop:runLoopRef];
    [appDelegate performSelectorOnMainThread:@selector(registerSource:) withObject:runLoopContext waitUntilDone:NO];
}

// 当前Input source被告知需要处理事件的回调方法
void runLoopSourcePerformRoutine (void *info)
{
    CCRunLoopInputSource *runLoopInputSource = (__bridge CCRunLoopInputSource *)info;
    [runLoopInputSource inputSourceFired];
}

// 如果使用CFRunLoopSourceInvalidate函数把输入源从Run Loop里面移除的话,系统会回调该方法。我们在该方法中移除了主线程对当前Input source context的引用。
void runLoopSourceCancelRoutine (void *info, CFRunLoopRef runLoopRef, CFStringRef mode)
{
    CCRunLoopInputSource *runLoopInputSource = (__bridge CCRunLoopInputSource *)info;
    CCAppDelegate *appDelegate = [UIApplication sharedApplication].delegate;

    CCRunLoopContext *runLoopContext = [[CCRunLoopContext alloc] initWithSource:runLoopInputSource runLoop:runLoopRef];
    [appDelegate performSelectorOnMainThread:@selector(removeSource:) withObject:runLoopContext waitUntilDone:YES];
}
设置和移除Input source:
- (void)addToCurrentRunLoop
{
    CFRunLoopRef runLoop = CFRunLoopGetCurrent();
    CFRunLoopAddSource(runLoop, _runLoopSource, kCFRunLoopDefaultMode);
}

- (void)invalidate
{
    CFRunLoopRef runLoop = CFRunLoopGetCurrent();
    CFRunLoopRemoveSource(runLoop, _runLoopSource, kCFRunLoopDefaultMode);
}
当主线程发送数据到Input source需要处理时,我们需要使用CFRunLoopSourceSignal发送信号通知Input source,并且唤醒当前Run Loop CFRunLoopWakeUp:
- (void)fireAllCommandsOnRunLoop:(CFRunLoopRef)runLoop
{
    CFRunLoopSourceSignal(_runLoopSource);
    CFRunLoopWakeUp(runLoop);
}
详细代码可以从Github中查看。
如何配置Port-Based Input Source
由于iOS的沙盒特性,以下通过NSMachport的方式都是调用私有API。
不同线程间使用NSMachPort做为通讯的媒介。首先我们需要配置NSMachPort:
// 加载辅助线程的主线程代码
- (void)launchThread
{
    NSPort *myPort = [NSMachPort port];
    if (myPort) {
        // 处理通过Port传递的消息
        // @protocol -(void)handlePortMessage:(NSPortMessage *)message;
        [myPort setDelegate:self];

        // 添加Port到主线程的Run Loop
        [[NSRunLoop currentRunLoop] addPort:myPort forMode:NSDefaultRunLoopMode];

        // 开启工作线程
        [NSThread detachNewThreadSelector:@selector(LaunchThreadWithPort:)
               toTarget:[MyWorkerClass class] withObject:myPort];
    }
}
主线程Port的Protocol实现。当有数据到达线程的本地端口时,该方法被执行。示例代码中,当消息到达时,主线程就可以知道工作线程是否正常运行。当kCheckinMessage到达时,主线程可以直接检索端口并保存起来供之后使用。
#define kCheckinMessage 100

- (void)handlePortMessage:(NSPortMessage *)portMessage
{
    unsigned int message = [portMessage msgid];
    NSPort *distantPort = nil;

    if (message == kCheckinMessage) {
        distantPort = [portMessage sendPort];
        [self storeDistantPort:distantPort];
    } else {
        // Handle other messages.
    }
}
辅助线程的代码如下:
+ (void)LaunchThreadWithPort:(id)inData
{
    @autoreleasepool {
        // 获得和主线程通讯的端口
        NSPort *distantPort = (NSPort *)inData;

        MyWorkerClass *workerObj = [[self alloc] init];

        //发送kCheckinMessage到主线程
        [workerObj sendCheckinMessage:distantPort];

        // 启动Run Loop
        do {
            [[NSRunLoop currentRunLoop] runMode:NSDefaultRunLoopMode
                                beforeDate:[NSDate distantFuture]];
        } while (![workerObj shouldExit]);
    }
}
在使用NSMachPort时,工作线程和主线程可以使用相同的端口对象在线程间进行单边通讯,也就是说一个线程创建的本地端口对象成为另一个线程的远程端口对象。
辅助线程sendCheckinMessage:distantPort的实现如下。
- (void)sendCheckinMessage:(NSPort *)outPort
{
    // 保存远程端口对象为之后使用,该端口对象为主线程创建的本地端口对象
    [self setRemotePort:outPort];

    // 设置当前线程自己的本地端口对象
    NSPort *myPort = [NSMachPort port];
    [myPort setDelegate:self];
    [[NSRunLoop currentRunLoop] addPort:myPort forMode:NSDefaultRunLoopMode];

    // 创建签到消息
    NSPortMessage* messageObj = [[NSPortMessage alloc] initWithSendPort:outPort
                                         receivePort:myPort components:nil];

    if (messageObj) {
        // 配置签到消息的属性,并且立刻发送
        [messageObj setMsg:setMsg id:kCheckinMessage];
        [messageObj sendBeforeDate:[NSDate date]];
    }
}
为了保证线程的通讯稳定,我们不应该简单的在线程间传递端口对象。远程端口可以通过唯一标示符获得,因此我们应该在不同线程间仅仅传递这个设置的唯一标示符:
// 确保唯一性
NSString *localPortName = [NSString stringWithFormat:@"MyPortName"];
[[NSMessagePortNameServer sharedInstance] registerPort:localPort
                 name:localPortName];
总结
Run Loop在使用中会遇到一些坑,最主要我们需要理解Run Loop的事件源和Run Loop的事件队列。为了更好的掌握其中的概念,不凡自己在不同的case下,写一些Demo程序来加深对Run Loop的理解。
目前还没有在项目中使用过Custom Input source,欢迎大家阐述更加深层次的理解和更好的实现方式。
- 本文是关于iOS Run Loop的学习笔记。有不对的地方,欢迎大家指正。
- 本文的示例代码可以在GitHub上查看:https://github.com/yechunjun/RunLoopDemo
- 本文对应参考文献为 Threading Programming Guide from Apple Delevoper
- 本文由@Chun 发表于Chun Tips .
- 版权声明:自由转载-非商用-非衍生-保持署名 | Creative Commons BY-NC-ND 3.0
Posted by Chun Ye Oct 20th, 2014 7:03 am run loops, threading programming
iOS工程如何支持64-bit »
Comments
Copyright © 2015 - Chun Ye - Powered by Octopress


