ListView学习(1)-SimpleAdapter的学习
注意:
(1) 在Spinner 中监听 用 selected , 在ListView 中用 click。
一。首先是xml文件
这里公两个部分,一是主要 的listview.xml,一是子项的XMl文件,item.xml
(1) listview.xml
<LinearLayout xmlns:android="http://schemas.android.com/apk/res/android"
    android:layout_width="fill_parent"
    android:layout_height="fill_parent"
    android:orientation="vertical" >

    <ListView
        android:id="@+id/listView1"
        android:layout_width="match_parent"
        android:layout_height="wrap_content" >
    </ListView>

</LinearLayout>
(2) item.xml
两个部分,图片和文字 。
<LinearLayout xmlns:android="http://schemas.android.com/apk/res/android"
    android:layout_width="fill_parent"
    android:layout_height="fill_parent"
    android:orientation="horizontal" >

    <ImageView
        android:id="@+id/imageView1"
        android:layout_width="wrap_content"
        android:layout_height="wrap_content"
        android:src="@android:drawable/ic_menu_edit" />

    <TextView
        android:id="@+id/textView1"
        android:layout_width="wrap_content"
        android:layout_height="wrap_content"
        android:text="Large Text"
        android:textAppearance="?android:attr/textAppearanceLarge" />

</LinearLayout>
二。java部分
步骤:
(1)得到ListView 对象
(2)将原始数据转换成Adapter 要的数据结构。这个 是使用Adapter 中的一个难点 。
(3)新建Adapter 对象 。选择很多,可以自定义 ,这里先用简单点的,SimpleAdapter类,构造方法为:
SimpleAdapter (Context context ,
                    List<? extends Map<String ,?> >data ,
                    int resource,
                    String [] from,
                    int [] to );
参数二:数据源,键 一定要是String , 值 常常也是用的String 。
参数三:资源 的 Id ,也就是每个子项的布局文件(如item.xml的id )。
参数四:数据源(第二个参数)中的 KEY ,通过 这个 得到数据源中的 value ./
参数五:item.xml 文件中 要显示数据 的地方 的 Id ,如上面 的就是textView1 .
(4) 为 ListView 配置Adpater
ListView.setAdapter (ListAdapter adapter );
三。下面开始实例 :
原始安徽据源:String [ ] names
Adapter 要用的数据源的格式 : List <HashMap<String ,String >> listItem . 这里不能写成 Map
难点在于怎么将原始数据源转换成 Adapter 可用的数据 源。
可以 将names[i]一个个保存到 一个HashMap name 中,然后将这个 HashMap 加入 到 listItem 中。
(1)下面是整体架构
public class ListDemo extends Activity {
	private String[] names ;      //原始 数据 源
	private List<HashMap<String, String>> listItem ;  //adapter要用的格式 的数据 源
	private ListView lv ;

	@Override
	protected void onCreate(Bundle savedInstanceState) {
		super.onCreate(savedInstanceState);
		setContentView(R.layout.listview);

		loadData();   //还有产生Adapter 要的结构的数据。
		initCtrl ();  //初始化组件 ,

		lv.setOnItemClickListener(new OnItemClickListener(){
			public void onItemClick(AdapterView<?> parent, View view, int position,
					long id ) {
				Toast.makeText(getBaseContext(), names[position], Toast.LENGTH_SHORT).show();
			}
		});

	}
注意,这里用Click,而不是 Selected 严密监听。
(3) loadData() 可以 原始 数据 整理成Adapter 要的格式
private List<HashMap<String, String>> loadData() {
		// TODO Auto-generated method stub
		names = new String []{"android 1.1","android 2.1","android 3.1","android 4.1"};
		listItem = new ArrayList <HashMap<String ,String >>();

		for (int i=0;i< names.length;i++){
			HashMap <String ,String > name = new HashMap<String ,String >();
			name.put("name", names[i]);
			listItem.add(name);
		}
		return listItem ;
	}
(3) initCtrl() 中完成 了组件 的初始化和设置 ,
private void initCtrl() {
		// TODO Auto-generated method stub
		lv= (ListView)findViewById(R.id.listView1);   //得到 ListiV	iew
		SimpleAdapter adapter = new SimpleAdapter (getBaseContext(),
													listItem ,
													R.layout.item,
													new String []{"name"},
													new int [] {R.id.textView1});    //新建 Adapter
		lv.setAdapter(adapter);
	}
下面开始 讲复杂的listItem的。
还是用 SimpleAdapter 。
SimpleAdapter (Context context ,
                    List<? extends Map<String ,?> >data ,
                    int resource,
                    String [] from,
                    int [] to );
我们为了显示 下面的效果:
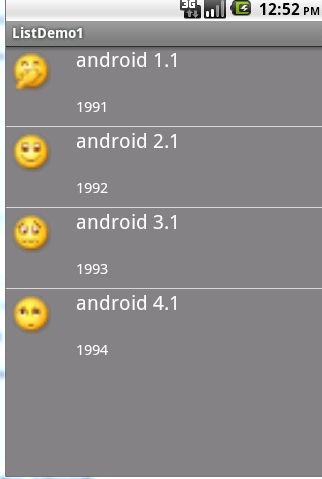
作出下面的修改:
一。item 的布局文件,用两层的 linearLayout
<LinearLayout xmlns:android="http://schemas.android.com/apk/res/android"
    android:layout_width="fill_parent"
    android:layout_height="80dp"
    android:background="#808080"
    android:orientation="horizontal"
    >

    <ImageView
        android:id="@+id/imageView1"
        android:layout_width="40dp"
        android:layout_height="40dp"
        android:layout_margin="5dp"
        android:src="@drawable/a"/>

    <LinearLayout
        android:layout_width="wrap_content"
        android:layout_height="fill_parent"
         android:layout_marginLeft="20dp"
        android:orientation="vertical">

        <TextView
            android:id="@+id/name"
            android:layout_width="wrap_content"
            android:layout_height="50dp"
            android:textColor="#FFFFff"
            android:textSize="20sp"
            android:text="name"/>

        <TextView
            android:id="@+id/info"
            android:layout_width="wrap_content"
            android:layout_height="30dp"
            android:text="info"
            android:textColor="#FFFFff"
            android:textSize="15sp" />

    </LinearLayout>

</LinearLayout>
二。java 程序 的修改
将 Adapter 要用的数据 类型改成
private List<Map<String, Object>> listItem ; //adapter要用的格式 的数据 源
其它各处都 要进行修改。
初始化部分改成:
private void initCtrl() {
		// TODO Auto-generated method stub
		lv= (ListView)findViewById(R.id.listView1);   //得到 ListiV	iew
		SimpleAdapter adapter = new SimpleAdapter (getBaseContext(),
													listItem ,
													R.layout.item,
													new String []{"name","img","info"},
													new int [] {R.id.name,R.id.imageView1, R.id.info});    //新建 Adapter
		lv.setAdapter(adapter);
	}
重点难点 在数据加载 部分,
private List<Map<String, Object>> loadData() {
		// TODO Auto-generated method stub
		names = new String []{"android 1.1","android 2.1","android 3.1","android 4.1"};
		imgs = new int []{R.drawable.a, R.drawable.b,R.drawable.c, R.drawable.d};
		infos =new String [] { "1991","1992","1993", "1994"};

		listItem = new ArrayList <Map<String ,Object >>();

		for (int i=0;i< names.length;i++){
			Map<String, Object> map = new HashMap<String ,Object >();
			map.put("name", names[i]);
			map.put("img",imgs[i] );
			map.put("info", infos[i]);

			listItem.add(map);
		}
		return listItem ;
	}