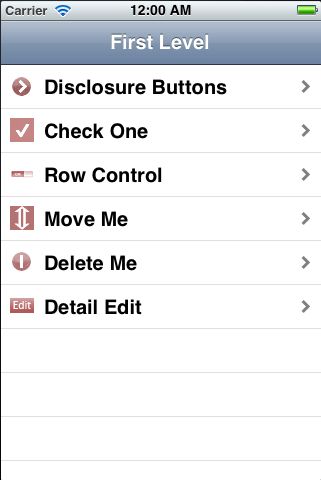
Navigation Controllers and Table Views(下)
三十而立,从零开始学ios开发(十六):Navigation Controllers and Table Views(下)
终于进行到下了,这是关于Navigation Controllers和Table Views的最后一个例子,稍微复杂了一点,但也仅仅是复杂而已,难度不大,我们开始吧。
如果没有上一篇的代码,可以从这里下载Nav_2
1)第六个subtableview:An Editable Detail Pane
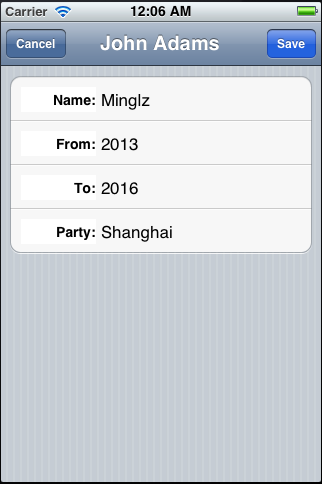
打开你iphone上的通讯录,首先看见的是你通讯录中所有的联系人列表,点选一个联系人,就会切换到联系人的详细页面,再点击右上角的编辑按钮,就可以对联系人的内容进行编辑。我们的这个例子与之有点相似之处,首先也是一个列表,这个列表中列举了历任的美国总统(他们的名字和任期),然后点击其中的一个总统名字,view切换到该总统的详细页面,我们可以对该总统的信息进行编辑保存。
好了,开始我们的例子,与以往不同的是,这次我们需要先创建一个类,叫做BIDPresident,这个类记录了每位美国总统的信息,名字啊,任职起止年,来自哪个政党等信息。选中Project navigator中的Nav文件夹,单击鼠标右键,选择“New File...”,在弹出的窗口中,左边选择Cocoa Touch,右边选择Objective-C class,点击Next按钮,在下一个窗口中将class命名为BIDPresident,Subclass of命名为NSObject,点击Next按钮,完成创建。
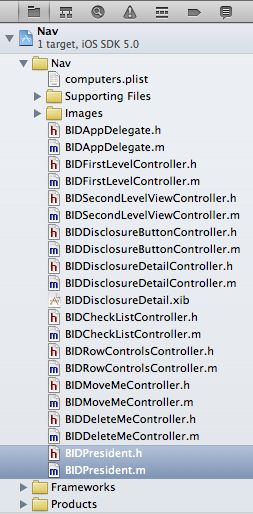
打开BIDPresident.h,添加如下代码
#import <Foundation/Foundation.h>

#define kPresidentNumberKey @"President"
#define kPresidentNameKey   @"Name"
#define kPreisdentFromKey   @"FromYear"
#define kPresidentToKey     @"ToYear"
#define kPresidentPartyKey  @"Party"

@interface BIDPresident : NSObject <NSCoding> @property int number; @property (nonatomic, copy) NSString *name; @property (nonatomic, copy) NSString *fromYear; @property (nonatomic, copy) NSString *toYear; @property (nonatomic, copy) NSString *party; @end
我们首先定义了5个常量,这5个常量会在标识总统信息的时候用到,看后面的代码就明白了,我们一般在编程的时候都会用到常量,这里没什么区别。接着我们用到了一个新的家伙<NSCoding>协议,这个东西的作用是将一个对象写入文件或者从文件中创建一个对象(the NSCoding protocol is what allows this object to be written to and created from files.)在这里你仅仅需要知道这些就可以了,在以后的章节中,会对NSCoding进行详细的了解。
好了,我们接着打开BIDPresident.m,添加如下代码
#import "BIDPresident.h"

@implementation BIDPresident

@synthesize number; @synthesize name; @synthesize fromYear; @synthesize toYear; @synthesize party; #pragma mark -
#pragma mark NSCoding
- (void)encodeWithCoder:(NSCoder *)coder { [coder encodeInt:self.number forKey:kPresidentNumberKey]; [coder encodeObject:self.name forKey:kPresidentNameKey]; [coder encodeObject:self.fromYear forKey:kPreisdentFromKey]; [coder encodeObject:self.toYear forKey:kPresidentToKey]; [coder encodeObject:self.party forKey:kPresidentPartyKey]; } - (id)initWithCoder:(NSCoder *)coder { if(self = [super init]) { number = [coder decodeIntForKey:kPresidentNumberKey]; name = [coder decodeObjectForKey:kPresidentNameKey]; fromYear = [coder decodeObjectForKey:kPreisdentFromKey]; toYear = [coder decodeObjectForKey:kPresidentToKey]; party = [coder decodeObjectForKey:kPresidentPartyKey]; } return self; }
encodeWithCoder和initWithCoder是2个NSCoding的协议方法,encodeWithCoder用于将我们的对象进行编码,initWithCoder用于将我们的对象进行解码。这2个方法的作用是从plist中读取数据,并转换成BIDPresident的对象。
下载President.plist.zip,解压后,将President.plist拖入到项目中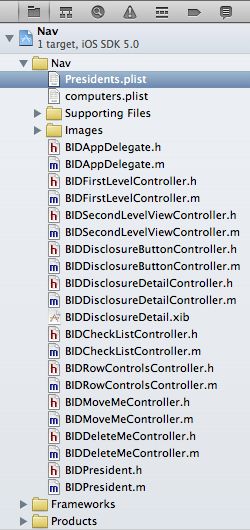
下面开始创建controller,我们需要创建2个controller,一个用于展示presidents列表,另一个是展示总统信息的详细页面。选中Project navigator中的Nav文件夹,单击鼠标右键,选择“New File...”,在弹出的窗口中,左边选择Cocoa Touch,右边选择Objective-C class,点击Next按钮,在下一个窗口中将class命名为BIDPresidentsViewController,Subclass of命名为BIDSecondLevelViewController,点击Next按钮,完成创建。使用同样的方法再创建一个,class命名为BIDPresidentDetailController,Subclass of命名为UITableViewController。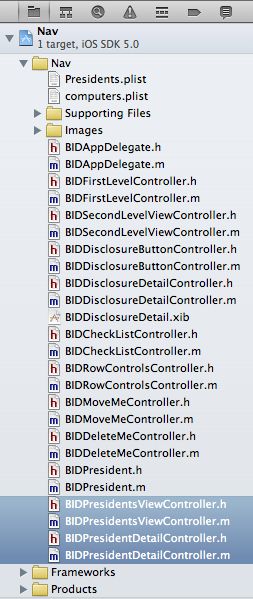
打开BIDPresidentsViewController.h,添加如下代码
#import "BIDSecondLevelViewController.h"

@interface BIDPresidentsViewController : BIDSecondLevelViewController

@property (strong, nonatomic) NSMutableArray *list; @end
这个list用于保存Presidents的列表
打开BIDPresidentsViewController.m,添加如下代码
#import "BIDPresidentsViewController.h"
#import "BIDPresidentDetailController.h"
#import "BIDPresident.h"

@implementation BIDPresidentsViewController

@synthesize list; - (void)viewDidLoad { [super viewDidLoad]; NSString *path = [[NSBundle mainBundle] pathForResource:@"Presidents" ofType:@"plist"]; NSData *data; NSKeyedUnarchiver *unarchiver; data = [[NSData alloc] initWithContentsOfFile:path]; unarchiver = [[NSKeyedUnarchiver alloc] initForReadingWithData:data]; NSMutableArray *array = [unarchiver decodeObjectForKey:@"Presidents"]; self.list = array; [unarchiver finishDecoding]; } - (void)viewWillAppear:(BOOL)animated { [super viewWillAppear:animated]; [self.tableView reloadData]; }
上面这段代码中,要对viewDidLoad稍微解释一下:
首先,通过下面的代码找到Presidents.plist:
NSString *path = [[NSBundlemainBundle] pathForResource:@"Presidents"ofType:@"plist"];
接着,我们声明了一个NSData对象,一个NSKeyedUnarchiver对象,NSData是一个保存数据的类,其保存数据的格式是二进制的(应该是二进制的吧,byte类型),然后NSData可以将其内容转换为其他的类型,例如NSString。NSKeyedUnarchiver类从字节流中读取数据(与NSKeyedUnarchiver类对应的有一个NSKeyedArchiver类,它的作用是将对象写入字节流)。
NSData *data;
NSKeyedUnarchiver *unarchiver;
接着初始化data中的数据,Presidents.plist中的数据,然后将data中的数据赋给unarchiver
data = [[NSDataalloc] initWithContentsOfFile:path];
unarchiver = [[NSKeyedUnarchiver alloc] initForReadingWithData:data];
接着对unarchiver中的内容进行解码,并赋给新创建的NSMutableArray
NSMutableArray *array = [unarchiver decodeObjectForKey:@"Presidents"];
最后将array赋值给list,并终止解码过程
self.list = array;
[unarchiver finishDecoding];
这段viewDidLoad代码如果是第一次接触的话,确实有点搞脑子,几个对象是第一次遇到,如果实在看不懂也不要太在意,只要知道这个过程是干嘛的,只要知道我们从plist中读取了Presidents的对象,然后把它赋值给了list就可以了。
viewWillAppear貌似也是我们第一次使用到吧,这个方法是在每次view即将出现之前被调用到的(在viewDidLoad之后被调用),当我们修改了某一个president的信息后,那么这个president在列表中的显示也将发生变化,我们所采用的方法不是去判断这个president出现在列表的哪个位置,而是不管三七二十一,整个的重新载入列表,这是一个比较偷懒且简单易实现的方法。
继续添加代码
#pragma mark -
#pragma mark Table Data Source Methods
- (NSInteger)tableView:(UITableView *)tableView numberOfRowsInSection:(NSInteger)section { return [list count]; } - (UITableViewCell *)tableView:(UITableView *)tableView cellForRowAtIndexPath:(NSIndexPath *)indexPath { static NSString *PresidentListCellIdentifier = @"PresidentListCellIdentifier"; UITableViewCell *cell = [tableView dequeueReusableCellWithIdentifier:PresidentListCellIdentifier]; if(cell == nil) { cell = [[UITableViewCell alloc] initWithStyle:UITableViewCellStyleSubtitle reuseIdentifier:PresidentListCellIdentifier]; } NSUInteger row = [indexPath row]; BIDPresident *thePres = [self.list objectAtIndex:row]; cell.textLabel.text = thePres.name; cell.detailTextLabel.text = [NSString stringWithFormat:@"%@ - %@", thePres.fromYear, thePres.toYear]; return cell; }
在tableView:cellForRowAtIndexPath方法中,首先要注意的是,cell的style是UITableViewCellStyleSubtitle。其次我们每次都对cell的textLabel和detailTextLabel重新赋值,这个是因为我们可能会对某些president的信息进行修改,这样重新取回的cell中保存的还是旧数据,所以要更新一下。
继续添加代码
#pragma mark -
#pragma mark Table Delegate Methods
- (void)tableView:(UITableView *)tableView didSelectRowAtIndexPath:(NSIndexPath *)indexPath { NSUInteger row = [indexPath row]; BIDPresident *prez = [self.list objectAtIndex:row]; BIDPresidentDetailController *childController = [[BIDPresidentDetailController alloc] initWithStyle:UITableViewStyleGrouped]; childController.title = prez.name; childController.president = prez; [self.navigationController pushViewController:childController animated:YES]; }
当我们点选一个cell后,将创建一个BIDPresident的对象,里面包含了选中的president的详细信息,然后创建一个BIDPresidentDetailController的对象childController,并设置其title属性(可以在navigation bar上面显示)和其需要展示的president,BIDPresidentDetailController对象的style为UITableViewStyleGrouped。navigationController的pushViewController方法之前也用到过,将新的childController push进栈并显示childController。
另外,这里应该会有一个错误:childController.president = prez,因为到目前位置BIDPresidentDetailController中什么都没有,更别说president,不过没关系,先留在这里,我们马上就要去实现BIDPresidentDetailController了。
保存好文件后,我们开始编辑BIDPresidentDetailController,打开BIDPresidentDetailController.h,添加如下代码
#import <UIKit/UIKit.h>

@class BIDPresident; #define kNumberOfEditableRows   4
#define kNameRowIndex           0
#define kFromYearRowIndex       1
#define kToYearRowIndex         2
#define kPartyIndex             3

#define kLabelTag               4096

@interface BIDPresidentDetailController : UITableViewController <UITextFieldDelegate> @property (strong, nonatomic) BIDPresident *president; @property (strong, nonatomic) NSArray *fieldLabels; @property (strong, nonatomic) NSMutableDictionary *tempValues; @property (strong, nonatomic) UITextField *currentTextField; - (IBAction)cancel:(id)sender; - (IBAction)save:(id)sender; - (IBAction)textFieldDone:(id)sender; @end
在BIDPresidentDetailController中定义了一个style为grouped的table,且这个table有4行,分别记录了当前president的名字,担任总统的开始年份,担任总统的结束年份和来自哪个政党。上面的代码中,前5个常量分别表示了这些信息:
#define kNumberOfEditableRows 4 \\ 有4行可编辑的行
#define kNameRowIndex 0 \\ president名字
#define kFromYearRowIndex 1 \\ 开始年份
#define kToYearRowIndex 2 \\ 结束年份
#define kPartyIndex 3 \\ 政党
最后一个常量kLabelTag在之后的code中会有解释,它的作用是取回cell中的UILabel,看之后的代码就会明白。
在这里我们引入了一个新的协议<UITextFieldDelegate>。
*president:指向当前的总统,这个就是我们上面提到的那个错误,现在把那个错误弥补了。
*fieldLabels:是一个Array,里面保存了与4个常量对应的label,kNameRowIndex对应fieldLabels中index为0的label,kFromYearRowIndex对应fieldLabels中index为1的label,以此类推,具体如何实现还是看之后的代码吧,这样比较直观。
*tempValues:是一个mutable dictionary,它将临时保存用户修改过的值,因为当一个值被修改后(例如任职的开始年份),我们并不喜欢它直接反映到最终的list中,因为一旦用于点击了Cancel按钮,所有的修改都将作废,因此我们先保存在tempValues中,如果之后用户点击的是Save按钮,那么才会将值保存到list中。
*currentTextField:当用户点击一个BIDPresidentDetailController的text field时,currentTextField将指向那个text field。我们必须拥有一个currentTextField的原因有点复杂,当我们完成对一个text field修改的时候,我们可能会跳转到另一个text field,此时UITextField的delegate方法textFieldDidEndEditing方法将被触发,textFieldDidEndEditing有当前的textfield参数传人,可以知道是哪个textfield在编辑,我们可以保存最新值到tempValues中,但是当我们点击Save按钮的时候,BIDPresidentDetailController将会出栈并显示BIDPresidentsViewController,那么此时我们没有机会得到是那个textfield在编辑,因此我们也没有办法保存最新的值到tempValues中,基于这种情况,我们定义了currentTextField,这样就可以知道最后编辑的那个textfield,也可以获得其值,这样就可以保存最新的值到tempValues中去了。
说了一大段了理论,大家是不是看的云里雾里的,我也说的云里雾里的,还是看具体的实现吧,这样可以拨开云雾见月明。
打开BIDPresidentDetailController.m,添加如下代码
#import "BIDPresidentDetailController.h"
#import "BIDPresident.h"

@implementation BIDPresidentDetailController
@synthesize president; @synthesize fieldLabels; @synthesize tempValues; @synthesize currentTextField; - (IBAction)cancel:(id)sender { [self.navigationController popViewControllerAnimated:YES]; } - (IBAction)save:(id)sender { if (currentTextField != nil) { NSNumber *tagAsNum = [NSNumber numberWithInt:currentTextField.tag]; [tempValues setObject:currentTextField.text forKey:tagAsNum]; } for (NSNumber *key in [tempValues allKeys]) { switch ([key intValue]) { case kNameRowIndex: president.name = [tempValues objectForKey:key]; break; case kFromYearRowIndex: president.fromYear = [tempValues objectForKey:key]; break; case kToYearRowIndex: president.toYear = [tempValues objectForKey:key]; break; case kPartyIndex: president.party = [tempValues objectForKey:key]; break; } } [self.navigationController popViewControllerAnimated:YES]; NSArray *allControllers = self.navigationController.viewControllers; UITableViewController *parent = [allControllers lastObject]; [parent.tableView reloadData]; } - (IBAction)textFieldDone:(id)sender { [sender resignFirstResponder]; }
第一个实现的是cancel action方法,当用户点击Cancel按钮时,会调用该方法。当cancel action被触发后,当前的view会出栈(BIDPresidentDetailController出栈),之前的一个view会显示出来(BIDPresidentsViewController会到栈的顶端显示)。
第二个实现的是save action方法,当用户点击Save按钮时,会调用该方法。save action的目的是保存用户对于信息的修改,当save action被触发后,位于tempValues中的值将被写入到president中,但是有一种情况是例外的,如果用户正在编辑一个textField,当编辑完后,立刻点击Save按钮(此时textField还是获得焦点的,虚拟键盘也还在),那么当前正在被编辑的textField的内容还没有保存到tempValues中,如果直接保存数据,当前textField中的内容将无法保存,因此为了解决这个问题,我们引入了之前所说的currentTextField,在save action中,我们首先判断currentTextField是否为nil,如果不是,则说明当前有textField正在被编辑,我们就通过currentTextField来获得当前编辑的textField的内容,并把值保存进tempValues中。
if (currentTextField != nil) {
NSNumber *tagAsNum = [NSNumber numberWithInt:currentTextField.tag];
[tempValues setObject:currentTextField.text forKey:tagAsNum];
}
之后的快速遍历tempValues中的每一个值,将其保存到president中。tempValues的类型是NSMutableDictionary,它的key是行号,即每个textField所处的在第几行的行号,通过行号获得tempValues中对应的值,并赋给president。
for (NSNumber *key in [tempValues allKeys]) {
switch ([key intValue]) {
case kNameRowIndex:
president.name = [tempValues objectForKey:key];
break;
......
default:
break;
}
}
之后就是当前的view出栈,父view提升为第一个view显示
[self.navigationControllerpopViewControllerAnimated:YES];
我们还需要做一件事情,因为我们可能对信息进行了修改,因此必须重新load父view中的数据(BIDPresidentsViewController中的数据)。代码中首先列举出所有navigation中的viewController,其实也就只有一个,因此可以用lastObject获得,然后重新载入数据即可。
NSArray *allControllers = self.navigationController.viewControllers;
UITableViewController *parent = [allControllers lastObject]; // 只有一个controller,如果换成objectAtIndex:0也是对的
[parent.tableView reloadData];
第三个实现的是textFieldDone action方法,当完成对一个textField内容修改后,点击虚拟键盘上面的Done按钮,使虚拟键盘消失。
继续添加如下代码
#pragma mark -
- (void)viewDidLoad { [super viewDidLoad]; NSArray *array = [[NSArray alloc] initWithObjects:@"Name:", @"From:", @"To:", @"Party:", nil]; self.fieldLabels = array; UIBarButtonItem *cancelButton = [[UIBarButtonItem alloc] initWithTitle:@"Cancel" style:UIBarButtonItemStylePlain target:self action:@selector(cancel:)]; self.navigationItem.leftBarButtonItem = cancelButton; UIBarButtonItem *saveButton = [[UIBarButtonItem alloc] initWithTitle:@"Save" style:UIBarButtonItemStyleDone target:self action:@selector(save:)]; self.navigationItem.rightBarButtonItem = saveButton; NSMutableDictionary *dict = [[NSMutableDictionary alloc] init]; self.tempValues = dict; }
首先创建4个string,并赋给fieldLabels。接着创建了2个按钮,cancelButton和saveButton。cancelButton中定义了它调用的action为cancel,并且它放置的位置为navigationbar的左边。同样saveButton中定义了它调用的action为save,并且它放置的位置为navigationbar的右边。最后我们创建了一个NSMutableDictionary对象,并使tempValues指向这个对象。
接着添加代码
#pragma mark -
#pragma mark Table Data Source Methods
- (NSInteger)tableView:(UITableView *)tableView numberOfRowsInSection:(NSInteger)section { return kNumberOfEditableRows; } - (UITableViewCell *)tableView:(UITableView *)tableView cellForRowAtIndexPath:(NSIndexPath *)indexPath { static NSString *PresidentCellIdentifier = @"PresidentCellIdentifier"; UITableViewCell *cell = [tableView dequeueReusableCellWithIdentifier:PresidentCellIdentifier]; if (cell == nil) { cell = [[UITableViewCell alloc] initWithStyle:UITableViewCellStyleDefault reuseIdentifier:PresidentCellIdentifier];
 UILabel *label = [[UILabel alloc] initWithFrame:CGRectMake(10, 10, 75, 25)]; label.textAlignment = UITextAlignmentRight; label.tag = kLabelTag; label.font = [UIFont boldSystemFontOfSize:14]; [cell.contentView addSubview:label]; UITextField *textField = [[UITextField alloc] initWithFrame:CGRectMake(90, 12, 200, 25)]; textField.clearsOnBeginEditing = NO; [textField setDelegate:self]; textField.returnKeyType = UIReturnKeyDone; [textField addTarget:self action:@selector(textFieldDone:) forControlEvents:UIControlEventEditingDidEndOnExit]; [cell.contentView addSubview:textField]; } NSUInteger row = [indexPath row]; UILabel *label = (UILabel *)[cell viewWithTag:kLabelTag]; UITextField *textField = nil; for (UIView *oneView in cell.contentView.subviews) { if([oneView isMemberOfClass:[UITextField class]]) textField = (UITextField *)oneView; } label.text = [fieldLabels objectAtIndex:row]; NSNumber *rowAsNum = [NSNumber numberWithInt:row]; switch (row) { case kNameRowIndex: if ([[tempValues allKeys] containsObject:rowAsNum]) textField.text = [tempValues objectForKey:rowAsNum]; else textField.text = president.name; break; case kFromYearRowIndex: if ([[tempValues allKeys] containsObject:rowAsNum]) textField.text = [tempValues objectForKey:rowAsNum]; else textField.text = president.fromYear; break; case kToYearRowIndex: if ([[tempValues allKeys] containsObject:rowAsNum]) textField.text = [tempValues objectForKey:rowAsNum]; else textField.text = president.toYear; break; case kPartyIndex: if ([[tempValues allKeys] containsObject:rowAsNum]) textField.text = [tempValues objectForKey:rowAsNum]; else textField.text = president.party; break; default: break; } if (currentTextField == textField) { currentTextField = nil; } textField.tag = row; return cell; }
tableView:numberOfRowsInSection就不解释了,和之前的一样,重点看一下tableView:cellForRowAtIndexPath。
首先,我们再明确一次这个方法被调用的时机,定table view中的cell要出现时,会调用该方法来创建或者取回cell,也就是说cell是一个一个单独创建的或者取回的,他们不是一下子创建完,必须一个一个创建,好了记住这一点后再看代码就会比较容易理解。
代码一开始还是和以前的例子一样定义identifier,然后试着取回cell,如果不行就创建cell
static NSString *PresidentCellIdentifier = @"PresidentCellIdentifier";
UITableViewCell *cell = [tableView dequeueReusableCellWithIdentifier:PresidentCellIdentifier];
if (cell == nil) {
cell = [[UITableViewCell alloc] initWithStyle:UITableViewCellStyleDefault reuseIdentifier:PresidentCellIdentifier];
这些就一笔带过了,之后的代码才是重点。
在创建cell的同时,还创建了一个UILabel和UITextField。创建UILabel时,我们指定了它的位置,文字是右对齐的,tag是kLabelTag(可以利用这个kLabelTag取回cell中的label),设置了字体,最后将label添加到cell中。
UILabel *label = [[UILabelalloc] initWithFrame:CGRectMake(10, 10, 75, 25)];
label.textAlignment = UITextAlignmentRight;
label.tag = kLabelTag;
label.font = [UIFont boldSystemFontOfSize:14];
[cell.contentView addSubview:label];
创建UITextField时,指定了它的位置,设置其获得焦点后原有的内容不消失,设置self作为它的delegate(textField是在BIDPresidentDetailController上创建的,BIDPresidentDetailController也是它的delegate文件,它的协议方法都在这个文件中实现),当点击textField时,会有虚拟键盘弹出,将虚拟键盘的Return键设置成Done键,接着为textField的Did End On Exit事件制定action为textFieldDone(addTarget是说明textFieldDone在哪里,用self就是说在BIDPresidentDetailController中),最后将textField添加到cell中。
UITextField *textField = [[UITextField alloc] initWithFrame:CGRectMake(90, 12, 200, 25)];
textField.clearsOnBeginEditing = NO;
[textField setDelegate:self];
textField.returnKeyType = UIReturnKeyDone;
[textField addTarget:self action:@selector(textFieldDone:) forControlEvents:UIControlEventEditingDidEndOnExit];
[cell.contentView addSubview:textField]
注意,在创建textField的时候,我们并没有为其添加tag,我们使用遍历cell中所用subviews的方式来找到textField的。接着看下面的代码,通过indexPath我们可以知道当前的cell是table view中的第几个
NSUInteger row = [indexPath row];
接着就是得到当前cell中的label和textField,为他们赋值。因为cell中只有一个label的tag为kLabelTag,基于这点,我们可以用过tag来找到label
UILabel *label = (UILabel *)[cell viewWithTag:kLabelTag];
在cell中也只有一个textField,所以只要遍历cell中包含的所有view,并判断view的类型是不是UITextField,就可以找到textField
UITextField *textField = nil;
for (UIView *oneView in cell.contentView.subviews) {
if([oneView isMemberOfClass:[UITextField class]])
textField = (UITextField *)oneView;
}
找到了label和textField就为他们赋值,label的赋值相对简单,我们已经知道是第几个cell,那么就可以在fieldLabels中找到对应的值赋给label
label.text = [fieldLabels objectAtIndex:row];
textField相对来说比较复杂些,我们首先要判断当前的内容是不是被修改过,如果修改过,那么我们要从tempValues中取值,如果没有修改过,则从president对象中取值(之后的代码会有对tempValues的赋值,看来就明白了,这里稍微想一想原理,应该可以理解)
if ([[tempValues allKeys] containsObject:rowAsNum])
textField.text = [tempValues objectForKey:rowAsNum];
else
textField.text = president.name;
接着是判断当前的textField是否是正在编辑的textField(currentTextField),如果是就将currentTextField设为nil,因为textField的内容已经发生了变化,里面包含的都是最新的值,所有currentTextField就不需要了。
if (currentTextField == textField) {
currentTextField = nil;
}
最后设置textField的tag为row,并返回cell
textField.tag = row;
return cell;
继续添加代码
#pragma mark -
#pragma mark Table Delegate Methods
- (NSIndexPath *)tableView:(UITableView *)tableView willSelectRowAtIndexPath:(NSIndexPath *)indexPath { return nil; } #pragma mark Text Field Delegate Methods
- (void)textFieldDidBeginEditing:(UITextField *)textField { self.currentTextField = textField; } - (void)textFieldDidEndEditing:(UITextField *)textField { NSNumber *tagAsNum = [NSNumber numberWithInt:textField.tag]; [tempValues setObject:textField.text forKey:tagAsNum]; }
第一个是tableview的delegate方法,返回nil表示不能选择table view中的cell。
之后的2个都是textField的delegate方法,第一个textFieldDidBeginEditing,当textField变成first responder时(获得焦点,弹出虚拟键盘时)会触发这个方法,在这个方法中,我们将currentTextField指向了当前的textField,这个就能够保证我们在点击Save按钮时,可以得到正确的值。
第二个是textFieldDidEndEditing方法,当textField失去焦点或者点选了虚拟键盘上的Done按钮就会触发该方法,在这个方法中,首先获得textField的tag,然后为tempValues赋值,值是当前textField的text,key是textField的tag。
至此BIDPresidentDetailController中所有的代码都添加完成了,大家看懂了吗?没看懂的话多看几遍,然后加上自己的理解,应该能够搞明白的,相信自己,相信奇迹吧!
最后打开BIDFirstLevelController.m,添加如下代码
#import "BIDFirstLevelController.h"
#import "BIDSecondLevelViewController.h"
#import "BIDDisclosureButtonController.h"
#import "BIDCheckListController.h"
#import "BIDRowControlsController.h"
#import "BIDMoveMeController.h"
#import "BIDDeleteMeController.h"
#import "BIDPresidentsViewController.h"

@implementation BIDFirstLevelController

@synthesize controllers;

- (void)viewDidLoad {
    [super viewDidLoad];
    self.title = @"First Level";
    NSMutableArray *array = [[NSMutableArray alloc] init];

    // Disclosure Button
    BIDDisclosureButtonController *disclosureButtonController = [[BIDDisclosureButtonController alloc]
                                                                 initWithStyle:UITableViewStylePlain];
    disclosureButtonController.title = @"Disclosure Buttons";
    disclosureButtonController.rowImage = [UIImage imageNamed:@"disclosureButtonControllerIcon.png"];
    [array addObject:disclosureButtonController];

    // Checklist
    BIDCheckListController *checkListController = [[BIDCheckListController alloc]
                                                   initWithStyle:UITableViewStylePlain];
    checkListController.title = @"Check One";
    checkListController.rowImage = [UIImage imageNamed:@"checkmarkControllerIcon.png"];
    [array addObject:checkListController];

    // Row Control
    BIDRowControlsController *rowControlsController = [[BIDRowControlsController alloc]
                                                       initWithStyle:UITableViewStylePlain];
    rowControlsController.title = @"Row Control";
    rowControlsController.rowImage = [UIImage imageNamed:@"rowControlsIcon.png"];
    [array addObject:rowControlsController];

    // Move Control
    BIDMoveMeController *moveMeController = [[BIDMoveMeController alloc]
                                             initWithStyle:UITableViewStylePlain];
    moveMeController.title = @"Move Me";
    moveMeController.rowImage = [UIImage imageNamed:@"moveMeIcon.png"];
    [array addObject:moveMeController];

    // Delete Me
    BIDDeleteMeController *deleteMeController = [[BIDDeleteMeController alloc]
                                                 initWithStyle:UITableViewStylePlain];
    deleteMeController.title = @"Delete Me";
    deleteMeController.rowImage = [UIImage imageNamed:@"deleteMeIcon.png"];
    [array addObject:deleteMeController];

    // BIDPresident View/Edit
    BIDPresidentsViewController *presidentsViewController = [[BIDPresidentsViewController alloc] initWithStyle:UITableViewStylePlain]; presidentsViewController.title = @"Detail Edit"; presidentsViewController.rowImage = [UIImage imageNamed:@"detailEditIcon.png"]; [array addObject:presidentsViewController];

    self.controllers = array;
}
选择最后的Detail Edit,切换到BIDPresidentsViewController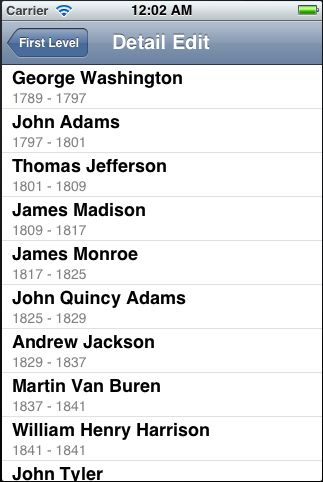
随便选择一个总统的名字,切换到BIDPresidentDetailController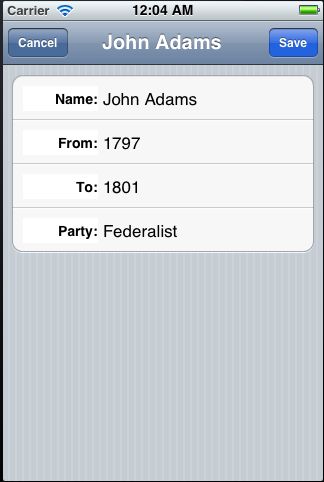
随便选择一个textField,会出现虚拟键盘,且会显示Done按钮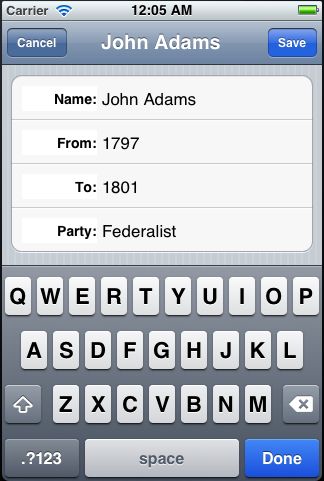
点击Save按钮保存修改,或者点击Cancel按钮,放弃修改,这里我点击的是Save按钮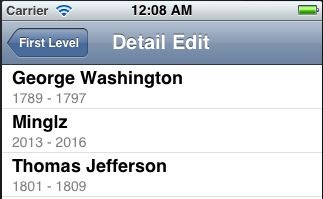
ok,大致功能就是这些,但是还是有可以改进的地方,如果你打开你iphone上的通讯录,选择一条记录进行编辑,弹出的虚拟键盘上显示的是return按钮,点击return按钮,光标会移动到下一个textField中,这个是怎么实现的呢?其实没那么困难,下面就来实现一下。
打开BIDPresidentDetailController.m,在tableView:cellForRowAtIndexPath方法中,将下面的这句话删除
- (UITableViewCell *)tableView:(UITableView *)tableView cellForRowAtIndexPath:(NSIndexPath *)indexPath
{
    static NSString *PresidentCellIdentifier = @"PresidentCellIdentifier";

    UITableViewCell *cell = [tableView dequeueReusableCellWithIdentifier:PresidentCellIdentifier];
    if (cell == nil) {
        cell = [[UITableViewCell alloc]
                initWithStyle:UITableViewCellStyleDefault
                reuseIdentifier:PresidentCellIdentifier];

        UILabel *label = [[UILabel alloc] initWithFrame:CGRectMake(10, 10, 75, 25)];
        label.textAlignment = UITextAlignmentRight;
        label.tag = kLabelTag;
        label.font = [UIFont boldSystemFontOfSize:14];
        [cell.contentView addSubview:label];

        UITextField *textField = [[UITextField alloc] initWithFrame:CGRectMake(90, 12, 200, 25)];
        textField.clearsOnBeginEditing = NO;
        [textField setDelegate:self];
        textField.returnKeyType = UIReturnKeyDone;
        [textField addTarget:self action:@selector(textFieldDone:) forControlEvents:UIControlEventEditingDidEndOnExit];
        [cell.contentView addSubview:textField];
    }
    NSUInteger row = [indexPath row];
    ......
这样虚拟键盘就不会显示Done按钮了,会显示默认的return按钮。然后找到textFieldDone方法,进行如下修改
- (IBAction)textFieldDone:(id)sender
{
    [sender resignFirstResponder]; UITableViewCell *cell = (UITableViewCell *)[[sender superview] superview]; UITableView *table = (UITableView *)[cell superview]; NSIndexPath *textFieldIndexPath = [table indexPathForCell:cell]; NSUInteger row = [textFieldIndexPath row]; row++; if (row >= kNumberOfEditableRows) { row = 0; } NSIndexPath *newPath = [NSIndexPath indexPathForRow:row inSection:0]; UITableViewCell *nextCell = [self.tableView cellForRowAtIndexPath:newPath]; UITextField *nextField = nil; for (UIView *oneView in nextCell.contentView.subviews) { if([oneView isMemberOfClass:[UITextField class]]) nextField = (UITextField *)oneView; } [nextField becomeFirstResponder];
}
有一点需要明确,cell本身是不知道自己处在哪一行的,textFieldDone也没有indexPath参数传进来告知现在是哪一行,因此我们要另辟蹊径。令人欣慰的是,table view知道当前是哪个cell正在响应,因此我们需要先得到table view。触发textFieldDone的是textField,它的superview是contentView,contextView的superview是UITableViewCell,cell的superview是table view,好了,就这么找到table view了
UITableViewCell *cell = (UITableViewCell *)[[sender superview] superview];
UITableView *table = (UITableView *)[cell superview];
通过table view的indexPathForCell方法,可以得到indexPath,有了indexPath就可以知道当前的cell是哪一行的,最最关键的东西得到后,之后的代码就很简单了,大家应该可以很容易的理解。再次编译code,并选择一个preisdent进行编辑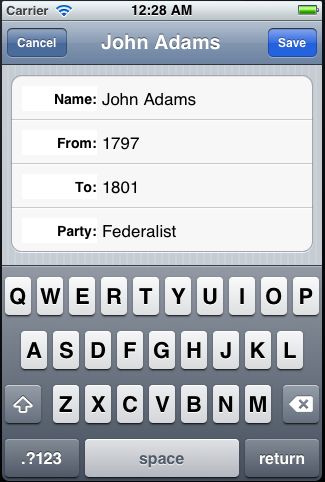
这次出现的return按钮,试着点击return按钮,光标会在4个textField之间循环跳跃,很是活泼。
好了,这个例子终于结束了,很不容易。
P.S. 做一个预告吧,之后的例子我将升级成iOS6.0来完成,xcode也将升级,望各位留意,不用新的东西更不是时代的潮流啊,必须与时俱进,谢谢大家!
