第一个JSF程序——Hello World!(maven+eclipse4)
开始做一个小的JSF程序。
主要用到的工具及软件有:
- Eclipse Java EE IDE(Version: Juno Release)
- apache-tomcat-6.0.35
- m2eclipse(1.1.0.201205300009)
- jdk1.7.0_05
helloworld主要实现用户输入名字,然后单击Say hello to按钮或回车,下面相应显示"Hello xxx!"。下面是开发的主要步骤(默认jdk、tomcat、maven等已经配置好了。):
(1)新建一个maven项目。File>New>Other>Maven>Maven Project;在弹出的对话框中勾选Create a simple project选项,其他保持默认。next。输入GroupId、AtifactId、Packaging、name等。例如GroupId:com.wsong.simples;ArtifactId:hello-world;Packaging选择war;name:helloworld。ok!Finish!
(2)现在创建的maven项目还不是一个web project,需要转换成eclipse支持的Dynamic Web Project。在hello-world项目上右击>properties>Project Facets>Convert to faceted form>勾选Dynamic Web Module。OK!可以看到项目中多了几个依赖包和一个叫WebContent的文件夹。这已经是eclipse web project的文件结构了,但还不是tomcat的文件结构。
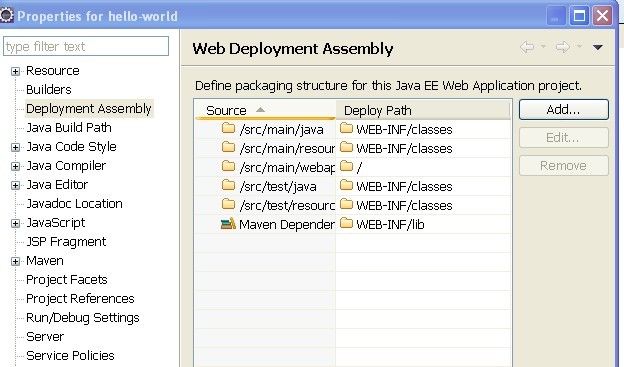
首先要改一下项目的加载路径,在项目上右击properties>Deployment Assembly,在右边删掉source 为/WebContent的一行。Add>Folder>src下面的webapp。Finish。
还有就是我们希望把将来maven管理的依赖包也加载到tomcat中,加载到tomcat哪里呢?当然是lib下。好的,继续Add>Java Build Path Entries>Maven Dependencies。Finish!我们看到Deploy Path一栏中自动填入了WEB-INF/lib。如下图所示。
好了,现在就可以删掉WebContent文件夹了。并且在webapp下面新建folder:WEB-INF。在WEB-INF中新建web.xml。在webapp中新建一个helloworld.xhtml。
现在我们就得到一个符合tomcat要求的目录结构的web project。
(3)为项目添加JSF依赖包。pom.xml如下:
<dependencies>
 <dependency>
  <groupId>org.glassfish</groupId>
  <artifactId>javax.faces</artifactId>
  <version>2.1.10</version>
 </dependency>
</dependencies>
(4)web.xml,如下:
<servlet>
 <servlet-name>Faces Servlet</servlet-name>
 <servlet-class>javax.faces.webapp.FacesServlet</servlet-class>
 <load-on-startup>1</load-on-startup>
</servlet>
<servlet-mapping>
 <servlet-name>Faces Servlet</servlet-name>
 <url-pattern>*.xhtml</url-pattern>
</servlet-mapping>
(5)src/main/java下面新建一个class。com.wsong.simples.jsf.hello.HelloWorld.java。代码如下:
package com.wsong.simples.jsf.hello;
import javax.faces.bean.ManagedBean;
import javax.faces.bean.SessionScoped;
@ManagedBean(name="hello")
@SessionScoped
public class HelloWorld implements java.io.Serializable{
    private static final long serialVersionUID = 2670923978809388476L;
    private String name; public String getName(){
        if(this.name == null){
           return "World";
        }
        return name;
    }
    public void setName(String name){
        this.name = name;
    }
}
(6)helloworld.xhtml,如下:
<!DOCTYPE html PUBLIC "-//W3C//DTD XHTML 1.0 Transitional//EN" "http://www.w3.org/TR/xhtml1/DTD/xhtml1-transitional.dtd">
<html xmlns="http://www.w3.org/1999/xhtml" xmlns:h="http://java.sun.com/jsf/html" xmlns:f="http://java.sun.com/jsf/core" xmlns:ui="http://java.sun.com/jsf/facelets">
<h:head>
 <title>Hello World</title>
 <meta http-equiv="keywords" content="enter,your,keywords,here" />
 <meta http-equiv="description" content="A short description of this page." />
 <meta http-equiv="content-type" content="text/html; charset=UTF-8" />
</h:head>
<h:body>
 <h:form id="form">
 <div style="padding: 100px 0 0 100px; font-size: 22px; font-weight: bold">
 <h:commandButton value="Say Hello To" /> <h:inputText value="#{hello.name}" /><br></br> Hello,#{hello.name}! </div> </h:form> </h:body>
</html>
至此,这个小项目就完成了,可以添加到server中运行,也可以run as>build path...>输入clean install打包运行。
