本文使用的是CXF 2.7.3版本。转贴请注明出处为ITEYE!!!!!!
1.什么是WS-N
WS-N全称是WebService Notification,属于WS-*标准中的一个。
该标准主要由IBM等提出(微软等提出的是WS-Eventing),主要用于Publish/Subscribe方式的"Notifications"或者 "Events"通知,而publish 方和 subscription方不需要事先知道对端的webservice服务地址。
WS-N有两种实现:
a.WebService base Notification : 主要用于点对点
b.WebService Broker Notification : 完整的Publish/Subscribe机制的实现,需要一个Broker
该标准已经被OASIS定为国际标准。
2.CXF对WS-N的实现
CXF号称是支持WS-N了,实际上仅仅是实现了WS-N(Broker方式,当然也支持了PullPoint这种客户端去拉消息的方式),并没有将WebService Base Notification也一并实现。
3.使用CXF WS-N进行开发
准备条件:需要一个JMS消息服务器,可以使用ActiveMQ或者JBOSS MQ(本文使用ActiveMQ)
A.启动ActiveMQ消息服务器
去ActiveMQ的bin目录,运行activemq.bat
【注意】
如果是轻量级的APP,不需要单独启动ACTIVEMQ服务。
直接在JVM里面启动消息服务器,使用vm的embed(内置)的ActiveMQJMS服务器,而且不需要持久化JMS 消息。
内置的JMS服务,有两种创建方式:
(1)使用Srping创建embed的jms broker
<bean id="broker" class="org.apache.activemq.xbean.BrokerFactoryBean">
		<property name="config"
			value="classpath:activemq/activemq.xml" />
		<property name="persistent" value="false"></property>
		<property name="start" value="true" />
		<property name="brokerName" value="test"></property>
	</bean>
再使用
activeMQConnectionFactory连接:
	<bean id="activeMQConnectionFactory" class="org.apache.activemq.ActiveMQConnectionFactory">
		<constructor-arg>
                        <!--    同一个VM内直接使用broker name连接     -->
			<value>vm://test</value>
		</constructor-arg>
	</bean>
(2)使用activeMQConnectionFactory直接进行embed jms broker创建
	<bean id="activeMQConnectionFactory" class="org.apache.activemq.ActiveMQConnectionFactory">
	    <constructor-arg>
	    	<value>vm:(broker:(tcp://localhost:19999)?persistent=false)</value>
	    </constructor-arg>
	</bean>
【注意】
如果程序中启动了多个不同名字的VM broker,那么可能会有如下警告:Failed to start jmx connector: Cannot bind to URL [rmi://localhost:1099/jmxrmi]: javax.naming.NameAlreadyBoundException…可以通过在transportOptions中追加broker.useJmx=false来禁用JMX来避免这个警告。
由于编码的问题,如果通过URL的Query方式设置多个参数的话,需要使用"&"来代替"&"
例如:
<bean id="activeMQConnectionFactory" class="org.apache.activemq.ActiveMQConnectionFactory">
<constructor-arg>
<value>vm:(broker:(tcp://localhost:19999)?persistent=false&useJmx=false)</value>
</bean>
【注意2】
如果不需要发布TCP的访问端口,甚至可以这样:
那么现在就成了彻底的内置JMS服务了,需要将ConnectionFactory注入到业务类才能访问了
<bean id="activeMQConnectionFactory" class="org.apache.activemq.ActiveMQConnectionFactory">
<constructor-arg>
<value>vm://localhost?broker.useJmx=false&broker.persistent=false</value>
</constructor-arg>
</bean>
B.配置应用与ActiveMQ消息服务器的连接
这里使用了Spring进行管理,Spring配置:
<bean id="activeMQConnectionFactory" class="org.apache.activemq.ActiveMQConnectionFactory">
		<constructor-arg>
			<value>tcp://localhost:61616</value>
		</constructor-arg>
	</bean>

	<bean id="singleConnectionFactory"
		class="org.springframework.jms.connection.SingleConnectionFactory">
		<property name="targetConnectionFactory" ref="activeMQConnectionFactory"></property>
	</bean>
C.配置Broker
配置Broker需要指定Broker的名称(构造函数第一个参数),注入ConnectionFactory(上面配置的)
还需要指定Broker地址
<bean id="notificationBroker" class="org.apache.cxf.wsn.servicesJmsNotificationBroker"
		init-method="init">
		<constructor-arg index="0" type="java.lang.String" name="name" >
			<value>WSNotificationBroker</value>
		</constructor-arg>
		<constructor-arg index="1" name="connectionFactory" >
			<ref bean="activeMQConnectionFactory"/>
		</constructor-arg>
		<property name="address"
			value="http://localhost:19800/wsn/NotificationBroker"></property>

	</bean>
D.注册Consumer
(1)需要先有一个Client端的NotificationBroker代理对象
当然您也可以在代码里面new出来(该对象的意思是代理了真正的Broker,该clientNotificationBroker的地址需要和真正的Broker发布地址一样,从而指向真正的Broker)
<bean id="clientNotificationBroker" class="org.apache.cxf.wsn.client.NotificationBroker">
    <constructor-arg index="0" type="java.lang.String" name="name" >
			<value>http://localhost:19800/wsn/NotificationBroker</value>
		</constructor-arg>
</bean>
(2)将这个对象注入到您的业务类里面
(3)发布生成一个Consumer对象,包括对应的CallBack。
Callback类:
public class TestConsumer implements Consumer.Callback {

        final List<NotificationMessageHolderType> notifications
            = new ArrayList<NotificationMessageHolderType>();

        public void notify(NotificationMessageHolderType message) {
            synchronized (notifications) {
                notifications.add(message);
                notifications.notify();
            }
        }
    }
生成Consumer
TestConsumer callback = new TestConsumer();
Consumer consumer = new Consumer(callback, "http://localhost:19800/wsn/NotificationBroker");
当然也可以采用Spring生成:
<bean id="callback" class="org.apache.cxf.wsn.client.Consumer.Callback">
</bean>

<bean id="consumer" class="org.apache.cxf.wsn.client.Consumer">
    <constructor-arg index="0"name="callback" >
	<ref bean="callback"/>
    </constructor-arg>
    <constructor-arg index="1"name="address" >
	<value>http://localhost:19100/test/consumer</value>
    </constructor-arg>
    <constructor-arg index="2"type="java.lang.Class" name="extraClasses" >
	<value>org.apache.cxf.wsn.type.CustomType</value>
    </constructor-arg>
</bean>
(4)注册Consumer
注册不建议用Spring注入,因为可能对端服务没启动,会调用失败。主要有失败中心注册的处理机制。
clientNotificationBroker.subscribe(consumer, "myTopic");
D.注册Publisher
类似上面的Consumer,我们这里只给出代码形式的注册Publser了,Spring方式参考上面的Consumer
需要注意的是,注册publisher之后返回的registration可以用来销毁注册,需要保存下来
另外真正调用Notify不是通过publisher调用,而是上文提到的Client端的Broker调用其Notify方法。
public class PublisherCallback implements Publisher.Callback {
        final CountDownLatch subscribed = new CountDownLatch(1);
        final CountDownLatch unsubscribed = new CountDownLatch(1);

        public void subscribe(TopicExpressionType topic) {
            subscribed.countDown();
        }

        public void unsubscribe(TopicExpressionType topic) {
            unsubscribed.countDown();
        }
    }
PublisherCallback publisherCallback = new PublisherCallback();
        Publisher publisher = new Publisher(publisherCallback, "http://localhost:19000/test/publisher");
        Registration registration = clientNotificationBroker.registerPublisher(publisher, "myTopic");
E.发送Notify
上文提到了一个Client Broker:
<bean id="clientNotificationBroker" class="org.apache.cxf.wsn.client.NotificationBroker"
</bean>
使用它注入到您需要发送Notify的业务类,调用:
clientNotificationBroker.notify(publisher, "myTopic", new CustomType(1, 2)
【OVER】
这样客户端就能收到Publish的消息了。
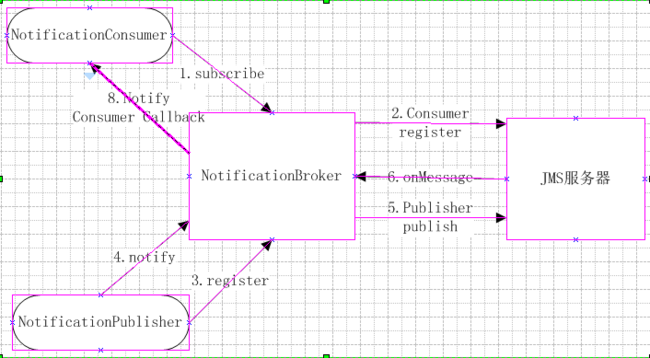
其实整体的架构是这样子的:

