Android之Map&GPS
1.题记
提起谷歌Map相信大家都不会陌生,那进入我们今天的话题,如何在Android手机上进行Google Map的开发。
2.Map应用程序的开发
2.1 准备工作
2.1.1 申请Android Map API KEY
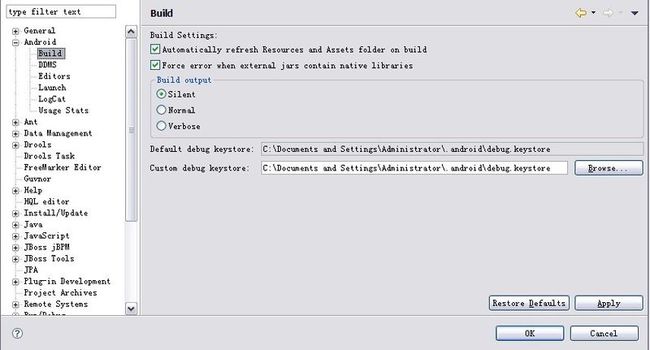
步骤一: 找到你的debug.keystore文件,在Eclipse 首选项中可以看到该文件。如下图:
步骤二:取得debug.keystore的MD5值
在命令行下进入debug.keystore文件所在的路径,执行命令:keytool -list -keystore debug.keystore,会提示输入密码,输入默认密码“android”,即可取得MD5值。
步骤三:申请Android Map的API key。
在浏览器重输入网址:http://code.google.com/intl/zh-CN/android/maps-api-signup.html,登录Google账号,输入步骤2中得到的MD5值,即可申请到API Key。记下API Key。
2.1.2 创建基于Google APIs的AVD
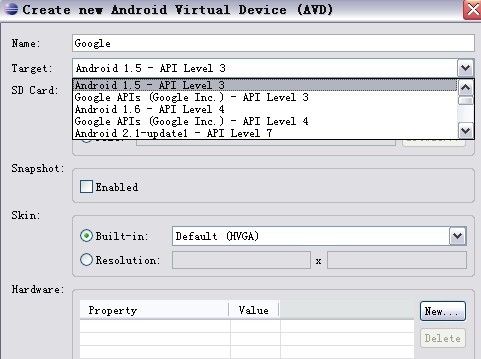
在Eclipse中打开AVD 界面,创建AVD,选择Target为Google APIs的项,如下图:
若在Target处无Google APIs选项,请自行添加maps.jar文件。
2.1.3 创建基于Google APIs的工程(略),即选择Build Target为Google APIs。
2.2 Google Map API的使用
其类均在com.google.android.maps包中,一下是该包中几个重要的类:
MapActivity用于显示Google Map的Activity类,该类为抽象类,开发时请继承该类,并实现onCreate()方法。在该类中必须创建一个MapView实例。
MapView 用户显示地图的View组件.
MapController 用于控制地图的移动、缩放等
Overlay 这是一个可显示于地图上的可绘制的对象
GeoPoint 一个包含经纬度位置的对象
2.3 实例
2.3.1 创建工程,注意选择Build Target为“Google APIs”
2.3.2 修改AndroidManifest.xml文件,增加访问网络的权限
2.3.3 创建Map View,代码如下:
<com.google.android.maps.MapView
	android:id="@+id/MapView01"
	android:layout_width="fill_parent"
	android:layout_height="fill_parent"
	android:apiKey="0u7spJisVnJZmy3X6nX1M01SirYWYgNm-EQZbhQ"/>
其中APIKEY即为之前得到的APIkey。
2.3.4 实现MapActivity,代码和讲解如下:
package com.sulang.android.map;

import java.util.List;
import android.graphics.Bitmap;
import android.graphics.BitmapFactory;
import android.graphics.Canvas;
import android.graphics.Paint;
import android.graphics.Point;
import android.os.Bundle;

import com.google.android.maps.GeoPoint;
import com.google.android.maps.MapActivity;
import com.google.android.maps.MapController;
import com.google.android.maps.MapView;
import com.google.android.maps.Overlay;


public class Activity01 extends MapActivity
{
	private MapView	 mMapView;
	private MapController mMapController;
	private GeoPoint mGeoPoint;
	/** Called when the activity is first created. */
	@Override
	public void onCreate(Bundle savedInstanceState)
	{
		super.onCreate(savedInstanceState);
		setContentView(R.layout.main);
		mMapView = (MapView) findViewById(R.id.MapView01);
		//设置为交通模式
		//mMapView.setTraffic(true);
		//设置为卫星模式
		//mMapView.setSatellite(true);
		//设置为街景模式
		mMapView.setStreetView(false);
		//取得MapController对象(控制MapView)
		mMapController = mMapView.getController();
		mMapView.setEnabled(true);
		mMapView.setClickable(true);
		//设置地图支持缩放
		mMapView.setBuiltInZoomControls(true);
		//设置起点为成都
		mGeoPoint = new GeoPoint((int) (30.659259 * 1000000), (int) (104.065762 * 1000000));
		//定位到成都
		mMapController.animateTo(mGeoPoint);
		//设置倍数(1-21)
		mMapController.setZoom(12);
		//添加Overlay,用于显示标注信息
        MyLocationOverlay myLocationOverlay = new MyLocationOverlay();
        List<Overlay> list = mMapView.getOverlays();
        list.add(myLocationOverlay);
	}
	protected boolean isRouteDisplayed()
	{
		return false;
	}
	class MyLocationOverlay extends Overlay
	{
		@Override
		public boolean draw(Canvas canvas, MapView mapView, boolean shadow, long when)
		{
			super.draw(canvas, mapView, shadow);
			Paint paint = new Paint();
			Point myScreenCoords = new Point();
			// 将经纬度转换成实际屏幕坐标
			mapView.getProjection().toPixels(mGeoPoint, myScreenCoords);
			paint.setStrokeWidth(1);
			paint.setARGB(255, 255, 0, 0);
			paint.setStyle(Paint.Style.STROKE);
			Bitmap bmp = BitmapFactory.decodeResource(getResources(), R.drawable.home);
			canvas.drawBitmap(bmp, myScreenCoords.x, myScreenCoords.y, paint);
			canvas.drawText("**广场", myScreenCoords.x, myScreenCoords.y, paint);
			return true;
		}
	}
}
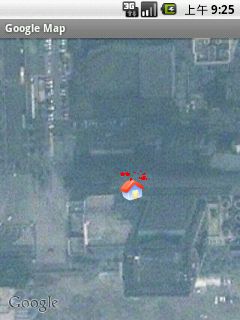
2.3.5 启动模拟器,看效果图:
至此关于Google Map的开发已完成,下面是GPS的开发。
3.GPS应用开发
3.1相关API说明
关于地理定位系统的API全部位于android.location包内,其中包括以下几个重要的功能类:
LocationManager:本类提供访问定位服务的功能,也提供了获取最佳定位提供者的功能。
LocationProvider:该类是定位提供者的抽象类。定位提供者具备周期性报告设备地理位置的功能
LocationListener:提供定位信息发生改变时的回调功能。必须事先在定位管理器中注册监听器对象。
Criteria:该类是的应用能够通过在LocationProvider中设置的属性来选择合适的定位提供者.
Geocider:用于处理地理编码和反向地理编码的类。
要使用地理定位,首先需要取得LocationManager的实例:
locationManager = (LocationManager) getSystemService(context);
取得LocationManager对象之后,还需要注册一个周期性的更新视图:
locationManager.requestLocationUpdates(provider, 3000, 0,locationListener);
其中第一个参数是设置服务提供者,第二个参数是周期。最后一个参数是用来监听定位信息的改变的。
3.2 具体实例
3.2.1 在AndroidManifest.xml文件中添加权限,代码如下:
<?xml version="1.0" encoding="utf-8"?>
<manifest xmlns:android="http://schemas.android.com/apk/res/android"
	package="com.sulang.android.map" android:versionCode="1"
	android:versionName="1.0">
	<uses-sdk android:minSdkVersion="3" />

	<application android:icon="@drawable/icon" android:label="@string/app_name">
		<uses-library android:name="com.google.android.maps" />
		<activity android:name=".Activity01" android:label="@string/app_name">
			<intent-filter>
				<action android:name="android.intent.action.MAIN" />
				<category android:name="android.intent.category.LAUNCHER" />
			</intent-filter>
		</activity>
	</application>
	<uses-permission android:name="android.permission.INTERNET" />
	<uses-permission android:name="android.permission.ACCESS_COARSE_LOCATION" />
	<uses-permission android:name="android.permission.ACCESS_FINE_LOCATION" />
</manifest>
3.2.2 给模拟器设置个默认的坐标值
启动Eclipse ,选择Window ->Show View 打开 Emulator Control 界面即可进行设置。
3.2.3 实现MapActivity
具体代码和讲解如下:
package com.sulang.android.map;

import java.io.IOException;
import java.util.List;
import java.util.Locale;

import android.content.Context;
import android.graphics.Bitmap;
import android.graphics.BitmapFactory;
import android.graphics.Canvas;
import android.graphics.Paint;
import android.graphics.Point;
import android.location.Address;
import android.location.Criteria;
import android.location.Geocoder;
import android.location.Location;
import android.location.LocationListener;
import android.location.LocationManager;
import android.os.Bundle;
import android.view.Menu;

import com.google.android.maps.GeoPoint;
import com.google.android.maps.MapActivity;
import com.google.android.maps.MapController;
import com.google.android.maps.MapView;
import com.google.android.maps.Overlay;

/*
 *@author 七里香的悔恨,2011-3-16
 *MyMapActivity.java
 *Blog:[url]http://bigboy.iteye.com/[/url]
 */
public class MyMapActivity extends MapActivity {
	public MapController mapController;
	public MyLocationOverlay myPosition;
	public MapView myMapView;
	private static final int ZOOM_IN = Menu.FIRST;
	private static final int ZOOM_OUT = Menu.FIRST + 1;

	@Override
	protected boolean isRouteDisplayed() {
		return false;
	}

	class MyLocationOverlay extends Overlay {
		Location mLocation;

		// 在更新坐标时,设置该坐标,一边画图
		public void setLocation(Location location) {
			mLocation = location;
		}

		@Override
		public boolean draw(Canvas canvas, MapView mapView, boolean shadow,
				long when) {
			super.draw(canvas, mapView, shadow);
			Paint paint = new Paint();
			Point myScreenCoords = new Point();
			// 将经纬度转换成实际屏幕坐标
			GeoPoint tmpGeoPoint = new GeoPoint(
					(int) (mLocation.getLatitude() * 1E6), (int) (mLocation
							.getLongitude() * 1E6));
			mapView.getProjection().toPixels(tmpGeoPoint, myScreenCoords);
			paint.setStrokeWidth(1);
			paint.setARGB(255, 255, 0, 0);
			paint.setStyle(Paint.Style.STROKE);
			Bitmap bmp = BitmapFactory.decodeResource(getResources(),
					R.drawable.home);
			canvas.drawBitmap(bmp, myScreenCoords.x, myScreenCoords.y, paint);
			canvas.drawText("Here am I", myScreenCoords.x, myScreenCoords.y,
					paint);
			return true;

		}

	}

	@Override
	protected void onCreate(Bundle savedInstanceState) {
		super.onCreate(savedInstanceState);
		setContentView(R.layout.main);
		// 取得LocationManager实例
		LocationManager locationManager;
		String context = Context.LOCATION_SERVICE;
		locationManager = (LocationManager) getSystemService(context);
		myMapView = (MapView) findViewById(R.id.MapView01);
		// 取得MapController实例,控制地图
		mapController = myMapView.getController();
		myMapView.setEnabled(true);
		myMapView.setClickable(true);
		// 设置显示模式
		myMapView.setSatellite(true);
		myMapView.setStreetView(true);
		// 设置缩放控制
		myMapView.setBuiltInZoomControls(true);
		myMapView.displayZoomControls(true);
		// 设置使用MyLocationOverlay来绘图
		mapController.setZoom(17);
		myPosition = new MyLocationOverlay();
		List<Overlay> overlays = myMapView.getOverlays();
		overlays.add(myPosition);
		// 设置Criteria(服务商)的信息
		Criteria criteria = new Criteria();
		// 经度要求
		criteria.setAccuracy(Criteria.ACCURACY_FINE);
		criteria.setAltitudeRequired(false);
		criteria.setBearingRequired(false);
		criteria.setCostAllowed(false);
		criteria.setPowerRequirement(Criteria.POWER_LOW);
		// 取得效果最好的criteria
		String provider = locationManager.getBestProvider(criteria, true);
		// 得到坐标相关的信息
		Location location = locationManager.getLastKnownLocation(provider);
		// 更新坐标
		updateWithNewLocation(location);
		// 注册一个周期性的更新,3000ms更新一次
		// locationListener用来监听定位信息的改变
		locationManager.requestLocationUpdates(provider, 3000, 0,
				locationListener);

	}

	private void updateWithNewLocation(Location location) {
		String latLongString;

		String addressString = "没有找到地址\n";

		if (location != null) {
			// 为绘制标志的类设置坐标
			myPosition.setLocation(location);
			// 取得经度和纬度
			Double geoLat = location.getLatitude() * 1E6;
			Double geoLng = location.getLongitude() * 1E6;
			// 将其转换为int型
			GeoPoint point = new GeoPoint(geoLat.intValue(), geoLng.intValue());
			// 定位到指定坐标
			mapController.animateTo(point);
			double lat = location.getLatitude();
			double lng = location.getLongitude();
			latLongString = "经度:" + lat + "\n纬度:" + lng;

			double latitude = location.getLatitude();
			double longitude = location.getLongitude();
			// 更具地理环境来确定编码
			Geocoder gc = new Geocoder(this, Locale.getDefault());
			try {
				// 取得地址相关的一些信息\经度、纬度
				List<Address> addresses = gc.getFromLocation(latitude,
						longitude, 1);
				StringBuilder sb = new StringBuilder();
				if (addresses.size() > 0) {
					Address address = addresses.get(0);
					for (int i = 0; i < address.getMaxAddressLineIndex(); i++)
						sb.append(address.getAddressLine(i)).append("\n");

					sb.append(address.getLocality()).append("\n");
					sb.append(address.getPostalCode()).append("\n");
					sb.append(address.getCountryName());
					addressString = sb.toString();
				}
			} catch (IOException e) {
			}
		} else {
			latLongString = "没有找到坐标.\n";
		}
		// 显示
		// myLocationText.setText("你当前的坐标如下:\n"+latLongString+"\n"+addressString);
	}

	private final LocationListener locationListener = new LocationListener() {
		// 当坐标改变时触发此函数
		public void onLocationChanged(Location location) {
			updateWithNewLocation(location);
		}

		// Provider被disable时触发此函数,比如GPS被关闭
		public void onProviderDisabled(String provider) {
			updateWithNewLocation(null);
		}

		// Provider被enable时触发此函数,比如GPS被打开
		public void onProviderEnabled(String provider) {
		}

		// Provider的转态在可用、暂时不可用和无服务三个状态直接切换时触发此函数
		public void onStatusChanged(String provider, int status, Bundle extras) {
		}
	};
}
至此 GPS 应用开发完毕。
源代码


