android 位置包..............
android.location 包提供了一些工具来实现基于位置的服务。主要包括 Geocoder 类和LocationManager服务。首先介绍 Geocoder。
1.使用Android进行地理编码
如果打算使用地图做一些实际的事情,可能必须将地址(或位置)转换为纬度/经度对。此概念称为地理编码,android.location.Geocoder 类提供了此功能。实际上,Geocoder既提供了前向转换,也提供了后向转换--------它可以获取地址并返回经度/纬度,也可以将经度/纬度对转换为一组地址。该类提供了以下方法。
List<Address>  getFromLocation(double latitude,double longitude,int maxResults);
List<Address> getFromLocationName(String locationName, int maxResults, double lowerLeftLatitude, double lowerLeftLongitue, double upperRightLatitude, double upperRightLongitude);
List<Address>  getFromLocationName(String locationName, int maxResults)。
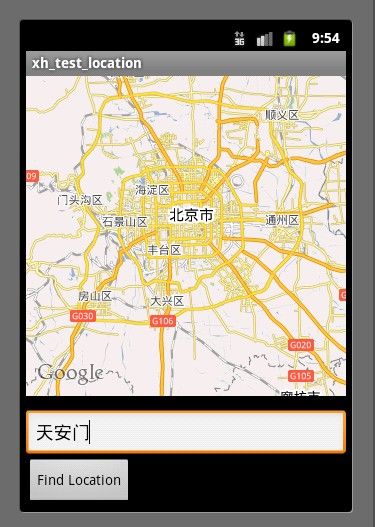
事实证明,计算地址并不完全属于科学范畴,因为可以通过各种方式来描述位置。例如,getFromLocationName() 方法可以获得地方的名称、物理地址和机场编号,或者该位置的流行名称。因此,这些方法提供了一个地址列表,而不是一个地址。因为这些方法返回一个列表,所以最好提供1~5的maxResults 值来限制结果集,下面我们来看一个查询地址的例子,和原来一样我们得自己定义一个类来继承MapActivity,先来看看运行效果。

我们的布局文件
<?xml version="1.0" encoding="utf-8"?>
<RelativeLayout xmlns:android="http://schemas.android.com/apk/res/android"
    android:orientation="vertical"
    android:layout_width="fill_parent"
    android:layout_height="fill_parent"
    >
    <LinearLayout android:layout_width="fill_parent"
    	android:layout_alignParentBottom="true"
    	android:layout_height="wrap_content" android:orientation="vertical">
		<EditText
			android:id="@+id/location"
			android:layout_width="fill_parent"
			android:layout_height="wrap_content"
			android:text="请输入地址..."/>
		<Button
			android:id="@+id/geocodeBtn"
			android:layout_width="wrap_content"
			android:layout_height="wrap_content"
			android:text="Find Location" />
    </LinearLayout>


    	<com.google.android.maps.MapView
	        android:id="@+id/geoMap"
	    	android:clickable="true"
	    	android:layout_width="fill_parent"
	    	android:layout_height="320px"
	        android:apiKey="0XemFEdFemEDqY3dE3Ko9ELJX12MRLjJGKEJ01g"
                 />

</RelativeLayout>
AndroidManifest.xml文件
<?xml version="1.0" encoding="utf-8"?>
<manifest xmlns:android="http://schemas.android.com/apk/res/android"
	package="xiaohang.zhimeng" android:versionCode="1" android:versionName="1.0">
	<uses-sdk android:minSdkVersion="10" />
	<application android:icon="@drawable/icon" android:label="@string/app_name">
		<uses-library android:name="com.google.android.maps" />
		<activity android:name=".MainActivity" android:label="@string/app_name">
			<intent-filter>
				<action android:name="android.intent.action.MAIN" />
				<category android:name="android.intent.category.LAUNCHER" />
			</intent-filter>
		</activity>
	</application>
	<uses-permission android:name="android.permission.ACCESS_FINE_LOCATION" />
	<uses-permission android:name="android.permission.ACCESS_COARSE_LOCATION" />
	<uses-permission android:name="android.permission.INTERNET" />
</manifest>
我们的MainActivity类
package xiaohang.zhimeng;

import java.util.List;

import com.google.android.maps.GeoPoint;
import com.google.android.maps.MapActivity;
import com.google.android.maps.MapView;
import android.location.Address;
import android.location.Geocoder;
import android.os.Bundle;
import android.view.View;
import android.view.View.OnClickListener;
import android.widget.Button;
import android.widget.EditText;

public class MainActivity extends MapActivity {

	Geocoder geocoder = null;
	MapView mapView = null;

	@Override
	protected boolean isLocationDisplayed() {
		return false;
	}

	@Override
	protected boolean isRouteDisplayed() {
		return false;
	}

	@Override
	public void onCreate(Bundle savedInstanceState) {
		super.onCreate(savedInstanceState);
		setContentView(R.layout.main);
		mapView = (MapView) findViewById(R.id.geoMap);
		mapView.setBuiltInZoomControls(true);
		// 经度:116.3946533203125
		// 纬度:39.87601941962116
		int lat = (int) (39.87601941962116 * 1E6);
		int lng = (int) (116.3946533203125 * 1E6);
		GeoPoint pt = new GeoPoint(lat, lng);
		mapView.getController().setZoom(10);
		mapView.getController().setCenter(pt);

		Button geoBtn = (Button) findViewById(R.id.geocodeBtn);

		geocoder = new Geocoder(this);

		geoBtn.setOnClickListener(new OnClickListener() {
			@Override
			public void onClick(View v) {
				try {
					EditText loc = (EditText) findViewById(R.id.location);
					String locationName = loc.getText().toString();

					List<Address> addressList = geocoder.getFromLocationName(
							locationName, 5);
					if (addressList != null && addressList.size() > 0) {
						int lat = (int) (addressList.get(0).getLatitude() * 1E6);
						int lng = (int) (addressList.get(0).getLongitude() * 1E6);

						GeoPoint pt = new GeoPoint(lat, lng);
						mapView.getController().setZoom(15);
						mapView.getController().setCenter(pt);
					}
				} catch (Exception e) {
					e.printStackTrace();
				}
			}
		});
	}
}
但是如果这个类要是这么写,就会有问题了。但是感觉这么写是没错误的,但是每当你点击一次Find Location按钮就会出现一次异常(IOException),异常见下图。

说什么服务不可以用,去网上一搜 遇见这问题的人还真不少,eoe上边也有 但是没说怎么解决,不了了之了。至于为什么有这个异常,我也不能准确的告诉大家 我也不太清楚,网上说什么的都有。 什么 是bug之类的 等等,大家可以去网上搜搜 最后自己这样写一次试试。但是解决方法还是有的,在这里 http://code.google.com/p/android/issues/detail?id=8816 老外搞出来的方法,他们讨论的也很火热,感觉比我们 积极很多。大家看 21楼就行了, 呵呵。
具体解决方法就是自己定义了两个静态方法,我把这两个方法放到了MapUtility类中,这个类是我自己定义的。
MapUtility类
package xiaohang.zhimeng.tool;

import java.io.IOException;
import java.io.InputStream;
import org.apache.http.HttpEntity;
import org.apache.http.HttpResponse;
import org.apache.http.client.ClientProtocolException;
import org.apache.http.client.HttpClient;
import org.apache.http.client.methods.HttpGet;
import org.apache.http.impl.client.DefaultHttpClient;
import org.json.JSONArray;
import org.json.JSONException;
import org.json.JSONObject;

import com.google.android.maps.GeoPoint;

public class MapUtility {
	public static JSONObject getLocationInfo(String address) {

		HttpGet httpGet = new HttpGet("http://maps.google."
				+ "com/maps/api/geocode/json?address=" + address
				+ "ka&sensor=false");
		HttpClient client = new DefaultHttpClient();
		HttpResponse response;
		StringBuilder stringBuilder = new StringBuilder();

		try {
			response = client.execute(httpGet);
			HttpEntity entity = response.getEntity();
			InputStream stream = entity.getContent();
			int b;
			while ((b = stream.read()) != -1) {
				stringBuilder.append((char) b);
			}
		} catch (ClientProtocolException e) {
		} catch (IOException e) {
		}

		JSONObject jsonObject = new JSONObject();
		try {
			jsonObject = new JSONObject(stringBuilder.toString());
		} catch (JSONException e) {
			e.printStackTrace();
		}

		return jsonObject;
	}

	// After executing this, another method converts that JSONObject into a
	// GeoPoint.

	public static GeoPoint getGeoPoint(JSONObject jsonObject) {

		Double lon = new Double(0);
		Double lat = new Double(0);

		try {

			lon = ((JSONArray) jsonObject.get("results")).getJSONObject(0)
					.getJSONObject("geometry").getJSONObject("location")
					.getDouble("lng");

			lat = ((JSONArray) jsonObject.get("results")).getJSONObject(0)
					.getJSONObject("geometry").getJSONObject("location")
					.getDouble("lat");

		} catch (JSONException e) {
			e.printStackTrace();
		}
		return new GeoPoint((int) (lat * 1E6), (int) (lon * 1E6));
	}

}
这两个方法就不多解释了,反正我们最终的目的是需要一个GeoPoint对象,它给我们返回正确的GeoPoint对象就行了,大家可以去原地址去看看他们怎么讨论了,链接在上边我已经贴出来了,现在我们在搜索tian an men 就会把tian an men给我们显示在地图的中央了,没修改之前是 一点 一次异常,现在的效果如下图,( 大家知道 tian an men是啥意思吧,自动eye被 oracle搞过一次 法律意识越来越强啊。。。。

要体验地理编码在Android中的使用,可以在 EditText字段中键入位置名称或它的地址,然后点击 Find Location按钮。要找到某个位置的地址,调用 Geocoder的 getFromLocationName()方法。位置可以是地址或流行名称,比如 “故宫”。地理编码是一项实时操作,所以根据Android文档的建议,我们建议将结果限制为5个。对getFromLocationName()的调用返回一个地址列表。示例程序获取该地址列表并处理第一个地址(如果存在)。每个地址都具有经纬度。可以使用它来创建 GeoPoint。然后调用地图控制器并导航到该点。缩放级别可以设置为1~21 (包括1和21)的整数。在从1向21移动时,缩放级别每次将增加两级。
对于地理编码,应该了解几点。第一,返回的地址并不总是准确的地址。显然,由于返回的地址列表取决于输入的准确度,所以需要尽量向 Geocoder 提供准确的位置名称。第二,尽量将 maxResults 设置为1~5的值。最后,应该认真考虑在不同于UI线程的线程中执行地理编码操作。这有两个原因。第一个很明显:这项操作很耗时,而且你一定不希望UI在进行地理编码时停顿,如果停顿会阻塞整个用户界面。当在执行一些耗时的操作的时候,不能及时地分发 事件,包括用户界面重绘事件。从用户的角度来看,应用程序看上去像挂掉了。更糟糕的是,如果阻塞应用程序的时间过长(5秒钟)Android会向用户提示 一些信息,即打开一个“应用程序没有相应(application not responding)”ANR 的对话框,关于线程的更多内容请大家看这里 http://byandby.iteye.com/blog/825071 第二个原因是,对于移动设备,始终需要假设网络连接可能丢失并且连接很弱。因此,需要恰当地处理I/O 异常和超时。计算出地址以后,就可以将结果发送给UI线程,下面我们看看使用后台线程进行地理编码,这个例子和上一个例子一样 唯一不同的就是 这个例子把查询地址的操作放到 另外一个辅助线程里来执行了,上一个是所有的操作都在UI线程里,下面是我们的Activity类,GeocodingDemoActivity,我们看看怎么实现。。。
GeocodingDemoActivity类
package xiaohang.zhimeng;

import java.util.List;
import org.json.JSONObject;
import xiaohang.zhimeng.tools.MapUtility;
import android.app.AlertDialog;
import android.app.Dialog;
import android.app.ProgressDialog;
import android.location.Address;
import android.location.Geocoder;
import android.os.Bundle;
import android.os.Handler;
import android.os.Message;
import android.view.View;
import android.view.View.OnClickListener;
import android.widget.Button;
import android.widget.EditText;
import com.google.android.maps.GeoPoint;
import com.google.android.maps.MapActivity;
import com.google.android.maps.MapView;

public class GeocodingDemoActivity extends MapActivity {

	Geocoder geocoder = null;
	MapView mapView = null;
	ProgressDialog progDialog = null;
	List<Address> addressList = null;

	@Override
	protected boolean isLocationDisplayed() {
		return false;
	}

	@Override
	protected boolean isRouteDisplayed() {
		return false;
	}

	@Override
	protected void onCreate(Bundle icicle) {
		super.onCreate(icicle);
		setContentView(R.layout.main);
		mapView = (MapView) findViewById(R.id.geoMap);
		mapView.setBuiltInZoomControls(true);
		// 北京经纬度
		// 经度:116.3946533203125
		// 纬度:39.87601941962116
		int lat = (int) (39.87601941962116 * 1000000);
		int lng = (int) (116.3946533203125 * 1000000);
		GeoPoint pt = new GeoPoint(lat, lng);
		mapView.getController().setZoom(10);
		mapView.getController().setCenter(pt);

		Button geoBtn = (Button) findViewById(R.id.geocodeBtn);
		geoBtn.setOnClickListener(new OnClickListener() {
			@Override
			public void onClick(View v) {
				EditText loc = (EditText) findViewById(R.id.location);
				String locationName = loc.getText().toString();
				progDialog = ProgressDialog.show(GeocodingDemoActivity.this,
						"Processing.....", "Finding Location", true, false);
				findLocation(locationName);

			}
		});
	}

	private void findLocation(final String locationName) {

		Thread thrd = new Thread() {
			@Override
			public void run() {
				System.out.println("线程Name是:"
						+ Thread.currentThread().getName());
				try {
					// do backgrond work
					JSONObject jo = MapUtility.getLocationInfo(locationName);
					GeoPoint gp = MapUtility.getGeoPoint(jo);
					Message message = uiCallback.obtainMessage();
					message.obj = gp;
					message.sendToTarget();
				} catch (Exception e) {
					e.printStackTrace();
				}
			}
		};
		thrd.start();
	}

	// ui thread callback handler
	private Handler uiCallback = new Handler() {
		public void handleMessage(android.os.Message msg) {
			System.out.println("线程Name是:" + Thread.currentThread().getName());
			progDialog.dismiss();
			GeoPoint pt = (GeoPoint) msg.obj;
			if (pt != null) {
				mapView.getController().setZoom(15);
				mapView.getController().setCenter(pt);
			} else {
				Dialog foundNothingDlg = new AlertDialog.Builder(
						GeocodingDemoActivity.this).setIcon(0)
						.setTitle("Failed to Find Location")
						.setPositiveButton("OK", null)
						.setMessage("Location Not Found").create();
				foundNothingDlg.show();
			}
		};
	};
}
这次我们再来看看运行效果。


从下图我们能看出 查询操作在不同的线程中完成。

最后在提醒大家如果下载源码 注意替换成自己的 密钥。
源码已上传