Spring3MVC和JDBC的集成
在以前的教程中我们并没有进行数据库连接操作.
一个没有进行数据库操作的web项目几乎是不存在的.
所以数据库连接也是一个很重要的知识点.
而在本教程中,我们会用SpringMVC+JDBC实现一个简单的数据库访问.
并对Person对象进行简单的CRUD操作.
我们将使用MySql数据库.
相应的也可以用于DB2,oracle,SqlServer,HyperSQL等数据库.
JDBC是什么?
JDBC(Java Data Base Connectivity,java数据库连接)是一种用于执行SQL语句的Java API,可以为多种关系数据库提供统一访问,它由一组用Java语言编写的类和接口组成。JDBC提供了一种基准,据此可以构建更高级的工具和接口,使数据库开发人员能够编写数据库应用程序,同时,JDBC也是个商标名。
MySql是什么?
MySQL由于性能高、成本低、可靠性好,已经成为最流行的开源数据库,被广泛地应用在Internet上的中小型网站中。随着MySQL的不断成熟,它也逐渐用于更多大规模网站和应用,比如维基百科、Google和Facebook等网站。非常流行的开源软件组合LAMP中的“M”指的就是MySQL。
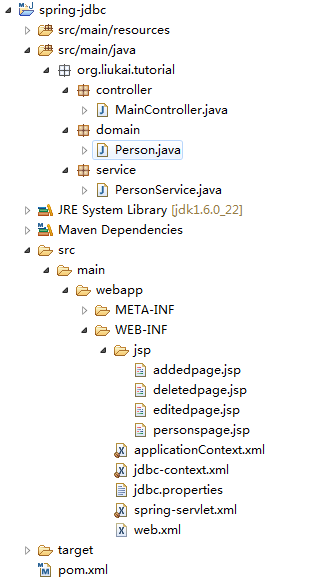
下面是我们的应用程序文件夹结构:

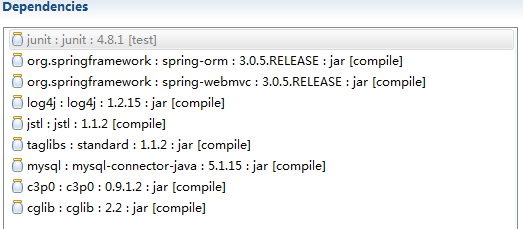
然后是pom.xml里添加的jar包:

创建一张MySql表.
注意数据库是 spring3db.
首先添加Spring MVC所必须的配置.
web.xml
在web.xml中我们定义servlet:spring.
按照惯例,我们必须声明一个spring-servle.xml
spring-servle.xml
这个XML配置声明一个视图解析器.在控制器中会根据JSP名映射到/ WEB-INF/jsp中相应的位置.
要进行数据库操作,一定需要一个数据库连接的配置.
jdbc.properties
注:以后所有的教程所用到的数据库统一为spring3db
jdbc-context.xml
该文件主要配置了:
1.启用了事务管理
2.声明了一个数据源
我们将使用连接池(Connection pool)对数据库进行管理.
JDBC连接通常是通过一个连接池(Connection pool)管理,而不是直接driver.
连接池包括BoneCP,C3P0的和DBCP.
连接池(Connection pool)是什么东西?
由于创建一个数据库连接比较耗费资源,因此对于一个项目来讲,从使用人数来看,先初始化一部分连接,放在连接池中,有用户过来直接拿来使用.如果全部用完了的话,就新创建连接.当用户从连接池中取出的连接用完以后,自动返回连接池等下个用户来用.
下面是所有开源的Connection Pools
Open Source Database Connection Pools
网上对于BoneCP,C3P0的和DBCP这3种连接池效率有很多的评测.结果各不相同.
但是Spring和Hibernate官方推荐使用c3p0,(据了解JavaEye也是用的c3p0)肯定有其性能上的优点.
所以我们也使用c3p0
关于c3p0的详细信息可以参考: HowTo configure the C3P0 connection pool
然后创建一个applicationContext.xml.
applicationContext.xml.
定义一个Person对象.
Person.java
由于我们要实现对Person 的CRUD操作.
需要定义一个service来实现对Person进行操作的方法.
PersonService.java
我们在PersonService实现了一个简单的CRUD.主要对应了下面几种方法.
getAll
add
delete
edit
注意:我们是通过一个 SimpleJdbcTemplate实例来进行数据库的操作的.
什么是JdbcTemplate?
JdbcTemplate类是在JDBC核心包的核心类。 它处理的创建和释放资源,它可以帮助您避免如忘记关闭连接常见的错误。 它执行核心的JDBC工作流,如语句创建和执行基本任务,让应用程序代码提供SQL和提取结果。 JdbcTemplate类执行SQL查询,更新语句和存储过程调用,执行过的ResultSets和返回的参数值的提取迭代。 它还捕捉JDBC异常并将它们转换为通用的,更丰富,层次结构异常org.springframework.dao包定义。
来源: Spring3官方文档
什么是SimpleJdbcTemplate?
来源: Spring3官方文档
换句通俗点的话就是SimpleJdbcTemplate是JdbcTemplate的加强版.
值得注意的是:
我们的教程中使用的是Spring官方文档中的最佳实践.而实际工作中为了编码的效率和代码的整洁.
我们可以使用SimpleJdbcTemplate自带的其他方法.
比如PersonService中的getAll方法采用的是Spring推荐的最佳实践.
我们也可以用BeanPropertyRowMapper来达到检索所有的Person的功能,并且代码更少.
但是要注意BeanPropertyRowMapper的使用条件.返回的对象必须和数据库里的字段相同(可以忽略带"_"和大写的字段).
然后是Controller
MainController.java
该Controller包含了4个映射.
每个映射调用一个PersonService.当调用成功后则会跳转到指定的JSP页面
addedpage.jsp

editedpage.jsp

deletedpage.jsp

personspage.jsp

我们的应用程序已经完成了
进入主页输入: http://localhost:8080/spring-jdbc/main/persons
新增一Person: http://localhost:8080/spring-jdbc/main/persons/add?firstname=John&lastname=Smith&money=1000
删除一Person: http://localhost:8080/spring-jdbc/main/persons/delete?id=1
修改一Person: http://localhost:8080/spring-jdbc/main//persons/edit?id=1&firstname=Johnny&lastname=Smith&money=2000
总结
这样我们完成了预定的目标:成功的连接了数据库并通过使用SpringMVC和JDBC实现了一个简单的CRUD操作;
我们了解了什么是JdbcTemplate以及如何使用SimpleJdbcTemplate对数据库进行操作.
而spring3MVC自带的SimpleJdbcTemplate能够很好的封装JDBC.数据库操作方便.
和Hibernate的HQL不同.因为是直接用原生态的sql进行查询.所以能够对sql语句进行拼接.
十分的灵活.这点是HQL所不能比拟的.
BTW:附件为本次教程源码.你可以下载后直接在tomcat或其他web服务器启动.也可以自行添加
maven插件启动.
一个没有进行数据库操作的web项目几乎是不存在的.
所以数据库连接也是一个很重要的知识点.
而在本教程中,我们会用SpringMVC+JDBC实现一个简单的数据库访问.
并对Person对象进行简单的CRUD操作.
我们将使用MySql数据库.
相应的也可以用于DB2,oracle,SqlServer,HyperSQL等数据库.
JDBC是什么?
引用
JDBC(Java Data Base Connectivity,java数据库连接)是一种用于执行SQL语句的Java API,可以为多种关系数据库提供统一访问,它由一组用Java语言编写的类和接口组成。JDBC提供了一种基准,据此可以构建更高级的工具和接口,使数据库开发人员能够编写数据库应用程序,同时,JDBC也是个商标名。
MySql是什么?
引用
MySQL由于性能高、成本低、可靠性好,已经成为最流行的开源数据库,被广泛地应用在Internet上的中小型网站中。随着MySQL的不断成熟,它也逐渐用于更多大规模网站和应用,比如维基百科、Google和Facebook等网站。非常流行的开源软件组合LAMP中的“M”指的就是MySQL。
下面是我们的应用程序文件夹结构:

然后是pom.xml里添加的jar包:

创建一张MySql表.
注意数据库是 spring3db.
DROP TABLE IF EXISTS `person`;

CREATE TABLE `person` (
  `ID` int(11) unsigned NOT NULL AUTO_INCREMENT,
  `FIRST_NAME` varchar(255) DEFAULT NULL,
  `LAST_NAME` varchar(255) DEFAULT NULL,
  `MONEY` double DEFAULT NULL,
  PRIMARY KEY (`ID`)
) ENGINE=InnoDB AUTO_INCREMENT=4 DEFAULT CHARSET=utf8;
首先添加Spring MVC所必须的配置.
web.xml
<?xml version="1.0" encoding="UTF-8"?>
<web-app id="WebApp_ID" version="2.4"
	xmlns="http://java.sun.com/xml/ns/j2ee"
	xmlns:xsi="http://www.w3.org/2001/XMLSchema-instance"
	xsi:schemaLocation="http://java.sun.com/xml/ns/j2ee
	http://java.sun.com/xml/ns/j2ee/web-app_2_4.xsd">

	<servlet>
		<servlet-name>spring</servlet-name>
		<servlet-class>org.springframework.web.servlet.DispatcherServlet</servlet-class>
		<load-on-startup>1</load-on-startup>
	</servlet>

	<servlet-mapping>
		<servlet-name>spring</servlet-name>
		<url-pattern>/</url-pattern>
	</servlet-mapping>

	<listener>
		<listener-class>org.springframework.web.context.ContextLoaderListener</listener-class>
	</listener>

</web-app>
在web.xml中我们定义servlet:spring.
按照惯例,我们必须声明一个spring-servle.xml
spring-servle.xml
<?xml version="1.0" encoding="UTF-8"?>
<beans xmlns="http://www.springframework.org/schema/beans"
	xmlns:xsi="http://www.w3.org/2001/XMLSchema-instance" xmlns:p="http://www.springframework.org/schema/p"
	xsi:schemaLocation="http://www.springframework.org/schema/beans
	   		http://www.springframework.org/schema/beans/spring-beans-3.0.xsd">

	<!-- 定义一个视图解析器 -->
	<bean id="viewResolver"
		class="org.springframework.web.servlet.view.InternalResourceViewResolver"
		p:prefix="/WEB-INF/jsp/" p:suffix=".jsp" />

</beans>
这个XML配置声明一个视图解析器.在控制器中会根据JSP名映射到/ WEB-INF/jsp中相应的位置.
要进行数据库操作,一定需要一个数据库连接的配置.
jdbc.properties
# database properties
#spring3db is databaseName.
app.jdbc.driverClassName=com.mysql.jdbc.Driver
app.jdbc.url=jdbc:mysql://localhost/spring3db
app.jdbc.username=root
app.jdbc.password=root
注:以后所有的教程所用到的数据库统一为spring3db
jdbc-context.xml
<?xml version="1.0" encoding="UTF-8"?>
<beans 	xmlns="http://www.springframework.org/schema/beans"
       	xmlns:xsi="http://www.w3.org/2001/XMLSchema-instance"
       	xmlns:p="http://www.springframework.org/schema/p"
       	xmlns:tx="http://www.springframework.org/schema/tx"
       	xmlns:context="http://www.springframework.org/schema/context"
       	xsi:schemaLocation="
			http://www.springframework.org/schema/beans
			http://www.springframework.org/schema/beans/spring-beans-3.0.xsd
			http://www.springframework.org/schema/tx
			http://www.springframework.org/schema/tx/spring-tx-3.0.xsd
			http://www.springframework.org/schema/context
			http://www.springframework.org/schema/context/spring-context-3.0.xsd
	   		">
	<!-- 定义jdbc配置信息路径 -->
	<context:property-placeholder location="/WEB-INF/jdbc.properties" />

   	<!-- 使用annotation定义事务 -->
	<tx:annotation-driven transaction-manager="transactionManager" />

	<!-- 数据源配置,使用c3p0数据库连接池 -->
	<bean id="dataSource" class="com.mchange.v2.c3p0.ComboPooledDataSource"
				destroy-method="close"
				p:driverClass="${app.jdbc.driverClassName}"
				p:jdbcUrl="${app.jdbc.url}"
				p:user="${app.jdbc.username}"
				p:password="${app.jdbc.password}"
				p:acquireIncrement="5"
				p:idleConnectionTestPeriod="60"
				p:maxPoolSize="100"
				p:maxStatements="50"
				p:minPoolSize="10" />

	<!-- 定义事务管理 -->
	<!-- See http://static.springsource.org/spring/docs/3.0.x/spring-framework-reference/html/transaction.html -->
	<bean id="transactionManager" class="org.springframework.jdbc.datasource.DataSourceTransactionManager"
       			p:dataSource-ref="dataSource" />

</beans>
该文件主要配置了:
1.启用了事务管理
2.声明了一个数据源
我们将使用连接池(Connection pool)对数据库进行管理.
JDBC连接通常是通过一个连接池(Connection pool)管理,而不是直接driver.
连接池包括BoneCP,C3P0的和DBCP.
连接池(Connection pool)是什么东西?
引用
由于创建一个数据库连接比较耗费资源,因此对于一个项目来讲,从使用人数来看,先初始化一部分连接,放在连接池中,有用户过来直接拿来使用.如果全部用完了的话,就新创建连接.当用户从连接池中取出的连接用完以后,自动返回连接池等下个用户来用.
下面是所有开源的Connection Pools
Open Source Database Connection Pools
网上对于BoneCP,C3P0的和DBCP这3种连接池效率有很多的评测.结果各不相同.
但是Spring和Hibernate官方推荐使用c3p0,(据了解JavaEye也是用的c3p0)肯定有其性能上的优点.
所以我们也使用c3p0
关于c3p0的详细信息可以参考: HowTo configure the C3P0 connection pool
然后创建一个applicationContext.xml.
applicationContext.xml.
<?xml version="1.0" encoding="UTF-8"?>
<beans xmlns="http://www.springframework.org/schema/beans"
	xmlns:xsi="http://www.w3.org/2001/XMLSchema-instance"
	xmlns:context="http://www.springframework.org/schema/context"
	xmlns:mvc="http://www.springframework.org/schema/mvc"
	xsi:schemaLocation="http://www.springframework.org/schema/beans
	   		http://www.springframework.org/schema/beans/spring-beans-3.0.xsd
	   		http://www.springframework.org/schema/context
	   		http://www.springframework.org/schema/context/spring-context-3.0.xsd
			http://www.springframework.org/schema/mvc
			http://www.springframework.org/schema/mvc/spring-mvc-3.0.xsd">

	<!-- 激活spring的注解. -->
	<context:annotation-config />

	<!-- 扫描注解组件并且自动的注入spring beans中.
	例如,他会扫描@Controller 和@Service下的文件.所以确保此base-package设置正确. -->
	<context:component-scan base-package="org.liukai.tutorial" />

	<!-- 配置注解驱动的Spring MVC Controller 的编程模型.注:次标签只在 Servlet MVC工作! -->
	<mvc:annotation-driven />

	<!-- 导入jdbc的配置文件 -->
	<import resource="jdbc-context.xml" />

</beans>
定义一个Person对象.
Person.java
package org.liukai.tutorial.domain;

import java.io.Serializable;

public class Person implements Serializable {

	private static final long serialVersionUID = -6463052236469808931L;

	private Integer id;
	private String firstName;
	private String lastName;
	private Double money;

	// setter/getter..

}
由于我们要实现对Person 的CRUD操作.
需要定义一个service来实现对Person进行操作的方法.
PersonService.java
package org.liukai.tutorial.service;

import java.sql.ResultSet;
import java.sql.SQLException;
import java.util.HashMap;
import java.util.List;
import java.util.Map;

import javax.annotation.Resource;
import javax.sql.DataSource;

import org.apache.log4j.Logger;
import org.liukai.tutorial.domain.Person;
import org.springframework.jdbc.core.RowMapper;
import org.springframework.jdbc.core.simple.SimpleJdbcTemplate;
import org.springframework.stereotype.Service;
import org.springframework.transaction.annotation.Transactional;


/**
 * Service for processing Persons.
 * <p>
 * 关于Spring JDBC 和 JdbcTemplate
 * see http://static.springsource.org/spring/docs/3.0.x/spring-framework-reference/html/jdbc.html
 * <p>
 * 关于transactions, see http://static.springsource.org/spring/docs/3.0.x/spring-framework-reference/html/transaction.html
 */

@Service("personService")
@Transactional
public class PersonService {

	protected static Logger logger = Logger.getLogger("service");

private SimpleJdbcTemplate jdbcTemplate;

	@Resource(name="dataSource")
	public void setDataSource(DataSource dataSource) {
	    this.jdbcTemplate = new SimpleJdbcTemplate(dataSource);
	}

	/**
	 *检索所有的Person
	 */
	public List<Person> getAll() {
		logger.debug("Retrieving all persons");

		String sql = "select id, first_name, last_name, money from person";

		// Maps a SQL result to a Java object
		RowMapper<Person> mapper = new RowMapper<Person>() {
	        public Person mapRow(ResultSet rs, int rowNum) throws SQLException {
	        	Person person = new Person();
	        	person.setId(rs.getInt("id"));
	        	person.setFirstName(rs.getString("first_name"));
	        	person.setLastName(rs.getString("last_name"));
	        	person.setMoney(rs.getDouble("money"));
	            return person;
	        }
	    };

		return jdbcTemplate.query(sql, mapper);
	}

	/**
	 * 新增person
	 */
	public void add(String firstName, String lastName, Double money) {
		logger.debug("Adding new person");

		String sql = "insert into person(first_name, last_name, money) values " +
				"(:firstName, :lastName, :money)";

		Map<String, Object> parameters = new HashMap<String, Object>();
		parameters.put("firstName", firstName);
		parameters.put("lastName", lastName);
		parameters.put("money", money);

		// Save
		jdbcTemplate.update(sql, parameters);

	}

	/**
	 * 删除指定Person
	 */
	public void delete(Integer id) {
		logger.debug("Deleting existing person");

		String sql = "delete from person where id = ?";

		Object[] parameters = new Object[] {id};

		jdbcTemplate.update(sql, parameters);
	}

	/**
	 * Edit指定的Person
	 */
	public void edit(Integer id, String firstName, String lastName, Double money) {
		logger.debug("Editing existing person");

		String sql = "update person set first_name = :firstName, " +
				"last_name = :lastName, money = :money where id = :id";

		// Assign values to parameters
		Map<String, Object> parameters = new HashMap<String, Object>();
		parameters.put("id", id);
		parameters.put("firstName", firstName);
		parameters.put("lastName", lastName);
		parameters.put("money", money);

		// Edit
		jdbcTemplate.update(sql, parameters);

	}

}
我们在PersonService实现了一个简单的CRUD.主要对应了下面几种方法.
getAll
add
delete
edit
注意:我们是通过一个 SimpleJdbcTemplate实例来进行数据库的操作的.
什么是JdbcTemplate?
引用
JdbcTemplate类是在JDBC核心包的核心类。 它处理的创建和释放资源,它可以帮助您避免如忘记关闭连接常见的错误。 它执行核心的JDBC工作流,如语句创建和执行基本任务,让应用程序代码提供SQL和提取结果。 JdbcTemplate类执行SQL查询,更新语句和存储过程调用,执行过的ResultSets和返回的参数值的提取迭代。 它还捕捉JDBC异常并将它们转换为通用的,更丰富,层次结构异常org.springframework.dao包定义。
来源: Spring3官方文档
什么是SimpleJdbcTemplate?
引用
SimpleJdbcTemplate类包装的可变参数和自动装箱,如经典的JdbcTemplate,并利用Java 5的语言特性。
来源: Spring3官方文档
换句通俗点的话就是SimpleJdbcTemplate是JdbcTemplate的加强版.
值得注意的是:
我们的教程中使用的是Spring官方文档中的最佳实践.而实际工作中为了编码的效率和代码的整洁.
我们可以使用SimpleJdbcTemplate自带的其他方法.
比如PersonService中的getAll方法采用的是Spring推荐的最佳实践.
public List<Person> getAll() {
		logger.debug("Retrieving all persons");

		String sql = "select id, first_name, last_name, money from person";

		// Maps a SQL result to a Java object
		RowMapper<Person> mapper = new RowMapper<Person>() {
	        public Person mapRow(ResultSet rs, int rowNum) throws SQLException {
	        	Person person = new Person();
	        	person.setId(rs.getInt("id"));
	        	person.setFirstName(rs.getString("first_name"));
	        	person.setLastName(rs.getString("last_name"));
	        	person.setMoney(rs.getDouble("money"));
	            return person;
	        }
	    };

		return jdbcTemplate.query(sql, mapper);
	}
我们也可以用BeanPropertyRowMapper来达到检索所有的Person的功能,并且代码更少.
public List<Person> getAll() {
		logger.debug("Retrieving all persons");

		String sql = "select id, first_name, last_name, money from person";

		return jdbcTemplate.query(sql, new BeanPropertyRowMapper<Person>(Person.class));
	}
但是要注意BeanPropertyRowMapper的使用条件.返回的对象必须和数据库里的字段相同(可以忽略带"_"和大写的字段).
然后是Controller
MainController.java
package org.liukai.tutorial.controller;

import java.util.List;

import javax.annotation.Resource;

import org.apache.log4j.Logger;
import org.liukai.tutorial.domain.Person;
import org.liukai.tutorial.service.PersonService;
import org.springframework.stereotype.Controller;
import org.springframework.ui.Model;
import org.springframework.web.bind.annotation.RequestMapping;
import org.springframework.web.bind.annotation.RequestMethod;
import org.springframework.web.bind.annotation.RequestParam;

@Controller
@RequestMapping("/main")
public class MainController {

protected static Logger logger = Logger.getLogger("controller");

	@Resource(name="personService")
	private PersonService personService;

	/**
	 *获得所有的Person并返回到指定JSP页面
	 *
	 * @return the name of the JSP page
	 */
    @RequestMapping(value = "/persons", method = RequestMethod.GET)
    public String getPersons(Model model) {

    	logger.debug("Received request to show all persons");

    	// 调用personService中的getAll获得所有的Person
    	List<Person> persons = personService.getAll();

    	// 把Person装入一个指定的model
    	model.addAttribute("persons", persons);

    	// 解析 /WEB-INF/jsp/personspage.jsp
    	return "personspage";
	}

    /**
     *根据页面传递过来的值新增一Person并跳转到指定页面.
     */
    @RequestMapping(value = "/persons/add", method = RequestMethod.GET)
    public String add(
    		@RequestParam(value="firstname", required=true) String firstName,
    		@RequestParam(value="lastname", required=true) String lastName,
    		@RequestParam(value="money", required=true) Double money) {

		logger.debug("Received request to add new person");

		personService.add(firstName, lastName, money);

		return "addedpage";
	}

    /**
     * 根据接收的ID删除Person
     */
    @RequestMapping(value = "/persons/delete", method = RequestMethod.GET)
    public String delete(@RequestParam(value="id", required=true) Integer id,
    										Model model) {

		logger.debug("Received request to delete existing person");

		personService.delete(id);

		model.addAttribute("id", id);

		return "deletedpage";
	}

    /**
     * edit指定的Person
     */
    @RequestMapping(value = "/persons/edit", method = RequestMethod.GET)
    public String edit(
    		@RequestParam(value="id", required=true) Integer id,
    		@RequestParam(value="firstname", required=true) String firstName,
    		@RequestParam(value="lastname", required=true) String lastName,
    		@RequestParam(value="money", required=true) Double money,
    		Model model){

		logger.debug("Received request to edit existing person");

		personService.edit(id, firstName, lastName, money);

		model.addAttribute("id", id);

		return "editedpage";
	}

}
该Controller包含了4个映射.
引用
/persons
/persons/add?firstname=''&lastname=''&money=''
/persons/delete?id=''
/persons/edit?id=''&firstname=''&lastname=''&money=''
/persons/add?firstname=''&lastname=''&money=''
/persons/delete?id=''
/persons/edit?id=''&firstname=''&lastname=''&money=''
每个映射调用一个PersonService.当调用成功后则会跳转到指定的JSP页面
addedpage.jsp

<%@ taglib uri="http://java.sun.com/jsp/jstl/core" prefix="c" %>
<%@ page import="java.util.Date" %>
<%@ page language="java" contentType="text/html; charset=UTF-8"
    pageEncoding="UTF-8"%>
<!DOCTYPE html PUBLIC "-//W3C//DTD HTML 4.01 Transitional//EN" "http://www.w3.org/TR/html4/loose.dtd">
<html>
<head>
<meta http-equiv="Content-Type" content="text/html; charset=UTF-8">
<title>Insert title here</title>
</head>
<body>

<h1>Persons</h1>

<p>你于
<%= new java.util.Date() %>
新增一个Person
</p>
</body>
</html>
editedpage.jsp

<%@ taglib uri="http://java.sun.com/jsp/jstl/core" prefix="c" %>
<%@ page import="java.util.Date" %>
<%@ page language="java" contentType="text/html; charset=UTF-8"
    pageEncoding="UTF-8"%>
<!DOCTYPE html PUBLIC "-//W3C//DTD HTML 4.01 Transitional//EN" "http://www.w3.org/TR/html4/loose.dtd">
<html>
<head>
<meta http-equiv="Content-Type" content="text/html; charset=UTF-8">
<title>Insert title here</title>
</head>
<body>

<h1>Persons</h1>

<p>你于
<%= new java.util.Date() %>
根据${id }修改了一个Person
</p>
</body>
</html>
deletedpage.jsp

<%@ taglib uri="http://java.sun.com/jsp/jstl/core" prefix="c" %>
<%@ page import="java.util.Date" %>
<%@ page language="java" contentType="text/html; charset=UTF-8"
    pageEncoding="UTF-8"%>
<!DOCTYPE html PUBLIC "-//W3C//DTD HTML 4.01 Transitional//EN" "http://www.w3.org/TR/html4/loose.dtd">
<html>
<head>
<meta http-equiv="Content-Type" content="text/html; charset=UTF-8">
<title>Insert title here</title>
</head>
<body>

<h1>Persons</h1>

<p>你于
<%= new java.util.Date() %>
根据${id }删除了一个Person
</p>

</body>
</html>
personspage.jsp

<%@ taglib uri="http://java.sun.com/jsp/jstl/core" prefix="c" %>
<%@ page language="java" contentType="text/html; charset=UTF-8"
    pageEncoding="UTF-8"%>
<!DOCTYPE html PUBLIC "-//W3C//DTD HTML 4.01 Transitional//EN" "http://www.w3.org/TR/html4/loose.dtd">
<html>
<head>
<meta http-equiv="Content-Type" content="text/html; charset=UTF-8">
<title>Insert title here</title>
</head>
<body>

<h1>Persons</h1>

<table>
	<tr>
		<td width="50">Id</td>
		<td width="150">First Name</td>
		<td width="150">Last Name</td>
		<td width="50">Money</td>
	</tr>
	<c:forEach items="${persons}" var="person">
		<tr>
			<td><c:out value="${person.id}" /></td>
			<td><c:out value="${person.firstName}" /></td>
			<td><c:out value="${person.lastName}" /></td>
			<td><c:out value="${person.money}" /></td>
		</tr>
	</c:forEach>
</table>

</body>
</html>
我们的应用程序已经完成了
进入主页输入: http://localhost:8080/spring-jdbc/main/persons
新增一Person: http://localhost:8080/spring-jdbc/main/persons/add?firstname=John&lastname=Smith&money=1000
删除一Person: http://localhost:8080/spring-jdbc/main/persons/delete?id=1
修改一Person: http://localhost:8080/spring-jdbc/main//persons/edit?id=1&firstname=Johnny&lastname=Smith&money=2000
总结
这样我们完成了预定的目标:成功的连接了数据库并通过使用SpringMVC和JDBC实现了一个简单的CRUD操作;
我们了解了什么是JdbcTemplate以及如何使用SimpleJdbcTemplate对数据库进行操作.
而spring3MVC自带的SimpleJdbcTemplate能够很好的封装JDBC.数据库操作方便.
和Hibernate的HQL不同.因为是直接用原生态的sql进行查询.所以能够对sql语句进行拼接.
十分的灵活.这点是HQL所不能比拟的.
BTW:附件为本次教程源码.你可以下载后直接在tomcat或其他web服务器启动.也可以自行添加
maven插件启动.