BlazeDS入门——HTTP Service
原文:http://www.riafan.com/blaseds-http-service
其实BlazeDS可以看成是LCDS的简化版,它少了后者的Data Management Service高级功能,目前不支持RTMP协议。
一、下载BlazeDS
BlazeDS已经推出正式版:http://opensource.adobe.com/wiki/display/blazeds/Release+Builds,它有三个版本,其中Turnkey版内置了Tomcat和 Flex 3 SDK,还包含blazeds.war、ds-console.war和samples.war,建议初学者使用;Binary Distribution版只包括blazeds.war,此为最简配置;而Source则包含blazeds的Java源代码,想做二次开发就下载这个。
二、新建BlazeDS工程
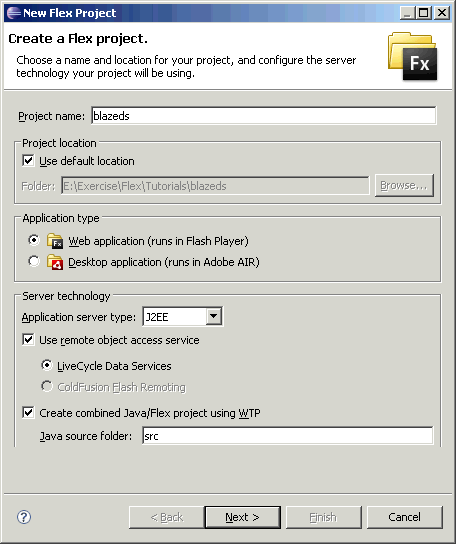
1. 创建Flex工程,勾选Use remote object access service。
最好在WTP上安装Flex 插件版,这样可以将Flex和Java整合在一个工程中。
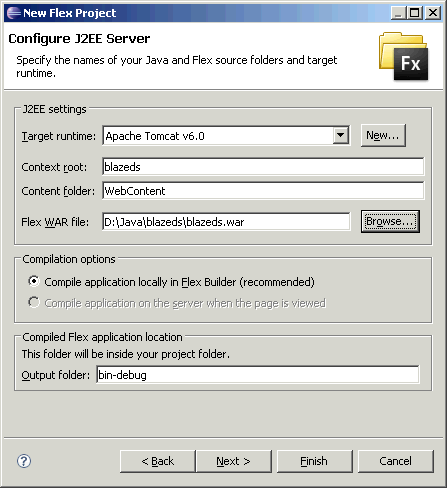
2. 配置J2EE服务器,对于BlazeDS来说,使用Tomcat就可以了。设定上下文路径和blazeds.war的位置,如下图。
3. 设置资源文件夹名、主文件名称和输出文件的路径。
三、同域访问
访问HTTP Service可以直接在Flex端直接指定一个同域名的URL,也可以在proxy-config.xml中设置代理。现在我们就用一个简单的HTTP Service来检验工程是否可以在服务器上运行,请参考HTTPServiceDemo.mxml。
四、使用服务器端代理
更多情况下,我们需要对HTTP Service跨域访问,这就会存在Flash Player存在安全沙箱问题。对于跨域访问RPC有三种解决方案:使用Proxy Service和Remote Object Service或者在目标域下部署crossdomain.xml策略文件。
对于服务器端代理,可以简单在服务器端定义DefaultHTTP,打开proxy-config.xml,如下配置。其中*号表示http://127.0.0.1:8080/blazeds下所有的HTTP Service。由于我们已经设置了默认的destination,因此在Flex端不需要设定destination了,但需要在Flex中指定HTTPService的绝对URL属性,并设定useProxy="true"。请参看DefaultDestination.mxml。
<destination id="DefaultHTTP">
      <properties>
           <dynamic-url>http://127.0.0.1:8080/blazeds/*</dynamic-url>
      </properties>
 </destination>
如上所述,服务器端代理使用默认的destination,需要指定HTTPService的绝对URL属性,不灵活不安全,我们更多时候还是要自定义destination。如下面的配置,我们在proxy-config.xml中设置destination的属性值为student,然后就可以在Flex中设定destination为student,然后就可以调用该端点对应的HTTP Service了。请参考NamedDestination.mxml。
<destination id="student">
      <properties>
          <url>http://{server.name}:{server.port}/{context.root}/data/student.xml</url>
      </properties>
 </destination>
注意:
1.使用BlazeDS/WTP整合向导时,BlazeDS工程的Content Root始终是/WebContent,请修改成根据Root URL作相应修改;
2. 运行主程序前请导出发布版本(Export Release Build)并启动服务器;
3.在url元素中,{server.name}之类的变量和*不能同时使用。关于BlazeDS的配置,我们在后面还会讲述。如果我们安装了Turnkey版,可以在blazeds\resources\config中查看更详细的配置。
点击此处下载工程文件。该工程文件也包括后面要讲述的部分。

