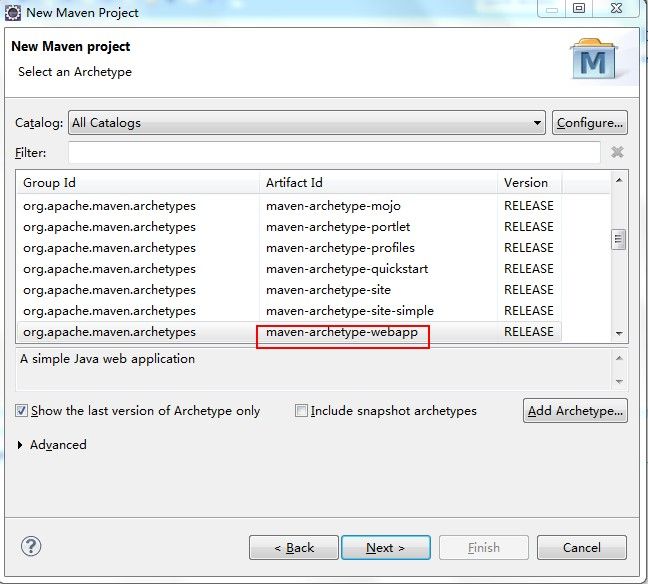
1、使用eclipse创建一个maven web工程,如图所示
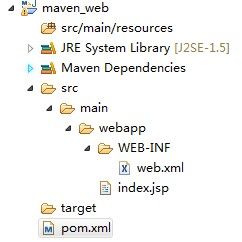
创建工程的目录结构,如图:
2、配置项目 需要添加src/main/java,src/test/java ,src/test/resources三个文件夹。右键项目根目录点击New -> Source Folder,建出这三个文件夹,Java Build Path -> Source
3、在src/main/java下创建com.hb.SimpleServlet类
package com.hb;

import java.io.IOException;
import java.io.PrintWriter;

import javax.servlet.ServletException;
import javax.servlet.http.HttpServlet;
import javax.servlet.http.HttpServletRequest;
import javax.servlet.http.HttpServletResponse;

public class SimpleServlet extends HttpServlet {
	@Override
	protected void doPost(HttpServletRequest req, HttpServletResponse resp)
			throws ServletException, IOException {
		req.setAttribute("myname", "huangbiao");

//		PrintWriter pw = resp.getWriter();
//		pw.write("simple servlet");
//		pw.flush();
//		pw.close();

		req.getRequestDispatcher("a.jsp").forward(req, resp);
	}

	@Override
	protected void doGet(HttpServletRequest req, HttpServletResponse resp)
			throws ServletException, IOException {
		this.doPost(req, resp);
	}
}
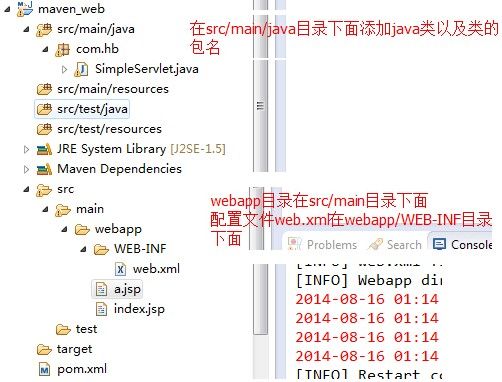
最终目录结构如图:
4、该类需要继承HttpServlet类,因此需要导入javax.servlet-api-3.0.1.jar,在pom.xml文件中配置dependency
<dependencies>
<!-- servlet依赖的jar -->
	<dependency>
		<groupId>javax.servlet</groupId>
		<artifactId>javax.servlet-api</artifactId>
		<version>3.0.1</version>
	</dependency>
</dependencies>
5、为了加快速度开发,需要的jar包不是从“中央仓库”中在线下载,而是在本地仓库下载,因此需要配置本地仓库(默认已经配置好了)
<!-- 配置本地仓库的路径 -->
<repositories>
	<repository>
		<id>nexus</id>
		<name>nexus repository</name>
		<url>http://localhost:8081/nexus/content/groups/public/</url>
		<releases>
			<enabled>true</enabled>
		</releases>
		<snapshots>
			<enabled>true</enabled>
		</snapshots>
	</repository>
</repositories>
6、添加一个JSP页面,为了能够支持JSTL,需要配置web.xml文件,因此需要在webapp目录下面添加WEB-INF/web.xml文件
<?xml version="1.0" encoding="UTF-8"?>
<web-app id="WebApp_ID" version="2.4" xmlns="http://java.sun.com/xml/ns/j2ee" xmlns:xsi="http://www.w3.org/2001/XMLSchema-instance" xsi:schemaLocation="http://java.sun.com/xml/ns/j2ee http://java.sun.com/xml/ns/j2ee/web-app_2_4.xsd">
	<display-name>myweb</display-name>
	<servlet>
		<servlet-name>SimpleServlet</servlet-name>
		<servlet-class>com.hb.SimpleServlet</servlet-class>
	</servlet>

	<servlet-mapping>
		<servlet-name>SimpleServlet</servlet-name>
		<url-pattern>/SimpleServlet.do</url-pattern>
	</servlet-mapping>
</web-app>
7、添加a.jsp文件在webapp目录下面
<%@ page language="java" contentType="text/html; charset=ISO-8859-1"
	pageEncoding="ISO-8859-1"%>
<!DOCTYPE html PUBLIC "-//W3C//DTD HTML 4.01 Transitional//EN" "http://www.w3.org/TR/html4/loose.dtd">
<html>
<head>
<meta http-equiv="Content-Type" content="text/html; charset=ISO-8859-1">
<title>Insert title here</title>
</head>
<body>
	ffff
	<%
	out.println("huangbiao test jetty");
%>
	<br> ${myname }
</body>
</html>
8、发布web工程,正常是将web工程打包成war包,然后将其放到tomcat容器中,再启动tomcat。这种方式很繁琐,我们可以使用Jetty直接发布+启动,一步到到位。因此,我们需要在pom.xml文件中添加jetty插件
<build>
	<plugins>
	<!-- 添加jetty插件,能够通过浏览器访问网址 -->
		<plugin>
			<groupId>org.mortbay.jetty</groupId>
			<artifactId>jetty-maven-plugin</artifactId>
			<version>8.1.3.v20120416</version>
			<configuration>
				<scanIntervalSeconds>10</scanIntervalSeconds>
				<!-- 设置网址的上下文为huangbiao,可以简单理解为工程名字 -->
				<webApp>
					<contextPath>/huangbiao</contextPath>
				</webApp>
			</configuration>
		</plugin>
<!-- 添加war插件,方便maven打war包 -->
		<plugin>
			<groupId>org.apache.maven.plugins</groupId>
			<artifactId>maven-war-plugin</artifactId>
			<version>2.2</version>
		</plugin>
	</plugins>
</build>
9、启动工程
10、在地址栏中输入http://localhost:8080/huangbiao/SimpleServlet.do,显示如图:
pom.xml配置文件的详细内容:
<project xmlns="http://maven.apache.org/POM/4.0.0" xmlns:xsi="http://www.w3.org/2001/XMLSchema-instance"
	xsi:schemaLocation="http://maven.apache.org/POM/4.0.0 http://maven.apache.org/maven-v4_0_0.xsd">
	<modelVersion>4.0.0</modelVersion>
	<groupId>com.hb</groupId>
	<artifactId>maven_web</artifactId>
	<packaging>war</packaging>
	<version>0.0.1-SNAPSHOT</version>
	<name>maven_web Maven Webapp</name>
	<url>http://maven.apache.org</url>

	<!-- 配置本地仓库的路径 -->
	<repositories>
		<repository>
			<id>nexus</id>
			<name>nexus repository</name>
			<url>http://localhost:8081/nexus/content/groups/public/</url>
			<releases>
				<enabled>true</enabled>
			</releases>
			<snapshots>
				<enabled>true</enabled>
			</snapshots>
		</repository>
	</repositories>

	<dependencies>
		<!-- servlet依赖的jar -->
		<dependency>
			<groupId>javax.servlet</groupId>
			<artifactId>javax.servlet-api</artifactId>
			<version>3.0.1</version>
		</dependency>
	</dependencies>

	<build>
		<finalName>maven_web</finalName>
		<plugins>
			<!-- 添加jetty插件,能够通过浏览器访问网址 -->
			<plugin>
				<groupId>org.mortbay.jetty</groupId>
				<artifactId>jetty-maven-plugin</artifactId>
				<version>8.1.3.v20120416</version>
				<configuration>
					<scanIntervalSeconds>10</scanIntervalSeconds>
					<!-- 设置网址的上下文为huangbiao,可以简单理解为工程名字 -->
					<webApp>
						<contextPath>/huangbiao</contextPath>
					</webApp>
				</configuration>
			</plugin>
			<!-- 添加war插件,方便maven打war包 -->
			<plugin>
				<groupId>org.apache.maven.plugins</groupId>
				<artifactId>maven-war-plugin</artifactId>
				<version>2.2</version>
			</plugin>
		</plugins>
	</build>
</project>


