Mahout源码MeanShiftCanopyDriver分析之一初识
如果要先把meanshift算法先跑一遍的话,可以直接使用synthetic_control.data数据来做,把synthetic_control.data下载赋值到一个文本文件中,然后上传到HDFS文件系统上面,使用下面的命令: bin/hadoop fs -put synthetic_control.data testdata;上传完毕后直接在mahout中运行:bin/mahoutorg.apache.mahout.clustering.syntheticcontrol.meanshift.Job 即可在终端中看到运行的情况,但是在最后面该程序把所有的数据结果都显示出来了,导致前面的Job信息看不到了,所以我就改变了下程序的某些部分,编写下面的程序,来进行测试:
package mahout.fansy.test.meanshift;

import java.io.IOException;

import org.apache.hadoop.conf.Configuration;
import org.apache.hadoop.fs.Path;
import org.apache.mahout.clustering.conversion.meanshift.InputDriver;
import org.apache.mahout.clustering.meanshift.MeanShiftCanopyDriver;
import org.apache.mahout.common.distance.DistanceMeasure;
import org.apache.mahout.common.distance.EuclideanDistanceMeasure;
import org.apache.mahout.common.kernel.TriangularKernelProfile;

public class TestMeanShift {

	/**
	 * @param args
	 * @throws Exception
	 */
	public static void main(String[] args) throws Exception {
		testMeanShift();
	}

	public static void testMeanShift() throws ClassNotFoundException, IOException, InterruptedException{
		Configuration conf=new Configuration();
		conf.set("mapred.job.tracker", "ubuntu:9001");
	//	Path input=new Path("hdfs://ubuntu:9000/user/test/input/transform/part-r-00000");
		Path input=new Path("hdfs://ubuntu:9000/user/test/input/synthetic_control.data");
		Path realInput=new Path("hdfs://ubuntu:9000/user/test/input/real_input");
		InputDriver.runJob(input, realInput);
		Path output=new Path("hdfs://ubuntu:9000/user/test/output-meanshift");
		DistanceMeasure measure=new EuclideanDistanceMeasure();
		TriangularKernelProfile kernelProfile =new TriangularKernelProfile();
		double t1=47.6;
		double t2=1;
		double convergenceDelta=0.5;
		int maxIterations=10;
		MeanShiftCanopyDriver.run(conf, realInput, output, measure, kernelProfile, t1, t2, convergenceDelta, maxIterations,true,true,false);
	}
}
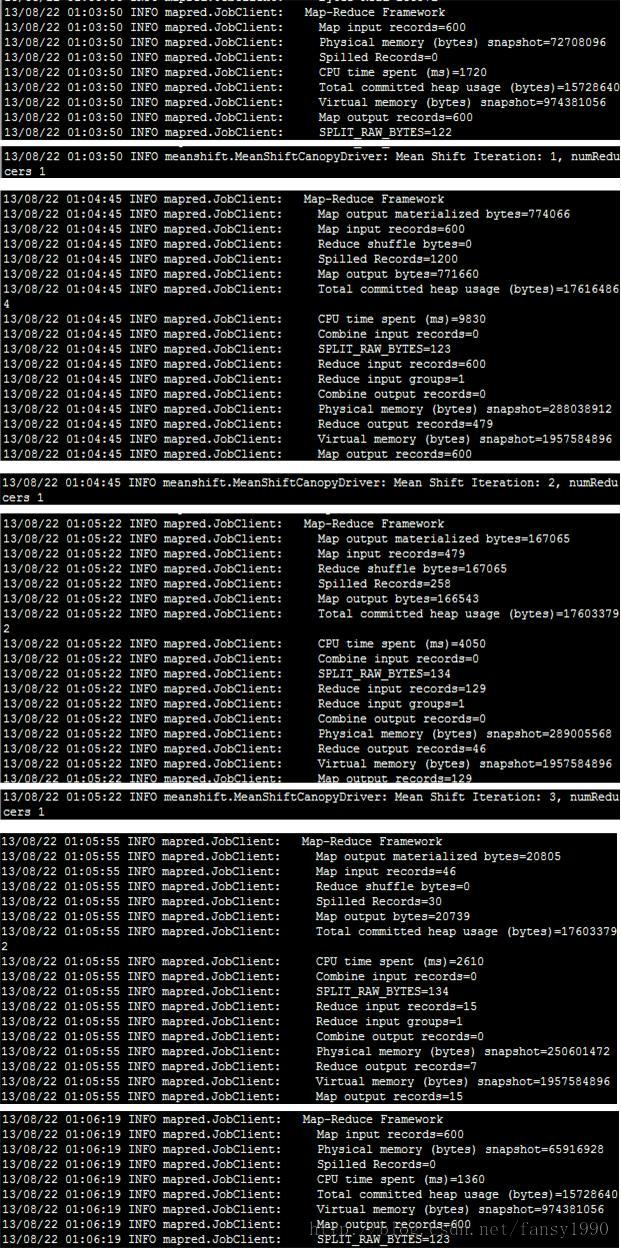
编译,打包上面的程序,然后在终端中运行:bin/hadoop jar ../../mahout_jar/ClusteringUtils.jar mahout.fansy.test.meanshift.TestMeanShift,然后在终端中即可看到显示的信息,主要的信息粘贴如下:
由上面的信息可以看到第一个job,只使用了mapper,把600条记录转换为了600个meanshiftcanopy(等下分析);然后进行了3次循环,每次map和reduce的输入记录数都有变化,分别如下:
| map-in | map_out | reduce_in | reduce_out | |
| 第一次 | 600 | 600 | 600 | 479 |
| 第二次 | 479 | 129 | 129 | 46 |
| 第三次 | 46 | 15 | 15 | 7 |
然后先分析下第一个Job,这个Job就是把原始每条记录都转换为一个meanshiftcanopy,具体代码如下:
InputDriver:
Job job = new Job(conf, "Mean Shift Input Driver running over input: " + input);
    job.setOutputKeyClass(Text.class);
    job.setOutputValueClass(ClusterWritable.class);
    job.setOutputFormatClass(SequenceFileOutputFormat.class);
    job.setMapperClass(org.apache.mahout.clustering.conversion.meanshift.InputMapper.class);
    job.setReducerClass(Reducer.class);
    job.setNumReduceTasks(0);
    job.setJarByClass(InputDriver.class);

    FileInputFormat.setInputPaths(job, input);
    FileOutputFormat.setOutputPath(job, output);
org.apache.mahout.clustering.conversion.meanshift.InputMapper:
protected void map(LongWritable key, Text values, Context context) throws IOException, InterruptedException {
    String[] numbers = SPACE.split(values.toString());
    // sometimes there are multiple separator spaces
    Collection<Double> doubles = Lists.newArrayList();
    for (String value : numbers) {
      if (!value.isEmpty()) {
        doubles.add(Double.valueOf(value));
      }
    }
    // ignore empty lines in input data
    if (!doubles.isEmpty()) {
      Vector point = new DenseVector(doubles.size());
      int index = 0;
      for (Double d : doubles) {
        point.set(index++, d);
      }
      cw.setValue(new MeanShiftCanopy(point, nextCanopyId++, new EuclideanDistanceMeasure()));
      context.write(new Text(), cw);
    }
  }
第一个job相对比较好理解,和前面的数据转换差不多,都是把文本转换为序列文件同时设定key和value的类型。
分享,快乐,成长
转载请注明出处:http://blog.csdn.net/fansy1990
