Android中的布局方式(二)
Android中的布局方式(二)
【3】TableLayout表格布局
TableLayout以行和列的方式排列子控件,但它不会显示行和列的边界线。在TableLayout中使用TableRow对象来定义多行。
重要属性介绍:
android:stretchColumns=”1” // 表示在有剩余空间的情况下,第2列可以拉伸
android:shrinkColumns=”1” // 空间不够时,第2列可以被压缩
android:collapseColumns=”1” // 第2列不显示
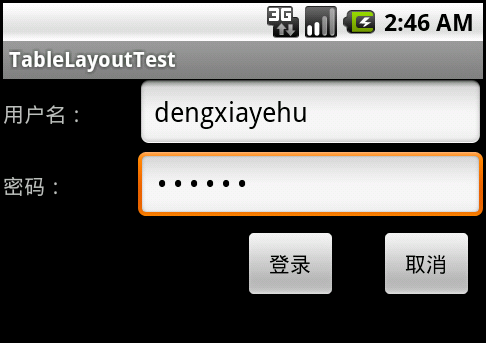
在前面我们用LinearLayout来搭建了一个简易的登录窗口,这里准备用TableLayout也来搭一个,运行截图如下:
XML布局文件如下:
<?xml version="1.0" encoding="utf-8"?>
<LinearLayout xmlns:android="http://schemas.android.com/apk/res/android"
android:orientation="vertical"
android:layout_width="fill_parent"
android:layout_height="fill_parent">
<TableLayout
android:layout_width="fill_parent"
android:layout_height="wrap_content"
android:collapseColumns="2"
android:stretchColumns="1">
<TableRow android:id="@+id/tr1"
android:layout_width="fill_parent"
android:layout_height="wrap_content">
<TextView android:id="@+id/tv1"
android:layout_width="90dip"
android:layout_height="wrap_content"
android:text="用户名:"/>
<EditText android:id="@+id/et1"
android:layout_width="wrap_content"
android:layout_height="wrap_content"
android:maxLines="1"/>
</TableRow>
<TableRow android:id="@+id/tr2"
android:layout_width="fill_parent"
android:layout_height="wrap_content">
<TextView android:id="@+id/tv2"
android:layout_width="90dip"
android:layout_height="wrap_content"
android:text="密码:"/>
<EditText android:id="@+id/et2"
android:layout_width="wrap_content"
android:layout_height="wrap_content"
android:maxLines="1"
android:password="true"/>
</TableRow>
</TableLayout>
<!-- 下面的两个按钮用LineaerLayout来布局,和前例一样 -->
<LinearLayout
android:layout_width="fill_parent"
android:layout_height="wrap_content"
android:layout_marginTop="5dip"
android:orientation="horizontal">
<Button android:id="@+id/btn1"
android:layout_width="wrap_content"
android:layout_height="wrap_content"
android:text=" 登录 "
android:layout_marginLeft="160dip"/>
<Button android:id="@+id/btn2"
android:layout_width="wrap_content"
android:layout_height="wrap_content"
android:text=" 取消 "
android:layout_marginLeft="27dip"/>
</LinearLayout>
</LinearLayout>
【4】RelativeLayout相对布局
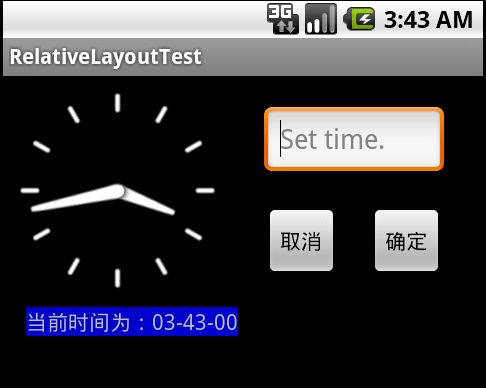
相对布局可以让子控件根据其父控件或者它们之间的相对位置来决定自己的显示位置。比如有A控件,然后B控件可以指定说在A控件右边显示,后面的C可以指定说在B控件的下边显示等等,下面用一个简单的示例来说明问题。
运行截图:
XML布局文件为:
<?xml version="1.0" encoding="utf-8"?>
<RelativeLayout xmlns:android="http://schemas.android.com/apk/res/android"
android:layout_width="fill_parent"
android:layout_height="fill_parent">
<AnalogClock android:id="@+id/analog_clock"
android:layout_width="wrap_content"
android:layout_height="wrap_content"/>
<TextView android:id="@+id/tv1"
android:layout_width="wrap_content"
android:layout_height="wrap_content"
android:text="当前时间为:03-43-00"
android:background="#0000CC"
android:layout_marginLeft="15dip"
android:layout_below="@id/analog_clock"/>
<EditText android:id="@+id/et1"
android:layout_width="120dip"
android:layout_height="wrap_content"
android:layout_toRightOf="@id/analog_clock"
android:layout_margin="20dip"
android:hint="Set time."/>
<Button android:id="@+id/btn1"
android:layout_width="wrap_content"
android:layout_height="wrap_content"
android:text="确定"
android:layout_below="@id/et1"
android:layout_alignRight="@id/et1"/>
<Button android:id="@+id/btn2"
android:layout_width="wrap_content"
android:layout_height="wrap_content"
android:text="取消"
android:layout_toLeftOf="@id/btn1"
android:layout_alignTop="@id/btn1"
android:layout_marginRight="20dip"/>
</RelativeLayout>
【5】AbsoluteLayout绝对布局
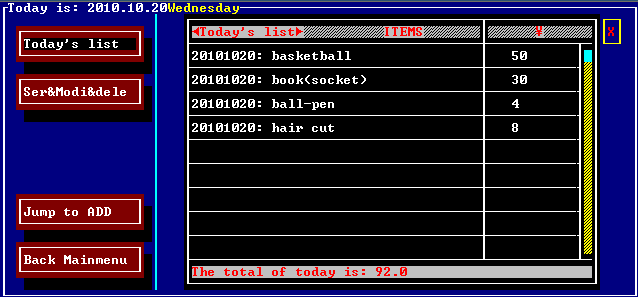
这种布局方式是我们需要用具体的坐标才能定位控件,其实这种方式不就是我们原来常用的嘛。还记得原来在TC中,文本模式下,愣是用gotoxy来搭界面,累死人,还达不到预设的效果-_-!,翻翻看,看能否找到:
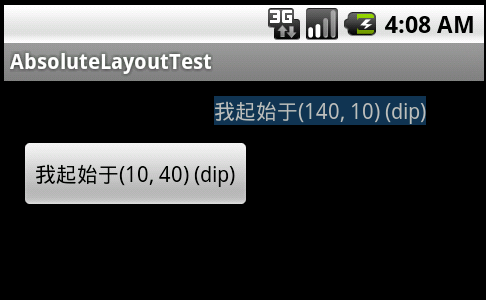
在android中通过设置android:layout_x及android:layout_y来定位。注意:这中刚性布局屏幕适应性不是很好,一个设备上运行得还可以,可能到另外一台设备上就是“乱码”了。下面是一个简单的示例:
XML文件内容如下:
<?xml version="1.0" encoding="utf-8"?>
<AbsoluteLayout xmlns:android="http://schemas.android.com/apk/res/android"
android:layout_width="fill_parent"
android:layout_height="fill_parent">
<TextView android:id="@+id/tv1"
android:layout_width="wrap_content"
android:layout_height="wrap_content"
android:text="我起始于(140, 10) (dip)"
android:background="#123456"
android:layout_x="140dip"
android:layout_y="10dip"/>
<Button android:id="@+id/btn1"
android:layout_width="wrap_content"
android:layout_height="wrap_content"
android:text="我起始于(10, 40) (dip)"
android:layout_x="10dip"
android:layout_y="40dip"/>
</AbsoluteLayout>
小结:在实际情况中,若想界面达到良好的效果,通常需要嵌套使用布局方式,不然就会显得单调。接下来就留由大家去探索了。


