android5种布局使用注意事项
AbsoluteLayout ,是一个按照绝对坐标定义的布局,由于使用绝对坐标去定位控件,因此要实现自适应界面时,应尽少使用 AbsoluteLayout 。
RelativeLayout-->最好在界面设计时 做好布局,尽少程序运行时 做控件布局的更改,因为 RelativeLayout布局里面的属性之间,很容易冲突
FrameLayout,顾名思义跟帧有关,布局里所有的控件都被放到布局的左上角,并且一层覆盖一层。
关键的是layout_gravity,负责控制控件的位置
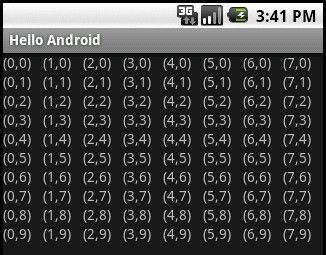
TableLayout + TableRow是一组搭配使用的布局,TableLayout置底,TableRow在TableLayout的上面,而Button、TextView等控件就在TableRow之上,另外,TableLayout之上也可以单独放控件。经常在代码里使用TableLayout,例如做出表格的效果。
<?xml version="1.0" encoding="utf-8"?>
<LinearLayout xmlns:android="http://schemas.android.com/apk/res/android"
    android:orientation="vertical"
    android:layout_width="fill_parent"
    android:layout_height="fill_parent"
    >
     <TableLayout
             android:id="@+id/TableLayout01"
             android:layout_width="fill_parent"
             android:layout_height="wrap_content">
     </TableLayout>
</LinearLayout>
package com.LayoutDemo;
import com.LayoutDemo.R;
import android.app.Activity;
import android.os.Bundle;
import android.view.ViewGroup;
import android.widget.TableLayout;
import android.widget.TableRow;
import android.widget.TextView;
public class LayoutDemo extends Activity {
    /** Called when the activity is first created. */
	private final int WC = ViewGroup.LayoutParams.WRAP_CONTENT;
	private final int FP = ViewGroup.LayoutParams.FILL_PARENT;

    @Override
    public void onCreate(Bundle savedInstanceState) {
        super.onCreate(savedInstanceState);
        setContentView(R.layout.main);
        //新建TableLayout01的实例
        TableLayout tableLayout = (TableLayout)findViewById(R.id.TableLayout01);
        //全部列自动填充空白处
        tableLayout.setStretchAllColumns(true);
        //生成10行,8列的表格
        for(int row=0;row<10;row++)
        {
            TableRow tableRow=new TableRow(this);
            for(int col=0;col<8;col++)
            {
            	//tv用于显示
            	TextView tv=new TextView(this);
                tv.setText("("+col+","+row+")");
                tableRow.addView(tv);
            }
            //新建的TableRow添加到TableLayout
            tableLayout.addView(tableRow, new TableLayout.LayoutParams(FP, WC));
        }
    }
}

