Castle.ActiveRecord初探
注:本文翻译自Castle的官方网站http://www.castleproject.org
有关Castle的更多内容请参阅李会军博客的系列文章
http://terrylee.cnblogs.com/archive/2006/04/28/castl_ioc_article.html
本文所用代码下载页面:
http://www.castleproject.org/activerecord/gettingstarted/index.html
配置要求
我们假定你安装了Castle Project assemblies以及自带的NHibernate assemblies,如果没有的话你可以下载安装MSI installer distribution(http://www.castleproject.org/castle/download.html)
本文假定你使用的是MSSQL Server 2003,不过NHibernate也支持其它的数据库.
如果你使用的是Visual Studio .Net,记得添加这些引用:
.Castle.ActiveRecord.dll
.Castle.Core.dll
.Castle.DynamicProxy.dll
.Iesi.Collections.dll
.log4net.dll
.NHibernate.dll
如果你使用的是其它的环境,务必在Castle安装目录里引用上述assemblies
创建数据库及表
我们将在数据库test里创建3个表:User, Blog 和 Post.你可以按如下构架创建或让ActiveRecord生成该构架.

图1
如你所见,User是孤立的表,而Blog 和 Post表是相互关联的,一个博客可以有很多文章,所以对blog来说是一对多关系,而对post来说是多对一关系.
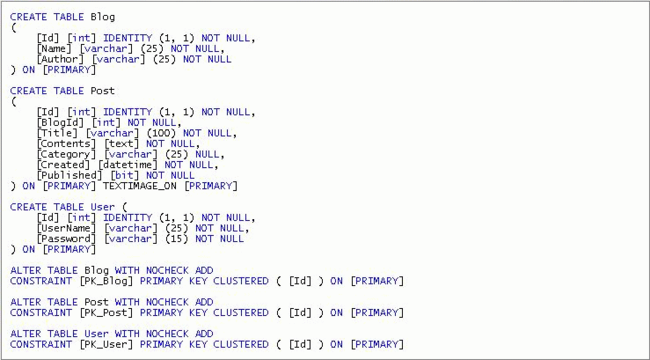
图2
创建类
现在我们要创建表的对应的类,你将看到这是多么的容易.首先我们创建最简单的User class:
创建User class
1.创建名为User的空类,添加using声明:
namespace BlogSample
{
using System;
using Castle.ActiveRecord;
public class User
{
}
}
2.标明该类源自ActiveRecordBase,使用ActiveRecord特性:
namespace BlogSample
{
using System;
using Castle.ActiveRecord;
[ActiveRecord]
public class User : ActiveRecordBase
{
}
}
3.添加相应的域(field)和属性:
namespace BlogSample
{
using System;
using Castle.ActiveRecord;
[ActiveRecord]
public class User : ActiveRecordBase
{
private int id;
private string username;
private string password;
public int Id
{
get { return id; }
set { id = value; }
}
public string Username
{
get { return username; }
set { username = value; }
}
public string Password
{
get { return password; }
set { password = value; }
}
}
}
4.最后,添加特性以告知ActiveRecord这些属性的类别(也就是propertie, primary key 和 relationship).在此,我们将Id标记为primary key而余下的标记为property:
namespace BlogSample
{
using System;
using Castle.ActiveRecord;
[ActiveRecord]
public class User : ActiveRecordBase
{
private int id;
private string username;
private string password;
[PrimaryKey]
public int Id
{
get { return id; }
set { id = value; }
}
[Property]
public string Username
{
get { return username; }
set { username = value; }
}
[Property]
public string Password
{
get { return password; }
set { password = value; }
}
}
}
这就完了,现在我们要创建Blog类和Post类,过程很简单,你自己试试吧.
创建Blog class
该Blog类简单易懂,不过还没有完,我们将创建一个连接Blog和Post的纽带,稍后你将看到.
namespace BlogSample
{
using System;
using System.Collections;
using Castle.ActiveRecord;
[ActiveRecord]
public class Blog : ActiveRecordBase
{
private int id;
private String name;
private String author;
public Blog()
{
}
[PrimaryKey]
public int Id
{
get { return id; }
set { id = value; }
}
[Property]
public String Name
{
get { return name; }
set { name = value; }
}
[Property]
public String Author
{
get { return author; }
set { author = value; }
}
}
}
创建Post class
该Post类也很简单,我们也需要将其与Blog类联系起来.些许不同在于,Contents属性使用[Property(ColumnType="StringClob")],这是必须的,因为该属性绑定到text字段.
namespace BlogSample
{
using System;
using Castle.ActiveRecord;
[ActiveRecord]
public class Post : ActiveRecordBase
{
private int id;
private String title;
private String contents;
private String category;
private DateTime created;
private bool published;
public Post()
{
created = DateTime.Now;
}
[PrimaryKey]
public int Id
{
get { return id; }
set { id = value; }
}
[Property]
public String Title
{
get { return title; }
set { title = value; }
}
[Property(ColumnType="StringClob")]
public String Contents
{
get { return contents; }
set { contents = value; }
}
[Property]
public String Category
{
get { return category; }
set { category = value; }
}
[Property]
public DateTime Created
{
get { return created; }
set { created = value; }
}
}
}
即使你第一次使用你也要承认用起来很简单,添加relationship也不难.
添加relationships
现在要告知ActiveRecord,类Blog 和 Post和有关联,对一对多关系要使用HasManyAttribute,而多对一关系要用BelongsToAttribute
对Post class使用BelongsTo
1.我们要在Post class里添加一个field 和 property以使Blog实例包含Post
[ActiveRecord]
public class Post : ActiveRecordBase
{
...
private Blog blog;
...
public Blog Blog
{
get { return blog; }
set { blog = value; }
}
2.最后对属性添加BelongsToAttribute,以告知ActiveRecord这是一个多对一关系.注意,默认时字段名和属性名是一样的.此时字段名为BlogId,我们的属性名用的是Blog.
对Blog class使用HasMany
1.同样的,我们要向Blog class添加一个field 和 property,以包含所有的Post实例.
using System;
using System.Collections;
using Castle.ActiveRecord;
[ActiveRecord]
public class Blog : ActiveRecordBase
{
...
private IList posts = new ArrayList();
...
public IList Posts
{
get { return posts; }
set { posts = value; }
}
2.向属性添加HasManyAttribute,以告知ActiveRecord这是一个一对多关系:
[HasMany(typeof(Post))]
public IList Posts
{
get { return posts; }
set { posts = value; }
}
HasManyAttribute有一些有用的特性用来更好的控制relationship行为。比如当2个类有关联时,它们之间就有一种"双边关系"(bidirectional relationship),那么由哪边来主导这种关系呢?你可能会想到将post添加到blog.Posts collection 集或使用Post.Blog属性。我要说的是就本例而言,使用Post.Blog是比较妥当的.为此,我们用Inverse属性:
[HasMany(typeof(Post), Inverse=true)]
public IList Posts
{
get { return posts; }
set { posts = value; }
}
我们也要定义其cascade行为.比如当用户删除blog时,NHibernate如何处理那些所属的post?我们的答案是全部删除:
[HasMany(typeof(Post), Inverse=true, Cascade=ManyRelationCascadeEnum.AllDeleteOrphan)]
public IList Posts
{
get { return posts; }
set { posts = value; }
}
另一件事你应该知道:Castle ActiveRecord会推断有外联关系的表和字段,这是因为另一边(比如Post class)有一个BelongsTo特性指向Blog.如果没有,你可以包含这些表和字段信息,比如下面:
[HasMany(typeof(Post),
Table="Posts", ColumnKey="blogid",
Inverse=true, Cascade=ManyRelationCascadeEnum.AllDeleteOrphan)]
public IList Posts
{
get { return posts; }
set { posts = value; }
}
接下来我们要启动framework并处理上述代码了
初始化framework
在调用任何类之前,Castle ActiveRecord必须要初始化.该过程只能执行一次且最好在程序启动时进行.就本例而言,由于我们的示例为WinForms 应用程序.我们必须要初始化ActiveRecord.
ActiveRecord也需要些许配置来告知使用哪个数据库。实际上当初始化NHibernate时,ActiveRecord也继承(pass on)了NHibernate配置.现在我们要决定如何存储配置信息.
配置ActiveRecord
当配置ActiveRecord以及如何保存储配置信息时,我们有多种选择.在官方文档里对对此做了详细阐述.为简单起见,我们使用一个简单的xml文件:
<?xml version="1.0" encoding="utf-8" ?>
<activerecord>
<config>
<add
key="hibernate.connection.driver_class"
value="NHibernate.Driver.SqlClientDriver" />
<add
key="hibernate.dialect"
value="NHibernate.Dialect.MsSql2000Dialect" />
<add
key="hibernate.connection.provider"
value="NHibernate.Connection.DriverConnectionProvider" />
<add
key="hibernate.connection.connection_string"
value="Data Source=.;Initial Catalog=test;Integrated Security=SSPI" />
</config>
</activerecord>
注意:上述配置使用的是SQL Server 2000数据库.如果你使用的是其它数据库,你需要做相应的改动.具体信息请参阅Xml Configuration Reference(Xml Configuration Reference).
现在将上述内容保存为appconfig.xml(并存储在生成assembly的文件夹里),如下的代码创建了一个
XmlConfigurationSource以加载上述配置信息.
namespace BlogSample
{
using System.Windows.Forms;
using BlogSample.UI;
using Castle.ActiveRecord;
using Castle.ActiveRecord.Framework.Config;
public class App
{
public static void Main()
{
XmlConfigurationSource source = new XmlConfigurationSource("appconfig.xml");
}
}
}
初始化ActiveRecord
最后我们要通过加载配置信息来初始化ActiveRecord.我们也需要指定ActiveRecord的类型.我们可以指定一个assemblies、一个assemblies数组或一个type数组.为简单起见,我们用一个type数组:
namespace BlogSample
{
using System.Windows.Forms;
using BlogSample.UI;
using Castle.ActiveRecord;
using Castle.ActiveRecord.Framework.Config;
public class App
{
public static void Main()
{
XmlConfigurationSource source = new XmlConfigurationSource("appconfig.xml");
ActiveRecordStarter.Initialize( source, typeof(Blog), typeof(Post), typeof(User) );
}
}
}
此时我们就可以使用了(只要配置正确,数据库存在)
创建表
如果你还没有创建表的话,可以让ActiveRecord来为我们创建:
public class App
{
public static void Main()
{
XmlConfigurationSource source = new XmlConfigurationSource("appconfig.xml");
ActiveRecordStarter.Initialize( source, typeof(Blog), typeof(Post), typeof(User) );
if (MessageBox.Show("Do you want to let ActiveRecord create the database tables?",
"Schema", MessageBoxButtons.YesNo, MessageBoxIcon.Question) ==
DialogResult.Yes)
{
ActiveRecordStarter.CreateSchema();
}
}
}
我们将在类里包含一些方法来执行更多的数据库相关操作.
使用类
如果你现在对ActiveRecord比较了解了的话,我们只需要使用我们创建好了的类.
创建第一个用户
我们的应用程序有一个登录窗口,你必须提供正确的用户名和密码才能运行余下的程序.但是数据库才刚刚创建,我们如何添加第一个用户呢?如下的代码创建了一个用户,它应该添加到main class,如下:
User user = new User("admin", "123");
user.Create();
但如果我们多次运行程序呢?一个比较好的解决办法是,只有在数据库里user为空才创建用户,我们可以统计现有的user,若为0,则创建用户"admin":
if (User.GetUsersCount() == 0)
{
User user = new User("admin", "123");
user.Create();
}
很明显,我们要向User class添加方法GetUsersCount:
[ActiveRecord("[User]")]
public class User : ActiveRecordBase
{
...
public static int GetUsersCount()
{
return CountAll(typeof(User));
}
}
login窗体
供登录的窗口如下:
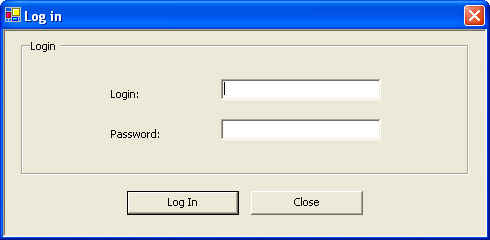
图3
代码很简单,利用一个查找方法来看用户是否存在:
private void logInButton_Click(object sender, System.EventArgs e)
{
User user = User.FindByUserName(loginText.Text);
if (user == null)
{
MessageBox.Show(this, "User not found", "Error", MessageBoxButtons.OK,
MessageBoxIcon.Error);
return;
}
if (user.Password != passwordText.Text)
{
MessageBox.Show(this, "Wrong password", "Error", MessageBoxButtons.OK,
MessageBoxIcon.Error);
return;
}
DialogResult = DialogResult.OK;
Hide();
}
为此,我们要包含一个FindByUserName方法:
using NHibernate.Expression;
[ActiveRecord("[User]")]
public class User : ActiveRecordBase
{
...
public static User FindByUserName(string userName)
{
// Note that we use the property name, _not_ the column name
return (User) FindOne(typeof(User), Expression.Eq("Username", userName));
}
}
blog管理
该窗口允许添加、编辑、删除一个blog,同时还有一个窗口对选定blog所属的post进行管理.

图4
当你单击Add或选中一个现有的blog,将显示另一个窗体.

图5
要填充blog列表,我们要选择所有的现有blog:
private void PopulateBlogList()
{
blogsList.Items.Clear();
foreach(Blog blog in Blog.FindAll())
{
ListViewItem item = blogsList.Items.Add(blog.Id.ToString());
item.Tag = blog;
item.SubItems.Add(blog.Name);
item.SubItems.Add(blog.Author);
}
}
为此我们要在Blog class里添加FindAll方法,此外我们还有添加一个方法获取主键值primary key:
[ActiveRecord]
public class Blog : ActiveRecordBase
{
...
public static Blog[] FindAll()
{
return (Blog[]) ActiveRecordBase.FindAll(typeof(Blog));
}
public static Blog Find(int id)
{
return (Blog) ActiveRecordBase.FindByPrimaryKey(typeof(Blog), id);
}
...
要向数据库添加一个新的blog,为此添加如下代码:
Blog blog = new Blog();
blog.Name = "My blog";
blog.Author = "hammett";
blog.Create();
假如你只记得blog的id值,我们可以:
Blog blog = Blog.Find(100); // Id that we know exists
blog.Name = "Different name";
blog.Author = "Different author";
blog.Update();
要删除一个blog实例,仅仅需要调用Delete方法即可.
posts管理
对post来说,我们需要将blog实例与创建的post关联起来:
currentPost.Blog = parentBlog;
currentPost.Title = titleText.Text;
currentPost.Contents = contentsText.Text;
currentPost.Category = categoryText.Text;
currentPost.Created = createdDtTime.Value;
currentPost.Published = publishedCheck.Checked;
currentPost.Save();
更多功能请参阅官方文档!