android中的UI控制(三)
android中的UI控制(三)
转载自 : http://www.android777.com/index.php/tutorial/android-view/androids-ui-control-c.html
上一篇 我 们讲了Android GUI中的MVC架构和一些视图的文字控制能力,接着我们看一些按钮控制的例子。按钮在界面中算是最常见的控件,一般我们都用按钮来触发动作。按钮可以分 为一般按钮(Button)、带有图片的按钮(ImageButton)、有开启关闭状态的按钮(ToggleButton)。
Button:
按钮在Android中是android.wiget.Button类,我们常用它来处理一些点击事件。它继承了TextView,所有 TextView可配置的属性都可以在Button上配置,所以我们可以定义很多Button的样式,同时Button还扩展了部分功能让用户可以在文字 的上下左右四个方向添加icon图片。
布局文件fourth.xml
<?xml version="1.0" encoding="utf-8"?>
<LinearLayout
  xmlns:android="http://schemas.android.com/apk/res/android"
  android:id="@+id/linerlayout1"
  android:layout_width="fill_parent"
  android:orientation="vertical"
  android:layout_height="fill_parent">
     <Button
        android:id="@+id/button1"
        android:layout_width="wrap_content"
        android:layout_height="wrap_content"
        android:text="这是一个普通按钮"
        android:typeface="serif"
        android:textStyle="bold"
     />
     <Button
        android:id="@+id/button2"
        android:layout_width="wrap_content"
        android:layout_height="wrap_content"
        android:text="带图片按钮"
        android:drawableTop="@drawable/icon"
     />
</LinearLayout>
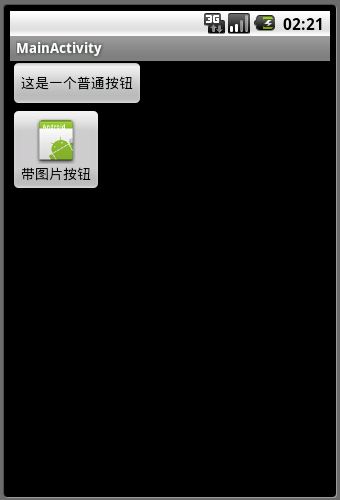
对应的效果图如下(图1):
我们可以给按钮注册一个点击事件,通过setOnClickListener方法:
     	Button btn1 = (Button)findViewById(R.id.button1);
    	btn1.setOnClickListener(new OnClickListener(){
			@Override
			public void onClick(View v) {
				Toast.makeText(MainActivity.this,"Button[button1]点击事件."
						,Toast.LENGTH_SHORT).show();
			}
    	});
ImageButton:
ImageButton是一个内容是图片的按钮,它跟Button不一样,Button的内容可以是文字或者文字+图片,但是 ImageButton的内容只能是图片,而且ImageButton是继承ImageView,而不是Button,所以二者是不一样的。你可以通过在 xml布局里设置android:src属性指定显示的图片地址,也可以动态的通过代码调用setImageResource()方法来填充一个图片:
<?xml version="1.0" encoding="utf-8"?>
<LinearLayout
  xmlns:android="http://schemas.android.com/apk/res/android"
  android:id="@+id/linerlayout1"
  android:layout_width="fill_parent"
  android:orientation="vertical"
  android:layout_height="fill_parent">
     <Button
        android:id="@+id/button1"
        android:layout_width="wrap_content"
        android:layout_height="wrap_content"
        android:text="这是一个普通按钮"
        android:typeface="serif"
        android:textStyle="bold"
     />
     <Button
        android:id="@+id/button2"
        android:layout_width="wrap_content"
        android:layout_height="wrap_content"
        android:text="带图片按钮"
        android:drawableTop="@drawable/icon"
     />
     <ImageButton
	   	android:id="@+id/button3"
	   	android:layout_width="wrap_content"
	   	android:layout_height="wrap_content"
	   	android:src="@drawable/icon"
		/>
</LinearLayout>
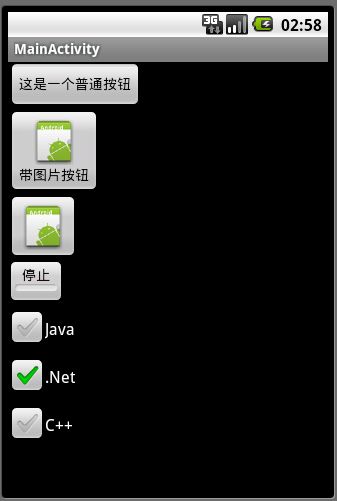
对应的效果图如下(图2):
图2
ToggleButton:
ToggleButton和Checkbox、radio按钮一样是一个有状态的按钮,它有一个开启或关闭状态,在开启状态时,按钮的下面有一条绿 色的粗线,当它是在关闭状态时则粗线变成灰色的。你可以通过配置android:textOn和android:textOff来配置对应两种不同状态时 要显示的文字:
	<ToggleButton
	    android:id="@+id/button4"
	    android:layout_width="wrap_content"
	    android:layout_height="wrap_content"
	    android:textOn="播放"
	    android:textOff="停止"
		/>
对应的效果图如下(图3):
图3
CheckBox:
这边的CheckBox跟HTML、Java GUI里的Checkbox概念是一样的,它是一个复选框,它也存在两种状态:选中和未选中。用户可以通过调用CheckBox对象的 setChecked()或toggle()方法来改变复选框的状态,通过调用isChecked方法获取选中的值。
可以通过调用CheckBox的setOnCheckedChangeListener()方法来监听Checkbox的状态改变事件。
	<CheckBox
	    android:id="@+id/checkbox1"
	    android:layout_width="wrap_content"
	    android:layout_height="wrap_content"
	    android:text="Java"
		/>
	<CheckBox
	    android:id="@+id/checkbox2"
	    android:layout_width="wrap_content"
	    android:layout_height="wrap_content"
	    android:text=".Net"
	    android:checked="true"
		/>
	<CheckBox
	    android:id="@+id/checkbox3"
	    android:layout_width="wrap_content"
	    android:layout_height="wrap_content"
	    android:text="C++"
		/>
对应的效果图如下(图4):
图4
RadioButton:
Radio跟html里的radio一样,只允许用户在多个选项里选择其中一个,称为:单选框。为了让多个radio中仅能选择一个,我们需要将这 多个radio放到一个分组中,这样默认每个分组只允许用户选中分组中的一项radio button。所以为了要使用RadioButton首先我们要先创建一个RadioGroup分组,然后将RadioButton放到分组中。
	<RadioGroup
	    android:id="@+id/radiogroup1"
	    android:layout_width="wrap_content"
	    android:layout_height="wrap_content"
	    android:orientation="horizontal">
	    <RadioButton
	    	android:id="@+id/radiobutton1"
	    	android:layout_width="wrap_content"
	    	android:layout_height="wrap_content"
	    	android:text="Java"
	    />
	    <RadioButton
	    	android:id="@+id/radiobutton2"
	    	android:layout_width="wrap_content"
	    	android:layout_height="wrap_content"
	    	android:text=".Net"
	    	android:checked="true"
	    />
	    <RadioButton
	    	android:id="@+id/radiobutton3"
	    	android:layout_width="wrap_content"
	    	android:layout_height="wrap_content"
	    	android:text="C++"
	    />
	</RadioGroup>
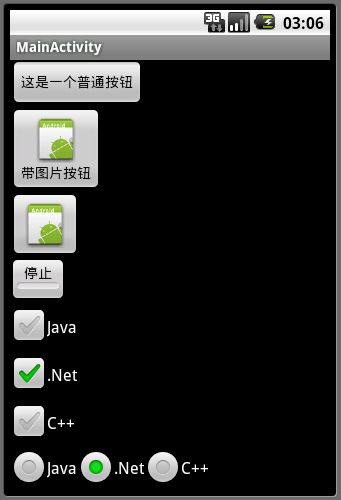
对应的效果图如下(图5):
图5
所有在RadioGroup中的RadioButton默认都是未选中状态,但是你也可以通过xml布局,设置某个RadioButton处于选中 状态。跟CheckBox一样,你可以调用setChecked()和toggle()方法来改变它里面的状态值。也可以监听它的状态改变事件。
在RadioGroup中你也可以存放其他不是RadioButton的控件,当然通常你不会那么做,因为那只会在界面上混淆用户,不过也不会改变 RadioGroup和RadioButton的行为。当用户选中一个RadioButton时,他再次点击RadioButton也不会改变 RadioButton状态,那如果整个RadioGroup要处于未选状态时要怎么处理呢?这边可以调用RadioGroup中的 clearCheck()方法,它会将内部所有RadioButton状态改为未选中状态。


