nodejs实战案例(Express框架+mongoDB)——(4)——路由配置,ejs引擎
上一节详细的分析了路由原理,和摸版,现在我们把整个网站的骨架建立起来:
这里我们需要用到前端的bootstrap,jquery请大家下载
下载好以后将js,css和图片放置到public文件中,public里面是放置静态文件的
如图:
修改routes中的index.js文件,我们将整个路由配置放置在这个文件中:
get表示请求数据,post是发送数据
module.exports = function(app){
//http://localhost:3000/ 请求地址
app.get('/',function(req,res){
});
//http://localhost:3000/loginout 登出请求地址
app.get('/loginout',function(req,res){
});
//发送登陆信息接受地址http://localhost:3000/login
app.post('/login',function(req,res){
});
//发送注册信息接受地址http://localhost:3000/reg
app.post('/reg',function(req,res){
});
//http://localhost:3000/show 网站登陆后内容展示页
app.get('/show',function(req,res){
});
//ajax异步的get请求获取地址http://localhost:3000/getQuestion
app.get('/getQuestion',function(req,res){
});
//http://localhost:3000/people/tang tang这个用户的展示页面
app.get('/people/:user',function(req,res){
});
//发生编辑和修改个人信息的请求地址http://localhost:3000/people
app.post('/people',function(req,res){
});
//http://localhost:3000/question/1 具体问题展示页
app.get('/question/:id',function(req,res){
});
//http://localhost:3000/error 404和错误页面展示地址
app.get('/error',function(req,res){
});
//ajax异步提问发生问题地址http://localhost:3000/ask
app.post('/ask',function(req,res){
});
//ajax异步回答问题地址http://localhost:3000/answer
app.post('/answer',function(req,res){
});
//百度百科爬虫获取地址
app.get('/baike',function(req,res){
});
//后台管理
app.get('/admin',function(req,res){
});
//管理员登陆发送信息地址
app.post('/adminLogin',function(req,res){
});
//信息管理页面地址
app.get('/admincon',function(req,res){
});
//发生修改信息地址
app.post('/adminchange',function(req,res){
});
};
打开views文件,删掉index.ejs 文件下面是试用下ejs这个摸版引擎尝试下效果:直接用上面代码覆盖之前的index.js
ps:这里扩展一个知识点,关于模板后缀名,如果不习惯ejs这种写法,是可以修改为html这种但是使用ejs模板引擎的。
下面引用中文api解释
----------------------------------------------------
app.engine(ext, callback)
注册模板引擎的 callback 用来处理ext扩展名的文件 默认情况下, 根据文件扩展名require() 对应的模板引擎。 比如你想渲染一个 "foo.jade" 文件,Express会在内部执行下面的代码,然后会缓存require(),这样就可以提高后面操作的性能
app.engine('jade', require('jade').__express);
那些没有提供 .__express 的或者你想渲染一个文件的扩展名与模板引擎默认的不一致的时候,也可以用这个方法。 比如你想用EJS模板引擎来处理 ".html" 后缀的文件:
app.engine('html', require('ejs').renderFile);
这个例子中EJS提供了一个.renderFile() 方法和Express预期的格式: (path, options, callback)一致, 可以在内部给这个方法取一个别名ejs.__express,这样你就可以使用".ejs" 扩展而不需要做任何改动
有些模板引擎没有遵循这种转换, 这里有一个小项目consolidate.js 专门把所有的node流行的模板引擎进行了包装,这样它们在Express内部看起来就一样了。
var engines = require('consolidate');
app.engine('haml', engines.haml);
app.engine('html', engines.hogan);
----------------------------------------------------
具体操作:下面为实验,做完后请修改回原来内容
在app.js 文件里面,我们找到
app.set('views', __dirname + '/views');
app.set('view engine', 'ejs');
1. 在后面添加app.engine('html', require('ejs').renderFile);
2. 将views下面文件都修改为html后缀名,
3. 将index.html内容的头和尾修改为<%- include header.html %><%- include footer.html %>
4. 将routes/index.js内容
res.render('index.html', {
title:"知道",
name:"问答平台"
});
修改蓝色部分。
好了重新打开页面,这样html后缀文件就能使用了
我们这个例子中不这样使用,请返回修改。
下面继续,我们在views中新建3个文件:
header.ejs 公共头文件
footer.ejs 公共尾文件
index.ejs 登陆注册页
header.ejs文件内容:
<!DOCTYPE html>
<html>
<head>
<meta charset="UTF-8" />
<title>know</title>
<base href="http://localhost:3000/" />
<link rel="stylesheet" href="stylesheets/style.css">
<link rel="stylesheet" href="stylesheets/bootstrap.min.css">
<script type="text/javascript" src="javascripts/jquery-1.8.0.min.js"></script>
<script type="text/javascript" src="javascripts/bootstrap.min.js"></script>
<script type="text/javascript" src="javascripts/underscore.js"></script>
</head>
<body>
<div class="navbar navbar-inverse navbar-fixed-top">
<div class="navbar-inner">
<div class="container">
<button type="button" class="btn btn-navbar" data-toggle="collapse" data-target=".nav-collapse">
<span class="icon-bar"></span>
<span class="icon-bar"></span>
<span class="icon-bar"></span>
</button>
<a class="brand" href="#">nodejs</a>
<div class="nav-collapse collapse">
<ul class="nav">
<li><a href="/">首页</a></li>
<li><a href="/show">信息广场</a></li>
<li><a href="/people">个人主页</a></li>
<li><a href="#myModal" data-toggle="modal">提问</a></li>
<li class="dropdown">
<a href="#" class="dropdown-toggle" data-toggle="dropdown">小工具<b class="caret"></b></a>
<ul class="dropdown-menu">
<li><a href="/baike">百度百科</a></li>
</ul>
</li>
</ul>
</div>
</div>
</div>
</div>
然后是footer.ejs内容:上面都是静态页面,直接复制上面代码到header.ejs即可
</body>
</html>
首页index.ejs登陆内容:
<%- include header %>
<div class="container">
<div class="row hero-unit">
<div class="span4">
<h1>1</h1>
<p>2</p>
</div>
<div class="span3 offset3">
<form id="login" action="/login" method="post">
<fieldset>
<div class="row-fluid">
<div class="span3">登陆</div>
<div class="span5 offset4" id="changeReg" style="cursor:pointer">切换注册</div>
</div>
<input type="text" placeholder="用户名" name="name">
<input type="password" name="password" placeholder="密码">
<button type="submit" class="btn">登陆</button>
</fieldset>
</form>
<form id="reg" action="/reg" method="post">
<fieldset>
<div class="row-fluid">
<div class="span3">注册</div>
<div class="span5 offset4" id="changeLog" style="cursor:pointer">切换登陆</div>
</div>
<input type="text" placeholder="用户名" name="name">
<input type="password" name="password" placeholder="密码">
<input type="password" name="repassword" placeholder="确定密码">
<button type="submit" class="btn">注册</button>
</fieldset>
</form>
</div>
</div>
<hr>
<footer>
</footer>
</div>
<script>
$("#login").hide();
$("#changeReg").on("click",function(){
$("#login").hide();
$("#reg").show();
});
$("#changeLog").on("click",function(){
$("#login").show();
$("#reg").hide();
});
</script>
<%- include footer %>
里面加入了简单的js切换效果
最顶端的和低端引入了公共的头和尾。
下面我们像查看下效果:
修改index.js路由:
app.get('/',function(req,res){
});
为:
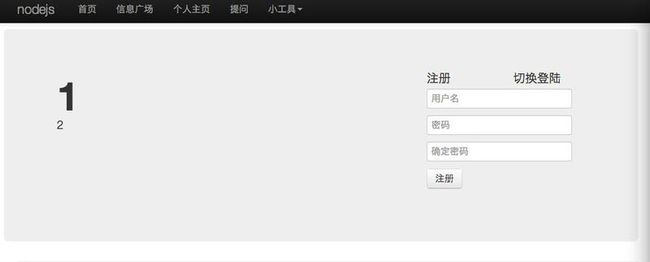
app.get('/',function(req,res){ res.render('index'); }); node app 后打开网页可以看到下面效果 |
能看到下面页面内容:
现在我们希望有有node控制内容,而不都是静态内容,
继续修改
app.get('/',function(req,res){
//当页面访问http://localhost:3000/时,路由导向index.ejs
res.render('index');
});
为:
app.get('/',function(req,res){
res.render('index', {
title:"知道",
name:"问答平台"
});
});
引用下res.render的api
--------------------------------------------------------------------
res.render(view, [locals], callback)
渲染view, 同时向callback 传入渲染后的字符串。 callback如果不传的话,直接会把渲染后的字符串输出至请求方, 一般如果不需要再对渲染后的模板作操作,就不需要传callback。 当有错误发生时next(err)会被执行. 如果提供了callback参数,可能发生的错误和渲染的字符串都会被当作参数传入, 并且没有默认响应。
res.render('index', function(err, html){
  // ...
});
res.render('user', { name: 'Tobi' }, function(err, html){// ... });
--------------------------------------------------------------------
引用下res.redirect的api
--------------------------------------------------------------------
res.redirect([status], url)
使用可选的状态码跳转到url 状态码status默认为302 "Found".
res.redirect('/foo/bar');
res.redirect('http://example.com');res.redirect(301, 'http://example.com');res.redirect('../login');
Express支持几种跳转,第一种便是使用一个完整的URI跳转到一个完全不同的网站。
res.redirect('http://google.com');
第二种是相对根域路径跳转,比如你现在在 http://example.com/admin/post/new, 下面的的代码跳转到 /admin 将会把你带到http://example.com/admin:
res.redirect('/admin');
这是一种相对于应用程序挂载点的跳转。 比如把一个blog程序挂在 /blog, 事实上它无法知道它被挂载,所以当你使用跳转 /admin/post/new 时,将到跳到http://example.com/admin/post/new, 下面的相对于挂载点的跳转会把你带到http://example.com/blog/admin/post/new:
res.redirect('admin/post/new');
路径名.跳转同样也是支持的。 比如你在http://example.com/admin/post/new, 下面的跳转会把你带到 http//example.com/admin/post:
res.redirect('..');
最后也是最特别的跳转是 back 跳转, 它会把你带回Referer(也有可能是Referrer)的地址 当Referer丢失的时候默认为 /
res.redirect('back');
--------------------------------------------------------------------
将views中的index.ejs
<div class="span4"> <h1>1</h1> <p>2</p> </div> |
为:
<div class="span4"> <h1><%= title%></h1> <p><%= name%></p> </div> |
修改后如下图:
建议大家在index中多尝试下添加其他内容,练练手,下一节准备开始注册功能。


