Spring IDE
译注:原文开头介绍Spring IDE的安装,现在Spring官方已经移除“http://springide.org/updatesite”的在线安装方式,推荐使用SpringSource Tool Suite,下载链接http://www.springsource.com/developer/sts。
一旦完成安装,就来看看怎样使用Spring IDE创建Hello World的例程
选择Spring Project并点击Next
输入工程名并单击完成
工程右上角的“S”标记表明是一个Spring工程
右键src package并创建一个包名“com.vaannila”。创建如下的HelloWorld类
package com.vaannila;

public class HelloWorld {

	private String message;

	public void setMessage(String message) {
		this.message = message;
	}

	public void display(){
		System.out.println(message);
	}
}
这个HelloWorld类有个message属性且设置它的值使用setMessage()方法。这被称为setter注入。代替了直接向message设置的硬编码,而是通过配置文件注入。这种设计模式通常被称为依赖注入模式,下篇教程会详细介绍。HelloWorld类还有个display()方法显示message。
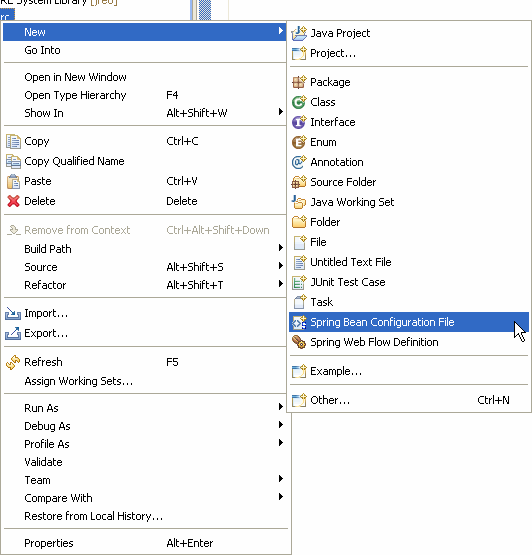
现在我们已经创建了HelloWorld bean,下步就是在bean配置文件中添加这个bean的入口。这个bean配置文件通常被用来配置Spring IoC容器的beans。创建一个新的bean配置文件右键src文件夹并选择New->Spring Bean Configuration File。
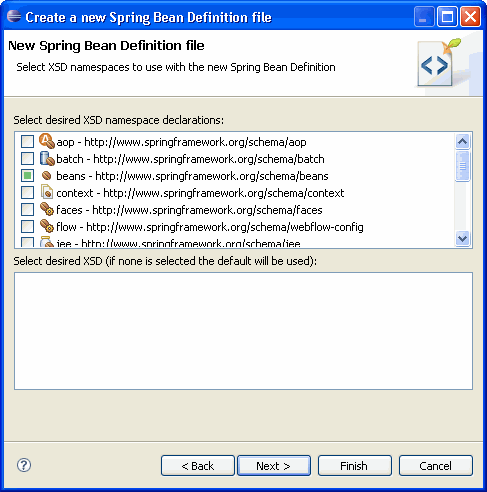
输入Bean名称并点击下步。
选择beans项并单击完成。
现在Spring的配置文件已经创建。添加如下代码来创建HelloWorld bean的访问入口。
<?xml version="1.0" encoding="UTF-8"?>
<beans xmlns="http://www.springframework.org/schema/beans"
	xmlns:xsi="http://www.w3.org/2001/XMLSchema-instance"
	xsi:schemaLocation=" http://www.springframework.org/schema/beans http://www.springframework.org/schema/beans/spring-beans.xsd">
	<bean id="helloWorld" class="com.vaannila.HelloWorld">
		<property name="message" value="Hello World!"></property>
	</bean>
</beans>
bean元素的id属性被用来获取bean逻辑名称且class属性指定了bean的类的全名。bean元素里的property元素被用来设置属性值。这里我们设置了message属性的值为“Hello World!”。
如果你想显示不同的message,只需要修改bean配置文件中的message的值。这是由依赖注入设计模式带来的主要好处,使得代码松耦合。
为了显示message,创建了如下的HelloWorldApp类
package com.vaannila;

import org.springframework.context.ApplicationContext;
import org.springframework.context.support.ClassPathXmlApplicationContext;

public class HelloWorldApp {
	public static void main(String[] args) {
		ApplicationContext context = new ClassPathXmlApplicationContext("beans.xml");
		HelloWorld helloWorld = (HelloWorld) context.getBean("helloWorld");
		helloWorld.display();
	}
}
首先我们通过bean配置文件“beans.xml”实例化了Spring IoC容器,然后使用getBean()方法从应用程序上下文(application context)获取helloWorldbean,并调用display()方法显示message到控制台上。
下图显示了hello world例程的最终目录结构。
添加如下jar文件到classpath。
antlr-runtime-3.0
commons-logging-1.0.4
org.springframework.asm-3.0.0.M3
org.springframework.beans-3.0.0.M3
org.springframework.context-3.0.0.M3
org.springframework.context.support-3.0.0.M3
org.springframework.core-3.0.0.M3
org.springframework.expression-3.0.0.M3
执行这个例程中的HelloWorldApp文件,“Hello World!”信息将打印在控制台上。


