《android 编程权威指南》--CriminalIntent开发 【贰】
上一次,我们已经对Fragment 有了大概的了解。
现在我们将CrimeFragment进行布局的添加。真正用于项目。
主要是进行
这里我们给Crime实体类添加两个变量,java.util.Date类型的mDate和布尔类型的mSolved
用于表示陋习记录的时间和是否更改陋习。
public class Crime {
	private UUID mUid;
	private String mTitle = "";
	private Date mDate;
	private Boolean Solved = false;

	/**省略get set方法*/
同时在布局中也添加一个Button和CheckBox
<Button
    android:id="@+id/crime_date"
    android:layout_height="wrap_content"
    android:layout_width="match_parent"
    android:textSize="20sp"
    android:text="@string/submit"
    android:background="@drawable/submit"
    />
<CheckBox
    android:id="@+id/isSolved"
    android:layout_width="wrap_content"
    android:layout_height="wrap_content"
    android:text="@string/isSolved"
    />
这边我门再给Button进行背景设置,在res/drawable下面创建submit.xml的安装文件
<selector xmlns:android="http://schemas.android.com/apk/res/android" >
    <item android:state_pressed="false">
        <shape>
            <!-- 实心 -->
            <solid android:color="#99ccff"/>
            <!-- 渐变 -->
            <!-- <gradient /> -->
            <!-- 描边 -->
            <!-- <stroke   /> -->
            <!-- 圆角 -->
            <!-- <corners  /> -->
            <!-- 边距 -->
            <!-- <padding  /> -->
        </shape>
    </item>
 </selector>
有关android:state
| android 标签 | 描述 |
| android:state_pressed |
是否按下,如一个按钮触摸或者点击 |
| android:state_focused | 是否取得焦点,比如用户选择了一个文本框 |
| android:state_hovered | 光标是否悬停 |
| android:state_selected | 它与focus state并不完全一样,如一个list view 被选中的时候,它里面的各个子组件可能通过方向键,被选中了。 |
| android:state_checkable | 组件是否能被check。如:RadioButton是可以被check的 |
| android:state_checked | 被checked了,如:一个RadioButton可以被check了 |
| android:state_enabled | 能够接受触摸或者点击事件 |
| android:state_activated | 被激活 |
| android:state_window_focused | 应用程序是否在前台,当有通知栏被拉下来或者一个对话框弹出的时候应用程序就不在前台了 |
如果有多个item,那么程序将自动从上到下进行匹配,最先匹配的将得到应用
效果如下:点击Button按钮后会显示颜色的变化。
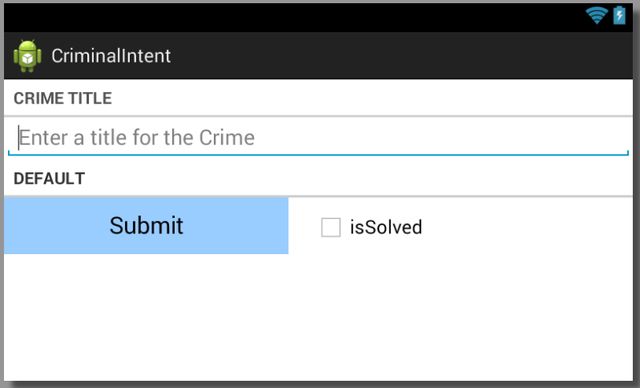
但是如果将,屏幕旋转,效果将变化为button横跨整个屏幕,我们希望Button和CheckBox是各占整行的50%
为此我们再添加一个landscape(横向)布局
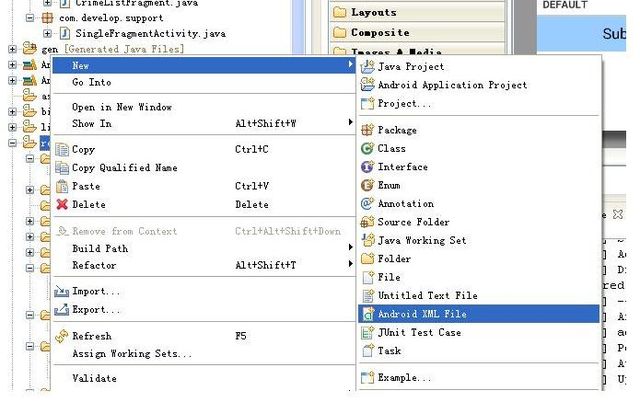
在res目录下右键,选择Android XML File
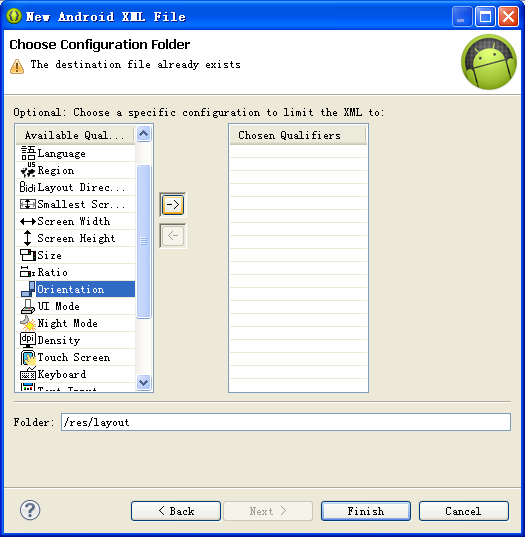
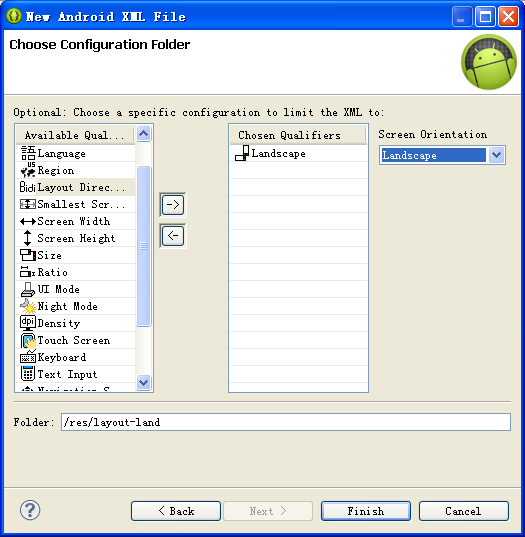
写入名字,要与原来纵向布局的名字一样。
选择纵向的
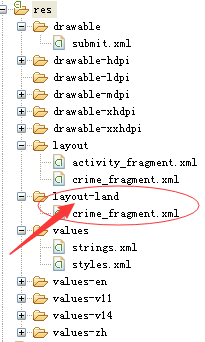
这样以后你会看到在res 目录下多出一个layout-land目录,表示在横向情况下用该布局文件。
修改横向布局,在原来checkBox和Button位置替换为一下代码
 <LinearLayout
        android:layout_width="match_parent"
        android:layout_height="wrap_content"
        android:orientation="horizontal"
        >
    <Button
        android:id="@+id/crime_date"
        android:layout_height="wrap_content"
        android:layout_width="wrap_content"
        android:layout_weight="1"
        android:textSize="20sp"
        android:text="@string/submit"
        android:background="@drawable/submit"
        />
	<CheckBox
	    android:id="@+id/isSolved"
	    android:layout_weight="1"
	    android:layout_marginLeft="20dp"
	    android:layout_width="wrap_content"
	    android:layout_height="wrap_content"
	    android:text="@string/isSolved"
	    />
	</LinearLayout>
书上有个图能够很好的表示android:layout_weight属性。android:layout_weight属性与android:layout:width属性相关(LinearLayout纵向条件下与android:layout:height相关)
如果Button和CheckBox的android:layout_width属性都为wrap_content,则空间分配如下,含有额外的空间(extra space)
然后给Button和CheckBox添加android:layout_weight="1"属性,则会将额外空间按1:1的比例分配给Button和CheckBox
如果android:layout_weight比例是2:1(Button 2,CheckBox 1)那么额外空间会按2;1进行分配
那么,如果想让Button和CheckBox总的空间分配各占一般怎么办呢?
可以在初始将android:layout_width="0dp",即在一开始不设置宽度,通过android:layout_weight进行空间分配。
这样我们完全控制了CrimeFragment在Portrait(纵向)和Landscape(横向)情况下的布局情况。纵向图在上面可以找到,横向图如下:

