手把手打造开源新监控利器check_mk
Check_MK是一款通用的Nagios/Icinga数据采集插件,主要由三个子项目组成。它采用了新的方法从操作系统和网络组件中收集数据和淘汰老式的NRPE、check_by_ssh、NSClient和check_snmp。其优点能够自动检测主机上的监控项目,并且在监控端的CPU使用率也显著减少。其遵循CPL v2,是开源的免费软件。
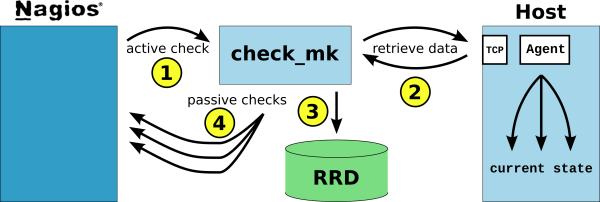
工作原理,摘自其官网上的一幅原理图像

1、Nagios每一次对所监控的主机每进行一次检查的时间间隔触发一个活动检查。这种主动检查将会触发check_mk插件。
2、check_mk通过TCP连接到目标主机。目标主机上的check_mk_agent检索有关该主机的所有相关数据, 并将其以ASCII文本形式返回给服务器端(这样的模式类似于zabbix哈~)。
3、check_mk提取performanca数据直接返回给rrd。
4、check_mk提取相关数据,比较所设置的warning/critical 阀值,然后返回这台主机通过Nagios的被动的服务检查的检查结果。
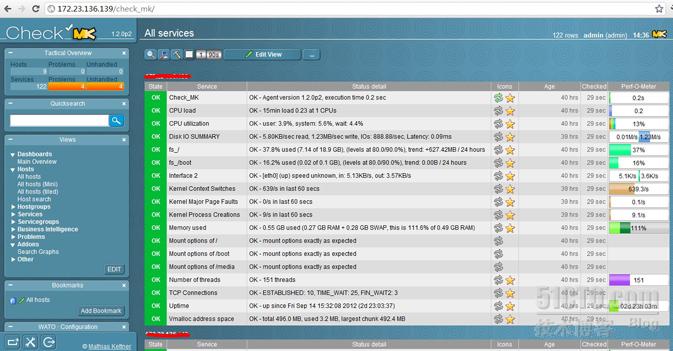
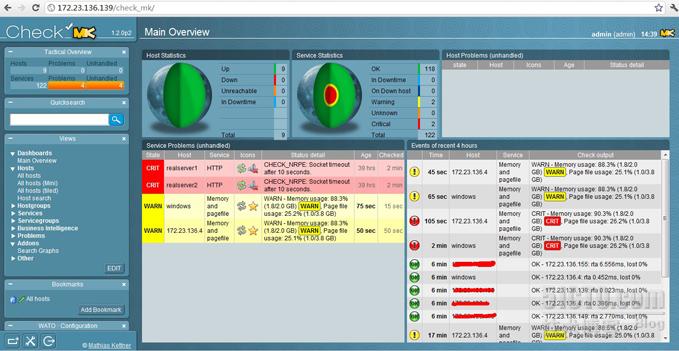
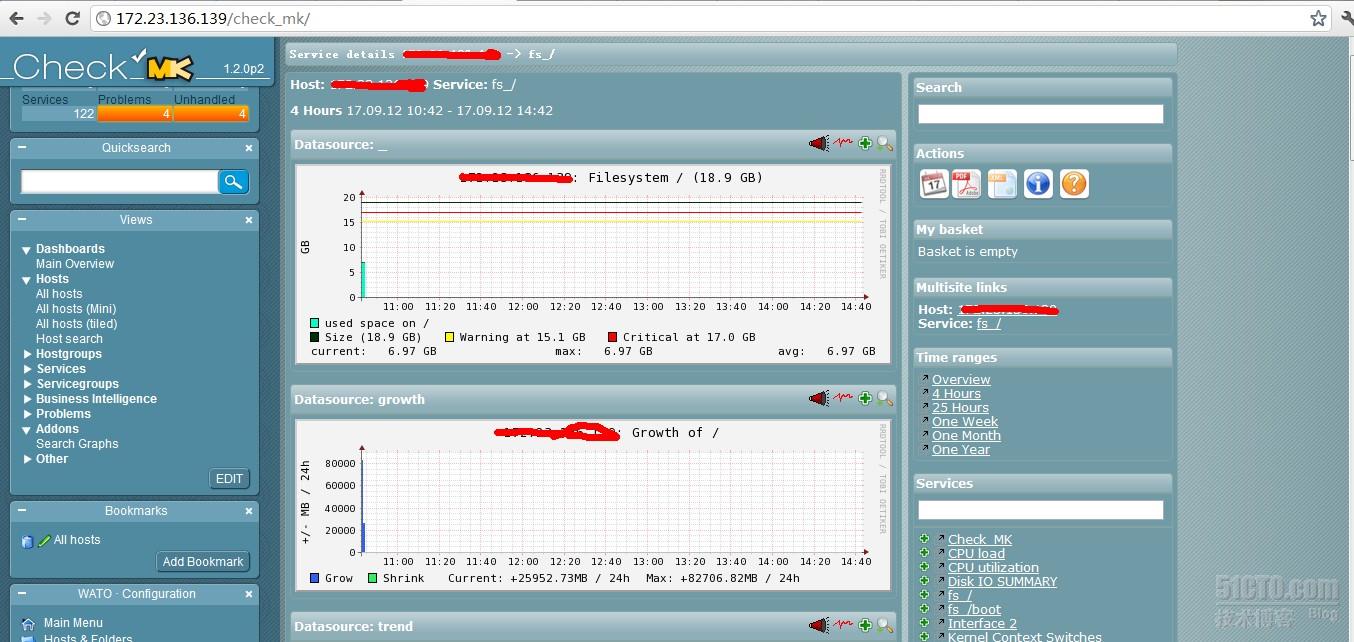
由于check_mk的图比较炫而且其监控主机也比较方便,类似cacti一样可以直接在web页面进行添加,个人觉得很不错,先上一些我配置完成的check_mk监控的图。


由于check_mk是nagios的一个插件,所以必须先配置安装好nagios,关于nagios的安装与配置在51cto上已经有很多大神给出各种平台的详细配置文档,需要的朋友可以读一下,这里我就不多介绍nagios.
以下安装配置check_mk,由于网上关于check_mk的资料比较少,笔者只好照着官方文档学习了下,无奈笔者连CECT-4都没过,想必各位也能估摸出笔者的英语水平,以下内容若有理解偏差或者出入很大,还请各位谅解。
开篇:
由于check_mk是由python语言编写的,所以必须要准备python的环境,并且python的版本最低也得2.3但是check_mk又不兼容python3,所以请确定你的python版本;另外check_mk需要作为非独立守护进程运行,所以请安装超级守护进程xinetd。了解xinetd的相关内容,请移步:基于Tcp Wrapper和Xinetd的服务访问控制
环境配置:
安装pnp4nagios
1.下载pnp4nagios http://sourceforge.net/projects/pnp4nagios/files/PNP-0.6/pnp4nagios-0.6.2.tar.gz/download
2.pnp4nagios是一个输出插件,用来创建和显示由nagios收集的数据,rrdtool绘画出来的图像因此还需要安装rrdtool-perl php-gd rrdtool rrdtool-php rrdtool-devel包。
rrdtool、rrdtool-devel的地址:http://packages.express.org/rrdtool/
rrdtool-php的地址:http://pkgs.org/download/rrdtool-php
rrdtool的组件和附加组件版本尽量一致,尽量请以rrdtool-php的版本来决定版本号
#yum localinstall -y --nogpgcheck rrdtool-*
#yum install php-gd
#tar xzf pnp4nagios-0.6.2.tar.gz
#cd pnp4nagios-0.6.2
#./configure --prefix=/usr/local/pnp4nagios --with-nagios-user=nagios --with-nagios-group=nagios --with-httpd-conf=/etc/httpd/conf.d
#make all
#make fullinstall(也可根据提示一步一步执行make install, install-webconf, install-init, and install-config.)
3.编辑nagios.cfg开启以下几项:
process_performance_data=1
host_perfdata_command=process-host-perfdata
service_perfdata_command=process-service-perfdata
host_perfdata_file=/tmp/host-perfdata
service_perfdata_file=/tmp/service-perfdata
host_perfdata_file_template=[HOSTPERFDATA]\t$TIMET$\t$HOSTNAME$\t$HOSTEXECUTIONTIME$\t$HOSTOUTPUT$\t$HOSTPERFDATA$
service_perfdata_file_template=[SERVICEPERFDATA]\t$TIMET$\t$HOSTNAME$\t$SERVICEDESC$\t$SERVICEEXECUTIONTIME$\t$SERVICELATENCY$\t$SERVICEOUTPUT$\t$SERVICEPERFDATA$
host_perfdata_file_mode=a
service_perfdata_file_mode=a
host_perfdata_file_processing_interval=0
service_perfdata_file_processing_interval=0
host_perfdata_file_processing_command=process-host-perfdata-file
service_perfdata_file_processing_command=process-service-perfdata-file
4.增加以下内容:
event_broker_options=-1
broker_module=/usr/local/pnp4nagios/lib/npcdmod.o config_file=/usr/local/pnp4nagios/etc/npcd.cfg'
这里要安装自己当前的环境设置模块和配置文件的目录路径
5.启动npcd
#service npcd start
6.重新启动nagios
#service nagios restart
7.重新启动apache.让pnp4nagios.conf加载进来
#killall -9 httpd
#apachectl start
访问:http://localhost/pnp4nagios
安装check_mk
1.下载check_mk http://mathias-kettner.de/download/check_mk-1.2.0p2.tar.gz
#wget http://mathias-kettner.de/download/check_mk-1.2.0p2.tar.gz
2.check_mk的安装包解压安装后,跟其他的软件不一样安装后就可以删除
#tar xvf check_mk-1.2.0p2.tar.gz
#cd check_mk-1.2.0p2
#./setup.sh
根据提示进行符合自己的设置,绝大部分的选项它都会检测你当前的环境配置
____ _ _ __ __ _ __
/ ___| |__ ___ ___| | __ | \/ | |/ /
| | | '_ \ / _ \/ __| |/ / | |\/| | ' /
| |___| | | | __/ (__| < | | | | . \
\____|_| |_|\___|\___|_|\_\___|_| |_|_|\_\
|_____|
Check_MK setup Version: 1.2.0p2
Welcome to Check_MK. This setup will install Check_MK into user defined directories. If you run this script as root, installation paths below /usr will be suggested. If you run this script as non-root user paths in your home directory will be suggested. You may override the default values or just hit enter to accept them.
Your answers will be saved to /root/.check_mk_setup.conf and will be reused when you run the setup of this or a later version again. Please delete that file if you want to delete your previous answers.
* Found running Nagios process, autodetected 20 settings.
1) Installation directories of check_mk
Executable programs
Otherwise youalways have to specify the installation path when calling check_mk:
( default --> /usr/bin):
安装check_mk命令的路径,默认即可
Check_MK configuration
( default --> /etc/check_mk):
安装check_mk的配置文件路径,默认即可
Check_MK software
( default --> /usr/share/check_mk):
指定安装check_mk软件的安装,这里我继续使用默认
documentation
( default --> /usr/share/doc/check_mk):
指定check_mk的文档安装目录,如果上一个选项你更改了安装路径,建议这里也作出修改,尽量保持父目录一致,我使用默认
check manuals
( default --> /usr/share/doc/check_mk/checks):
指定检测手册的安装路径,这里我使用默认
working directory of check_mk
( default --> /var/lib/check_mk):
指定check_mk的工作目录,以创建缓存文件等
2) Configuration of Linux/UNIX Agents
extensions for agents
( default --> /usr/lib/check_mk_agent):
指定check_mk的客户端的目录
configuration dir for agents
( default --> /etc/check_mk):
指定check_mk客户端的配置文件目录
3) Integration with Nagios
Name of Nagios user
( default --> nagios):
指定你的nagios的运行用户。
User of Apache process
( default --> apache):
指定你的apache的运行用户,这里我的是apache
Common group of Nagios+Apache
( default --> nagios):
指定你的apache的运行用户和nagios运行用户的共同组名,默认是nagios
Nagios binary
( autodetected --> /usr/local/apache/htdocs/nagios/bin/nagios):
指定nagios命令的目录,这里该安装程序会自动检测出你的当前环境的配置,所以基本上默认即可
Nagios main configuration file
( autodetected --> /usr/local/apache/htdocs/nagios/etc/nagios.cfg):
指定nagios的主配置文件
Nagios object directory
( autodetected --> /usr/local/apache/htdocs/nagios/etc/service):
指定nagios定义的对象目录,即nagios中配置的cfg_dir
Nagios startskript
( autodetected --> /etc/init.d/nagios):
nagios的SysV风格的启动脚本
Nagios command pipe
( autodetected --> /usr/local/apache/htdocs/nagios/var/rw/nagios.cmd):
指定nagios启动后生成的命令接口文件目录
Check results directory
( autodetected --> /usr/local/apache/htdocs/nagios/var/spool/checkresults):
指定nagios的检测结果目录
Nagios status file
( autodetected --> /usr/local/apache/htdocs/nagios/var/status.dat):
指定nagios的状态文件的路径
Path to check_icmp
( autodetected --> /usr/local/nagios/libexec/check_icmp):
指定check_mk附带的check_icmp的命令的安装目录,服务器端通过该命令来检测多个监控主机
4) Integration with Apache
URL Prefix for Web addons
( default --> /):
指定通过web访问时的别名。
Apache config dir
( autodetected --> /etc/httpd/conf.d):
指定apache的扩展配置文件目录,check_mk会在该目录下生成适用于apache的一个配置文件。
HTTP authentication file
( autodetected --> /usr/local/apache/htdocs/nagios/etc/htpasswd.users):
指定访问check_mk时的身份验证文件,这里它会使用nagios的用户验证文件
HTTP AuthName
( autodetected --> Nagios Access):
用于指定AuthName的提示信息。
5) Integration with PNP4Nagios 0.6
PNP4Nagios templates
( autodetected --> /usr/local/pnp4nagios/share/templates):
用于指定pnp4Nagios的模版目录
6) Check_MK Livestatus Module
compile livestatus module
( default --> yes):
这里询问是否要编译livestatus模块到nagios,具体的livestatus我还不了解,只是知道在执行此操作后,当nagios启动时会生成一个名为live的socket套接字文件,用于check_mk通信用的。
check_mk's binary modules
( default --> /usr/lib/check_mk):
指定之前check_mk命令的安装目录
Unix socket for Livestatus
( default --> /usr/local/apache/htdocs/nagios/var/rw/live):
指定livestatus的Unix的套接字文件生成的目录以及名字
Backends for other systems
( default --> /usr/share/check_mk/livestatus):
指定与其他操作系统通信的livestatus的目录
----------------------------------------------------------------------
You have chosen the following directories:
Executable programs /usr/bin
Check_MK configuration /etc/check_mk
Check_MK software /usr/share/check_mk
documentation /usr/share/doc/check_mk
check manuals /usr/share/doc/check_mk/checks
working directory of check_mk /var/lib/check_mk
extensions for agents /usr/lib/check_mk_agent
configuration dir for agents /etc/check_mk
Name of Nagios user nagios
User of Apache process apache
Common group of Nagios+Apache nagios
Nagios binary /usr/local/apache/htdocs/nagios/bin/nagios
Nagios main configuration file /usr/local/apache/htdocs/nagios/etc/nagios.cfg
Nagios object directory /usr/local/apache/htdocs/nagios/etc/service
Nagios startskript /etc/init.d/nagios
Nagios command pipe /usr/local/apache/htdocs/nagios/var/rw/nagios.cmd
Check results directory /usr/local/apache/htdocs/nagios/var/spool/checkresults
Nagios status file /usr/local/apache/htdocs/nagios/var/status.dat
Path to check_icmp /usr/local/nagios/libexec/check_icmp
URL Prefix for Web addons /
Apache config dir /etc/httpd/conf.d
HTTP authentication file /usr/local/apache/htdocs/nagios/etc/htpasswd.users
HTTP AuthName Nagios Access
PNP4Nagios templates /usr/local/pnp4nagios/share/templates
compile livestatus module yes
check_mk's binary modules /usr/lib/check_mk
Unix socket for Livestatus /usr/local/apache/htdocs/nagios/var/rw/live
Backends for other systems /usr/share/check_mk/livestatus
Proceed with installation (y/n)? y
此刻将会将之前的所有配置列出来,作出一个最后的确认。
(Compiling MK Livestatus.......................................................................................................................................................................................................................................................................................................................................................................................................................................................................................................................................................................................................)
Installation completed successfully.
Please restart Nagios and Apache in order to update/active check_mk's web pages.
You can access the new Multisite GUI at http://localhost/check_mk/
3.重启apache和nagios
#killall -9 httpd
#apachectl start
#service nagios restart
4.访问http://localhost/check_mk/
| 错误1: 提示没有mod_python模块 解决方法1: #wget http://archive.apache.org/dist/httpd/modpython/mod_python-3.3.1.tgz #tar zxvf mod_python-3.3.1.gz #cd mod_python-3.3.1 #./configure --with-apxs=/usr/local/apache/bin/apxs --with-python=/usr/bin/python #make apxs:Error: Command failed with rc=65536 make[1]: *** [mod_python.so] Error 1 make[1]: Leaving directory `/root/ndo/src/mod_python-3.3.1/src' make: *** [do_dso] Error 2 原因是 Apache 的版本还太高 mod_python 未支持 #vim src/connobject.c 把!(b == APR_BRIGADE_SENTINEL(b) || 改为!(b == APR_BRIGADE_SENTINEL(bb) || #make clean #make #make install 在httpd.conf中增加 LoadModule python_module modules/mod_python.so 重启apache,重新访问正常。 错误2: Your web server cannot create the directory ,or cannot set the group to or cannot set the permissions to.Please make sure that:Reason:[Error 13]Permission denied:'/var/lib/check_mk/web/admin' 解决方法2: #chown apache:apache /var/lib/check_mk/web 错误3: Livestatus problem:Cannot connect to 'unix:/usr/local/apache/htdocs/nagios/var/rw/live':[Error 13]Permission denied 解决方法3: #vim /usr/local/apache/htdocs/nagios/etc/nagios 添加如下内容: broker_module=/usr/lib/check_mk/livestatus.o /usr/local/apache/htdocs/nagios/var/rw/live #usermod -G apache,nagios nagios #chown nagios:nagios /usr/local/apache/htdocs/nagios/var/rw/live #service nagios restart #tail /usr/local/apache/htdocs/nagios/var/nagios.log 出现如下内容,则表示正常了,刷新重试。错误消失 [1347850110] Event broker module '/usr/lib/check_mk/livestatus.o' initialized successfully. [1347850110] livestatus: Timeperiod cache not updated, there are no timeperiods (yet) [1347850110] livestatus: Livestatus 1.2.0p2 by Mathias Kettner. Socket: '/usr/local/apache/htdocs/nagios/var/rw/live' [1347850110] livestatus: Please visit us at http://mathias-kettner.de/ [1347850110] livestatus: Hint: please try out OMD - the Open Monitoring Distribution [1347850110] livestatus: Please visit OMD at http://omdistro.org [1347850110] livestatus: Removed old left over socket file /usr/local/apache/htdocs/nagios/var/rw/live [1347850110] livestatus: Finished initialization. Further log messages go to /usr/local/apache/htdocs/nagios/var/livestatus.log |
5.一切访问正常,安装check_mk客户端:
Linux主机
#wget http://mathias-kettner.de/download/check_mk-agent-1.2.0p2-1.noarch.rpm
#rpm -ivh check_mk-agent-1.2.0p2-1.noarch.rpm
指定被监控端的IP
#vim /etc/xinetd.d/check_mk
修改only_from = “监控端IP”
重启xinetd
#service xinedt restart
windows主机
下载http://mathias-kettner.de/download/check-mk-agent-1.2.0p2.exe
安装即可
编辑安装目录下的check_mk.example.ini
修改only_from = “监控端IP”
重启Check_MK_Agent服务即可。
6.监控Linux主机
#vim /etc/check_mk/main.mk
修改all_hosts,填写每一个被监控机的IP地址,中间用,隔开,这里的IP地址如果在nagios中你作为hostname使用的话,请修改nagios中的hostname或者将其注释掉,否则两者将会冲突报错。
all_hosts = [ "172.23.136.139","172.23.136.149","172.23.136.155" ]
保存退出后:
执行以下命令:
#check_mk -I
检查所有可检测的项目
df 8 new checks
logwatch 14 new checks
mem.win 2 new checks
systemtime 2 new checks
uptime 2 new checks
winperf_phydisk 2 new checks
winperf_processor.util 2 new checks
#check_mk -O
创建或更新Nagios配置,并且重新加载Nagios
Generating Nagios configuration...OK
Validating Nagios configuration...OK
Precompiling host checks...OK
Reloading Nagios...OK
7、访问http://localhost/check_mk
发现并未出现定义的那些主机
#vim /etc/check_mk/multisite.mk
将admin_users = [ "nagiosadmin" ] 修改为登陆到nagios的用户名,即htpasswd定义的用户名,我这里是admin
admin_users = [ "admin" ]
保存退出,重新刷新,即可看到刚才定义的主机了
在长时间的观察发现,这些定义的主机的服务器基本上已正常,但是主机确实down的状态
| 错误提示: Waring:This plugin must be either run as root or setuid root" 解决方法: 找到当初安装check_mk时附带的check_icmp命令 #chown root:nagios check_icmp #chmod u+s check_icmp 发现主机马上就处于up状态了 |
对于从web界面直接添加主机的方法,点击左下角的一个Hosts & Folders按钮,点击New host即可

其他功能笔者这在琢磨,例如监控cluster还有那个wato等,由于界面是全英的,所以对于笔者这样的英语水平的确吃力,有兴趣的朋友可以自行研究下。同样欢迎朋友补充check_mk的其他功能。